
【ASP.NET Web API教程】2.3.7 创建首页
原文:【ASP.NET Web API教程】2.3.7 创建首页
注:本文是【ASP.NET Web API系列教程】的一部分,如果您是第一次看本博客文章,请先看前面的内容。
Part 7: Creating the Main Page
第7部分:创建首页
本文引自:http://www.asp.net/web-api/overview/creating-web-apis/using-web-api-with-entity-framework/using-web-api-with-entity-framework,-part-7
Creating the Main Page
创建首页
In this section, you will create the main application page. This page will be more complex than the Admin page, so we’ll approach it in several steps. Along the way, you'll see some more advanced Knockout.js techniques. Here is the basic layout of the page:
在这一小节中将创建主应用程序的首页。这个页面要比Admin页面更复杂些。因此,我们将采用几个步骤。在此过程中,你将看到一些更高级的Knockout.js技术。以下是此页面的基本布局(见图2-26):
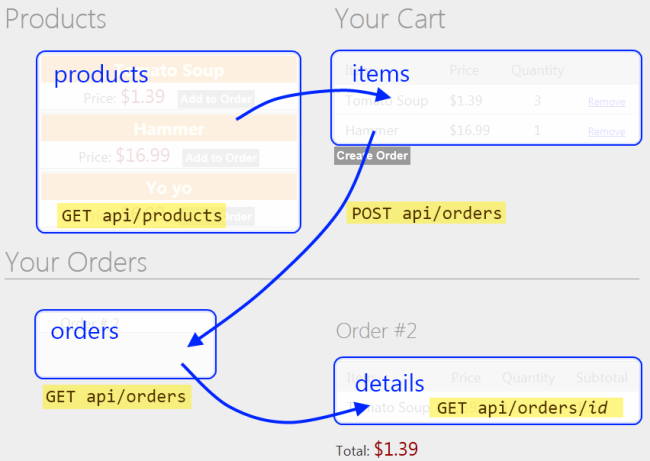
图2-26. 首页布局
- "Products" holds an array of products.
“产品”放置产品数组。 - "Cart" holds an array of products with quantities. Clicking “Add to Cart” updates the cart.
“购物车”放置带有订购数的产品数组。点击“加入购物车”会对购物车进行更新。 - "Orders" holds an array of order IDs.
“订单”放置订单的ID数组(订单号数组)。 - "Details" holds an order detail, which is an array of items (products with quantities)
“细节”放置一份订单细节,这是一个条目数组(带有订购数的产品)。
We’ll start by defining some basic layout in HTML, with no data binding or script. Open the file Views/Home/Index.cshtml and replace all of the contents with the following:
我们将以无数据的绑定或脚本首先定义一些HTML的基本布局。打开Views/Home/Index.cshtml文件,并将全部内容替换如下:
<div class="content">

    <!-- List of products(产品列表) -->

    <div class="float-left">

    <h1>Products</h1>

    <ul id="products">

    </ul>

    </div>

    <!—Cart(购物车) -->

    <div id="cart" class="float-right">

    <h1>Your Cart</h1>

        <table class="details ui-widget-content">

    </table>

    <input type="button" value="Create Order"/>

    </div>

</div>

<div id="orders-area" class="content" >

    <!-- List of orders -->

    <div class="float-left">

    <h1>Your Orders</h1>

    <ul id="orders">

    </ul>

    </div>

   <!-- Order Details(订单细节) -->

    <div id="order-details" class="float-right">

    <h2>Order #<span></span></h2>

    <table class="details ui-widget-content">

    </table>

    <p>Total: <span></span></p>

    </div>

</div>
Next, add a Scripts section and create an empty view-model:
下一步,添加一个脚本片段,并创建一个空的视图模型:
@section Scripts {

  <script type="text/javascript" src="@Url.Content("~/Scripts/knockout-2.1.0.js")"></script>

  <script type="text/javascript">

    function AppViewModel() {

        var self = this;

        self.loggedIn = @(Request.IsAuthenticated ? "true" : "false");

    }

    $(document).ready(function () {

        ko.applyBindings(new AppViewModel());

    });

  </script>

}
Based on the design sketched earlier, our view model needs observables for products, cart, orders, and details. Add the following variables to the AppViewModel object:
基于前面的设计框架,我们的视图需要产品、购物车、订单以及订单细节的可见对象(observables)。将以下变量添加到AppViewModel对象:
self.products = ko.observableArray();

self.cart = ko.observableArray();

self.orders = ko.observableArray();

self.details = ko.observable();
Users can add items from the products list into the cart, and remove items from the cart. To encapsulate these functions, we'll create another view-model class that represents a product. Add the following code to AppViewModel:
用户可以把产品列表中的条目添加到购物车中,以及从购物车删除条目。为了封装这些函数,我们将创建另一个表示产品的视图模型类。将以下代码添加到AppViewModel:
function AppViewModel() {

    // ...

    // NEW CODE

    // 新代码

    function ProductViewModel(root, product) {

        var self = this;

        self.ProductId = product.Id;

        self.Name = product.Name;

        self.Price = product.Price;

        self.Quantity = ko.observable(0);

        self.addItemToCart = function () {

            var qty = self.Quantity();

            if (qty == 0) {

                root.cart.push(self);

            }

            self.Quantity(qty + 1);

        };

        self.removeAllFromCart = function () {

            self.Quantity(0);

            root.cart.remove(self);

        };

    }

}
The ProductViewModel class contains two functions that are used to move the product to and from the cart: addItemToCart adds one unit of the product to the cart, and removeAllFromCart removes all quantities of the product.
这个ProductViewModel类包含两个函数,用于对购物车添加或删除产品:addItemToCart将一个产品单位添加到购物车(即,产品订购数加1 — 译者注),而removeAllFromCart删除产品的全部订购数。
Users can select an existing order and get the order details. We'll encapsulate this functionality into another view-model:
用户可以选择一个已有订单,并获取该订单细节。我们将把这个功能封装到另一个视图模型之中:
function AppViewModel() {

    // ...

    // NEW CODE

    // 新代码

    function OrderDetailsViewModel(order) {

        var self = this;

        self.items = ko.observableArray();

        self.Id = order.Id;

        self.total = ko.computed(function () {

            var sum = 0;

            $.each(self.items(), function (index, item) {

                sum += item.Price * item.Quantity;

            });

            return '$' + sum.toFixed(2);

        });

        $.getJSON("/api/orders/" + order.Id, function (order) {

            $.each(order.Details, function (index, item) {

                self.items.push(item);

            })

        });

    };

}
The OrderDetailsViewModel is initialized with an order, and it fetches the order details by sending an AJAX request to the server.
OrderDetailsViewModel用一个订单进行初始化,并能通过向服务器发送一个AJAX请求来捕捉该订单的细节。
Also, notice the total property on the OrderDetailsViewModel. This property is a special kind of observable called a computed observable. As the name implies, a computed observable lets you data bind to a computed value—in this case, the total cost of the order.
另外,要注意到OrderDetailsViewModel上的total属性。这个属性是一个叫做“已计算可见对象”的特殊类型的可见对象。正如其名称所暗示的那样,一个已计算可见对象可以让你把数据绑定到一个已计算的值 — 在此例中是订单的总费用(total cost)。
Next, add these functions to AppViewModel:
接下来,把这些函数添加到AppViewModel:
- resetCart removes all items from the cart.
resetCart删除购物车的所有条目。 - getDetails gets the details for an order (by
pusingpushing a new OrderDetailsViewModel onto the details list).
getDetails获取一份订单的细节(通过把一个新的OrderDetailsViewModel推入details列表)。 - createOrder creates a new order and empties the cart.
createOrder创建一个新的订单,并清空购物车。
function AppViewModel() {

    // ...

    // NEW CODE

    // 新代码

    self.resetCart = function() {

        var items = self.cart.removeAll();

        $.each(items, function (index, product) {

            product.Quantity(0);

        });

    }

    self.getDetails = function (order) {

        self.details(new OrderDetailsViewModel(order));

    }

    self.createOrder = function () {

        var jqxhr = $.ajax({

            type: 'POST',

            url: "api/orders",

            contentType: 'application/json; charset=utf-8',

            data: ko.toJSON({ Details: self.cart }),

            dataType: "json",

            success: function (newOrder) {

                self.resetCart();

                self.orders.push(newOrder);

            },

            error: function (jqXHR, textStatus, errorThrown) {

                self.errorMessage(errorThrown);

            }

        });

    };

};
Finally, initialize the view model by making AJAX requests for the products and orders:
最后,通过发送对产品和订单的AJAX请求的办法,对这个视图模型进行初始化:
function AppViewModel() {

    // ...

    // NEW CODE

    // 新代码

    // Initialize the view-model.

    $.getJSON("/api/products", function (products) {

        $.each(products, function (index, product) {

            self.products.push(new ProductViewModel(self, product));

        })

    });

    $.getJSON("api/orders", self.orders);

};
OK, that's a lot of code, but we built it up step-by-step, so hopefully the design is clear. Now we can add some Knockout.js bindings to the HTML.
好了,代码很多,但我们一步步把它建立起来了,希望这一设计是清晰的。现在,我们可以对这个HTML添加一些Knockout.js绑定。
Products
产品
Here are the bindings for the product list:
以下是对产品列表的绑定:
<ul id="products" data-bind="foreach: products">

    <li>

        <div>

            <span data-bind="text: Name"></span>

            <span class="price" data-bind="text: '$' + Price"></span>

        </div>

        <div data-bind="if: $parent.loggedIn">

            <button data-bind="click: addItemToCart">Add to Order</button>

        </div>

    </li>

</ul>
This iterates over the products array and displays the name and price. The "Add to Order" button is visible only when the user is logged in.
它对产品数组进行了循环,并显示名称和价格。“加入购物车”按钮只在用户登录时才是可见的。
The "Add to Order" button calls addItemToCart on the ProductViewModel instance for the product. This demonstrates a nice feature of Knockout.js: When a view-model contains other view-models, you can apply the bindings to the inner model. In this example, the bindings within the foreach are applied to each of the ProductViewModel instances. This approach is much cleaner than putting all of the functionality into a single view-model.
“加入购物车”按钮针对(所选)产品调用ProductViewModel实例上的addItemToCart。这演示了Knockout.js的一个很好的特性:当一个视图模型含有其它视图模型时,你可以把绑定运用于内部模型。在这个例子中,在foreach中的绑定被运用于每个ProductViewModel实例。这种办法要比把所有功能放在一个单一的视图模型中要清晰得多。
Cart
购物车
Here are the bindings for the cart:
以下是对购物车的绑定:
<div id="cart" class="float-right" data-bind="visible: cart().length > 0">

<h1>Your Cart</h1>

    <table class="details ui-widget-content">

    <thead>

        <tr><td>Item</td><td>Price</td><td>Quantity</td><td></td></tr>

    </thead>

    <tbody data-bind="foreach: cart">

        <tr>

            <td><span data-bind="text: $data.Name"></span></td>

            <td>$<span data-bind="text: $data.Price"></span></td>

            <td class="qty"><span data-bind="text: $data.Quantity()"></span></td>

            <td><a href="#" data-bind="click: removeAllFromCart">Remove</a></td>

        </tr>

    </tbody>

</table>

<input type="button" data-bind="click: createOrder" value="Create Order"/>
This iterates over the cart array and displays the name, price, and quantity. Note that the "Remove" link and the "Create Order" button are bound to view-model functions.
这是对购物车的循环,并且显示名称、价格和数据。注意,“删除”链接和“创建订单”按钮都被绑定到视图模型的函数上。
Orders
订单
Here are the bindings for the orders list:
以下是对订单列表的绑定:
<h1>Your Orders</h1>

<ul id="orders" data-bind="foreach: orders">

<li class="ui-widget-content">

    <a href="#" data-bind="click: $root.getDetails">

        Order # <span data-bind="text: $data.Id"></span></a>

</li>

</ul>
This iterates over the orders and shows the order ID. The click event on the link is bound to the getDetails function.
它对订单进行了循环,并显示订单ID。链接上的点击事件被绑定到getDetails函数。
Order Details
订单细节
Here are the bindings for the order details:
以下是对订单细节的绑定:
<div id="order-details" class="float-right" data-bind="if: details()">

<h2>Order #<span data-bind="text: details().Id"></span></h2>

<table class="details ui-widget-content">

    <thead>

        <tr><td>Item</td><td>Price</td><td>Quantity</td><td>Subtotal</td></tr>

    </thead>

    <tbody data-bind="foreach: details().items">

        <tr>

            <td><span data-bind="text: $data.Product"></span></td>

            <td><span data-bind="text: $data.Price"></span></td>

            <td><span data-bind="text: $data.Quantity"></span></td>

            <td>

                <span data-bind="text: ($data.Price * $data.Quantity).toFixed(2)"></span>

            </td>

        </tr>

    </tbody>

</table>

<p>Total: <span data-bind="text: details().total"></span></p>

</div>
This iterates over the items in the order and displays the product, price, and quanity quantity. The surrounding div is visible only if the details array contains one or more items.
它对订单中的条目进行循环,并显示产品、价格和数量。div所包围的部分只在订单细节数组含有一个或多个条目时才会显示。
Conclusion
结论
In this tutorial, you created an application that uses Entity Framework to communicate with the database, and ASP.NET Web API to provide a public-facing interface on top of the data layer. We use ASP.NET MVC 4 to render the HTML pages, and Knockout.js plus jQuery to provide dynamic interactions without page reloads.
在这个教程中,你创建了一个应用程序,它用实体框架与数据库进行通信,并用ASP.NET Web API提供了一个建立在数据层之上的面向公众的接口。我们使用了ASP.NET MVC 4来渲染HTML页面,并用Knckout.js加jQuery来提供不必进行页面重载的动态交互。
Additional resources:
其它资源:
看完此文如果觉得有所收获,恳请给个推荐
【ASP.NET Web API教程】2.3.7 创建首页的更多相关文章
- 【ASP.NET Web API教程】2.4 创建Web API的帮助页面
原文:[ASP.NET Web API教程]2.4 创建Web API的帮助页面 注:本文是[ASP.NET Web API系列教程]的一部分,如果您是第一次看本博客文章,请先看前面的内容. 2.4 ...
- 【ASP.NET Web API教程】2.1 创建支持CRUD操作的Web API
原文 [ASP.NET Web API教程]2.1 创建支持CRUD操作的Web API 2.1 Creating a Web API that Supports CRUD Operations2.1 ...
- 【ASP.NET Web API教程】2.4 创建Web API的帮助页面[转]
注:本文是[ASP.NET Web API系列教程]的一部分,如果您是第一次看本博客文章,请先看前面的内容. 2.4 Creating a Help Page for a Web API2.4 创建W ...
- 【ASP.NET Web API教程】3.2 通过.NET客户端调用Web API(C#)
原文:[ASP.NET Web API教程]3.2 通过.NET客户端调用Web API(C#) 注:本文是[ASP.NET Web API系列教程]的一部分,如果您是第一次看本博客文章,请先看前面的 ...
- 【ASP.NET Web API教程】3 Web API客户端
原文:[ASP.NET Web API教程]3 Web API客户端 Chapter 3: Web API Clients 第3章 Web API客户端 本文引自:http://www.asp.net ...
- 【ASP.NET Web API教程】2.3.6 创建产品和订单控制器
原文:[ASP.NET Web API教程]2.3.6 创建产品和订单控制器 注:本文是[ASP.NET Web API系列教程]的一部分,如果您是第一次看本博客文章,请先看前面的内容. Part 6 ...
- 【ASP.NET Web API教程】2.3.5 用Knockout.js创建动态UI
原文:[ASP.NET Web API教程]2.3.5 用Knockout.js创建动态UI 注:本文是[ASP.NET Web API系列教程]的一部分,如果您是第一次看本博客文章,请先看前面的内容 ...
- 【ASP.NET Web API教程】2.3.4 创建Admin视图
原文:[ASP.NET Web API教程]2.3.4 创建Admin视图 注:本文是[ASP.NET Web API系列教程]的一部分,如果您是第一次看本博客文章,请先看前面的内容. Part 4: ...
- 【ASP.NET Web API教程】2.3.3 创建Admin控制器
原文:[ASP.NET Web API教程]2.3.3 创建Admin控制器 注:本文是[ASP.NET Web API系列教程]的一部分,如果您是第一次看本博客文章,请先看前面的内容. Part 3 ...
随机推荐
- Codeforces 490B Queue【模拟】
题意还是很好理解的,根据题目给出描述条件然后求出这串QUEUE 我的做法就是用两个数组 before[] 和 after[] 表示 ai 前面的前面的人的学号 和 ai 后面的后面的人的学号 ex[] ...
- TreePuzzle 一点感想
题目链接 这一道题看起来像是一道贪心的水题,但是情况较难考虑周全,比如下图,我就考虑漏了这种情况,点0是可以移动到点1的.然后我就各种奇怪的分类讨论.最终还是没能A,决定放弃治疗. 然后我看了看解答, ...
- A_全然背包
/* copyright: Grant Yuan algorithm: 全然背包 time : 2014.7.18 __________________________________________ ...
- 《HTML 5网页开发实例具体解释》文件夹
第一篇 从宏观上认识HTML 5 讲述了HTML 5引发的Web革命.HTML 5的总体特性.HTML 5相关概念和框架和开发环境搭建. 第1章 HTML 5引发的Web革命 1.1 你是不是真的 ...
- osgi实战学习之路:8. Service-3之ServiceTracker
通过ServiceTracker能够对查找的Service进行扩展 以下的demo引入装饰器模式对Service进行日志的扩展 demo: Provider student-manage/Activa ...
- House Robber 分类: leetcode 算法 2015-07-09 20:53 2人阅读 评论(0) 收藏
DP 对于第i个状态(房子),有两种选择:偷(rob).不偷(not rob) 递推公式为: f(i)=max⎧⎩⎨⎪⎪{f(i−1)+vali,f(i−2)+vali,robi−1==0robi−1 ...
- Java进阶05 多线程
链接地址:http://www.cnblogs.com/vamei/archive/2013/04/15/3000898.html 作者:Vamei 出处:http://www.cnblogs.com ...
- awk 工具简介NF-NR
相较于 sed 常常作用于一整个行的处理, awk 则比较倾向于一行当中分成数个『字段』来处理. 因此,awk 相当的适合处理小型的数据数据处理呢!awk 通常运作的模式是这样的:[root@linu ...
- html+css实现图片的层布局
<!doctype html> <html lang="en"> <head> <meta charset="UTF-8&quo ...
- NOI08冬令营 数据结构的提炼与压缩
无聊随手翻,翻到了一个这样的好东西--据结构的提炼与压缩: 为了防止以后忘记,这里把论文里的题目都纪录一下吧. 1.二维结构的化简 问题一:ural 1568 Train car sorting 定义 ...