Spring Cloud 学习笔记一
一、spring cloud 搭建注册中心(Eureka server)
1、spring cloud中提供了多种分步式服务组件,其都依赖于注册中心(eureka),注册中心的服务者与发现者都通过Eureka server相互通信,服务者与发现者都是Eureka client,同时注册到Eureka server 中,然后通过服务名相互调用接口,故我们需要首先搭建注册中心(Eureka Server),以下以inlij idea 为例:
a、inlij idea新建项目->选择spring initializer->next->next->选择web web、cloud discovery Eureka server->完成
b、打开项目pom文件,可以看到已自动添加Eureka server服务:
<dependency>
<groupId>org.springframework.boot</groupId>
<artifactId>spring-boot-starter-web</artifactId>
</dependency>
<dependency>
<groupId>org.springframework.cloud</groupId>
<artifactId>spring-cloud-starter-netflix-eureka-server</artifactId>
</dependency>
C、打开application.properties文件,配置注册中心地址,如下:
spring.application.name=euraka-service
server.port=8088
eureka.instance.hostname=localhost
eureka.client.register-with-eureka=false
eureka.client.fetch-registry=false
eureka.client.serviceUrl.defaultZone=http://${eureka.instance.hostname}:${server.port}/eureka/
D、配置运行项目,打开localhost:8088/, 出现发下界面表示成功:
@SpringBootApplication
@EnableEurekaServer
public class EurakaServiceApplication {
public static void main(String[] args) {
SpringApplication.run(EurakaServiceApplication.class, args);
}
}

注:上面已注册了client,第一次运行应只注册了自已
1、搭建Eureka client(服务提供者)
A、inlij idea新建项目->选择spring initializer->next->next->选择web web、cloud discovery Eureka discovery->完成
B、打开项目pom文件,可以看到已自动添加Eureka client服务:
<dependency>
<groupId>org.springframework.boot</groupId>
<artifactId>spring-boot-starter-web</artifactId>
</dependency>
<dependency>
<groupId>org.springframework.cloud</groupId>
<artifactId>spring-cloud-starter-netflix-eureka-client</artifactId>
</dependency>
C、打开application.properties文件,配置注册中心地址,如下:
spring.application.name=euraka-client
server.port=8089
eureka.instance.hostname=localhost //注册中心地址,这里是本地
eureka.client.serviceUrl.defaultZone=http://${eureka.instance.hostname}:8088/eureka/
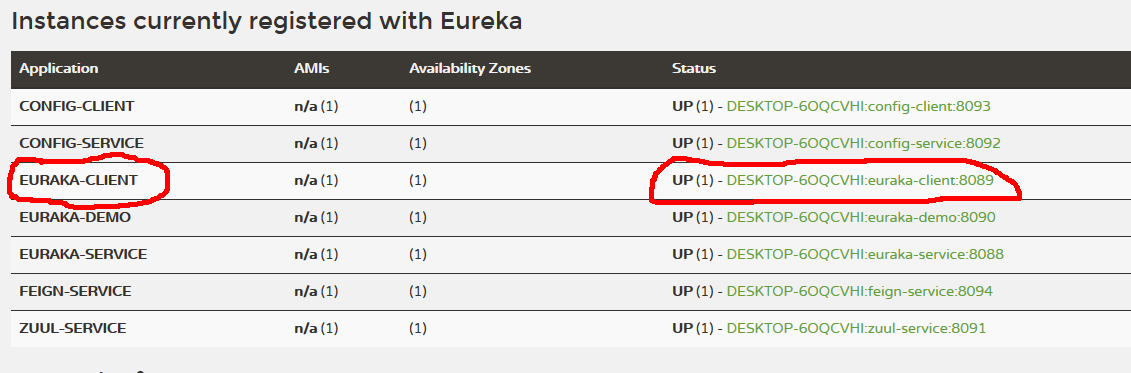
C、配置运行项目后,可在注册中心务中看到,如下图:
@SpringBootApplication
@EnableEurekaClient
public class EurekaClientApplication {
public static void main(String[] args) {
SpringApplication.run(EurekaClientApplication.class, args);
}
}
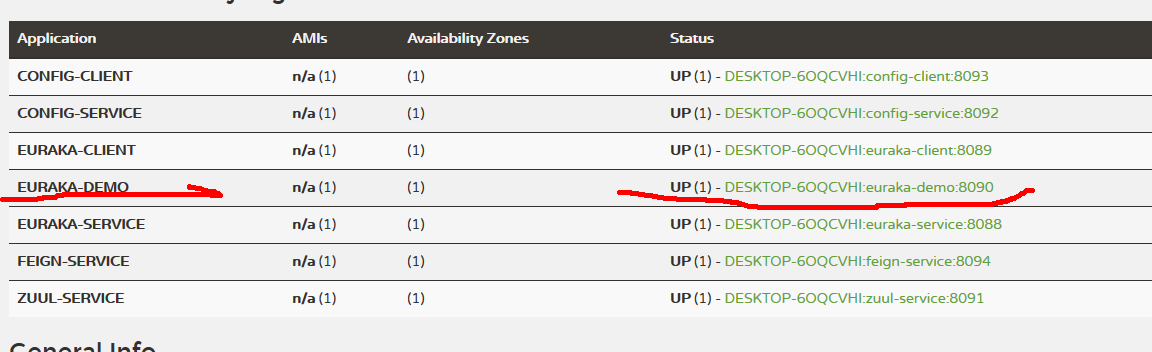
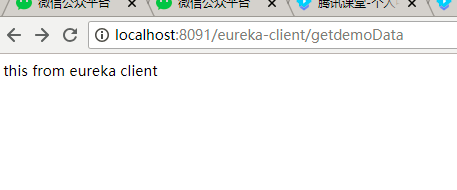
1、搭建注册中心(服务发现者)Eureka client,创建项目如2所示,所有都不变,然后运行如下图:
注:现在eureka demo 就可以访问Eureka client 中的接口了,后面我们将使用feign来访问
二、使用feign来现实访问服务者之间的接口
1、feign是spring cloud 中用于服务之间访问最简单的方式,使用起来非常方便,用使接口加注解就可完成服务间调用,当然这里不讲原理,只讲用法
A、inlij idea新建项目->选择spring initializer->next->next->选择web web、Cloud routing feign->完成。
B、打开项目pom文件,可以看到已自动添加feign服务:
<dependency>
<groupId>org.springframework.boot</groupId>
<artifactId>spring-boot-starter-web</artifactId>
</dependency>
<dependency>
<groupId>org.springframework.cloud</groupId>
<artifactId>spring-cloud-starter-netflix-eureka-client</artifactId>
</dependency>
<dependency>
<groupId>org.springframework.cloud</groupId>
<artifactId>spring-cloud-starter-openfeign</artifactId>
</dependency>
C、打开application.properties文件,配置注册中心地址,如下:
spring.application.name=feign-service
server.port=8094
eureka.instance.hostname=localhost
eureka.client.serviceUrl.defaultZone=http://${eureka.instance.hostname}:8088/eureka/
D、配置feign,eureka client
@SpringBootApplication
@EnableEurekaClient
@EnableFeignClients
public class FeignServiceApplication {
public static void main(String[] args) {
SpringApplication.run(FeignServiceApplication.class, args);
}
}
E、添加接口,并使用注解配置访问eureka client 服务,调用getdemoData方法
@FeignClient(value = "euraka-client")
public interface feignInterface {
@RequestMapping("/getdemoData")
public String getEurekaClient();
}
F、编写controller,如下图
@RestController
public class feignContrller {
@Autowired
private feignInterface feignInterfaces;
@GetMapping("/getFeignData")
public String getFeignData(){
return feignInterfaces.getEurekaClient();
}
}
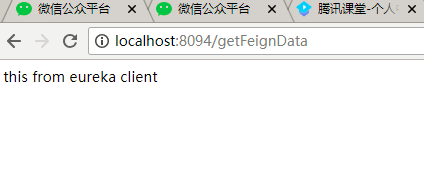
G、运行访问是否成功
三、注册配置中心
1、配置中心是用来统一管理配置,配置文件可以放在git上,也可以放在本地,也可以布署在另一台服务器上,这样我们在更改配置而不影响原有代码,也不必重新打包项目
2、开始搭建配置中心服务项目(config server)
A、inlij idea新建项目->选择spring initializer->next->next->选择web web、cloud cofing config server->完成
A、打开pom文件,查看引用
<dependency>
<groupId>org.springframework.boot</groupId>
<artifactId>spring-boot-starter-web</artifactId>
</dependency>
<dependency>
<groupId>org.springframework.cloud</groupId>
<artifactId>spring-cloud-config-server</artifactId>
</dependency>
<dependency>
<groupId>org.springframework.cloud</groupId>
<artifactId>spring-cloud-starter-netflix-eureka-server</artifactId>
</dependency>
C、打开application.properties文件,配置注册中心地址,如下:
spring.application.name=config-service
server.port=8092
eureka.instance.hostname=localhost
eureka.client.serviceUrl.defaultZone=http://${eureka.instance.hostname}:8088/eureka/
spring.profiles.active = native
spring.cloud.config.server.native.searchLocations=classpath:/resources/config-service/
注:这里首先把项目注册到注册中心,然后开启本地配置中心,配置本地路径
D、编写本地配置文件resources\config-service\config-dev.yml
config:
userName: whc
password: 123456
E、注解配置中心
@SpringBootApplication
@EnableEurekaClient
@EnableConfigServer
public class ConfigServiceApplication {
public static void main(String[] args) {
SpringApplication.run(ConfigServiceApplication.class, args);
}
}
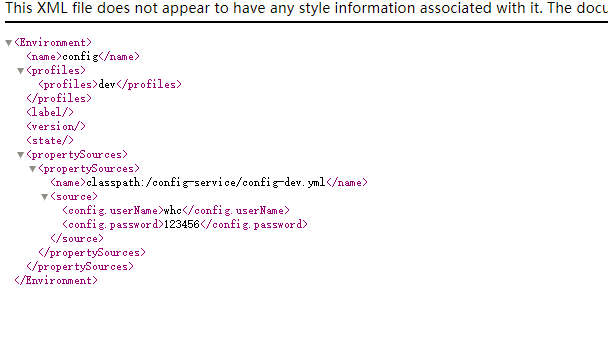
F、运行配置中心,输入如下地址:
http://localhost:8092/config/dev
结果如下,表示成功:
2、注册配置中心客户端(config client)
A、inlij idea新建项目->选择spring initializer->next->next->选择web web、cloud cofing config Client->完成
B、打开pom文件,查看配置引用
<dependency>
<groupId>org.springframework.boot</groupId>
<artifactId>spring-boot-starter-web</artifactId>
</dependency>
<dependency>
<groupId>org.springframework.cloud</groupId>
<artifactId>spring-cloud-starter-config</artifactId>
</dependency>
<dependency>
<groupId>org.springframework.cloud</groupId>
<artifactId>spring-cloud-starter-netflix-eureka-client</artifactId>
</dependency>
A、由于spring cloud会先去读bootstrap.properties文件,不能直接配置applicat
ion.properties文件,我们需要新建bootstrap.properties文件,配置如下:
spring.application.name=config-client
server.port=8093
eureka.instance.hostname=localhost
eureka.client.serviceUrl.defaultZone=http://${eureka.instance.hostname}:8088/eureka/
spring.cloud.config.enabled=true
spring.cloud.config.discovery.enabled=true
spring.cloud.config.discovery.serviceId=config-service
spring.cloud.config.name=config
spring.cloud.config.profile=dev
注:首先配置了注册中心,然后配置了配置中心项目的serviceId,指明了配置文件名name,再指明了配置环境dev,spring cloud 会自动去找config-service服务下的配置文件config-dev.yml文件
B、配置注解,如下:
@SpringBootApplication
@EnableEurekaClient
public class ConfigClientApplication {
public static void main(String[] args) {
SpringApplication.run(ConfigClientApplication.class, args);
}
}
注:发现我们只配置了注册中心
C、编写读取配置文件controller,如下:
@RestController
public class demoController {
@Value("${config.userName}")
private String userName;
@Value("${config.password}")
private String userPwd;
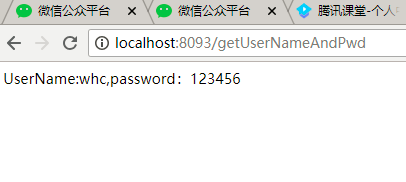
@GetMapping("/getUserNameAndPwd")
public String getUserNameAndPwd(){
return "UserName:"+userName+",password:"+userPwd;
}
}
D、运行结果如下:
四、配置网关(zuul-service)
1、网关是spring cloud中很重要的角色,它可以解决跨域的问题;网关可以把请求映射到多个地址,通过项目名来区分请求,并转发给对应的服务
A、inlij idea新建项目->选择spring initializer->next->next->选择web web、cloud routing Zuul->完成
B、打开pom文件,查看引用
<dependency>
<groupId>org.springframework.boot</groupId>
<artifactId>spring-boot-starter-web</artifactId>
</dependency>
<dependency>
<groupId>org.springframework.cloud</groupId>
<artifactId>spring-cloud-starter-netflix-eureka-client</artifactId>
</dependency>
<dependency>
<groupId>org.springframework.cloud</groupId>
<artifactId>spring-cloud-starter-netflix-zuul</artifactId>
</dependency>
C、打开application.properties文件,配置注册中心地址,如下:
spring.application.name=zuul-service
server.port=8091
eureka.instance.hostname=localhost
eureka.client.serviceUrl.defaultZone=http://${eureka.instance.hostname}:8088/eureka/
zuul.routes.api-a.path=/eureka-client/**
zuul.routes.api-a.serviceId=euraka-client
zuul.routes.api-b.path=/eureka-demo/**
zuul.routes.api-b.serviceId=euraka-demo
注:首先配置注册中心,然后配置zuul 路由项目,就可以完成网关映射
D、注解配置
@SpringBootApplication
@EnableEurekaClient
@EnableZuulProxy
public class ZuulServiceApplication {
public static void main(String[] args) {
SpringApplication.run(ZuulServiceApplication.class, args);
}
}
E、运行查看结果
Spring Cloud 学习笔记一的更多相关文章
- Spring Cloud学习笔记--Spring Boot初次搭建
1. Spring Boot简介 初次接触Spring的时候,我感觉这是一个很难接触的框架,因为其庞杂的配置文件,我最不喜欢的就是xml文件,这种文件的可读性很不好.所以很久以来我的Spring学习都 ...
- Spring Cloud 学习笔记 (一)-- Eureka 服务器
开局一张图,截取了本人学习资料中的一张图,很好地展示了Eureka的架构. Eureka服务器 管理服务的作用.细分为服务注册,服务发现. 所有的客户端在Eureka服务器上注册服务,再从Eureka ...
- Spring Cloud 学习笔记(二)——Netflix
4 Spring Cloud Netflix Spring Cloud 通过自动配置和绑定到Spring环境和其他Spring编程模型惯例,为Spring Boot应用程序提供Netflix OSS集 ...
- Spring Cloud 学习笔记(一)——入门、特征、配置
[TOC] 0 放在前面 0.1 参考文档 http://cloud.spring.io/spring-cloud-static/Brixton.SR7/ https://springcloud.cc ...
- Spring Cloud学习笔记-006
服务容错保护:Spring Cloud Hystrix 在微服务架构中,我们将系统拆分成了很多服务单元,各单元的应用间通过服务注册与订阅的方式互相依赖.由于每个单元都在不同的进程中运行,依赖通过远程调 ...
- Spring Cloud学习笔记-005
服务消费者 之前已经搭建好了微服务中的核心组件——服务注册中心(包括单节点模式和高可用模式).也有了服务提供者,接下来搭建一个服务消费者,它主要完成两个目标,发现服务以及消费服务.其中,服务发现的任务 ...
- Spring Cloud学习笔记-002
搭建Spring Cloud注册中心:Eureka 服务注册:在服务治理框架中,通常都会构建一个注册中心,每个服务单元向注册中心登记自己提供的服务,将主机与端口号.版本号.通信协议等一些附加信息告诉注 ...
- Spring Cloud学习笔记-007
声明式服务调用:Spring Cloud Feign Feign基于Netflix Feign实现,整合了Spring Cloud Ribbon和Spring Cloud Hystrix,除了提供这两 ...
- Spring Cloud学习笔记-008
继承特性 通过上节的示例实践,当使用Spring MVC的注解来绑定服务接口时,几乎完全可以从服务提供方的Controller中依靠复制操作,构建出相应的服务客户端绑定接口.既然存在这么多复制操作,自 ...
- Spring Cloud学习笔记-009
API网关服务:Spring Cloud Zuul API网关是一个更为智能的应用服务器,它的定义类似于面向对象设计模式中的Façade模式,它的存在就像是整个微服务架构系统的门面一样,所有的外部客户 ...
随机推荐
- Vxlan L2
VXLAN(Virtual eXtensible LAN可扩展虚拟局域网)诞生了,基于IP网络之上,采用的是MAC in UDP技术 跨三层实现二层通信 总结为何需要Vxlan: 虚拟机规模受到网络规 ...
- D. Yet Another Subarray Problem 思维 难 dp更好理解
D. Yet Another Subarray Problem 这个题目很难,我比赛没有想出来,赛后又看了很久别人的代码才理解. 这个题目他们差不多是用一个滑动窗口同时枚举左端点和右端点,具体如下: ...
- 07_CSS入门和高级技巧(5)
超级链接美化 1.伪类 同一个超级链接,根据用户的点击情况,有自己样式: 超级链接根据用户点选情况,有4种状态: a:link 没有访问的超级链接 a:visited 已经访问的超级链接 a:hove ...
- Ubuntu 1804 安装xmind8详细过程
安装比较简单, 折腾了很久,一启动就报错,切换了JDK版本就能用了: 安装 登陆官网,下载xmind8: 下载得到文件xmind-8-update9-linux.zip: 将文件解压至路径xmind下 ...
- STM32 OSAL操作系统抽象层的移植
文章目录 什么是 OSAL? 源码安装 Linux 上OSAL的移植 STM32上OSAL的移植 关键点 测试代码 结语 附件 什么是 OSAL? 今天同学忽然问我有没有搞过OSAL,忽然间一头雾水, ...
- FOC中的Clarke变换和Park变换详解(动图+推导+仿真+附件代码)
文章目录 1 前言 2 自然坐标系ABC 3 αβ\alpha\betaαβ 坐标系 3.1 Clarke变换 3.2 Clarke反变换 4 dqdqdq 坐标系 4.1 Park变换 正转 反转 ...
- scala 隐式参数
def test(implicit name: String = "susu"): Unit ={ println(name);} 三种调用方法如下:test("dudu ...
- 新抽象语法树(AST)给 PHP7 带来的变化
本文大部分内容参照 AST 的 RFC 文档而成:https://wiki.php.net/rfc/abstract_syntax_tree,为了易于理解从源文档中节选部分进行介绍. 我的官方群点击此 ...
- java ->基本数据类型与包装类的概述和转化
基本类型 包装类概述 在实际程序使用中,程序界面上用户输入的数据都是以字符串类型进行存储的.而程序开发中,我们需要把字符串数据,根据需求转换成指定的基本数据类型,如年龄需要转换成int类型,考试成绩需 ...
- 向大家介绍我的新书:《基于股票大数据分析的Python入门实战》
我在公司里做了一段时间Python数据分析和机器学习的工作后,就尝试着写一本Python数据分析方面的书.正好去年有段时间股票题材比较火,就在清华出版社夏老师指导下构思了这本书.在这段特殊时期内,夏老 ...