zabbix监控memcached服务
zabbix监控memcached服务
作者:尹正杰
版权声明:原创作品,谢绝转载!否则将追究法律责任。
一.安装并配置memcached服务
1>.使用yum方式安装memcached
[root@node201.yinzhengjie.org.cn ~]# yum -y install memcached

Loaded plugins: fastestmirror

Loading mirror speeds from cached hostfile

 * base: mirrors.huaweicloud.com

 * extras: mirrors.aliyun.com

 * updates: mirrors.tuna.tsinghua.edu.cn

base                                                                                                                                                                                                                                                   | 3.6 kB  ::

docker-ce-stable                                                                                                                                                                                                                                       | 3.5 kB  ::

extras                                                                                                                                                                                                                                                 | 2.9 kB  ::

kubernetes                                                                                                                                                                                                                                             | 1.4 kB  ::

updates                                                                                                                                                                                                                                                | 2.9 kB  ::

zabbix                                                                                                                                                                                                                                                 | 2.9 kB  ::

zabbix-non-supported                                                                                                                                                                                                                                   |   B  ::

Resolving Dependencies

--> Running transaction check

---> Package memcached.x86_64 :1.4.-.el7_3. will be installed

--> Finished Dependency Resolution

Dependencies Resolved

==============================================================================================================================================================================================================================================================================

 Package                                                          Arch                                                          Version                                                                     Repository                                                   Size

==============================================================================================================================================================================================================================================================================

Installing:

 memcached                                                        x86_64                                                        1.4.-.el7_3.                                                           base                                                          k

Transaction Summary

==============================================================================================================================================================================================================================================================================

Install   Package

Total download size:  k

Installed size:  k

Downloading packages:

memcached-1.4.-.el7_3..x86_64.rpm                                                                                                                                                                                                                 |   kB  ::

Running transaction check

Running transaction test

Transaction test succeeded

Running transaction

  Installing : memcached-1.4.-.el7_3..x86_64                                                                                                                                                                                                                         /

  Verifying  : memcached-1.4.-.el7_3..x86_64                                                                                                                                                                                                                         /

Installed:

  memcached.x86_64 :1.4.-.el7_3.

Complete!

[root@node201.yinzhengjie.org.cn ~]#
[root@node201.yinzhengjie.org.cn ~]# yum -y install memcached
2>.查看memcached的配置文件
[root@node201.yinzhengjie.org.cn ~]# cat /etc/sysconfig/memcached

PORT=""

USER="memcached"

MAXCONN=""

CACHESIZE=""

OPTIONS=""

[root@node201.yinzhengjie.org.cn ~]#
3>.启动memcached服务
[root@node201.yinzhengjie.org.cn ~]# systemctl start memcached.service

[root@node201.yinzhengjie.org.cn ~]#

[root@node201.yinzhengjie.org.cn ~]# systemctl enable memcached.service

Created symlink from /etc/systemd/system/multi-user.target.wants/memcached.service to /usr/lib/systemd/system/memcached.service.

[root@node201.yinzhengjie.org.cn ~]#

[root@node201.yinzhengjie.org.cn ~]# ss -ntl | grep

LISTEN                    *:                    *:*

LISTEN                   :::                   :::*

[root@node201.yinzhengjie.org.cn ~]#

[root@node201.yinzhengjie.org.cn ~]#
二.zabbix agent端配置监控memcached的脚本
1>.在命令行中查看数据memcached的监控指标
[root@node201.yinzhengjie.org.cn ~]# yum -y install nc

Loaded plugins: fastestmirror

Loading mirror speeds from cached hostfile

 * base: mirrors.huaweicloud.com

 * extras: mirrors.aliyun.com

 * updates: mirrors.tuna.tsinghua.edu.cn

Resolving Dependencies

--> Running transaction check

---> Package nmap-ncat.x86_64 :6.40-.el7 will be installed

--> Finished Dependency Resolution

Dependencies Resolved

==============================================================================================================================================================================================================================================================================

 Package                                                           Arch                                                           Version                                                                  Repository                                                    Size

==============================================================================================================================================================================================================================================================================

Installing:

 nmap-ncat                                                         x86_64                                                         :6.40-.el7                                                            base                                                          k

Transaction Summary

==============================================================================================================================================================================================================================================================================

Install   Package

Total download size:  k

Installed size:  k

Downloading packages:

nmap-ncat-6.40-.el7.x86_64.rpm                                                                                                                                                                                                                       |  kB  ::

Running transaction check

Running transaction test

Transaction test succeeded

Running transaction

  Installing : :nmap-ncat-6.40-.el7.x86_64                                                                                                                                                                                                                             /

  Verifying  : :nmap-ncat-6.40-.el7.x86_64                                                                                                                                                                                                                             /

Installed:

  nmap-ncat.x86_64 :6.40-.el7

Complete!

[root@node201.yinzhengjie.org.cn ~]#
[root@node201.yinzhengjie.org.cn ~]# yum -y install nc #安装nc工具
[root@node201.yinzhengjie.org.cn ~]# echo -e "stats\nquit" | nc 127.0.0.1 ""

STAT pid

STAT uptime

STAT time

STAT version 1.4.

STAT libevent 2.0.-stable

STAT pointer_size

STAT rusage_user 0.014680

STAT rusage_system 0.014680

STAT curr_connections

STAT total_connections

STAT connection_structures

STAT reserved_fds

STAT cmd_get

STAT cmd_set

STAT cmd_flush

STAT cmd_touch

STAT get_hits

STAT get_misses

STAT delete_misses

STAT delete_hits

STAT incr_misses

STAT incr_hits

STAT decr_misses

STAT decr_hits

STAT cas_misses

STAT cas_hits

STAT cas_badval

STAT touch_hits

STAT touch_misses

STAT auth_cmds

STAT auth_errors

STAT bytes_read

STAT bytes_written

STAT limit_maxbytes

STAT accepting_conns

STAT listen_disabled_num

STAT threads

STAT conn_yields

STAT hash_power_level

STAT hash_bytes

STAT hash_is_expanding

STAT bytes

STAT curr_items

STAT total_items

STAT expired_unfetched

STAT evicted_unfetched

STAT evictions

STAT reclaimed

END

[root@node201.yinzhengjie.org.cn ~]#
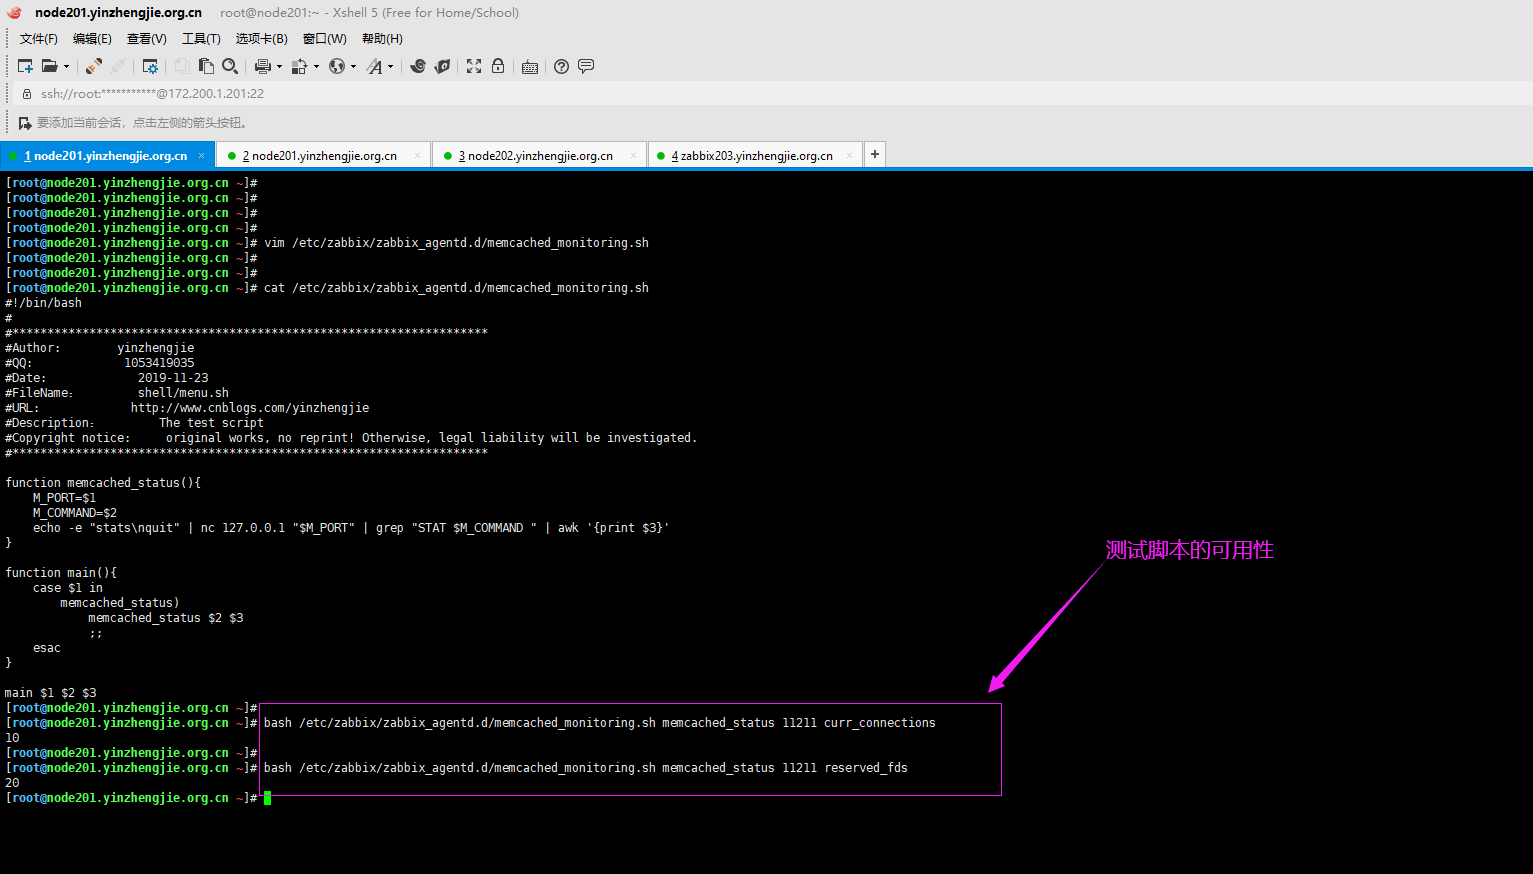
2>.编写脚本获取memcached的监控项数据
[root@node201.yinzhengjie.org.cn ~]# cat /etc/zabbix/zabbix_agentd.d/memcached_monitoring.sh

#!/bin/bash

#

#********************************************************************

#Author:        yinzhengjie

#QQ:

#Date:             --

#FileName:        shell/menu.sh

#URL:             http://www.cnblogs.com/yinzhengjie

#Description:        The test script

#Copyright notice:     original works, no reprint! Otherwise, legal liability will be investigated.

#********************************************************************

function memcached_status(){

    M_PORT=$

    M_COMMAND=$

    echo -e "stats\nquit" | nc 127.0.0.1 "$M_PORT" | grep "STAT $M_COMMAND " | awk '{print $3}'

}

function main(){

    case $ in

        memcached_status)

            memcached_status $ $

            ;;

    esac

}

main $ $ $

[root@node201.yinzhengjie.org.cn ~]#

[root@node201.yinzhengjie.org.cn ~]# bash /etc/zabbix/zabbix_agentd.d/memcached_monitoring.sh memcached_status  curr_connections

[root@node201.yinzhengjie.org.cn ~]#

[root@node201.yinzhengjie.org.cn ~]# bash /etc/zabbix/zabbix_agentd.d/memcached_monitoring.sh memcached_status  reserved_fds

[root@node201.yinzhengjie.org.cn ~]#
3>.给自定义的脚本添加可执行权限
[root@node201.yinzhengjie.org.cn ~]# ll /etc/zabbix/zabbix_agentd.d/memcached_monitoring.sh

-rw-r--r--  root root  Feb  : /etc/zabbix/zabbix_agentd.d/memcached_monitoring.sh

[root@node201.yinzhengjie.org.cn ~]#

[root@node201.yinzhengjie.org.cn ~]# chmod +x /etc/zabbix/zabbix_agentd.d/memcached_monitoring.sh

[root@node201.yinzhengjie.org.cn ~]#

[root@node201.yinzhengjie.org.cn ~]# ll /etc/zabbix/zabbix_agentd.d/memcached_monitoring.sh

-rwxr-xr-x  root root  Feb  : /etc/zabbix/zabbix_agentd.d/memcached_monitoring.sh

[root@node201.yinzhengjie.org.cn ~]#

[root@node201.yinzhengjie.org.cn ~]#
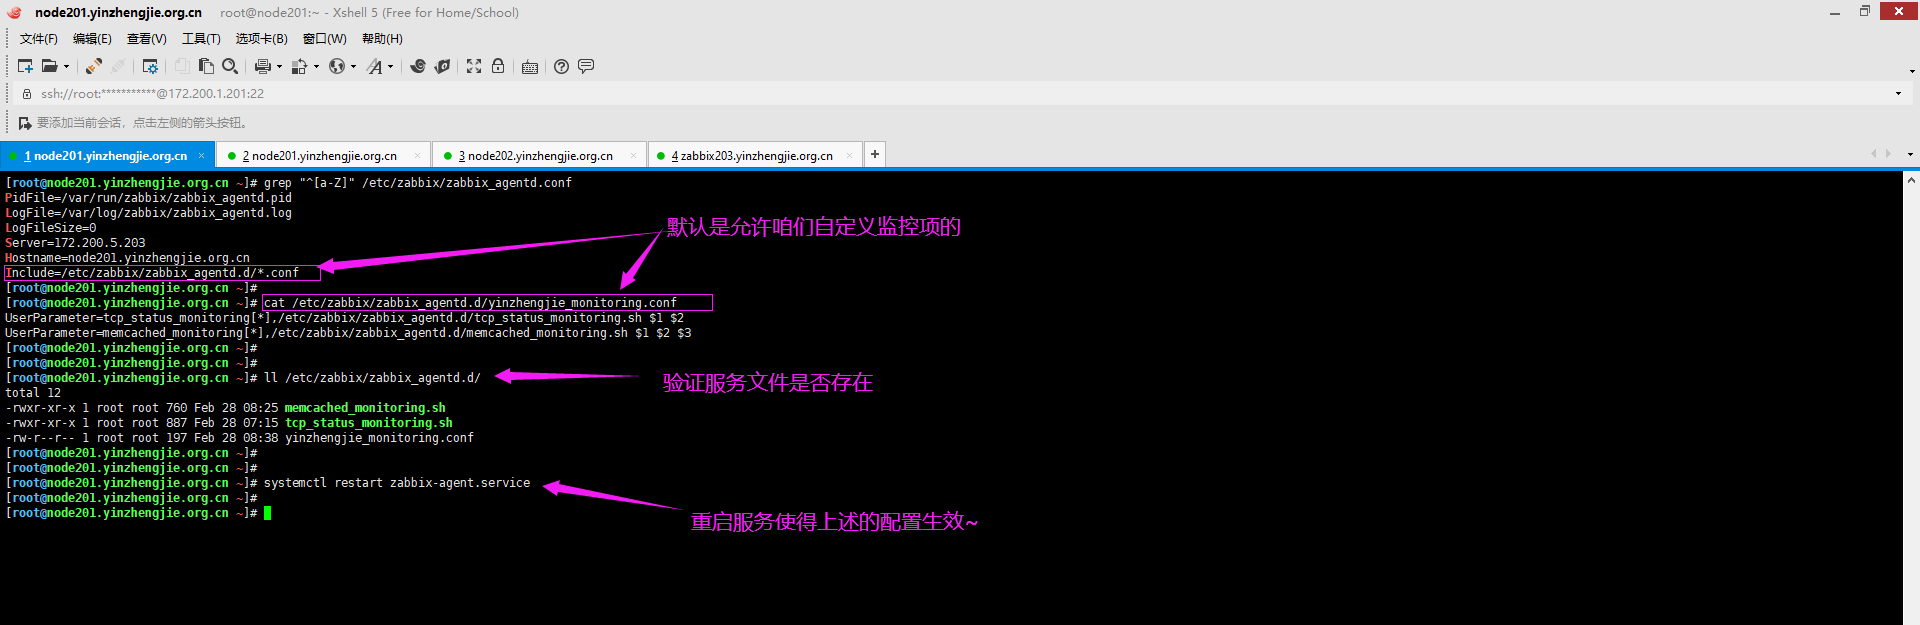
4>.修改zaibbix agent的配置文件
[root@node201.yinzhengjie.org.cn ~]# grep ^Include /etc/zabbix/zabbix_agentd.conf

Include=/etc/zabbix/zabbix_agentd.d/*.conf

[root@node201.yinzhengjie.org.cn ~]#

[root@node201.yinzhengjie.org.cn ~]# cat /etc/zabbix/zabbix_agentd.d/yinzhengjie_monitoring.conf

UserParameter=tcp_status_monitoring[*],/etc/zabbix/zabbix_agentd.d/tcp_status_monitoring.sh $1 $2

UserParameter=memcached_monitoring[*],/etc/zabbix/zabbix_agentd.d/memcached_monitoring.sh $1 $2 $3

[root@node201.yinzhengjie.org.cn ~]#
5>.重启zabbix agent服务使得配置生效
[root@node201.yinzhengjie.org.cn ~]# systemctl restart zabbix-agent.service
三.zabbix WebUI配置
1>.在zabbix server测试是否可以获取memcached的监控数据
[root@zabbix203.yinzhengjie.org.cn ~]# /yinzhengjie/softwares/zabbix/bin/zabbix_get -s node201.yinzhengjie.org.cn -p  -k "memcached_monitoring[memcached_status 11211 curr_connections]"

[root@zabbix203.yinzhengjie.org.cn ~]#

[root@zabbix203.yinzhengjie.org.cn ~]#

[root@zabbix203.yinzhengjie.org.cn ~]# /yinzhengjie/softwares/zabbix/bin/zabbix_get -s node201.yinzhengjie.org.cn -p  -k "memcached_monitoring[memcached_status 11211 reserved_fds]"

[root@zabbix203.yinzhengjie.org.cn ~]#
2>.自定义memcached的模板

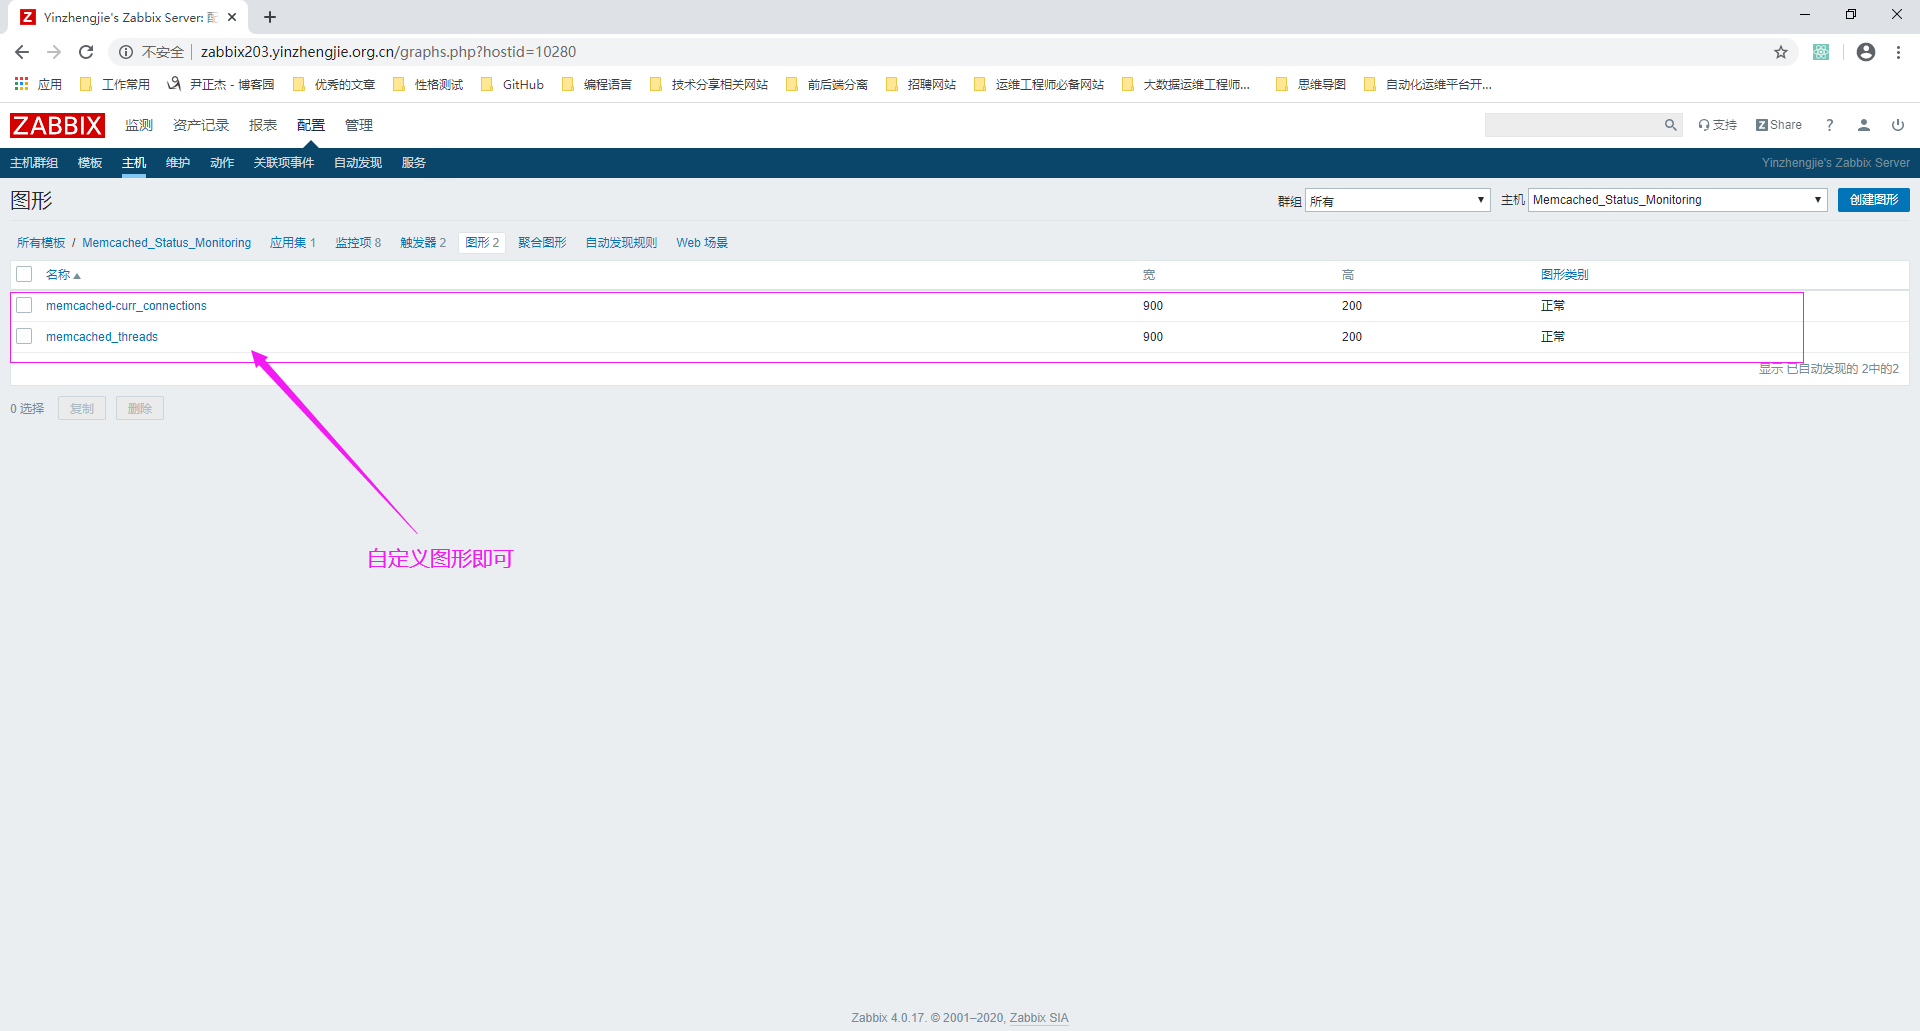
3>.自定义memecached模板监控项图形
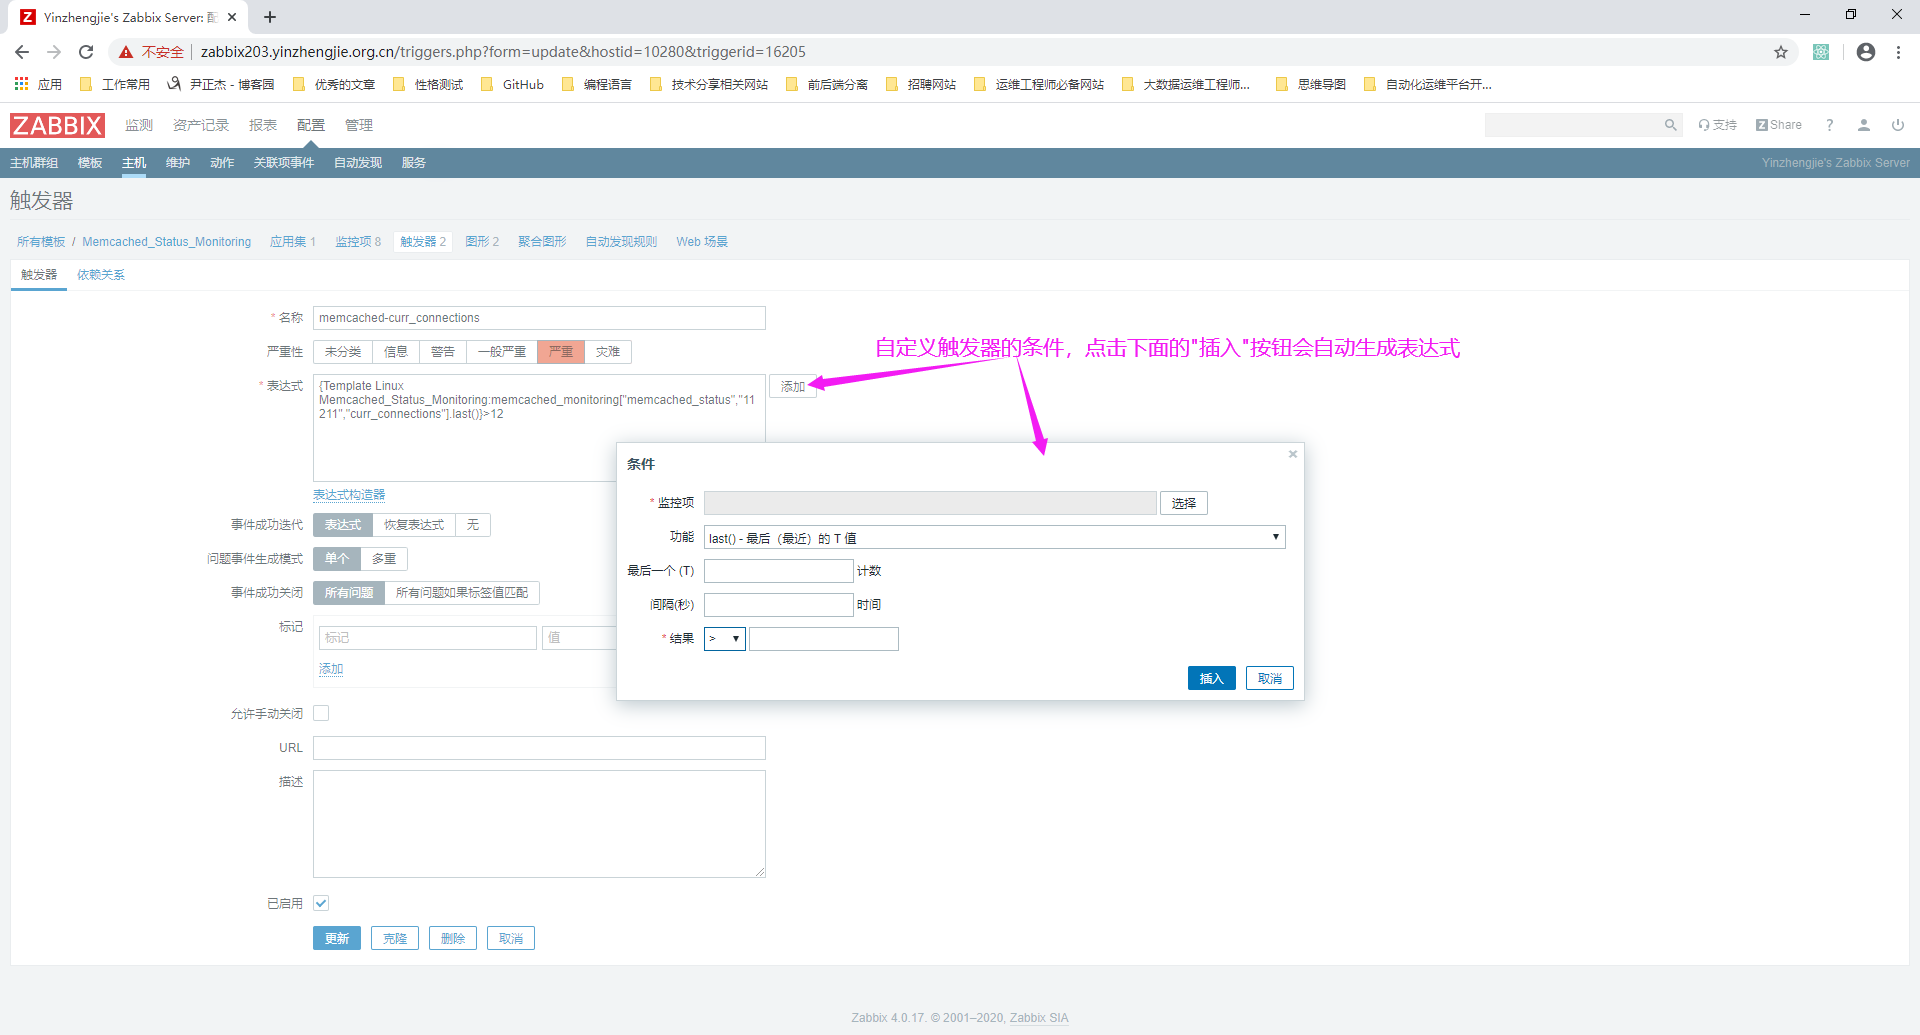
4>.自定义触发器
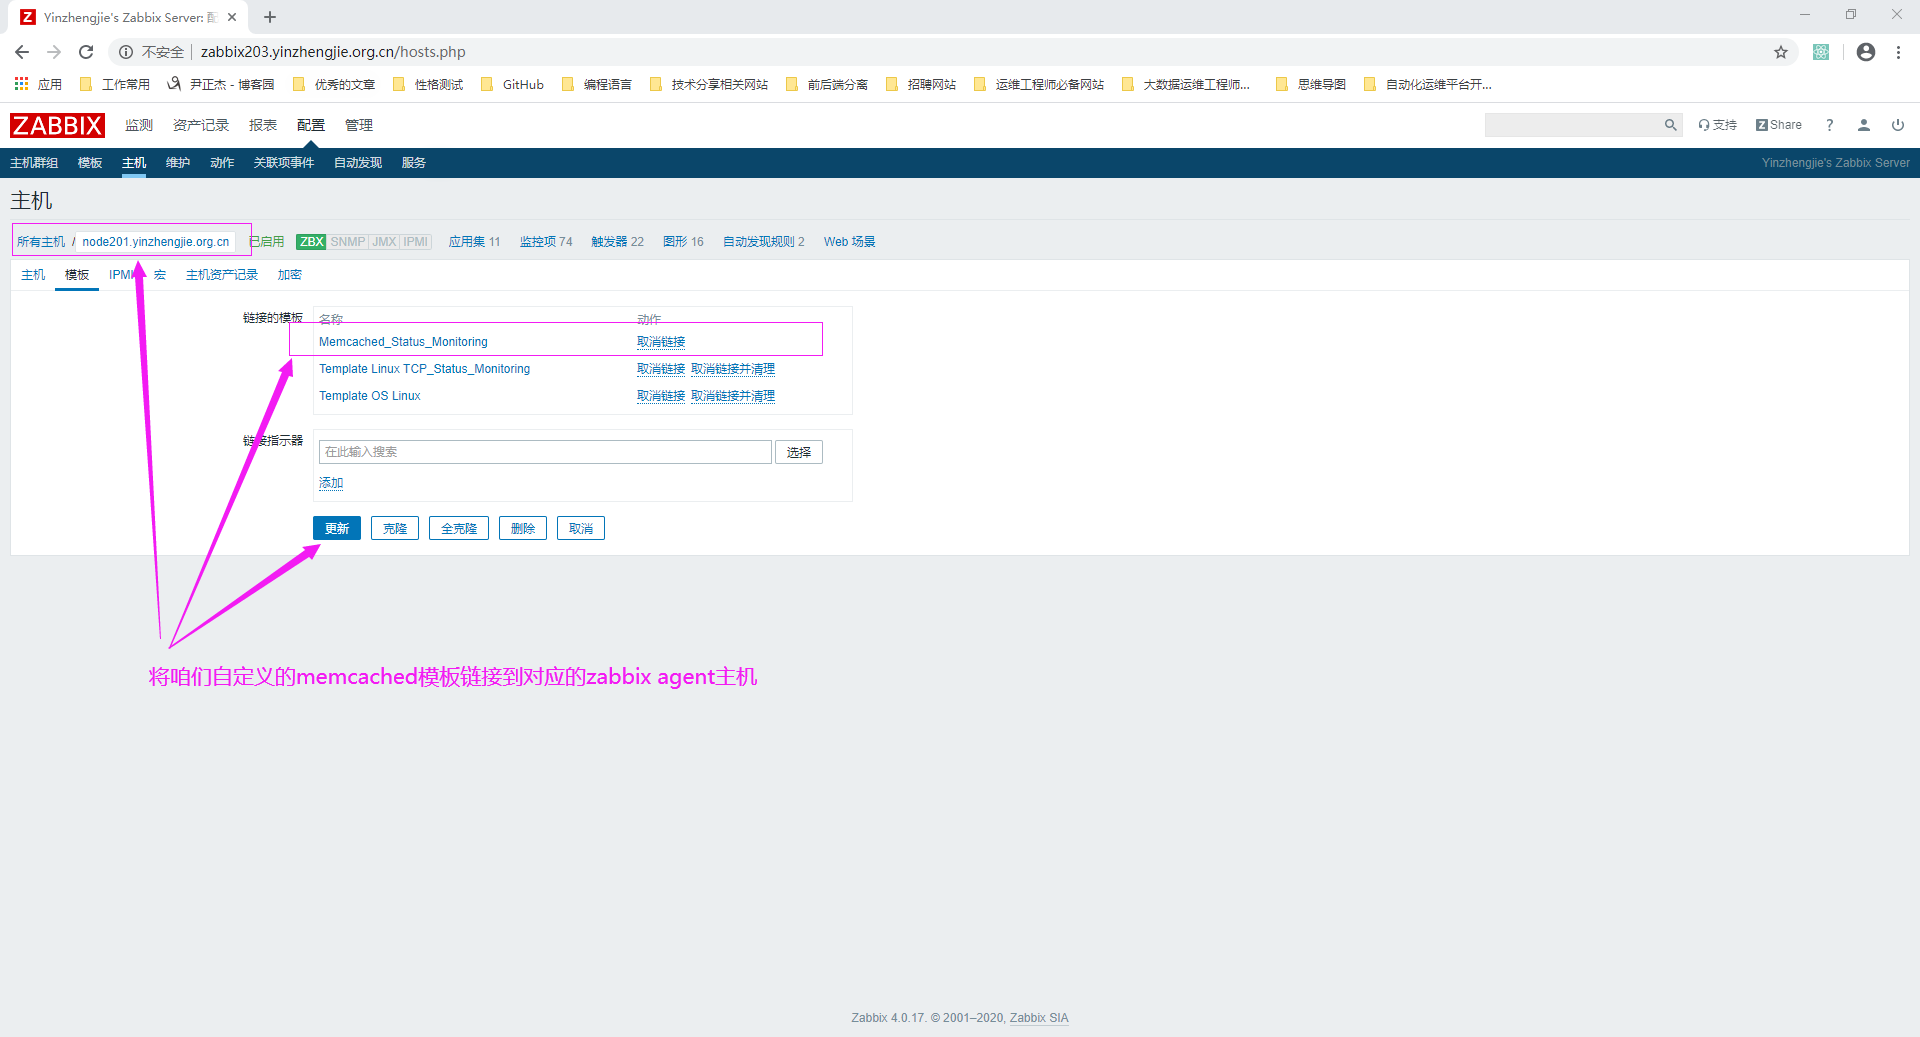
5>.将自定义的memcached模板和对应的zabbix agent主机进行关联
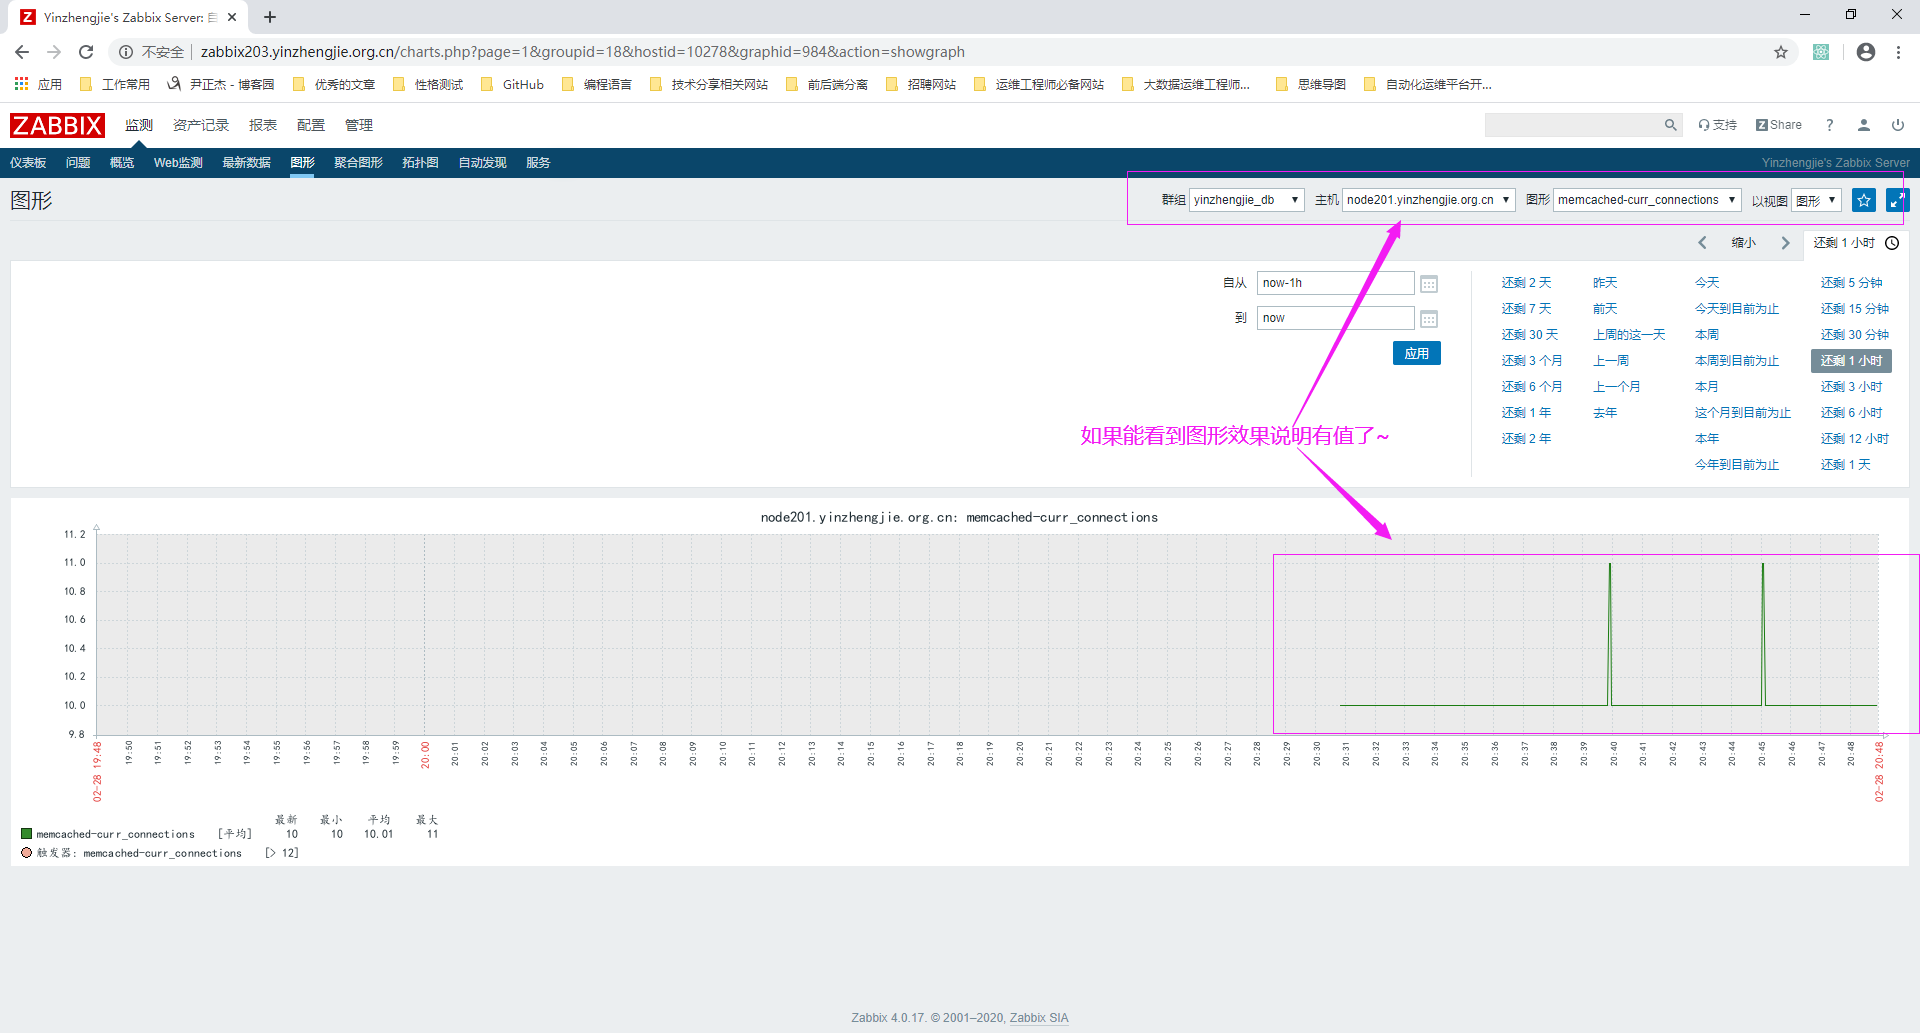
6>.查看图形
zabbix监控memcached服务的更多相关文章
- 监控memcached服务
#!/bin/bash #监控memcached服务 printf "del key\r\n" | nc 127.0.0.1 11211 &>/dev/null #使 ...
- Zabbix监控虚拟机服务-告警与自动恢复-模板化
上一篇文章测试了服务的告警与自动恢复:Zabbix监控虚拟机服务-告警与自动恢复 但是我是直接为某一个主机增加的监控项和触发器, 如果要让某一个自定义的监控项和触发器被很多机器共用,则需要创建模板 1 ...
- 使用Zabbix监控ZooKeeper服务的健康状态
一 应用场景描述 在目前公司的业务中,没有太多使用ZooKeeper作为协同服务的场景.但是我们将使用Codis作为Redis的集群部署方案,Codis依赖ZooKeeper来存储配置信息.所以做好Z ...
- 【zabbix告警监控】配置zabbix监控nginx服务
zabbix监控nginx,nginx需要添加--with-http_stub_status模块 使用zabbix监控nginx,首先nginx需要配置开启ngx_status.但是我这边nginx安 ...
- Zabbix 监控常见服务
监控Apache性能 1.客户端编译安装Apache服务,并在编译选项中开启监控页面功能. [root@localhost ~]# yum install -y gcc openssl openssl ...
- 使用Zabbix监控Nginx服务实战案例
使用Zabbix监控Nginx服务实战案例 作者:尹正杰 版权声明:原创作品,谢绝转载!否则将追究法律责任. 一.编译安装nginx步骤详解并开启状态页 博主推荐阅读: https://www.cn ...
- Zabbix监控虚拟机服务-告警与自动恢复
今天稍微空闲,使用下zabbix的5.0版本,目前生产环境是4.x版本 今天就只实现一个目的:监控任意一个服务(示例中监控的是docker.service),如果服务挂了,自动给恢复,先看一个动图 搭 ...
- 使用Zabbix监控rabbitmq服务
添加rabbitmq脚本 [root@controller rabbitmq]# cd /etc/zabbix/script/rabbitmq [root@controller rabbitmq]# ...
- 【zabbix监控】zabbix监控tomcat服务
服务器配置(zabbix_server) 1. 安装jdk 版本需要1.7以上,我这边安装的是1.8的,可以参考我jdk安装的文章 # 上传到zabbix_server服务端.安装(jdk-8u171 ...
随机推荐
- C++11常用特性介绍——array容器
std::array是具有固定大小的数组,支持快速随机访问,不能添加或删除元素,定义于头文件<array>中. 一.概要 array是C++11新引入的容器类型,与内置数组相比,array ...
- Vue日常报错
报错信息: Error: Cannot find module 'webpack/bin/config-yargs' at Function.Module._resolveFilename (inte ...
- SpringBoot Controller找不到视图路径
在启动类加注解@ComponentScan("com.controller")即可,括号里表示Controller所在包名. 参考:https://blog.csdn.net/ji ...
- 使用package.json安装模块
node.js模块的安装可以使用npm安装,如下: $ npm install <Module Name> 每个项目的根目录下面,一般都需要一个package.json文件,定义了这个项目 ...
- 电脑中安装了两个版本的jdk,后装的会把第一个覆盖掉
电脑中之前装过一个1.8的jdk,后来工作需要又装了个1.7的,但是1.7的没有在系统环境变量中进行配置,而是通过setclasspath文件设置的,但是后来我发现,虽然没有改变系统环境变量中的JAV ...
- express框架开发接口部署线上环境PM2
1.PM2介绍 PM2是一个线上环境下,用于启动nodejs进程守护的工具,用来保证服务的稳定及分摊服务器进程和压力. 2.下载安装 npm install pm2 -g => pm2 --v ...
- sqlserver 取数据常用
sqlDataReader: public SqlDataReader GetAuth_CourtListByAuth(int autIntNo) { // Create Instance of Co ...
- BigDecimal类用于计算(不会丢失精度)
- 单页面应用程序(SPA)的优缺点
我们通常所说的单页面应用程序通常通过前端框架(angular.react.vue)进行开发,单页面应用程序将所有的活动局限于一个Web页面中,仅在该Web页面初始化时加载相应的HTML.JavaScr ...
- I Hate it-HDU1754 点修改+区间最大值
题意: 很多学校流行一种比较的习惯.老师们很喜欢询问,从某某到某某当中,分数最高的是多少.这让很多学生很反感.不管你喜不喜欢, 现在需要你做的是,就是按照老师的要求,写一个程序,模拟老师的询问.当然, ...