Jenkins+Git+Fastlane+Fir CI集成
上一篇有讲关于fastlane自动化部署,本篇将会着重讲关于fastlane的实际应用。
目标:
- 利用自动化jenkins打包工具,自动拉取git仓库代码
- 不需要通过手动
检查修改xcode中项目配置修改(provisioning,codesigning) - 支持多渠道(chanel,appstore,enterprise,develop,adhoc)
- 支持一键上传appstore(首次需要输入账户,密码)
- 企业版本自动上传序号dsym文件到对应平台(fir的hdbug平台)
创建fastlane文件
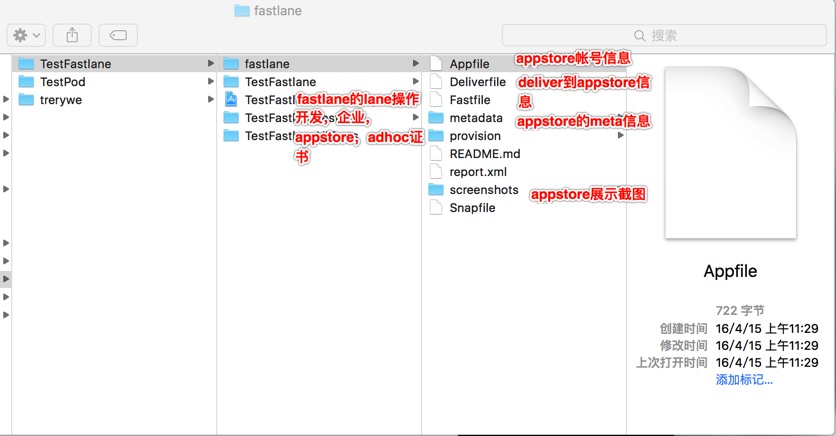
进入项目目录在终端输入fastlane init命令,会要求输入Apple ID信息按照提示输入即可,选择是否deliver等初始化工作按照上篇讲解即可。操作完成即可看到下图所示的基本内容,下面会对图中文件一一讲解:
fastlane源码解析
一. 统一管理fastlane操作脚本文件
1.外界控制版本号,并且控制渠道AdHoc AppStore Develop InHouse
1 |
versionNumber=$2 # 1.0.0 |
2.根据外界传递的数据控制,调用fastlane的lane操作
1 |
basicLanes="AdHoc Release Develop InHouse" |
二. Appfile文件修改
1.同一个app,appfile控制渠道(appstore非appstore的)。当然也可以通过控制多个app区分不同的lane即可
1 |
app_identifier "com.tww.test" # App Store的版本的app_idendifier |
三. Deliverfile文件修改
1.上传appstore的deliver文件
1 |
app_identifier "com.tww.test" # The bundle identifier of your app |
四. Fastfile文件修改
1.修改app identifier(就是bundle id,例如:com.husor.beibei)注意xcode7.0以上苹果改了CFBundleIdentifier or PRODUCT_BUNDLE_IDENTIFIER
1 |
update_app_identifier( |
2.修改team(teamid)
1 |
def prepare_update_project_team(team_id) update_project_team( |
3.修改info_plist(就是bundle id,例如:com.tww.test)
1 |
def prepare_update_info_plist(app_id) |
4.修改版本号和build号(修改为外部传入的版本,例如:1.0.0和100)
1 |
def prepare_version(options) |
5.修改签名的配置,配置对应的provision file,事先将个provisioning放入provision文件内容,关于怎么找到对应的provison可以通过xcode配置正确后,查看project文件(/Users/tianww/Library/MobileDevice/Provisioning Profiles/)找到后复制到这里。
1 |
def prepare_version(options) |
6.编译打包为ipa使用gym,当然首先要安装gym。
1 |
def generate_ipa(typePrefix,options,exportMethod,codeSignID) |
或者使用shenzhen ,但是发现使用shenzhen比gym的要大
1 |
def generate_ipa(typePrefix,options,exportMethod,codeSignID) |
7.构建不同的lane,处理不同的包。
1 |
# 企业版 证书打包 |
参考
fastlane actions所有的actions的详细讲解。当然我们也可以在terminate中输入以下命令:
1
2fastlane actions(会列出所有的action)
fastlane action deliver(单独详细的列出deliver的action对应的所有的内容)
- 使用fastlane实现iOS持续集成
- gym actions,关于gym中选择命令
Jenkins+Git+Fastlane+Fir CI集成的更多相关文章
- Jenkins +git +python 进行持续集成进行接口测试(接口测试jenkins持续集成篇)
使用jenkins+git+python脚本进行持续集成的接口测试,在jenkins平台,利用插件等,把管理代码的git仓库的代码更新下来进行持续接口测试,python进行开发测试脚本,git进行远程 ...
- 环境部署(七):linux下Jenkins+Git+JDK持续集成
前面几篇博客介绍了linux下安装Jenkins.Git.JDK以及Git基础教程和Git关联github等内容,这篇博客,介绍下如何在linux服务器中利用它们构建持续集成环境... 一.准备工作 ...
- Jenkins+GitHub+Xcode+fir搭了一个持续集成环境
enkins+GitHub+Xcode+fir搭了一个持续集成环境 字数826 阅读5699 评论44 喜欢49 原文链接 Coding Duck 今天用Jenkins+GitHub+Xcode+fi ...
- 「持续集成实践系列」Jenkins 2.x 搭建CI需要掌握的硬核要点
1. 前言 随着互联网软件行业快速发展,为了抢占市场先机,企业不得不持续提高软件的交付效率.特别是现在国内越来越多企业已经在逐步引入DevOps研发模式的变迁,在这些背景催促之下,对于企业研发团队所需 ...
- 「持续集成实践系列 」Jenkins 2.x 构建CI自动化流水线常见技巧
在上一篇文章中,我们介绍了Jenkins 2.x实现流水线的两种语法,以及在实际工作中该如何选择脚本式语法或声明式语法.原文可查阅:「持续集成实践系列」Jenkins 2.x 搭建CI需要掌握的硬核要 ...
- jenkins + Git 搭建持续集成环境
持续集成通过自动化构建.自动化测试以及自动化部署加上较高的集成频率保证了开发系统中的问题能迅速被发现和修复,降低了集成失败的风险,使得系统在开发中始终保持在一个稳定健康的集成状态.jenkins是目前 ...
- Jenkins+maven+git+sonar 系统持续集成&代码单測管理
Jenkins+maven+git+sonar 系统持续集成&代码单測管理 Jenkins的安装 Jenkins是基于Java开发的一种持续集成工具,用于监控持续反复的工作.功能包含: 1.持 ...
- Jenkins+Git 持续集成
持续集成是必要的! 希望达到的效果是:开发同事签入代码后,对应的站点可以自动实现更新.目前还只在在内部服务器上实现开发环境中的站点更新,不涉及到线上的发布. 目前使用Jenkins实现这样的持续集成. ...
- Linux下Jenkins+git+gradle持续集成环境搭建
Linux下Jenkins+git+gradle持续集成环境搭建 来源:IT165收集 发布日期:2014-08-22 21:45:50 我来说两句(0)收藏本文 一.项目介绍 和 linux ...
随机推荐
- Mac环境下pyCharm的安装,激活及使用
1.pyCharm的安装 安装地址: https://www.jetbrains.com/pycharm/download/#section=mac 2.激活 获取注册码地址: http://idea ...
- C++各种模板
高精度: 重载运算符版: #include<cstdio> #include<cstring> #include<algorithm> using namespac ...
- shell day01总结
,Iptables –Z 清空再计数 内存是如何工作的?是干什么的? 随机存取存储器又称作“随机存储器”,是与CPU直接交换的内部存储器,也叫主存.它可以随时读写,而且速度很快,通常作为操作系统或其他 ...
- Rails Create--params说明
参考:https://ruby-china.github.io/rails-guides/getting_started.html 表单提交后,其字段以参数形式传递给 Rails,然后就可以在控制器动 ...
- day37-进程-锁和信号量
#1.锁:房间的门上有一把锁,锁上有一把钥匙,一个人使用这把钥匙开锁之后,带上钥匙进入房间,把门给反锁了,他在房间干活, # 只要他不出来还锁,别人是无法进入房间的.同时只能有一个人在房间里干活.效率 ...
- 主效应|处理误差 |组间误差|处理效应|随机误差|组内误差|误差|效应分析|方差齐性检验|SSE|SSA|SST|MSE|MSA|F检验|关系系数|完全随机化设计|区组设计|析因分析
8 什么是只考虑主效应的方差分析? 就是不考虑交互效应的方差分析,即认为因素之间是不相互影响的,就是无重复的方差分析. 什么是处理误差 (treatment error).组间误差(between ...
- Python练习四-浅拷贝&深拷贝
一.数字.字符串不论是浅拷贝.深拷贝都是指向一个地址. a = 1 b = "abc" print (id(a)) print (id(b)) a1 = a b1 = b prin ...
- [flask]Restful接口测试简单的应用
#!/usr/bin/env python # -*- coding: utf-8 -*- # @Author : shenqiang from flask import Flask,make_res ...
- redis中间件
redis的集群:集群策略:主从复制(从库从主库同步获取数据,本身不提供服务)哨兵(监控主库和从库,当主库挂的时候自动把从库选一个切换为主库,主库存放的是全量数据)集群参考:https://blog. ...
- ROS中的日志(log)消息
学会使用日志(log)系统,做ROS大型项目的主治医生 通过显示进程的运行状态是好的习惯,但需要确定这样做不会影响到软件的运行效率和输出的清晰度.ROS 日志 (log) 系统的功能就是让进程生成一些 ...