echarts做飞线图
先上图,要不感觉没有说服力:
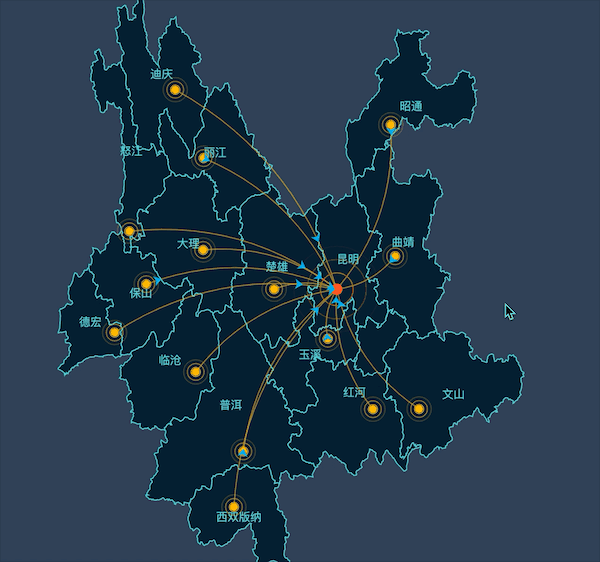
飞线图应该是大屏中很常见的一种了,通常你可以很轻易的用datav做一个飞线图,而且datav做的大屏逼格真的很高,本身也是开源免费的项目,开箱即用,上手简单……行了回归正题,我们使用echarts自己配置一个飞线图。当然echarts配置起来也不复杂,只要查看下面对应几个属性的配置就ok了
- geo
- serise 里的effectScatter
- serise 里的lines
三个配置,geo画地图,effectScatter在地图上画散点图,lines画线集,熟悉echarts配置项的看到这里基本就不用看了,自己看下配置文档马上就能撸一个出来,接下来我们按部就班把上面那个例子撸出来。
1、基础环境准备
<!DOCTYPE html>

<html>

<head>

    <meta charset="utf-8">

    <title>飞线图</title>

    <script src="https://cdn.bootcss.com/echarts/4.4.0-rc.1/echarts-en.js"></script>

    <style>

        html{

            height: 100%;

        }

        body{

            height: 100%;

            margin: 0;

            padding: 0;

            background-color:#2F4056;

        }

    </style>

</head>

<body>

<div id="chart-box" style="width:100%; height:100%;"></div>

    <script type="text/javascript">

        const chart = echarts.init(document.getElementById('chart-box'));

        const xhr = new XMLHttpRequest();

        xhr.open('get','https://geo.datav.aliyun.com/areas/bound/530000_full.json',true)

        xhr.send(null)

        xhr.onreadystatechange = () => {

            if ((xhr.status >= 200 && xhr.status < 300) || xhr.status == 304){

                const data = JSON.parse(xhr.responseText);

            } else {

                alert(xhr.status);

            }

        }

    </script>

</body>
这里为了简便处理,直接引用cdn上的echarts和datav官方的地图json文件,当然地图json文件也可以从http://geojson.io/#map=12/30.2275/120.1777获得;
好了,上面代码已经初始化了chart容器,然后请求获取了云南省地图json数据
2、画地图
          echarts.registerMap('yns', data);

            const option ={

                title: {

                    text: '云南省',

                },

                geo: {

                    map: 'yns',

                    zlevel: 10,

                    show:true,

                    layoutCenter: ['50%', '50%'],

                    roam: false,

                    layoutSize: "90%",

                    zoom: 1,

                    label: {

                        normal: {

                            show: true,

                            textStyle:{

                                fontSize:12,

                                color: '#43D0D6'

                            }

                        }

                    },

                    itemStyle: {

                        normal: {

                            color: '#062031',

                            borderWidth: 1.1,

                            borderColor: '#43D0D6'

                        }

                    },

                    emphasis: {

                            areaColor: '#FFB800',

                            label:{

                                show:false

                            }

                        }

                }

            }

            chart.setOption(option);
好了,这个geo配置已经能画出一个完整的云南地图了,这里因为要在地图上画线集和散点,所画地图要用geo而不是serise的map
3、配置散点和线集,具体的配置项的含义请参考echarts官网,下面附上完整代码,此代码直接复制粘在html,在有网络的环境下打开就能运行
<!DOCTYPE html>

<html>

<head>

    <meta charset="utf-8">

    <title>飞线图</title>

    <script src="https://cdn.bootcss.com/echarts/4.4.0-rc.1/echarts-en.js"></script>

    <style>

        html{

            height: 100%;

        }

        body{

            height: 100%;

            margin: 0;

            padding: 0;

            background-color:#2F4056;

        }

    </style>

</head>

<body>

<div id="chart-box" style="width:100%; height:100%;"></div>

    <script type="text/javascript">

        const chart = echarts.init(document.getElementById('chart-box'));

        const xhr = new XMLHttpRequest();

        xhr.open('get','https://geo.datav.aliyun.com/areas/bound/530000_full.json',true)

        xhr.send(null)

        xhr.onreadystatechange = () => {

            if ((xhr.status >= 200 && xhr.status < 300) || xhr.status == 304){

                const data = JSON.parse(xhr.responseText);

                  console.log(Object.prototype.toString(data))

                const coord = data.features.map(val => {

                return {

                    name:val.properties.name,

                    value:val.properties.center

                }

            })

            const lines_coord = [];

            coord.forEach((v,index)=> {

                index > 0 && lines_coord.push({

                    coords:[v.value,coord[0].value]

                })

            })

            //地市取简称

            data.features.forEach(v => {

                v.properties.name = v.properties.name.indexOf('版纳')>-1 ?v.properties.name.substr(0,4) : v.properties.name.substr(0,2);

            })

            echarts.registerMap('yns', data);

            const option ={

                title: {

                    text: '云南省',

                },

                geo: {

                    map: 'yns',

                    zlevel: 10,

                    show:true,

                    layoutCenter: ['50%', '50%'],

                    roam: false,

                    layoutSize: "90%",

                    zoom: 1,

                    label: {

                        normal: {

                            show: true,

                            textStyle:{

                                fontSize:12,

                                color: '#43D0D6'

                            }

                        }

                    },

                    itemStyle: {

                        normal: {

                            color: '#062031',

                            borderWidth: 1.1,

                            borderColor: '#43D0D6'

                        }

                    },

                    emphasis: {

                            areaColor: '#FFB800',

                            label:{

                                show:false

                            }

                        }

                },

                series: [

                    {

                        type:'effectScatter',

                        coordinateSystem: 'geo',

                        zlevel: 15,

                        symbolSize:8,

                        rippleEffect: {

                            period: 4, brushType: 'stroke', scale: 4

                        },

                        itemStyle:{

                            color:'#FFB800',

                            opacity:1

                        },

                        data:coord.slice(1)

                    },

                    {

                        type:'effectScatter',

                        coordinateSystem: 'geo',

                        zlevel: 15,

                        symbolSize:12,

                        rippleEffect: {

                            period: 6, brushType: 'stroke', scale: 8

                        },

                        itemStyle:{

                            color:'#FF5722',

                            opacity:1

                        },

                        data:coord.slice(0,1)

                    },

                    {

                        type:'lines',

                        coordinateSystem:'geo',

                        zlevel: 15,

                        effect: {

                            show: true, period: 5, trailLength: 0, symbol: 'arrow',  color:'#01AAED',symbolSize: 8,

                        },

                        lineStyle: {

                            normal: {width: 1.2, opacity: 0.6, curveness: 0.2, color: '#FFB800'}

                        },

                        data:lines_coord

                    }

                ]

            }

            chart.setOption(option);

            chart.on('click', function (params) {

                console.log(params);

            });

            } else {

                alert(xhr.status);

            }

        }

    </script>

</body>
echarts做飞线图的更多相关文章
- 使用ECharts画K线图
需引入echarts.js插件,开发环境建议选择源代码版本,该版本包含了常见的警告和错误提示.下载地址 http://echarts.baidu.com/download.html 下面是代码,注释很 ...
- echarts画k线图
var charset = echarts.init(document.getElementById("k_line")) $.get(k_line.url_A).done(fun ...
- 【React】react项目引入echarts插件 K线图
参考npm文档:https://www.npmjs.com/package/echarts-for-react 由于npm上已经有针对react项目出的echarts插件,所以在这里直接安装 第一步: ...
- echarts绘制k线图为什么写candlestick类型就报错
错误提示:echarts-en.common.js:11713 Uncaught Error: Component series.candlestick not exists. Load it fir ...
- 一起来玩echarts系列(一)------箱线图的分析与绘制
一.箱线图 Box-plot 箱线图一般被用作显示数据分散情况.具体是计算一组数据的中位数.25%分位数.75%分位数.上边界.下边界,来将数据从大到小排列,直观展示数据整体的分布情况. 大部分正常数 ...
- echarts - 特殊需求实现代码汇总之【线图】篇
时间过得好快,刚刚还是7月底,一转眼自己调整(浪费)了大半个月的时间.. 接下来要先总结一下自己之前的知识点,然后清掉自己的待办任务,重新轻装上阵! 继7月24的echarts-柱图配置汇总后,ech ...
- Echarts数据可视化series-line线图,开发全解+完美注释
全栈工程师开发手册 (作者:栾鹏) Echarts数据可视化开发代码注释全解 Echarts数据可视化开发参数配置全解 6大公共组件详解(点击进入): title详解. tooltip详解.toolb ...
- 基于Echarts的股票K线图展示
发布时间:2018-10-31 技术:javascript+html5+canvas 概述 基于echarts的股票K线图展示,只需引用单个插件,通过简单配置,导入数据,即可实现炫酷复杂的K线 ...
- 百度 echarts K线图使用
看个效果图先 首先在需要插入图例的HTML中嵌入 <div id="main" style="height:400px"></div> ...
随机推荐
- thinkphp的where 之 or的使用
需要生成 SELECT * FROM `goods` WHERE ( `goodstype_id` = 2 or `goodstype_id` = 3 ) $where['goodstype_id'] ...
- web前端-基础篇
该篇仅是本人学习前端时,做的备忘笔记: 一.背景图片设置: 设置背景图时的css代码:background-image:url(图片的url路径); ps:设置好这个背景后请一定要设置该背景图片的大小 ...
- APP项目下载及运行
1.首先下载Git 2.再下载安装node.js 3.dos窗口下载node.js依赖jar包 执行命令:npm install 4.从Git上down项目 5.运行项目 在项目根目录下 右键 打开 ...
- Ubuntu中获取和使用uiautomatorviewer
图省事的办法是直接在网上找个android platform tools的某个版本下载下来 比如这个网站里面的:Android SDK工具——Platform-tools 个人比较倾向于先下载andr ...
- Dubbo监控中心搭建-dubbo-monitor-simple的使用
场景 Dubbo环境搭建-管理控制台dubbo-admin实现服务监控: https://blog.csdn.net/BADAO_LIUMANG_QIZHI/article/details/10362 ...
- opencv:图形绘制与填充
#include <opencv2/opencv.hpp> #include <iostream> using namespace cv; using namespace st ...
- 不需要图片,css+svg绘制动态loading加载图标
1.html 部分: <div id="refershDiv" class="refershDiv"> <svg xmlns="ht ...
- H2知识小结
1.官网: http://www.h2database.com/html/main.html file:///E:/Develop/H2/docs/html/tutorial.html#web_app ...
- Educational Codeforces Round 75 (Rated for Div. 2)D(二分)
#define HAVE_STRUCT_TIMESPEC#include<bits/stdc++.h>using namespace std;pair<int,int>a[20 ...
- Windows 搭建WAMP+Mantis
下载WAMP http://www.wampserver.com/ 安装直接下一步就行 安装完启动后,显示下面的logo 在浏览器输入 127.0.0.1/phpmyadmin 设置数据库(默认 ...