【集群实战】sersync
1. sersync介绍
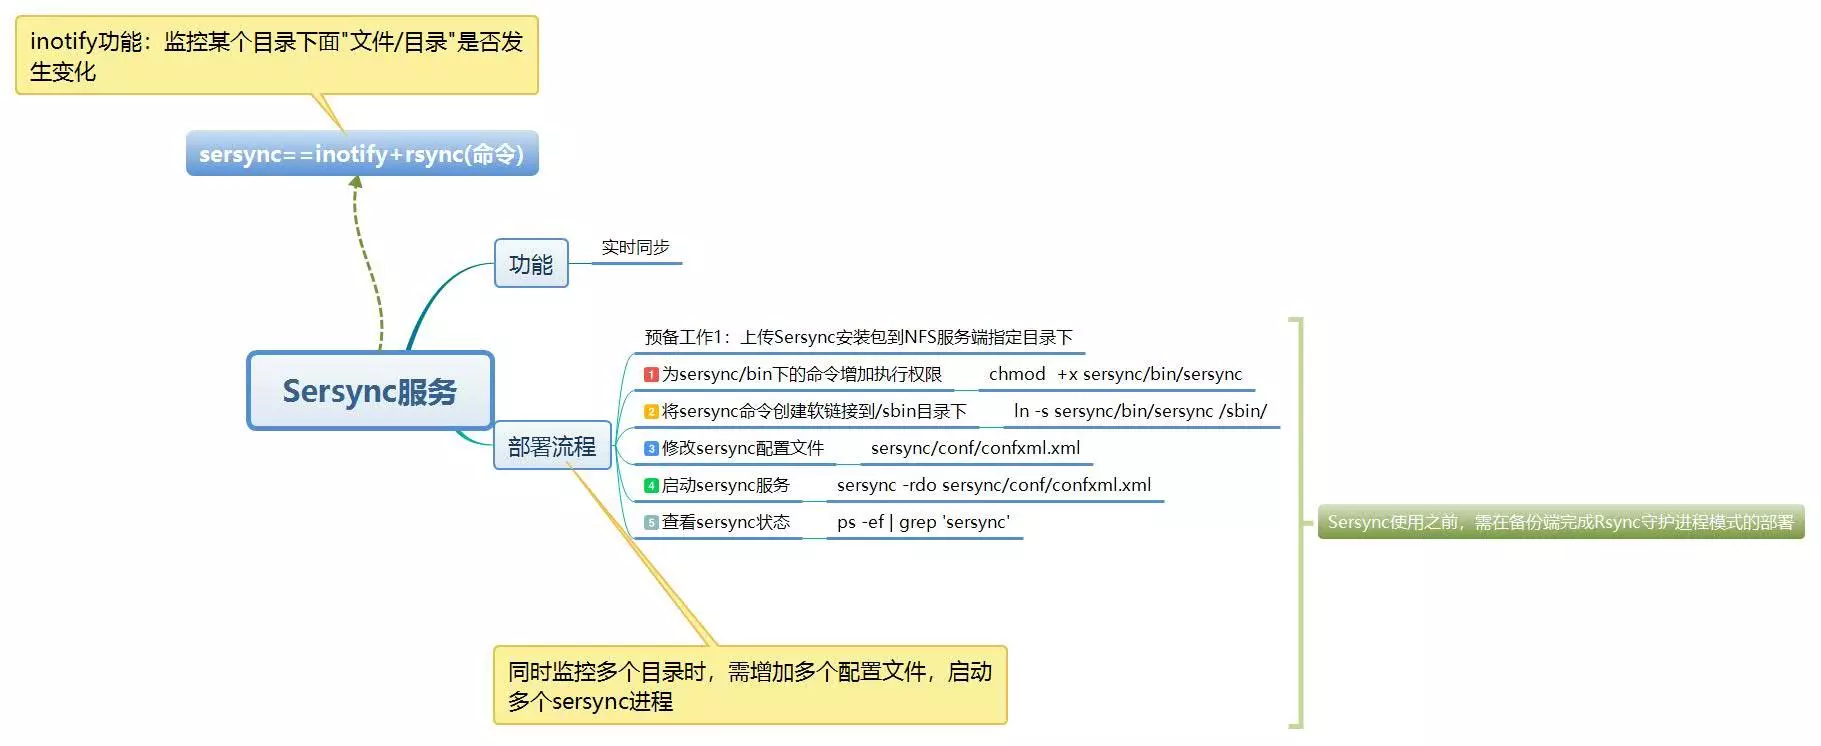
- sersync功能:
- 实时同步;
- sersync组成:
- sersync==inotify+rsync
- inotify: 监控某个目录下面"文件/目录"是否发生变化;
- sersync工作原理:
- 由inotify服务监控目录,当目录/文件发生变化时触发rsync服务进行推送,完成数据同步;
2. 部署流程
参照https://www.cnblogs.com/zoe233/p/12035383.html的部署过程。
注意:部署过程中将inotify监听服务和rsync同步数据的过程的脚本/server/scripts/inotifywait_nfs_to_backup.sh
通过/etc/init.d/syncd脚本加入了chkconfig开机自启动服务,可以通过/etc/init.dsyncd [start|stop]启动或关闭服务。
为了避免冲突,将相关所有服务关闭:
chkconfig syncd off

/etc/init.d/syncd stop
2.1 安装sersync
上传sersync安装包到NFS服务端指定目录下。
一般使用rz命令上传,由于secureCRT的transfer命令在mac上出现问题,使用scp命令传输文件。
scp `pwd`/sersync_installdir_64bit.zip root@192.168.0.31:/application
在nfs-31主机上进行操作:
# 创建目录

[root@nfs-31 /]# mkdir /application -p

# 等待rz或scp上传的sersync安装压缩包

[root@nfs-31 application]# ls

sersync_installdir_64bit.zip

# uzip解压zip文件

[root@nfs-31 application]# unzip ./sersync_installdir_64bit.zip

Archive:  ./sersync_installdir_64bit.zip

   creating: sersync_installdir_64bit/

   creating: sersync_installdir_64bit/sersync/

   creating: sersync_installdir_64bit/sersync/bin/

  inflating: sersync_installdir_64bit/sersync/bin/sersync

   creating: sersync_installdir_64bit/sersync/conf/

  inflating: sersync_installdir_64bit/sersync/conf/confxml.xml

   creating: sersync_installdir_64bit/sersync/logs/

# 将sersync目录移动到/application下

[root@nfs-31 application]# ls

sersync_installdir_64bit  sersync_installdir_64bit.zip

[root@nfs-31 application]# cd sersync_installdir_64bit

[root@nfs-31 sersync_installdir_64bit]# ls

sersync

[root@nfs-31 sersync_installdir_64bit]# mv ./sersync/ /application/

[root@nfs-31 sersync_installdir_64bit]# ls

[root@nfs-31 sersync_installdir_64bit]# cd ..

[root@nfs-31 application]# ls

sersync  sersync_installdir_64bit  sersync_installdir_64bit.zip
2.2 为/application/sersync/bin下的命令增加执行权限
[root@nfs-31 bin]# ll /application/sersync/bin

total 1768

-rw-r--r-- 1 root root 1810128 Oct 26  2011 sersync

[root@nfs-31 bin]# chmod +x /application/sersync/bin/sersync
2.3 将sersync命令创建软链接到/sbin目录下
[root@nfs-31 sersync]# ln -s /application/sersync/bin/sersync /sbin/

[root@nfs-31 sbin]# ll /sbin/sersync

lrwxrwxrwx 1 root root 32 Dec 13 19:04 /sbin/sersync -> /application/sersync/bin/sersync
2.4 修改sersync配置文件(/application/sersync/conf/confxml.xml)
配置sersync之前,先单独使用rsync服务推送一次,确定rsync服务正常以及各项参数的准确。
[root@nfs-31 conf]# cat confxml.xml -n

     1  <?xml version="1.0" encoding="ISO-8859-1"?>

     2  <head version="2.5">

     3      <host hostip="localhost" port=""></host>

     4      <debug start="false"/>

     5      <fileSystem xfs="false"/>

     6      <filter start="false">  # 过滤功能。默认是false,改成true即可启动

     7          <exclude expression="(.*)\.svn"></exclude>

     8          <exclude expression="(.*)\.gz"></exclude>

     9          <exclude expression="^info/*"></exclude>

    10          <exclude expression="^static/*"></exclude>

    11      </filter>

    12      <inotify>  # 监控的事件的属性,和inotify -e 参数类似;通过修改true or false,指定事件类型

    13          <delete start="true"/>

    14          <createFolder start="true"/>

    15          <createFile start="false"/>

    16          <closeWrite start="true"/>

    17          <moveFrom start="true"/>

    18          <moveTo start="true"/>

    19          <attrib start="false"/>

    20          <modify start="false"/>

    21      </inotify>

    22

    23      <sersync>  # 同步的部分

    24          <localpath watch="/opt/tongbu">   # 同步的源,目录

    25              <remote ip="127.0.0.1" name="tongbu1"/>   # ip是推送的机器的ip,name是rsync推送指定的模块

    26              <!--<remote ip="192.168.8.39" name="tongbu"/>-->

    27              <!--<remote ip="192.168.8.40" name="tongbu"/>-->

    28          </localpath>

    29          <rsync>  # rsync命令的各个参数

    30              <commonParams params="-artuz"/>  # 参数选项

    31              <auth start="false" users="root" passwordfile="/etc/rsync.pas"/>   # 连接用户和用户的指定密码文件

    32              <userDefinedPort start="false" port=""/><!-- port=874 -->  # 是否指定端口,false使用默认端口873

    33              <timeout start="false" time=""/><!-- timeout=100 -->  # 超时设置

    34              <ssh start="false"/>

    35          </rsync>

    36          <failLog path="/tmp/rsync_fail_log.sh" timeToExecute=""/> # 失败日志
<!--default every 60mins execute once-->

    37          <crontab start="false" schedule=""><!--600mins-->  # 每600分钟重传

    38              <crontabfilter start="false">  # 定时任务排除

    39                  <exclude expression="*.php"></exclude>

    40                  <exclude expression="info/*"></exclude>

    41              </crontabfilter>

    42          </crontab>

    43          <plugin start="false" name="command"/>

    44      </sersync>

    45

    46      <plugin name="command">

    47          <param prefix="/bin/sh" suffix="" ignoreError="true"/>  <!--prefix /opt/tongbu/mmm.sh suffix-->

    48          <filter start="false">

    49              <include expression="(.*)\.php"/>

    50              <include expression="(.*)\.sh"/>

    51          </filter>

    52      </plugin>

    53

    54      <plugin name="socket">

    55          <localpath watch="/opt/tongbu">

    56              <deshost ip="192.168.138.20" port=""/>

    57          </localpath>

    58      </plugin>

    59      <plugin name="refreshCDN">

    60          <localpath watch="/data0/htdocs/cms.xoyo.com/site/">

    61              <cdninfo domainname="ccms.chinacache.com" port="" username="xxxx" passwd="xxxx"/>

    62              <sendurl base="http://pic.xoyo.com/cms"/>

    63              <regexurl regex="false" match="cms.xoyo.com/site([/a-zA-Z0-9]*).xoyo.com/images"/>

    64          </localpath>

    65      </plugin>

    66  </head>
修改相应配置:
    22

    23      <sersync>  # 同步的部分

    24          <localpath watch="/data">   # 同步的源,目录

    25              <remote ip="192.168.0.41" name="nfsbackup"/>   # ip是推送的机器的ip,name是rsync推送指定的模块

    28          </localpath>

    29          <rsync>  # rsync命令的各个参数

    30              <commonParams params="-az"/>  # 参数选项

    31              <auth start="true" users="rsync_backup" passwordfile="/etc/rsync.password"/>   # 连接用户和用户的指定密码文件

    32              <userDefinedPort start="false" port=""/><!-- port=874 -->  # 是否指定端口,false使用默认端口873

    33              <timeout start="true" time=""/><!-- timeout=100 -->  # 超时设置

    34              <ssh start="false"/>

    35          </rsync>

    36          <failLog path="/tmp/rsync_fail_log.sh" timeToExecute=""/> # 失败日志
2.5 启动sersync服务
sersync命令参数说明:
[root@nfs-31 ~]# sersync -h

set the system param

execute:echo 50000000 > /proc/sys/fs/inotify/max_user_watches  # 调整了监控文件的数量和事件的数量

execute:echo 327679 > /proc/sys/fs/inotify/max_queued_events

parse the command param

_______________________________________________________

参数-d:启用守护进程模式

参数-r:在监控前,将监控目录与远程主机用rsync命令推送一遍

c参数-n: 指定开启守护线程的数量,默认为10个

参数-o:指定配置文件,默认使用confxml.xml文件

参数-m:单独启用其他模块,使用 -m refreshCDN 开启刷新CDN模块

参数-m:单独启用其他模块,使用 -m socket 开启socket模块

参数-m:单独启用其他模块,使用 -m http 开启http模块

不加-m参数,则默认执行同步程序

______________________________________________________________
服务启动后,将过程文件中rsync服务命令粘贴出来单独执行一遍,检验配置文件信息是否填写正确。
[root@nfs-31 ~]# sersync -rdo /application/sersync/conf/confxml.xml

set the system param

execute:echo 50000000 > /proc/sys/fs/inotify/max_user_watches

execute:echo 327679 > /proc/sys/fs/inotify/max_queued_events

parse the command param

option: -r      rsync all the local files to the remote servers before the sersync work

option: -d      run as a daemon

option: -o      config xml name:  /application/sersync/conf/confxml.xml

daemon thread num: 10

parse xml config file

host ip : localhost     host port: 8008

daemon start,sersync run behind the console

use rsync password-file :

user is rsync_backup

passwordfile is         /etc/rsync.password

config xml parse success

please set /etc/rsyncd.conf max connections=0 Manually

sersync working thread 12  = 1(primary thread) + 1(fail retry thread) + 10(daemon sub threads)

Max threads numbers is: 22 = 12(Thread pool nums) + 10(Sub threads)

please according your cpu ,use -n param to adjust the cpu rate

------------------------------------------

rsync the directory recursivly to the remote servers once

working please wait...

execute command: cd /data && rsync -az -R --delete ./  --timeout=100 rsync_backup@192.168.0.41::nfsbackup --password-file=/etc/rsync.password >/dev/null 2>&1

run the sersync:

watch path is: /data
2.6 查看sersync状态
[root@nfs-31 ~]# ps -ef|grep sersync|grep -v grep

root     20924     1  0 21:33 ?        00:00:00 sersync -rdo /application/sersync/conf/confxml.xml
2.7 开机自启动sersync服务
[root@nfs-31 ~]# tail -2 /etc/rc.local

# sersync start onboot sersync -rdo /application/sersync/conf/confxml.xml
注意:sersync服务的开机自启动和inotify的开机自启动最好不要冲突,只选其一。
【集群实战】sersync的更多相关文章
- redis3.0 集群实战1 -- 安装和配置
本文主要是在centos7上安装和配置redis集群实战 参考: http://hot66hot.iteye.com/blog/2050676 集群教程: http://redisdoc.com/to ...
- 《跟老男孩学Linux运维:Web集群实战》读书笔记
Linux 介绍 Linux 安装 Linux 调优 Web 基础 Nginx 应用 LNMP 应用 PHP 缓存加速 Nginx 调优 MySQL 应用 NFS 网络文件共享 Nginx 反向代理与 ...
- MySQL/MariaDB数据库的Galera高可用性集群实战
MySQL/MariaDB数据库的Galera高可用性集群实战 作者:尹正杰 版权声明:原创作品,谢绝转载!否则将追究法律责任. 一.Galera Cluster概述 1>.什么是Gale ...
- Haproxy+keepalived高可用集群实战
1.1 Haproxy+keepalived高可用集群实战 随着互联网火热的发展,开源负载均衡器的大量的应用,企业主流软件负载均衡如LVS.Haproxy.Nginx等,各方面性能不亚于硬件负载均衡 ...
- 基于Ambari Server部署HDP集群实战案例
基于Ambari Server部署HDP集群实战案例 作者:尹正杰 版权声明:原创作品,谢绝转载!否则将追究法律责任. 一.部署Ambari Server端 博主推荐阅读: https://www.c ...
- 【集群实战】Rsync数据同步工具
1. Rsync介绍 1.1 什么是Rsync? Rsync是一款开源的,快速的,多功能的,可实现全量及增量的本地或远程数据同步备份的优秀工具.Rsync软件适用于unix/linux/windows ...
- 高负载集群实战之lvs负载均衡-技术流ken
lvs简介 LVS的英文全称是Linux Virtual Server,即Linux虚拟服务器. 特点 跨平台:window,linux 作用 实现负载均衡 核心组件 ip_vs:linux的内核功能 ...
- Mongodb 集群实战
该实战过程完全跟着官网一步一步实现 ,官网教程:https://docs.mongodb.com/manual/tutorial/atlas-free-tier-setup/ 使用Mongo Shel ...
- activemq的高级特性:集群实战
高级特性实战需求 当消费端是多个集群,集群A又包含多个服务. 当每个集群都要接受相同的一批消息,而集群内的每个服务都去分摊消息. 解决办法一:级联 增加一个中转者.但是不是特别的优化,而且性能也不是特 ...
- 进阶的Redis之哈希分片原理与集群实战
前面介绍了<进阶的Redis之数据持久化RDB与AOF>和<进阶的Redis之Sentinel原理及实战>,这次来了解下Redis的集群功能,以及其中哈希分片原理. 集群分片模 ...
随机推荐
- jmeter配置CSV Data Set Config
Filename:需要引用文件的路径 File encoding:文件的编码格式,文件有中文时,一般是utf-8和gb2312,填其他编码可能乱码 Variable Names:要引用到请求中的变量名 ...
- 为什么要用内插字符串代替string.format
知道为什么要用内插字符串,只有踩过坑的人才能明白,如果你曾今使用string.format超5个以上占位符,那其中的痛苦我想你肯定是能够共鸣的. 一:痛苦经历 先上一段曾今写过的一段代码,大家来体会一 ...
- vs整合MySQL和QT
23:37:23 2019-08-12 尝试用vs写一个程序整合MySQL和QT 参考资料:https://blog.csdn.net/qq_35987486/article/details/8406 ...
- GoLang——Hello World,打开新世界的大门
本文始发于个人公众号:TechFlow,原创不易,求个关注 今天是Go语言系列的第一篇文章,我们来聊聊这门新的语言和它的基础语法. 浅谈Golang 作为程序员而言,往往对于学习新的语言都是有抗拒的. ...
- 【摸鱼向】UE4的AI模块探索手记(1)
前言 之前实现了自主创作的角色导入进UE4并成功控制其进行一系列动作,但目前的样子距离基本的游戏架构还差了一个很大的模块:NPC,而这部分是由电脑来进行自动控制,所以,我有一句话不知当讲不当讲(对,我 ...
- go 锁和sync包
一.什么是锁? sync.Mutex 是一个互斥锁,它的作用是守护在临界区入口来确保同一时间只能有一个线程进入临界区 在 sync 包中还有一个 RWMutex 锁:他能通过 RLock() 来允许同 ...
- Flask入门 之 没有装饰器的路由
有些时候,需要一个类似路由的功能,但又不能或者不想写装饰器,这该怎么办? so easy! eg: @app.route('login') def login(): return 'hello wor ...
- Linux kernel min/max宏
#define min(x,y) ({ \ typeof(x) _x = (x); \ typeof(y) _y = (y); \ (void) (&_x == &_y); \ _x ...
- AJ学IOS(50)多线程网络之GCD简单介绍(任务,队列)
AJ分享,必须精品 GCD简单介绍 1.什么是GCD? 全称是Grand Central Dispatch,可译为“牛逼的中枢调度器” 纯C语言,提供了非常多强大的函数 2.GCD的优势 GCD是苹果 ...
- 疲劳驾驶打瞌睡?python保障您的驾驶安全
道路千万条,安全第一条!疲劳驾驶可谓交通事故几大罪魁祸首之一,根据美国一项研究显示,司机睡眠不足4小时,交通事故肇事几率等同于醉驾. 为了减少疲劳驾驶现象,驾驶员疲劳检测应运而生.这是一项安全技术,可 ...