【集群实战】sersync
1. sersync介绍
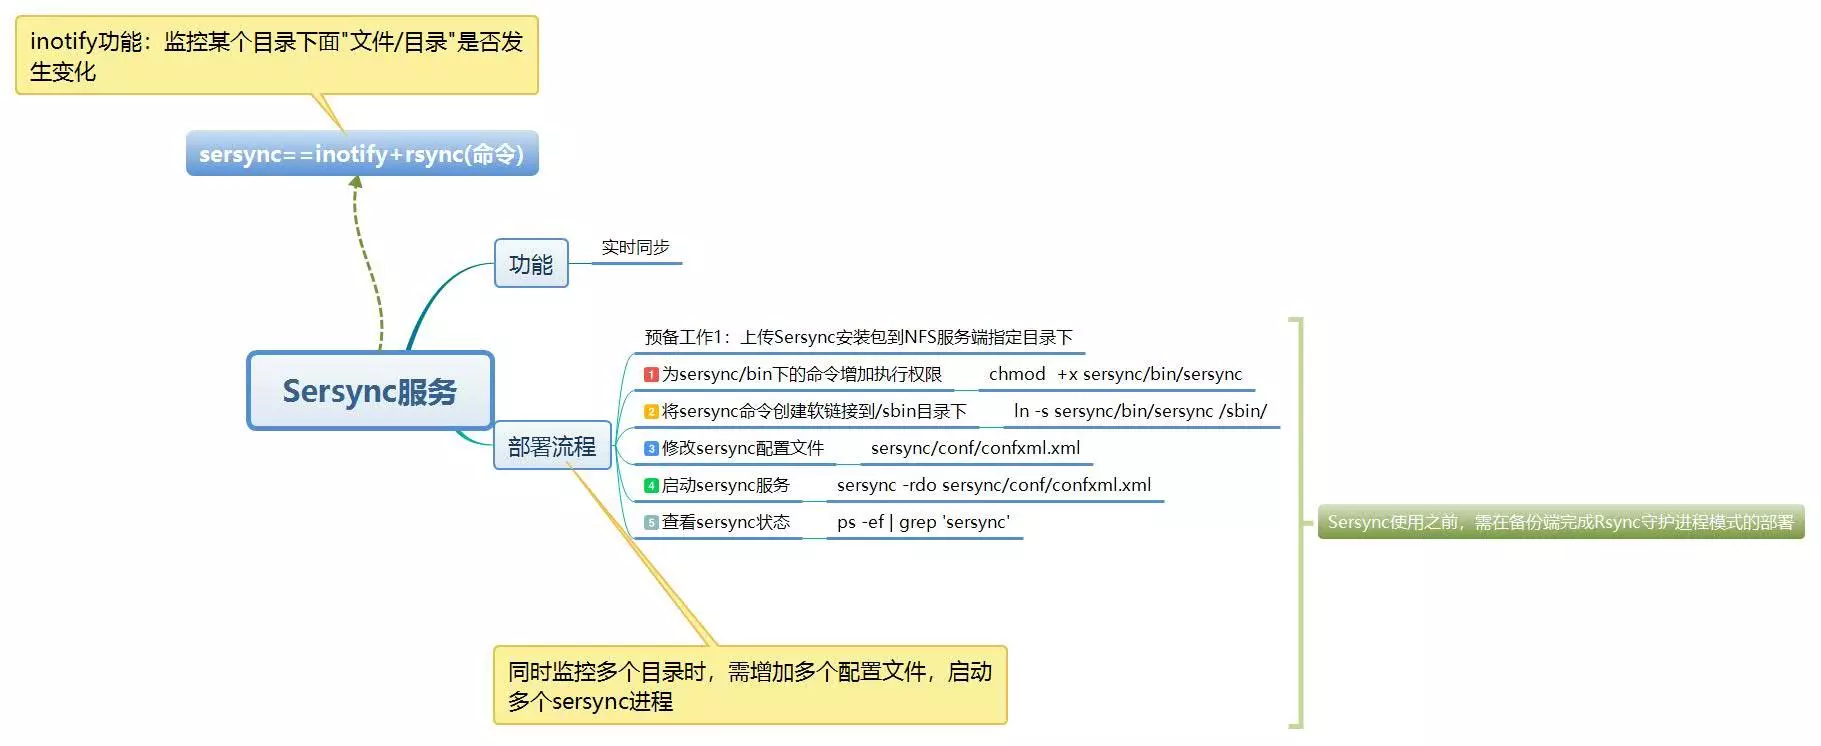
- sersync功能:
- 实时同步;
- sersync组成:
- sersync==inotify+rsync
- inotify: 监控某个目录下面"文件/目录"是否发生变化;
- sersync工作原理:
- 由inotify服务监控目录,当目录/文件发生变化时触发rsync服务进行推送,完成数据同步;
2. 部署流程
参照https://www.cnblogs.com/zoe233/p/12035383.html的部署过程。
注意:部署过程中将inotify监听服务和rsync同步数据的过程的脚本/server/scripts/inotifywait_nfs_to_backup.sh
通过/etc/init.d/syncd脚本加入了chkconfig开机自启动服务,可以通过/etc/init.dsyncd [start|stop]启动或关闭服务。
为了避免冲突,将相关所有服务关闭:
chkconfig syncd off

/etc/init.d/syncd stop
2.1 安装sersync
上传sersync安装包到NFS服务端指定目录下。
一般使用rz命令上传,由于secureCRT的transfer命令在mac上出现问题,使用scp命令传输文件。
scp `pwd`/sersync_installdir_64bit.zip root@192.168.0.31:/application
在nfs-31主机上进行操作:
# 创建目录

[root@nfs-31 /]# mkdir /application -p

# 等待rz或scp上传的sersync安装压缩包

[root@nfs-31 application]# ls

sersync_installdir_64bit.zip

# uzip解压zip文件

[root@nfs-31 application]# unzip ./sersync_installdir_64bit.zip

Archive:  ./sersync_installdir_64bit.zip

   creating: sersync_installdir_64bit/

   creating: sersync_installdir_64bit/sersync/

   creating: sersync_installdir_64bit/sersync/bin/

  inflating: sersync_installdir_64bit/sersync/bin/sersync

   creating: sersync_installdir_64bit/sersync/conf/

  inflating: sersync_installdir_64bit/sersync/conf/confxml.xml

   creating: sersync_installdir_64bit/sersync/logs/

# 将sersync目录移动到/application下

[root@nfs-31 application]# ls

sersync_installdir_64bit  sersync_installdir_64bit.zip

[root@nfs-31 application]# cd sersync_installdir_64bit

[root@nfs-31 sersync_installdir_64bit]# ls

sersync

[root@nfs-31 sersync_installdir_64bit]# mv ./sersync/ /application/

[root@nfs-31 sersync_installdir_64bit]# ls

[root@nfs-31 sersync_installdir_64bit]# cd ..

[root@nfs-31 application]# ls

sersync  sersync_installdir_64bit  sersync_installdir_64bit.zip
2.2 为/application/sersync/bin下的命令增加执行权限
[root@nfs-31 bin]# ll /application/sersync/bin

total 1768

-rw-r--r-- 1 root root 1810128 Oct 26  2011 sersync

[root@nfs-31 bin]# chmod +x /application/sersync/bin/sersync
2.3 将sersync命令创建软链接到/sbin目录下
[root@nfs-31 sersync]# ln -s /application/sersync/bin/sersync /sbin/

[root@nfs-31 sbin]# ll /sbin/sersync

lrwxrwxrwx 1 root root 32 Dec 13 19:04 /sbin/sersync -> /application/sersync/bin/sersync
2.4 修改sersync配置文件(/application/sersync/conf/confxml.xml)
配置sersync之前,先单独使用rsync服务推送一次,确定rsync服务正常以及各项参数的准确。
[root@nfs-31 conf]# cat confxml.xml -n

     1  <?xml version="1.0" encoding="ISO-8859-1"?>

     2  <head version="2.5">

     3      <host hostip="localhost" port=""></host>

     4      <debug start="false"/>

     5      <fileSystem xfs="false"/>

     6      <filter start="false">  # 过滤功能。默认是false,改成true即可启动

     7          <exclude expression="(.*)\.svn"></exclude>

     8          <exclude expression="(.*)\.gz"></exclude>

     9          <exclude expression="^info/*"></exclude>

    10          <exclude expression="^static/*"></exclude>

    11      </filter>

    12      <inotify>  # 监控的事件的属性,和inotify -e 参数类似;通过修改true or false,指定事件类型

    13          <delete start="true"/>

    14          <createFolder start="true"/>

    15          <createFile start="false"/>

    16          <closeWrite start="true"/>

    17          <moveFrom start="true"/>

    18          <moveTo start="true"/>

    19          <attrib start="false"/>

    20          <modify start="false"/>

    21      </inotify>

    22

    23      <sersync>  # 同步的部分

    24          <localpath watch="/opt/tongbu">   # 同步的源,目录

    25              <remote ip="127.0.0.1" name="tongbu1"/>   # ip是推送的机器的ip,name是rsync推送指定的模块

    26              <!--<remote ip="192.168.8.39" name="tongbu"/>-->

    27              <!--<remote ip="192.168.8.40" name="tongbu"/>-->

    28          </localpath>

    29          <rsync>  # rsync命令的各个参数

    30              <commonParams params="-artuz"/>  # 参数选项

    31              <auth start="false" users="root" passwordfile="/etc/rsync.pas"/>   # 连接用户和用户的指定密码文件

    32              <userDefinedPort start="false" port=""/><!-- port=874 -->  # 是否指定端口,false使用默认端口873

    33              <timeout start="false" time=""/><!-- timeout=100 -->  # 超时设置

    34              <ssh start="false"/>

    35          </rsync>

    36          <failLog path="/tmp/rsync_fail_log.sh" timeToExecute=""/> # 失败日志
<!--default every 60mins execute once-->

    37          <crontab start="false" schedule=""><!--600mins-->  # 每600分钟重传

    38              <crontabfilter start="false">  # 定时任务排除

    39                  <exclude expression="*.php"></exclude>

    40                  <exclude expression="info/*"></exclude>

    41              </crontabfilter>

    42          </crontab>

    43          <plugin start="false" name="command"/>

    44      </sersync>

    45

    46      <plugin name="command">

    47          <param prefix="/bin/sh" suffix="" ignoreError="true"/>  <!--prefix /opt/tongbu/mmm.sh suffix-->

    48          <filter start="false">

    49              <include expression="(.*)\.php"/>

    50              <include expression="(.*)\.sh"/>

    51          </filter>

    52      </plugin>

    53

    54      <plugin name="socket">

    55          <localpath watch="/opt/tongbu">

    56              <deshost ip="192.168.138.20" port=""/>

    57          </localpath>

    58      </plugin>

    59      <plugin name="refreshCDN">

    60          <localpath watch="/data0/htdocs/cms.xoyo.com/site/">

    61              <cdninfo domainname="ccms.chinacache.com" port="" username="xxxx" passwd="xxxx"/>

    62              <sendurl base="http://pic.xoyo.com/cms"/>

    63              <regexurl regex="false" match="cms.xoyo.com/site([/a-zA-Z0-9]*).xoyo.com/images"/>

    64          </localpath>

    65      </plugin>

    66  </head>
修改相应配置:
    22

    23      <sersync>  # 同步的部分

    24          <localpath watch="/data">   # 同步的源,目录

    25              <remote ip="192.168.0.41" name="nfsbackup"/>   # ip是推送的机器的ip,name是rsync推送指定的模块

    28          </localpath>

    29          <rsync>  # rsync命令的各个参数

    30              <commonParams params="-az"/>  # 参数选项

    31              <auth start="true" users="rsync_backup" passwordfile="/etc/rsync.password"/>   # 连接用户和用户的指定密码文件

    32              <userDefinedPort start="false" port=""/><!-- port=874 -->  # 是否指定端口,false使用默认端口873

    33              <timeout start="true" time=""/><!-- timeout=100 -->  # 超时设置

    34              <ssh start="false"/>

    35          </rsync>

    36          <failLog path="/tmp/rsync_fail_log.sh" timeToExecute=""/> # 失败日志
2.5 启动sersync服务
sersync命令参数说明:
[root@nfs-31 ~]# sersync -h

set the system param

execute:echo 50000000 > /proc/sys/fs/inotify/max_user_watches  # 调整了监控文件的数量和事件的数量

execute:echo 327679 > /proc/sys/fs/inotify/max_queued_events

parse the command param

_______________________________________________________

参数-d:启用守护进程模式

参数-r:在监控前,将监控目录与远程主机用rsync命令推送一遍

c参数-n: 指定开启守护线程的数量,默认为10个

参数-o:指定配置文件,默认使用confxml.xml文件

参数-m:单独启用其他模块,使用 -m refreshCDN 开启刷新CDN模块

参数-m:单独启用其他模块,使用 -m socket 开启socket模块

参数-m:单独启用其他模块,使用 -m http 开启http模块

不加-m参数,则默认执行同步程序

______________________________________________________________
服务启动后,将过程文件中rsync服务命令粘贴出来单独执行一遍,检验配置文件信息是否填写正确。
[root@nfs-31 ~]# sersync -rdo /application/sersync/conf/confxml.xml

set the system param

execute:echo 50000000 > /proc/sys/fs/inotify/max_user_watches

execute:echo 327679 > /proc/sys/fs/inotify/max_queued_events

parse the command param

option: -r      rsync all the local files to the remote servers before the sersync work

option: -d      run as a daemon

option: -o      config xml name:  /application/sersync/conf/confxml.xml

daemon thread num: 10

parse xml config file

host ip : localhost     host port: 8008

daemon start,sersync run behind the console

use rsync password-file :

user is rsync_backup

passwordfile is         /etc/rsync.password

config xml parse success

please set /etc/rsyncd.conf max connections=0 Manually

sersync working thread 12  = 1(primary thread) + 1(fail retry thread) + 10(daemon sub threads)

Max threads numbers is: 22 = 12(Thread pool nums) + 10(Sub threads)

please according your cpu ,use -n param to adjust the cpu rate

------------------------------------------

rsync the directory recursivly to the remote servers once

working please wait...

execute command: cd /data && rsync -az -R --delete ./  --timeout=100 rsync_backup@192.168.0.41::nfsbackup --password-file=/etc/rsync.password >/dev/null 2>&1

run the sersync:

watch path is: /data
2.6 查看sersync状态
[root@nfs-31 ~]# ps -ef|grep sersync|grep -v grep

root     20924     1  0 21:33 ?        00:00:00 sersync -rdo /application/sersync/conf/confxml.xml
2.7 开机自启动sersync服务
[root@nfs-31 ~]# tail -2 /etc/rc.local

# sersync start onboot sersync -rdo /application/sersync/conf/confxml.xml
注意:sersync服务的开机自启动和inotify的开机自启动最好不要冲突,只选其一。
【集群实战】sersync的更多相关文章
- redis3.0 集群实战1 -- 安装和配置
本文主要是在centos7上安装和配置redis集群实战 参考: http://hot66hot.iteye.com/blog/2050676 集群教程: http://redisdoc.com/to ...
- 《跟老男孩学Linux运维:Web集群实战》读书笔记
Linux 介绍 Linux 安装 Linux 调优 Web 基础 Nginx 应用 LNMP 应用 PHP 缓存加速 Nginx 调优 MySQL 应用 NFS 网络文件共享 Nginx 反向代理与 ...
- MySQL/MariaDB数据库的Galera高可用性集群实战
MySQL/MariaDB数据库的Galera高可用性集群实战 作者:尹正杰 版权声明:原创作品,谢绝转载!否则将追究法律责任. 一.Galera Cluster概述 1>.什么是Gale ...
- Haproxy+keepalived高可用集群实战
1.1 Haproxy+keepalived高可用集群实战 随着互联网火热的发展,开源负载均衡器的大量的应用,企业主流软件负载均衡如LVS.Haproxy.Nginx等,各方面性能不亚于硬件负载均衡 ...
- 基于Ambari Server部署HDP集群实战案例
基于Ambari Server部署HDP集群实战案例 作者:尹正杰 版权声明:原创作品,谢绝转载!否则将追究法律责任. 一.部署Ambari Server端 博主推荐阅读: https://www.c ...
- 【集群实战】Rsync数据同步工具
1. Rsync介绍 1.1 什么是Rsync? Rsync是一款开源的,快速的,多功能的,可实现全量及增量的本地或远程数据同步备份的优秀工具.Rsync软件适用于unix/linux/windows ...
- 高负载集群实战之lvs负载均衡-技术流ken
lvs简介 LVS的英文全称是Linux Virtual Server,即Linux虚拟服务器. 特点 跨平台:window,linux 作用 实现负载均衡 核心组件 ip_vs:linux的内核功能 ...
- Mongodb 集群实战
该实战过程完全跟着官网一步一步实现 ,官网教程:https://docs.mongodb.com/manual/tutorial/atlas-free-tier-setup/ 使用Mongo Shel ...
- activemq的高级特性:集群实战
高级特性实战需求 当消费端是多个集群,集群A又包含多个服务. 当每个集群都要接受相同的一批消息,而集群内的每个服务都去分摊消息. 解决办法一:级联 增加一个中转者.但是不是特别的优化,而且性能也不是特 ...
- 进阶的Redis之哈希分片原理与集群实战
前面介绍了<进阶的Redis之数据持久化RDB与AOF>和<进阶的Redis之Sentinel原理及实战>,这次来了解下Redis的集群功能,以及其中哈希分片原理. 集群分片模 ...
随机推荐
- IOS部分APP使用burpsuite抓不到包原因
曾经在ios12的时候,iphone通过安装burpsuite的ca证书并开启授权,还可以抓到包,升级到ios13后部分app又回到以前连上代理就断网的情况. 分析:ios(13)+burpsuite ...
- Ptask
这是一款非常弱鸡的小程序,不喜勿喷 你们好!如在使用中有bug或者有您宝贵的建议请在下方评论区留言或者投递至我的邮箱:Mj_Ymr@outlook.com. 那么我也会不断更新,并在这里贴上各版本的下 ...
- 怎样用scratch2.0谱写音乐
打开scratch2.0将语言切换为简体中文: 如果需要播放特殊的声音,可以用播放声音,找到一些特有的音乐,或者通过录制,将自己的配音或者唱歌录制下来: 可以用弹奏鼓声命令弹奏各种击鼓音乐: 通过控制 ...
- 关于Cookie的相关知识点以及使用方法
首先介绍cookie的一些方法 response.addCookie(Cookie cookie)是将一个cookie对象传入客户端. Cookie cookie=new Cookie(String ...
- Java第二十七天,线程池
1.什么情况下需要线程池? 频絮创建线程就会大大降低系统的效率,那么有没有一种办法使得线程可以复用,就是执行完一个任务,并不被销毁,而是可以继续执行其他的任务?在java中可以通过线程池来达到这样的效 ...
- Powershell 输出信息过多,结尾显示省略号
有时候我们通过powershell指令去查询某些信息时,因为输出结果过多,导致一部分重要信息被省略号代替,如下图 面对这种情况无论是 |fl 还是 out-file 亦或是 export-csv都无 ...
- 绕过XSS过滤姿势总结
0x01 弹窗关键字检测绕过 基本WAF都针对常用的弹窗函数做了拦截,如alert().prompt().confirm(),另外还有代码执行函数eval(),想要绕过去也比较简单,我们以alert( ...
- TcxLookupComboBox
1.绑定数据源显示 cxLookupComboBox1.Properties.DropDownAutoSize:=true; //设置下拉列表为自适应宽度 cxLookupComboBox1.Prop ...
- python干货:5种反扒机制的解决方法
前言 反爬虫是网站为了维护自己的核心安全而采取的抑制爬虫的手段,反爬虫的手段有很多种,一般情况下除了百度等网站,反扒机制会常常更新以外.为了保持网站运行的高效,网站采取的反扒机制并不是太多,今天分享几 ...
- Complete the Sequence HDU - 1121
题目大意: 输入两个数n和m,n表示有n个数,这n个数是一个多项式的前n项,让输出这个序列的n+1,n+2,..n+m项. 题解:差分规律,一直差分,直到全为0或者只剩下一个数.然后再递推回去. 给出 ...