
centos上搭建git服务--2
在 Linux 下搭建 Git 服务器
环境:

服务器 CentOS6.6 + git(version 1.7.1)
客户端 Windows10 + git(version 2.8.4.windows.1)
① 安装 Git
Linux 做为服务器端系统,Windows 作为客户端系统,分别安装 Git
服务器端:
#yum install -y git
安装完后,查看 Git 版本
[root@localhost ~]# git --version

git version 1.7.1
客户端:
下载 Git for Windows,地址:https://git-for-windows.github.io/
安装完之后,可以使用 Git Bash 作为命令行客户端。
安装完之后,查看 Git 版本
$ git --version

git version 2.8.4.windows.1
② 服务器端创建 git 用户,用来管理 Git 服务,并为 git 用户设置密码
[root@localhost home]# id git

id: git:无此用户

[root@localhost home]# useradd git

[root@localhost home]# passwd git
③ 服务器端创建 Git 仓库
设置 /home/data/git/gittest.git 为 Git 仓库
然后把 Git 仓库的 owner 修改为 git
[root@localhost home]# mkdir -p data/git/gittest.git

[root@localhost home]# git init --bare data/git/gittest.git

Initialized empty Git repository in /home/data/git/gittest.git/

[root@localhost home]# cd data/git/

[root@localhost git]# chown -R git:git gittest.git/
④ 客户端 clone 远程仓库
进入 Git Bash 命令行客户端,创建项目地址(设置在 d:/wamp64/www/gittest_gitbash)并进入:

dee@Lenovo-PC MINGW64 /d

$ cd wamp64/www

dee@Lenovo-PC MINGW64 /d/wamp64/www

$ mkdir gittest_gitbash

dee@Lenovo-PC MINGW64 /d/wamp64/www

$ cd gittest_gitbash

dee@Lenovo-PC MINGW64 /d/wamp64/www/gittest_gitbash

$
然后从 Linux Git 服务器上 clone 项目:
$ git clone git@192.168.56.101:/home/data/gittest.git
如果SSH用的不是默认的22端口,则需要使用以下的命令(假设SSH端口号是7700):
$ git clone ssh://git@192.168.56.101:7700/home/data/gittest.git
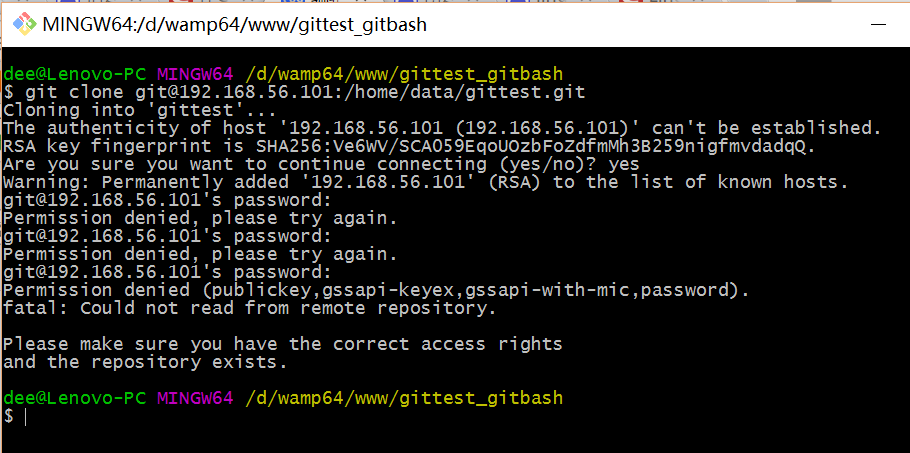
当第一次连接到目标 Git 服务器时会得到一个提示:
The authenticity of host '192.168.56.101 (192.168.56.101)' can't be established.

RSA key fingerprint is SHA256:Ve6WV/SCA059EqoUOzbFoZdfmMh3B259nigfmvdadqQ.

Are you sure you want to continue connecting (yes/no)?
选择 yes:
Warning: Permanently added '192.168.56.101' (RSA) to the list of known hosts.
此时 C:\Users\用户名\.ssh 下会多出一个文件 known_hosts,以后在这台电脑上再次连接目标 Git 服务器时不会再提示上面的语句。
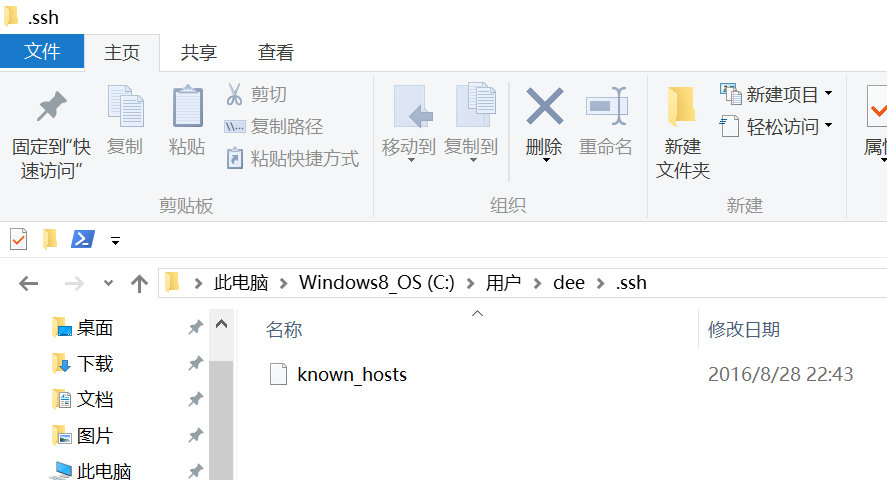
后面提示要输入密码,可以采用 SSH 公钥来进行验证。
⑤ 客户端创建 SSH 公钥和私钥
$ ssh-keygen -t rsa -C "472323087@qq.com"
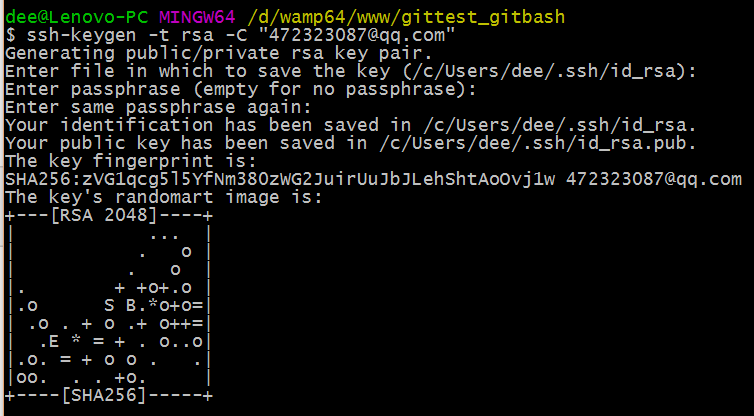
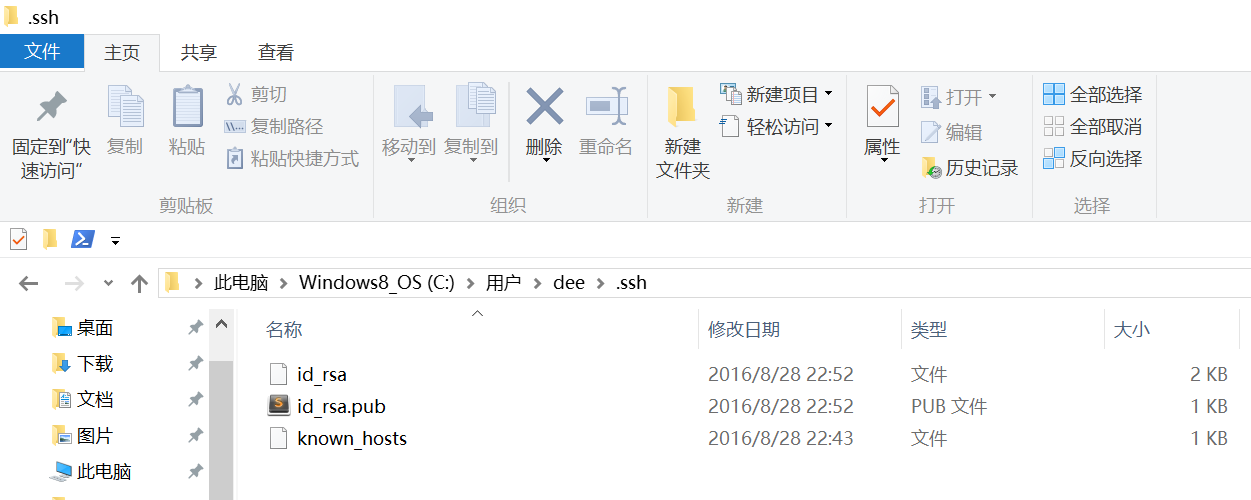
此时 C:\Users\用户名\.ssh 下会多出两个文件 id_rsa 和 id_rsa.pub
id_rsa 是私钥
id_rsa.pub 是公钥
⑥ 服务器端 Git 打开 RSA 认证
进入 /etc/ssh 目录,编辑 sshd_config,打开以下三个配置的注释:
RSAAuthentication yes

PubkeyAuthentication yes

AuthorizedKeysFile .ssh/authorized_keys
保存并重启 sshd 服务:
[root@localhost ssh]# /etc/rc.d/init.d/sshd restart
由 AuthorizedKeysFile 得知公钥的存放路径是 .ssh/authorized_keys,实际上是 $Home/.ssh/authorized_keys,由于管理 Git 服务的用户是 git,所以实际存放公钥的路径是 /home/git/.ssh/authorized_keys
在 /home/git/ 下创建目录 .ssh
[root@localhost git]# pwd

/home/git
[root@localhost git]# mkdir .ssh
[root@localhost git]# ls -a
. .. .bash_logout .bash_profile .bashrc .gnome2 .mozilla .ssh
然后把 .ssh 文件夹的 owner 修改为 git
[root@localhost git]# chown -R git:git .ssh

[root@localhost git]# ll -a

总用量 32

drwx------. 5 git  git  4096 8月  28 20:04 .

drwxr-xr-x. 8 root root 4096 8月  28 19:32 ..

-rw-r--r--. 1 git  git    18 10月 16 2014 .bash_logout

-rw-r--r--. 1 git  git   176 10月 16 2014 .bash_profile

-rw-r--r--. 1 git  git   124 10月 16 2014 .bashrc

drwxr-xr-x. 2 git  git  4096 11月 12 2010 .gnome2

drwxr-xr-x. 4 git  git  4096 5月   8 12:22 .mozilla

drwxr-xr-x. 2 git  git  4096 8月  28 20:08 .ssh
⑦ 将客户端公钥导入服务器端 /home/git/.ssh/authorized_keys 文件
回到 Git Bash 下,导入文件:
$ ssh git@192.168.56.101 'cat >> .ssh/authorized_keys' < ~/.ssh/id_rsa.pub
需要输入服务器端 git 用户的密码

回到服务器端,查看 .ssh 下是否存在 authorized_keys 文件:
[root@localhost git]# cd .ssh

[root@localhost .ssh]# ll

总用量 4

-rw-rw-r--. 1 git git 398 8月  28 20:08 authorized_keys
可以查看一下是否是客户端生成的公钥。
重要:
修改 .ssh 目录的权限为 700
修改 .ssh/authorized_keys 文件的权限为 600
[root@localhost git]# chmod 700 .ssh

[root@localhost git]# cd .ssh

[root@localhost .ssh]# chmod 600 authorized_keys
⑧ 客户端再次 clone 远程仓库
$ git clone git@192.168.56.101:/home/data/git/gittest.git

查看客户端项目目录:
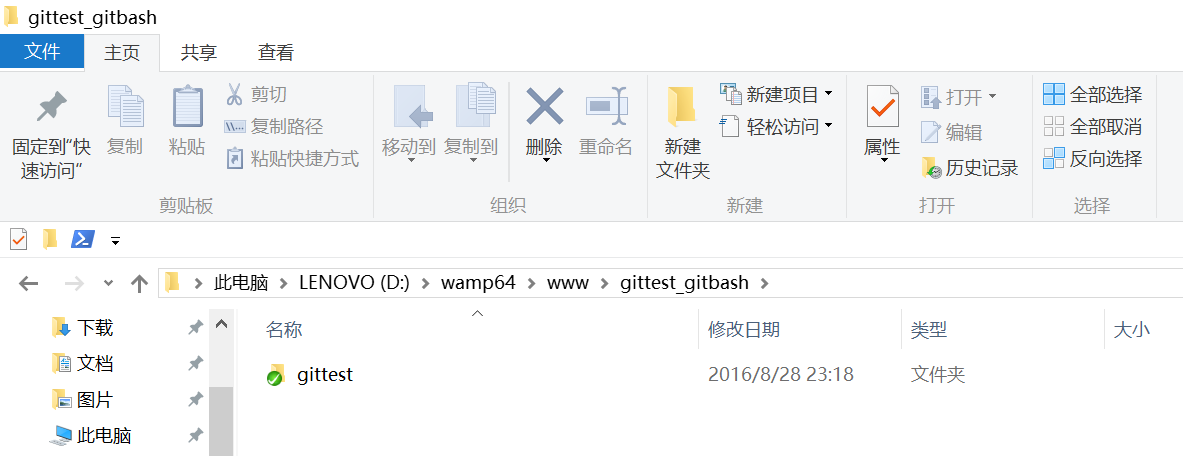
项目已经 clone 了。
也可以使用 tortoiseGit 客户端来管理项目:
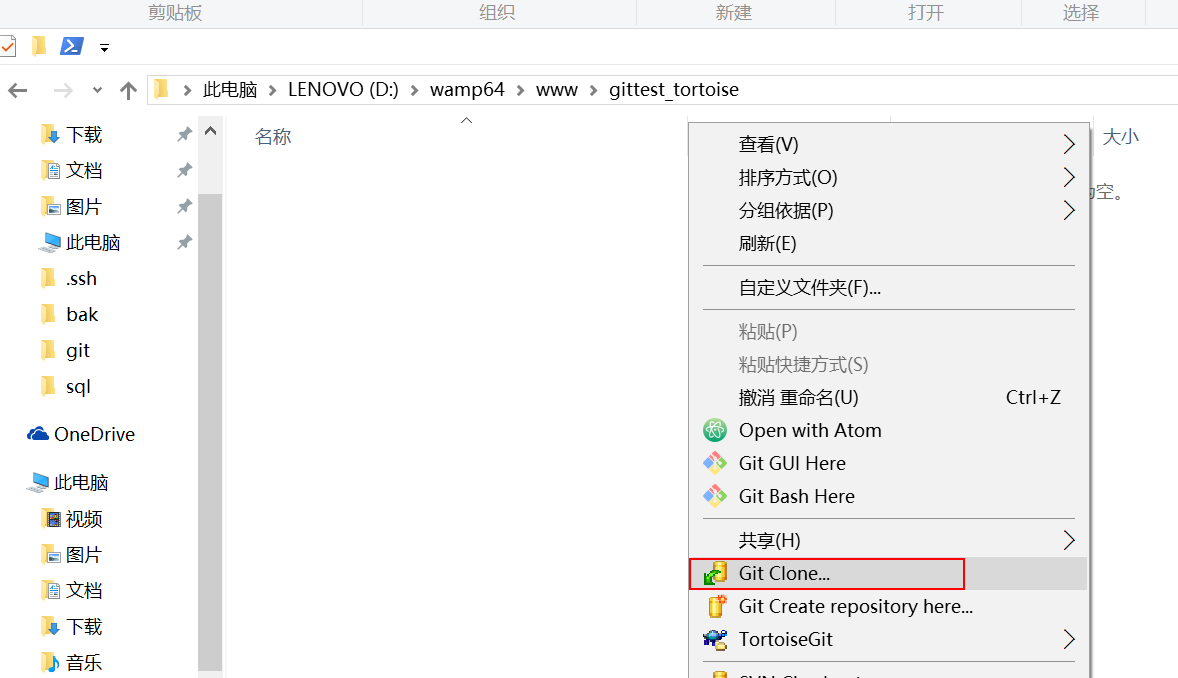
clone
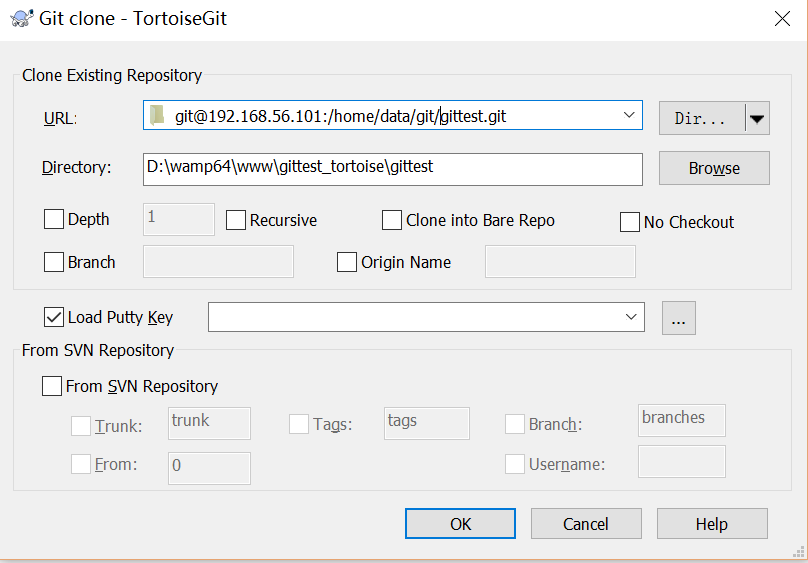
⑨ 禁止 git 用户 ssh 登录服务器
之前在服务器端创建的 git 用户不允许 ssh 登录服务器
编辑 /etc/passwd
找到:
git:x:502:504::/home/git:/bin/bash
修改为
git:x:502:504::/home/git:/bin/git-shell
此时 git 用户可以正常通过 ssh 使用 git,但无法通过 ssh 登录系统。
centos上搭建git服务--2的更多相关文章
- centos上搭建git服务--3
前言:当我们想要实现几个小伙伴合作开发同一个项目,或者建立一个资源分享平台的时候,GIT就是一个很好的选择.当然,既然是一个共有平台,那么把这个平台放到个人计算机上明显是不合适的,因此就要在服务器上搭 ...
- Centos上搭建git服务
1.安装Git $ yum install curl-devel expat-devel gettext-devel openssl-devel zlib-devel perl-devel $ yum ...
- centos上搭建git服务--4
Git是目前世界上最先进的分布式版本控制系统(没有之一).使用Svn的请参考<版本控制-svn服务器搭建和常用命令(centos 6.3)>,下面介绍Git的常用命令 常用命令 简单版 升 ...
- CentOs上搭建git服务器
CentOs上搭建git服务器 首先安装setuptools wget http://pypi.python.org/packages/source/s/setuptools/setuptools-0 ...
- 用Gogs在Windows上搭建Git服务
1.下载并安装Git,如有需求,请重启服务器让Path中的环境变量生效. 2.下载并安装Gogs,请注意,在Windows中部署时,请下载MiniWinService(mws)版本. 3.在Maria ...
- CentOS 上安装 GIT 服务
获取 YUM 中 GIT 信息: yum info git 查看当前 GIT 的版本: git --version 或 git version 卸载当前版本的 GIT: ...
- window服务器上搭建git服务,window server git!!!
先给大家看一个高大上的,这是我给我公司配置的,小伙伴们都说好! 阿里云的2012server 基于这篇大神的教程,我把服务端搭建好了. 传送门,当然我还是自己做个笔记的好. 1.下载java,并安装 ...
- 在centos上搭建Git服务器
第一步:先安装一些相关依赖库和编译工具 yum install curl-devel expat-devel gettext-devel openssl-devel zlib-devel yum in ...
- CentOS上安装GitBlit服务
简单介绍 在上一篇文章中,已经简单的介绍了如何在CentOS的服务器上搭建git服务器.但是这种方式实现的服务器功能比较弱,操作起来也比较繁琐.在网上搜索了一圈,感觉Gitblit比较符合我的需求.接 ...
随机推荐
- Oracle服务
oracle服务 参考网址:http://www.oraclejsq.com/article/010100132.html Oracle在window下安装完毕,会安装很多服务,如下图: 1.Orac ...
- 完全卸载MySQL数据库,实现重装
一.在控制面板,卸载MySQL的所有组件 控制面板——>所有控制面板项——>程序和功能,卸载所有和MySQL有关的程序 二.找到你的MysQL安装路径,看还有没有和MySQL有关的文件夹, ...
- vue bus方式解决非父子组件间的传值
对于非父子组件之间的传值 通常使用VUEX 和总线等方式解决 这里我聊聊发布订阅模式(总线) <body> <div class="app"> <ch ...
- webpack4+Vue搭建自己的Vue-cli
前言 最近在看webpack4,深感知识浅薄,这两天也一直在思考cli的配置,借助一些别人的实践,尝试自己搭建vue的项目,这里使用webpack4版本,之前我在网上查找别人的vue项目搭建,但是都是 ...
- 小白该如何学习Linux操作系统
一. 选择适合自己的Linux发行版 谈到linux的发行版别,太多了,可能谁也不能给出一个准确的数字,但是有一点是能够必定的,linux正在变得越来越盛行, 面临这么多的Linux 发行版,打算从别 ...
- redis未授权弱口令检测脚本(redis未授权访问漏洞,利用redis写webshell)
以下如有雷同,不胜荣幸 * --- 示例代码!!!!!----*/ #! /usr/bin/env python # _*_ coding:utf-8 _*_ import socket impor ...
- FPGA时序逻辑中常见的几类延时与时间(五)
FPGA逻辑代码重要的是理解其中的时序逻辑,延时与各种时间的记忆也是一件头疼的事,这里把我最近看到的比较简单的几类总结起来,共同学习. 一.平均传输延时 平均传输延时 二.开启时间与关闭时间 开 ...
- 在linux环境下安装redis并且搭建自己的redis集群
此文档主要介绍在linux环境下安装redis并且搭建自己的redis集群 搭建环境: ubuntun 16.04 + redis-3.0.6 本文章分为三个部分:redis安装.搭建redis集群 ...
- 20155227 2016-2017-2 《Java程序设计》第十周学习总结
20155227 2016-2017-2 <Java程序设计>第十周学习总结 教材学习内容总结 Java的网络编程 网络编程 就是在两个或两个以上的设备(例如计算机)之间传输数据.程序员所 ...
- 2017-2018-1 20155320加分项目——pwd的实现
2017-2018-1 20155320加分项目--pwd的实现 1 学习pwd命令 2 研究pwd实现需要的系统调用(man -k; grep),写出伪代码 3 实现mypwd 4 测试mypwd ...