ActiveMQ:Exception occurred while processing this request, check the log for more information!
出现上面错误的原因有以下两种
1 jdk的版本和activemq的版本不符
安装完ActiveMQ之后,通过http://IP:8161登陆到控制台。
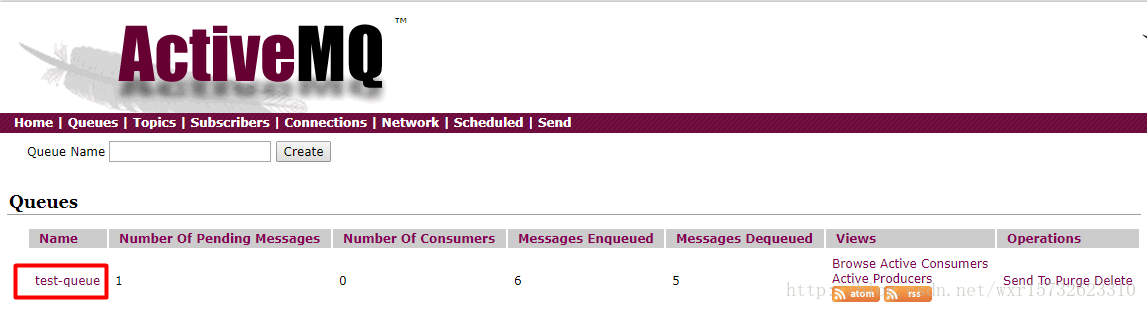
通过测试代码给服务端发送队列消息,在控制台点击queue可以看到如下消息:
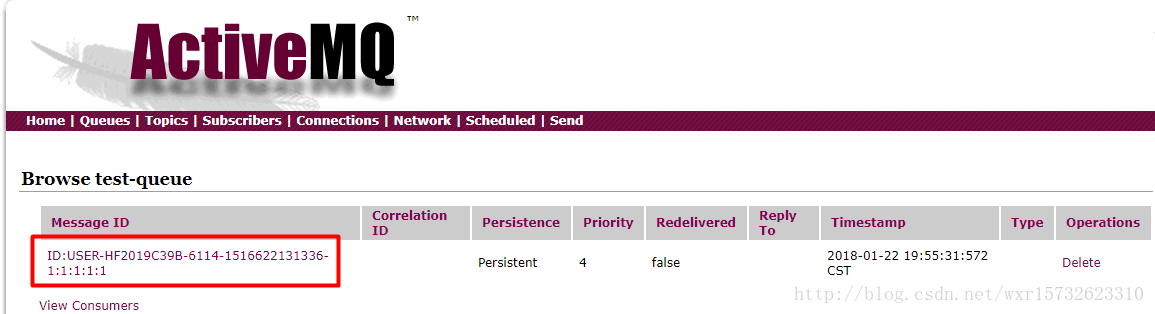
然后点击队列名称test-queue,出现如下页面:
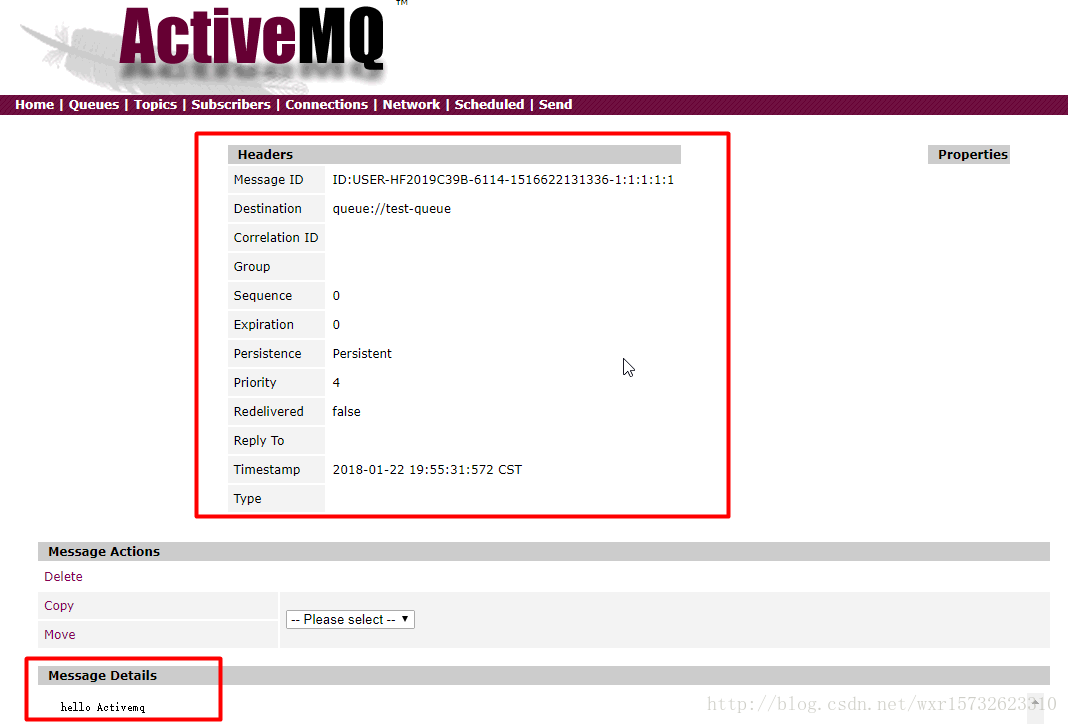
然后点击MessageID,应该出现以下页面:
但是我的却报错了,出现了一下错误:
Exception occurred while processing this request, check the log for more information!

查看MQ的错误日志(data路径下的activemq)
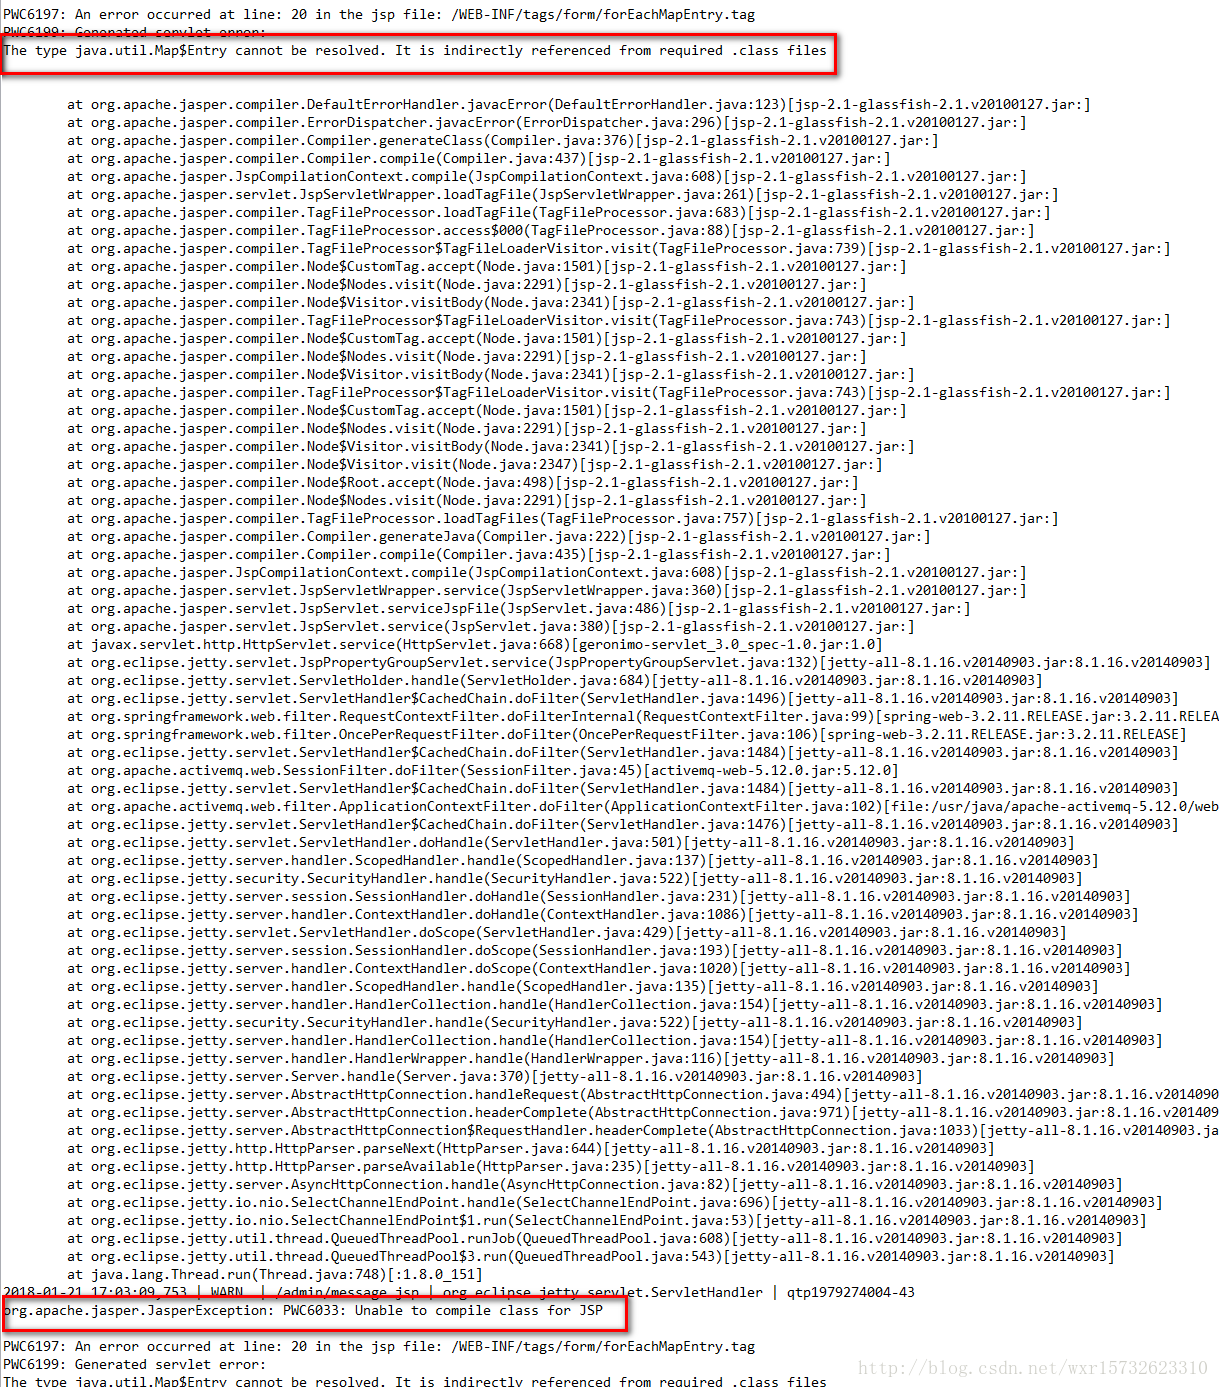
错误原因:jsp渲染的时候报错了。根本原因在于jdk版本和activemq版本的问题。
小编的activeMQ的版本为5.12,jdk的版本为1.8,然而mq5.12的版本需要依赖于jdk1.7.
两种解决方案:
1、把jdk版本改为jdk1.7
2、activeMQ采用5.15,它依赖于jdk1.8
2 权限不足
安装ActiveMq-5.14.1 并配置了安全验证成功后,客户端也连接成功了。服务端也能通过http://IP:8161登录到控制台。
但是在点击队列,想要查看队列视图时报错,如下图:
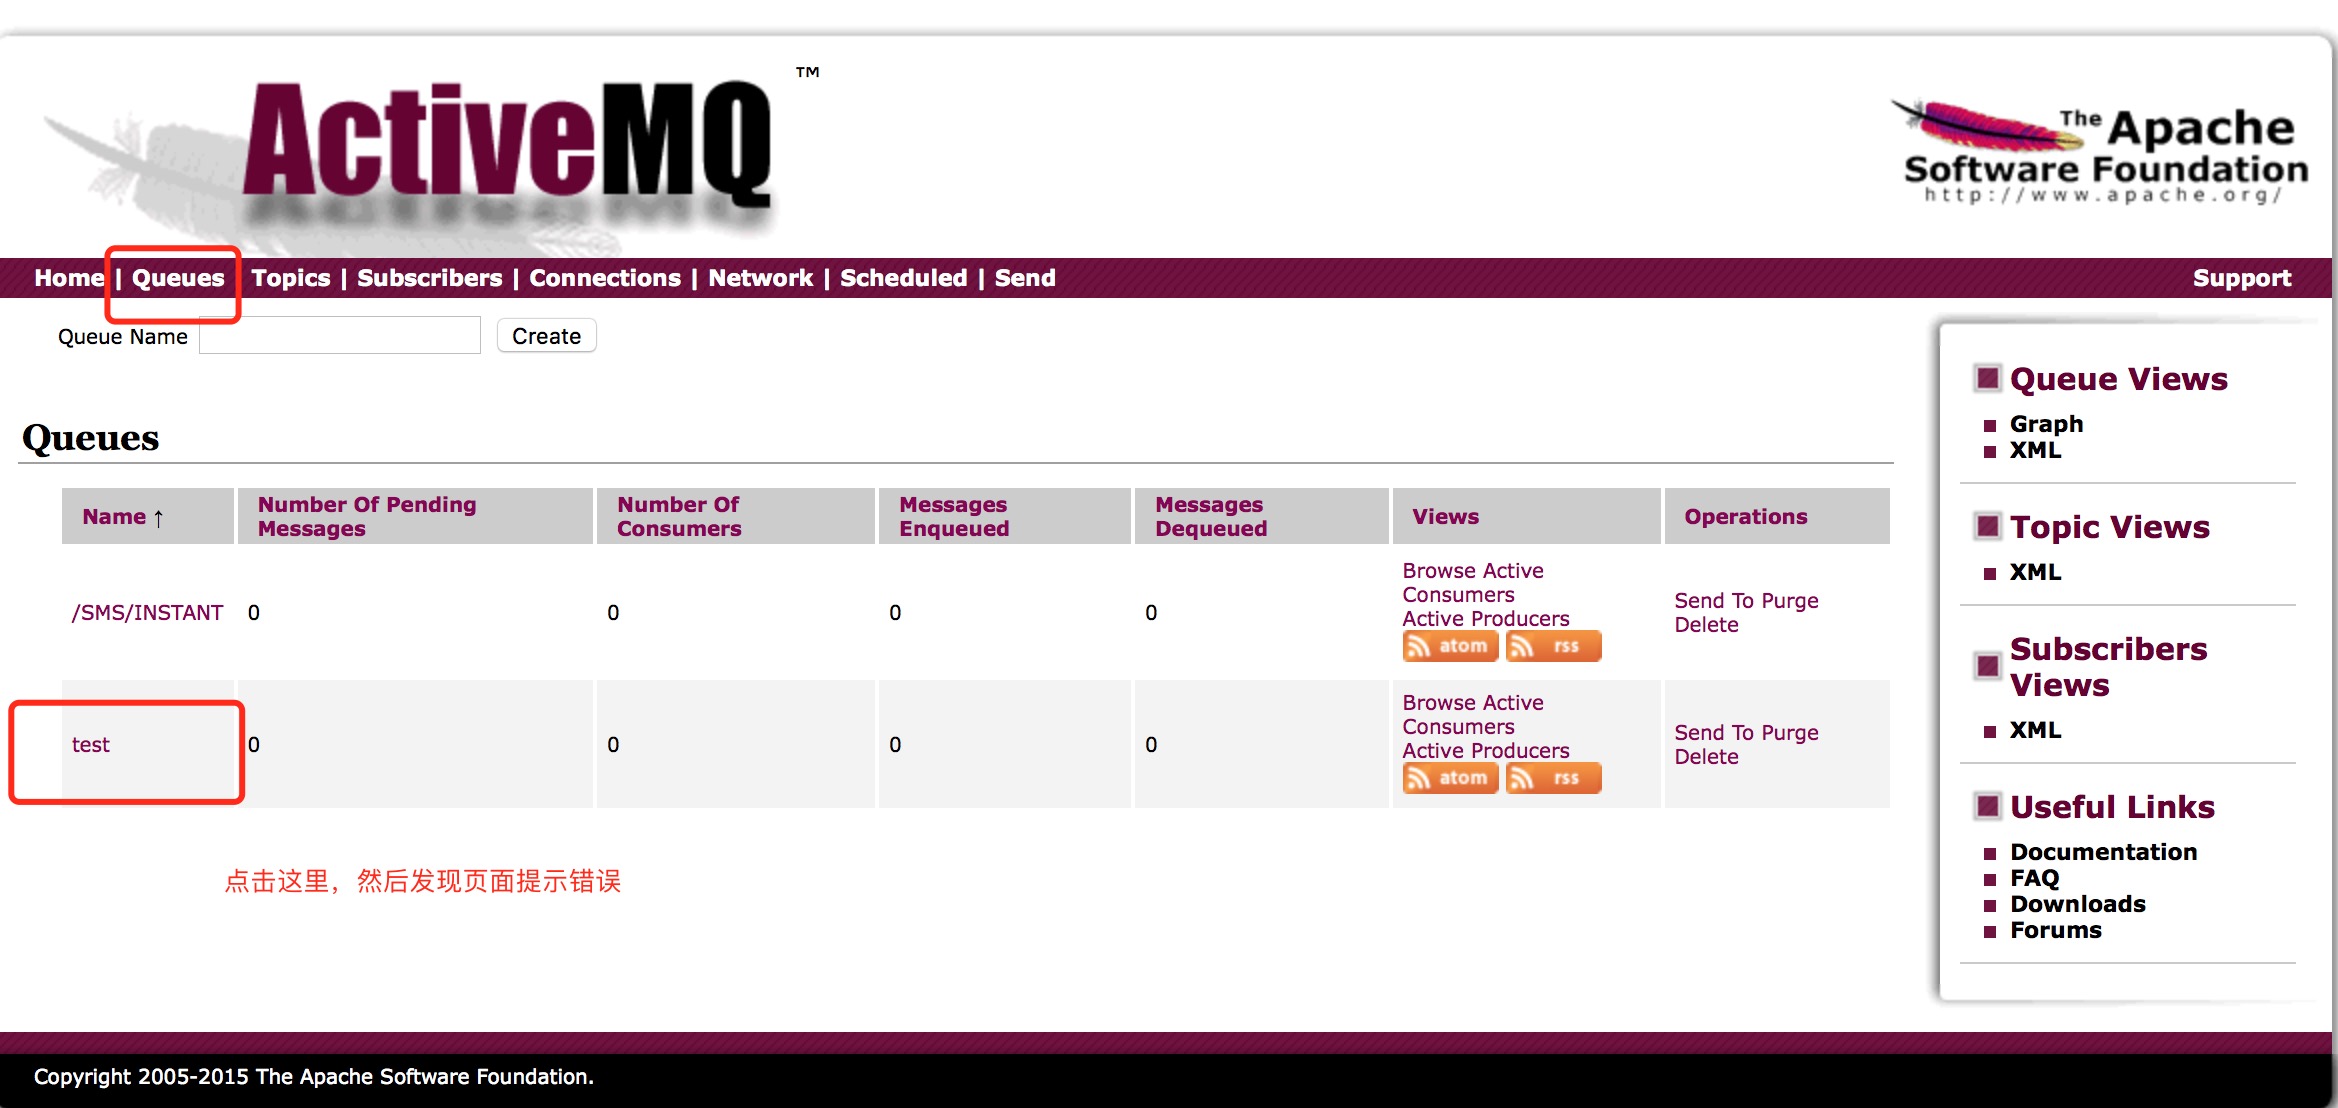

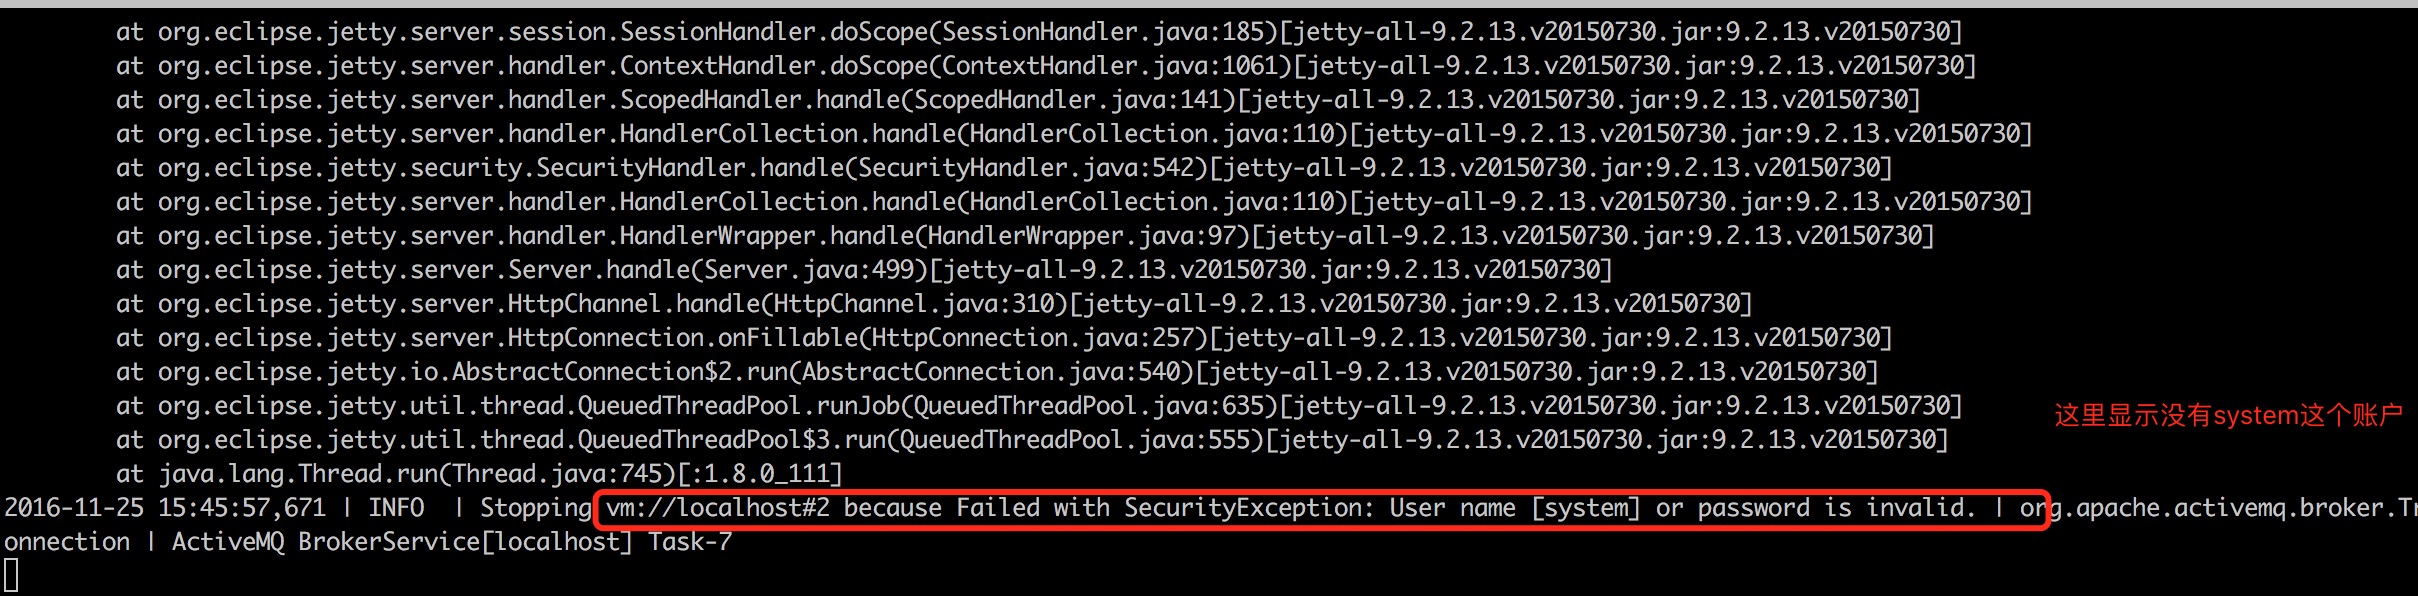
查看日志发现有如下报错:
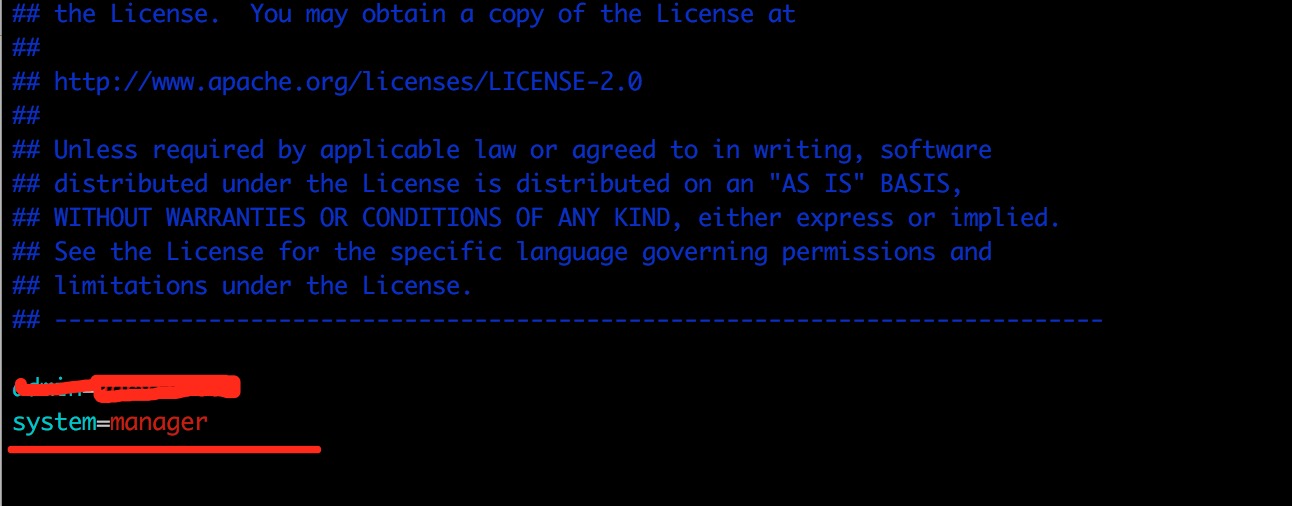
那么我就开始找配置这个用户的地方,发下时conf目录下的credentials.properties文件中。
内容如下:
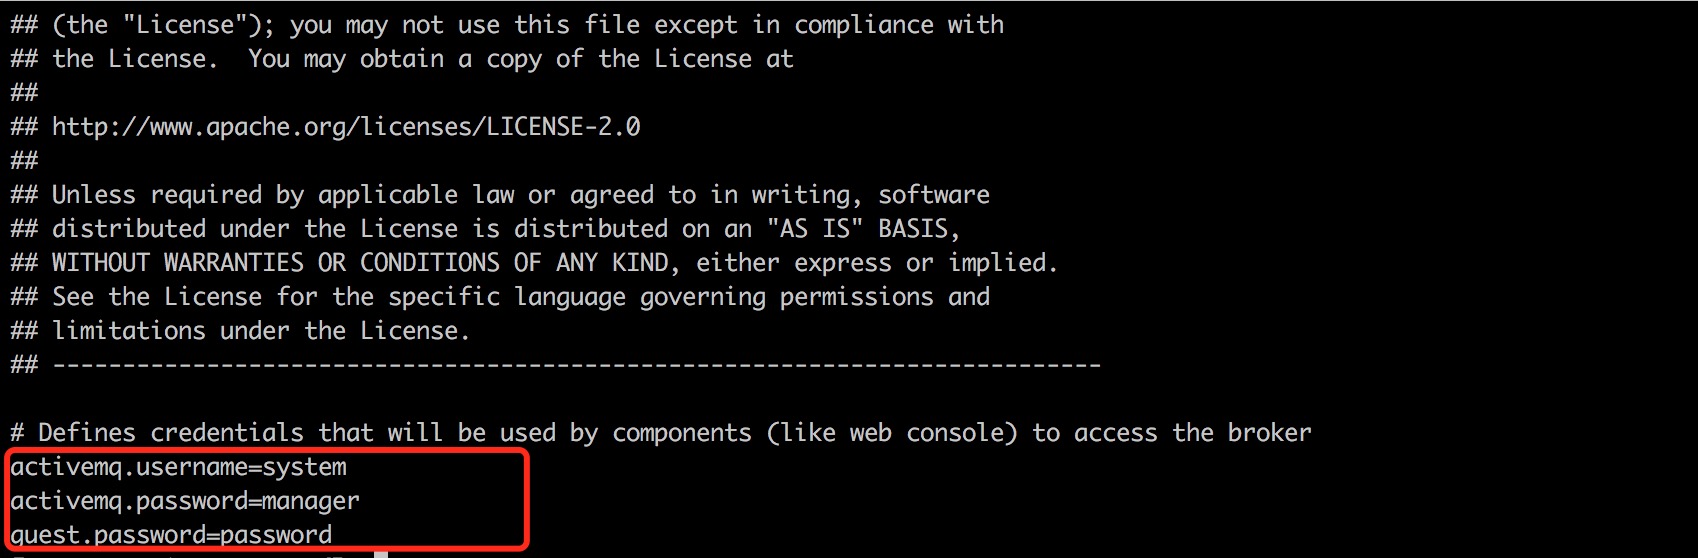
这里有这个账户的配置,那么是哪里引用这个配置文件呢?
在主配置文件 activemq.xml 查看,发现如下:
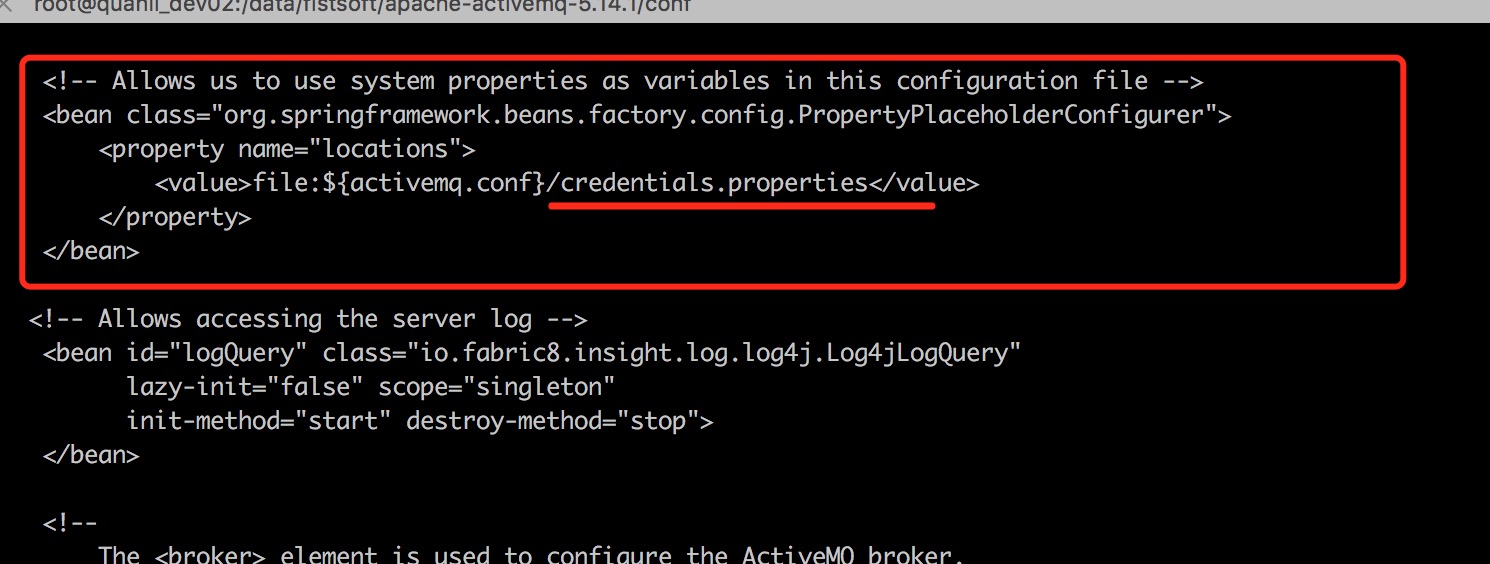
大概了解了下,这段配置的作用,是在控制台中查看,删除、发送消息到指定队列或主题的使用的账户。前面我们登录管理控制台仅是控制台的验证。要操作队列当然要用队列授权的用户。于是我想既然credentials.properties中配置了账户为system,那么我可以在user.properties中创建一个system用户。于是编辑
vim user.properties
这样这个用户就有了
然后我们再次访问发现前端依然报错,错误日志有所改变,错误日志信息如下:
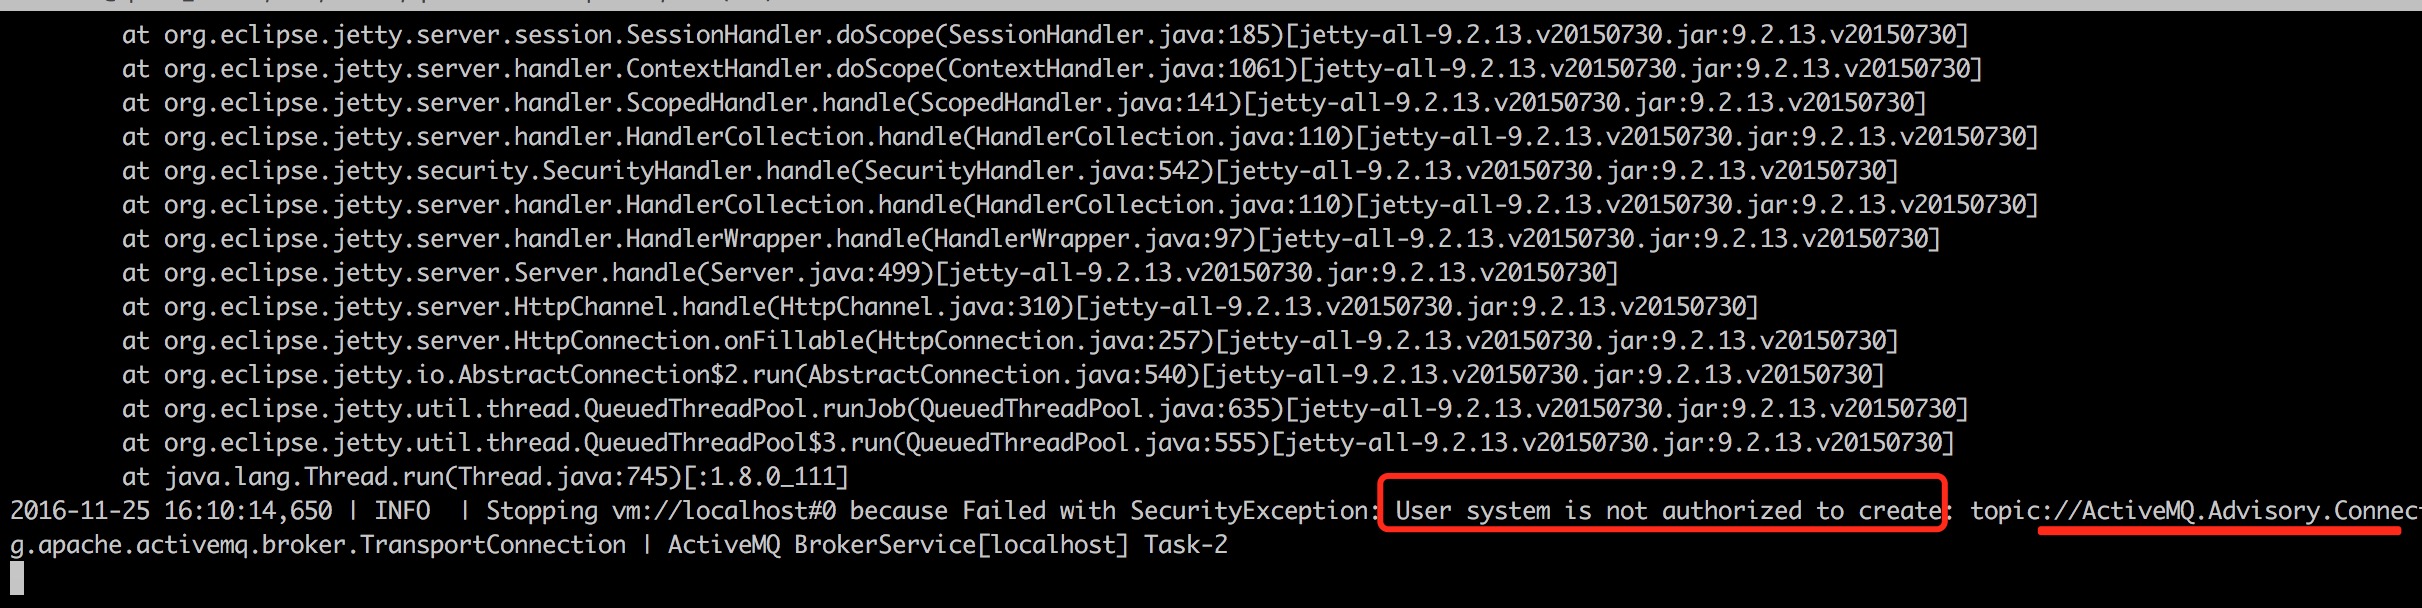
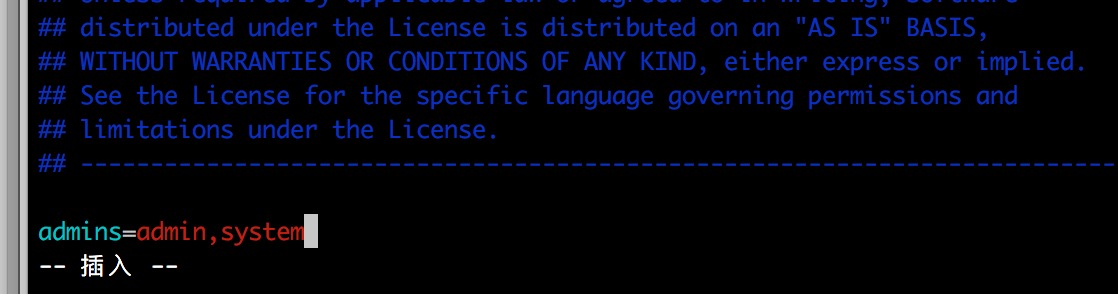
这个报错大概就是没有权限的原因,这时候我想到虽然用户创建了,但是还没做授权。于是最简单就是把system账户加入到admins组中。
于是vim groups.properties
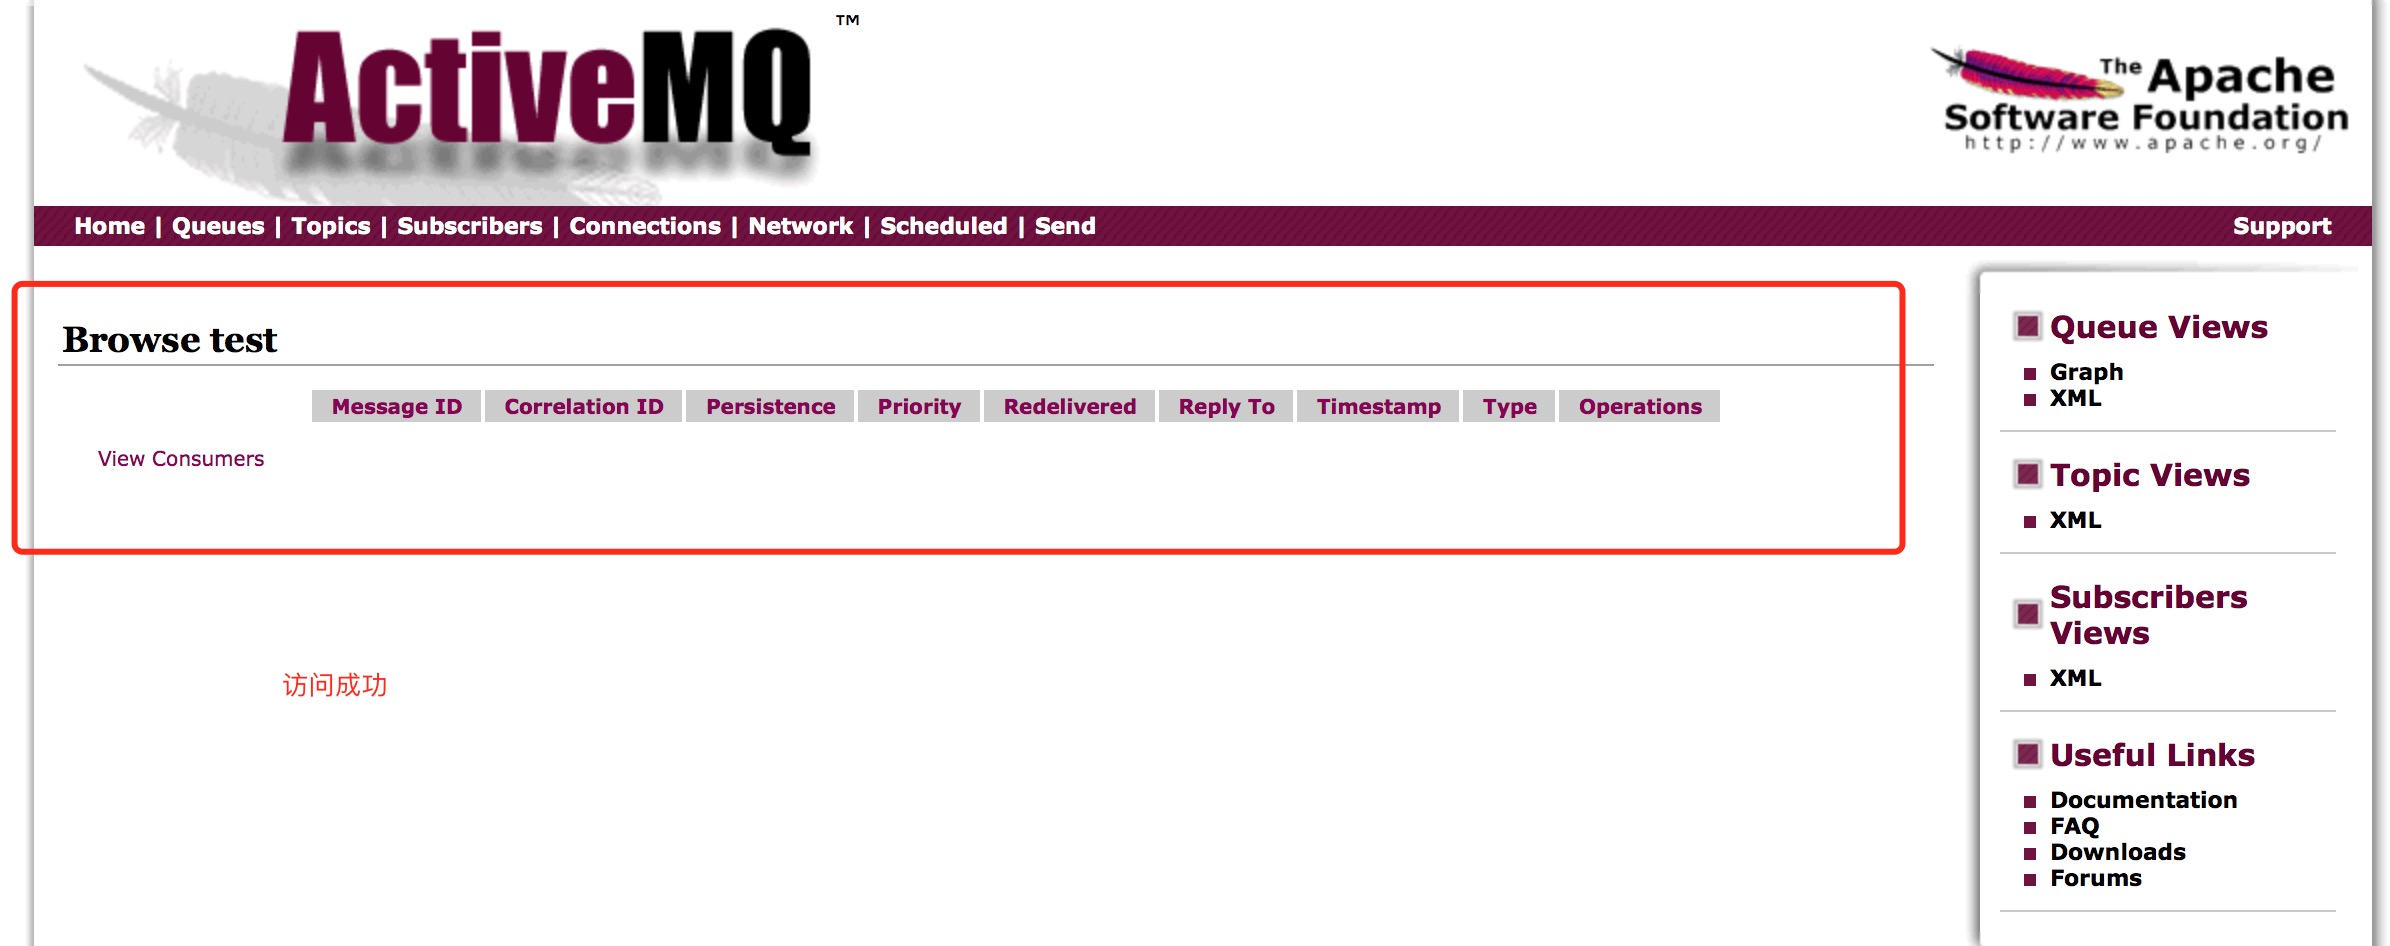
保存退出,然后在重启activemq,测试成功,如图:
备注:
如果你想改配置文件的地址,可以更改conf/log4j.propertiesd配置文件
文章来源:
https://blog.csdn.net/wxr15732623310/article/details/79132976
https://www.cnblogs.com/zhming26/p/6101916.html
ActiveMQ:Exception occurred while processing this request, check the log for more information!的更多相关文章
- 关于ActiveMq的Exception occurred while processing this request, check the log for more information!问题
错误原因:jsp渲染的时候报错了.根本原因在于jdk版本和activemq版本的问题. 两种解决方案: 1.把jdk版本改为jdk1.7 2.activeMQ采用5.15,它依赖于jdk1.8
- Exception occurred while processing this request, check the log for more information!安装ActiveMq-5.14.1 配置安全验证报错解决
安装ActiveMq-5.14.1 并配置了安全验证成功后,客户端也连接成功了.服务端也能通过http://IP:8161登录到控制台. 但是在点击队列,想要查看队列视图时报错,如下图: 查看日志发 ...
- [已解决]An unhandled exception occurred while processing the request.
An unhandled exception occurred while processing the request. InvalidOperationException: The layout ...
- struts2与struts1整合,java.lang.InstantiationException, Exception occurred during processing request: null
做了2个action,其中一个运行没有问题,另一个报错,看下面的报错信息,再看了看struts.xml,因为没有给GetBooks这个action配置actionform,所以就导致报null.下面是 ...
- SSH中使用延迟加载报错Exception occurred during processing request: could not initialize proxy - no Session
17:40:17,249 ERROR DefaultDispatcherErrorHandler:42 - Exception occurred during processing request: ...
- Exception occurred during processing request: id to load is required for loading
ERROR Dispatcher:38 - Exception occurred during processing request: id to load is required for loadi ...
- An exception occurred during a WebClient request
System.Net.WebException was caught HResult=-2146233079 Message=An exception occurred during a WebCli ...
- PHP: configure: error: mysql configure failed. Please check config.log for more information.
为php增加mysql模块时报错 configure: error: mysql configure failed. Please check config.log for more informat ...
- configure: error: mysql configure failed. Please check config.log for more information.
为php添加mysql模块时报错 configure: error: mysql configure failed. Please check config.log for more informat ...
随机推荐
- Spring AOP 自定义注解获取http接口及WebService接口入参和出参
注解方法实现过程中可以采用如下获取方式:—以下为例 HttpServletRequest request = ((ServletRequestAttributes) RequestContextHo ...
- WPF里面多线程访问UI线程、主线程的控件
如果出现以下错误:调用线程无法访问此对象,因为另一个线程拥有该对象. 你就碰到多线程访问UI线程.主线程的控件的问题了. 先占位.
- 【总结】 BZOJ1000~1099板刷计划
Tham又布置了一大堆题目,但是因为我TCL完全不会做,所以只能切切BZOJ的题目,划划水,要不是xz的面子大,我就已经被赶出了CJ信息组了QwQ(聂已己是神仙!) 1000 A+B这种入门题就不用写 ...
- ADV三星
#include <iostream> using namespace std; #define SIZE 12 int data[SIZE]; int data1[SIZE]; int ...
- Hello world(世界,你好)
每一个学习语言的小白,第一行代码就是向世界问好,话不多,大圣要开始自己的代码人生了! 一.字符串是可以相加的,比如:print("hello"+"world") ...
- Pangolin库的使用
使用Pangolin画出相机的轨迹(包括朝向). 数据集结构data.csv: #timestamp, p_RS_R_x [m], p_RS_R_y [m], p_RS_R_z [m], q_RS_w ...
- 创建maven自定义archetype项目
1.安装Nexus这里是用homebrew安装, brew nexus 安装成功后,默认的访问端口为8081, 我这里的访问地址是http://192.168.99.100:8081 默认用户:adm ...
- SQLServer 的存储过程与java交互
一. 存储过程简介 Sql Server的存储过程是一个被命名的存储在服务器上的Transacation-Sql语句集合,是封装重复性工作的一种方法,它支持用户声明的变量.条件执行和其他强大的编程 ...
- 各大浏览器相继发布声明将停止支持 TLS 1.0 和 TLS 1.1 !
简评:TLS 1.0 发布至今已将近 20 周年即将寿终正寝,期间为我们保障了千亿次甚至万亿次的数据请求安全. TLS 工作组几个月前发布声明文件弃用 TLS 1.0 和 TLS 1.1. 昨天,包括 ...
- python基础知识梳理-----7函数
基本内容梳理 1:函数定义,函数名,函数体以及函数的调用方式 2:函数的返回值 3:函数的参数 4:函数---动态传参数 5:名称空间,局部名称的加载顺序,全局名称空间,作用域,加载顺序 6:函数的嵌 ...