服务注册发现consul之二:在Spring Cloud中使用Consul实现服务的注册和发现
首先安装consul环境,参照之前的文章:《服务注册发现consul之一:consul介绍及安装》中的第一节介绍。
Spring Cloud使用Consul的服务与发现
1、导入依赖pring-cloud-starter-consul-discovery。
2、在其入口文件Application加入注解@EnableDiscoveryClient,开启服务发现(在consul中注册自己)。
3、配置中标明consul信息及自己注册到注册中心的SERVICES和instance-id
spring.cloud.consul.host=localhost

spring.cloud.consul.port=8500

spring.cloud.consul.discovery.healthCheckPath=${management.contextPath}/health

spring.cloud.consul.discovery.healthCheckInterval=15s

spring.cloud.consul.discovery.instance-id=consul-client1

spring.application.name=consul-client1
源码:
spring-cloud-starter-consul-discovery-1.3.3.RELEASE里的pom.xml中引入了spring-cloud-starter-consul,查看spring-cloud-starter-consul-1.3.3.RELEASE.jar中的pom.xml文件中引入了spring-cloud-consul-core和consul-api

再看spring-cloud-consul-core-1.3.3.RELEASE.jar的源代码:
几个配置有:ConsulProperties.java
@ConfigurationProperties("spring.cloud.consul")

@Data

@Validated

public class ConsulProperties {

    /** Consul agent hostname. Defaults to 'localhost'. */

    @NotNull

    private String host = "localhost";

    /** Consul agent port. Defaults to '8500'. */

    @NotNull

    private int port = 8500;

    /** Is spring cloud consul enabled */

    private boolean enabled = true;

}
RetryProperties.java
@ConfigurationProperties("spring.cloud.consul.retry")

@Data

public class RetryProperties {

    /** Initial retry interval in milliseconds. */

    private long initialInterval = 1000;

    /** Multiplier for next interval. */

    private double multiplier = 1.1;

    /** Maximum interval for backoff. */

    private long maxInterval = 2000;

    /** Maximum number of attempts. */

    private int maxAttempts = 6;

}
为了演示consul的注册与发现,下面会创建2个服务和1个client端:
一:服务端1:
1、pom.xml
<project xmlns="http://maven.apache.org/POM/4.0.0" xmlns:xsi="http://www.w3.org/2001/XMLSchema-instance"

    xsi:schemaLocation="http://maven.apache.org/POM/4.0.0 http://maven.apache.org/xsd/maven-4.0.0.xsd">

    <modelVersion>4.0.0</modelVersion>

    <groupId>com.dxz</groupId>

    <artifactId>cloud-server1</artifactId>

    <version>0.0.1-SNAPSHOT</version>

    <packaging>jar</packaging>

    <name>cloud-client</name>

    <url>http://maven.apache.org</url>

    <properties>

        <project.build.sourceEncoding>UTF-8</project.build.sourceEncoding>

        <project.reporting.outputEncoding>UTF-8</project.reporting.outputEncoding>

        <java.version>1.8</java.version>

    </properties>

    <parent>

        <groupId>org.springframework.boot</groupId>

        <artifactId>spring-boot-starter-parent</artifactId>

        <version>1.5.2.RELEASE</version>

        <relativePath/> <!-- lookup parent from repository -->

    </parent>

    <dependencies>

        <dependency>

            <groupId>org.springframework.cloud</groupId>

            <artifactId>spring-cloud-starter-consul-discovery</artifactId>

        </dependency>

        <dependency>

            <groupId>org.springframework.boot</groupId>

            <artifactId>spring-boot-starter-web</artifactId>

        </dependency>

        <dependency>

            <groupId>org.springframework.boot</groupId>

            <artifactId>spring-boot-starter-test</artifactId>

            <scope>test</scope>

        </dependency>

    </dependencies>

    <dependencyManagement>

        <dependencies>

            <dependency>

                <groupId>org.springframework.cloud</groupId>

                <artifactId>spring-cloud-dependencies</artifactId>

                <version>Dalston.RELEASE</version>

                <type>pom</type>

                <scope>import</scope>

            </dependency>

        </dependencies>

    </dependencyManagement>

    <build>

        <plugins>

            <plugin>

                <groupId>org.springframework.boot</groupId>

                <artifactId>spring-boot-maven-plugin</artifactId>

            </plugin>

        </plugins>

    </build>

</project>
server的启动类:ConsulApp.java
package com.dxz.cloud_server;

import org.springframework.boot.SpringApplication;

import org.springframework.boot.autoconfigure.SpringBootApplication;

import org.springframework.cloud.client.discovery.EnableDiscoveryClient;

import org.springframework.web.bind.annotation.RequestMapping;

import org.springframework.web.bind.annotation.RestController;

@SpringBootApplication

@EnableDiscoveryClient

@RestController

public class ConsulApp {

    @RequestMapping("/home")

    public Object home() {

        System.out.println("cloud-server1");

        return "cloud-server1";

    }

    public static void main( String[] args ) {

        SpringApplication.run(ConsulApp.class, args);

    }

}
配置文件application.properties
spring.cloud.consul.host=localhost

spring.cloud.consul.port=8500

spring.cloud.consul.discovery.healthCheckPath=${management.contextPath}/health

spring.cloud.consul.discovery.healthCheckInterval=15s

spring.cloud.consul.discovery.instance-id=consul-server1

spring.application.name=consul-server

server.port=8503
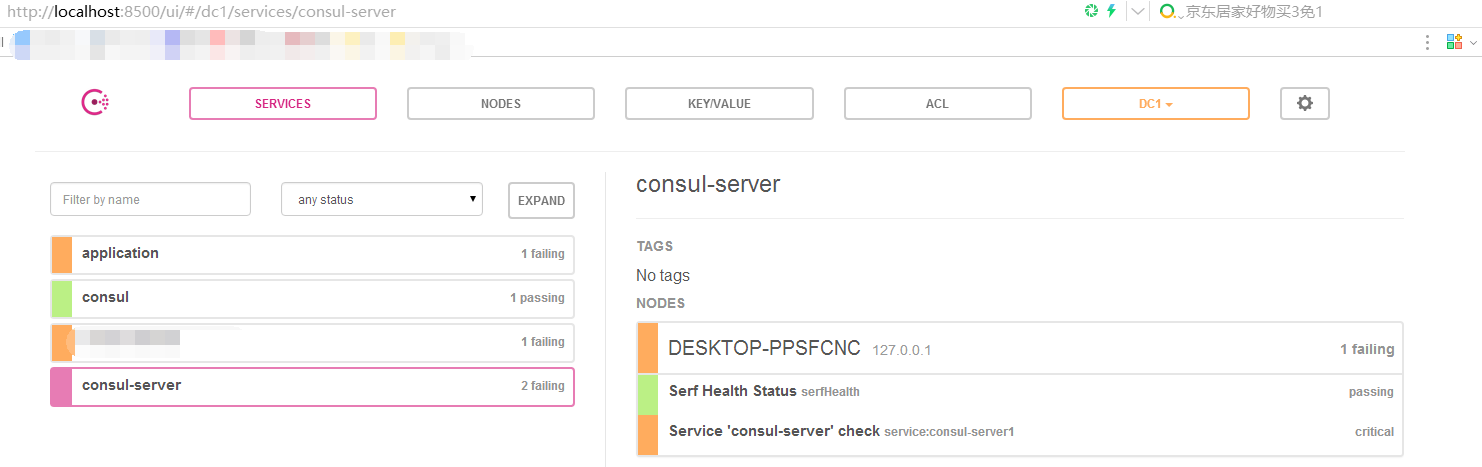
由于我们增加了@EnableDiscoveryClient注解,所以,系统启动的时候,就会向consul注册一个服务,服务的名字为consul-server, ID为consul-server1
启动后,访问:http://localhost:8500/ui/#/dc1/services/consul-server,输出如下页面:
访问consul的HTTP API:http://localhost:8500/v1/catalog/service/consul-server 输出如下:
[

    {

        "ID": "ae2b2853-18fa-7042-a157-25da30fcc744",

        "Node": "DESKTOP-PPSFCNC",

        "Address": "127.0.0.1",

        "Datacenter": "dc1",

        "TaggedAddresses": {

            "lan": "127.0.0.1",

            "wan": "127.0.0.1"

        },

        "NodeMeta": {},

        "ServiceID": "consul-server1",

        "ServiceName": "consul-server",

        "ServiceTags": [],

        "ServiceAddress": "DESKTOP-PPSFCNC",

        "ServicePort": 8503,

        "ServiceEnableTagOverride": false,

        "CreateIndex": 316,

        "ModifyIndex": 719

    },

    {

        "ID": "ae2b2853-18fa-7042-a157-25da30fcc744",

        "Node": "DESKTOP-PPSFCNC",

        "Address": "127.0.0.1",

        "Datacenter": "dc1",

        "TaggedAddresses": {

            "lan": "127.0.0.1",

            "wan": "127.0.0.1"

        },

        "NodeMeta": {},

        "ServiceID": "consul-server2",

        "ServiceName": "consul-server",

        "ServiceTags": [],

        "ServiceAddress": "DESKTOP-PPSFCNC",

        "ServicePort": 8504,

        "ServiceEnableTagOverride": false,

        "CreateIndex": 585,

        "ModifyIndex": 721

    }

]
二:服务端2
1、pom.xml同上
2、启动类:
package com.dxz.cloud_server;

import org.springframework.boot.SpringApplication;

import org.springframework.boot.autoconfigure.SpringBootApplication;

import org.springframework.cloud.client.discovery.EnableDiscoveryClient;

import org.springframework.web.bind.annotation.RequestMapping;

import org.springframework.web.bind.annotation.RestController;

@SpringBootApplication

@EnableDiscoveryClient

@RestController

public class ConsulApp {

    @RequestMapping("/home")

    public Object home() {

        System.out.println("cloud-server2");

        return "cloud-server2";

    }

    public static void main( String[] args ) {

        SpringApplication.run(ConsulApp.class, args);

    }

}
application.properties 配置内容:(端口、instance-id不同)
spring.cloud.consul.host=localhost

spring.cloud.consul.port=8500

spring.cloud.consul.discovery.healthCheckPath=${management.contextPath}/health

spring.cloud.consul.discovery.healthCheckInterval=15s

spring.cloud.consul.discovery.instance-id=consul-server2

spring.application.name=consul-server

server.port=8504
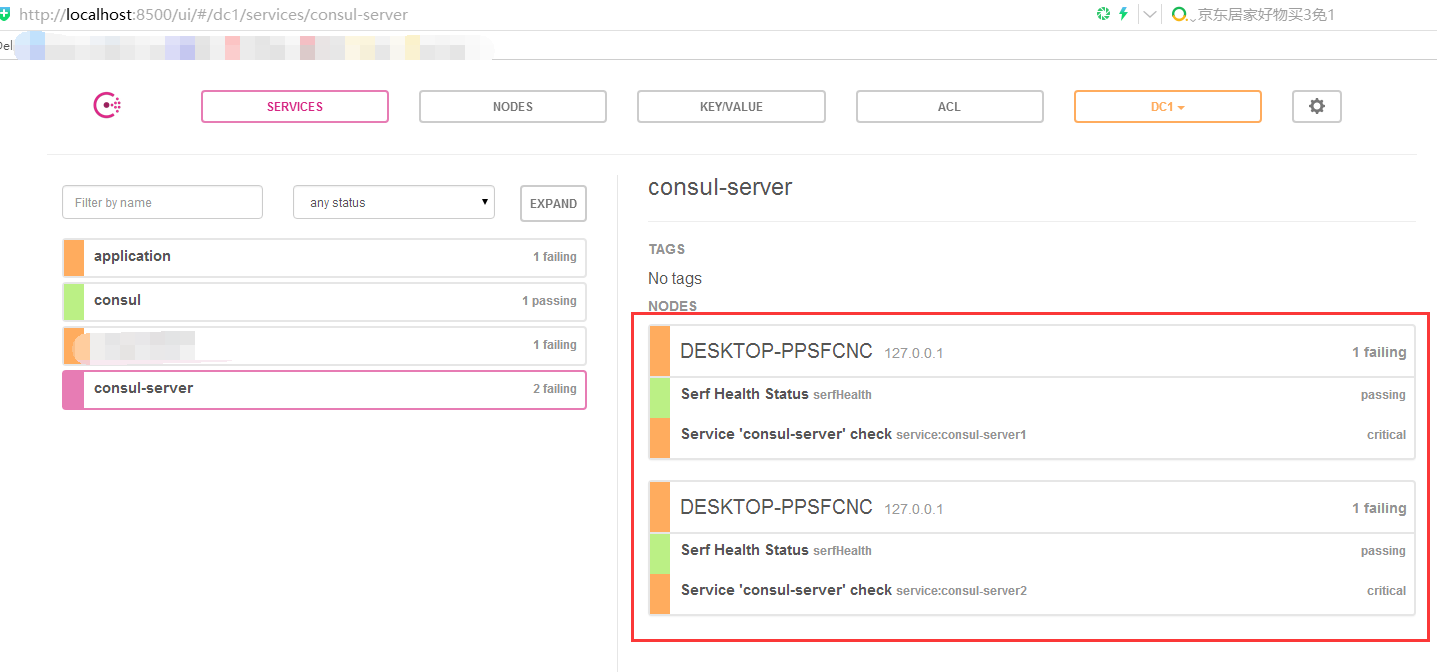
启动后:
三:客户端
项目依赖,只需要spring-cloud-starter-consul-discovery(我的pom同上)
application.properties 配置内容:
spring.cloud.consul.host=localhost

spring.cloud.consul.port=8500

spring.cloud.consul.discovery.healthCheckPath=${management.contextPath}/health

spring.cloud.consul.discovery.healthCheckInterval=15s

spring.cloud.consul.discovery.instance-id=consul-client1

spring.application.name=consul-client1

server.port=8501
主类:
package com.dxz.cloud_client;

import org.springframework.boot.autoconfigure.SpringBootApplication;

import org.springframework.boot.builder.SpringApplicationBuilder;

import org.springframework.cloud.client.discovery.EnableDiscoveryClient;

import org.springframework.web.bind.annotation.RequestMapping;

import org.springframework.web.bind.annotation.RestController;

@SpringBootApplication

@EnableDiscoveryClient

@RestController

public class ConsulClientApplication {

    @RequestMapping("/home")

    public String home() {

        return "hi ,i'm consul client";

    }

    public static void main(String[] args) {

        new SpringApplicationBuilder(ConsulClientApplication.class).web(true).run(args);

    }

}
主类:ConsulClientApplication.java
package com.dxz.cloud_client;

import org.springframework.beans.factory.annotation.Autowired;

import org.springframework.boot.autoconfigure.SpringBootApplication;

import org.springframework.boot.builder.SpringApplicationBuilder;

import org.springframework.cloud.client.discovery.DiscoveryClient;

import org.springframework.cloud.client.discovery.EnableDiscoveryClient;

import org.springframework.cloud.client.loadbalancer.LoadBalancerClient;

import org.springframework.web.bind.annotation.RequestMapping;

import org.springframework.web.bind.annotation.RestController;

@SpringBootApplication

@EnableDiscoveryClient

@RestController

public class ConsulClientApplication {

    @RequestMapping("/home")

    public String home() {

        return "hi ,i'm consul client";

    }

    @Autowired

    private LoadBalancerClient loadBalancer;

    @Autowired

    private DiscoveryClient discoveryClient;

    /**

     * 从所有服务中选择一个服务(轮询)

     */

    @RequestMapping("/discover")

    public Object discover() {

        return loadBalancer.choose("consul-server").getUri().toString();

    }

    /**

     * 获取所有服务

     */

    @RequestMapping("/services")

    public Object services() {

        return discoveryClient.getInstances("consul-server");

    }

    public static void main(String[] args) {

        new SpringApplicationBuilder(ConsulClientApplication.class).web(true).run(args);

    }

}
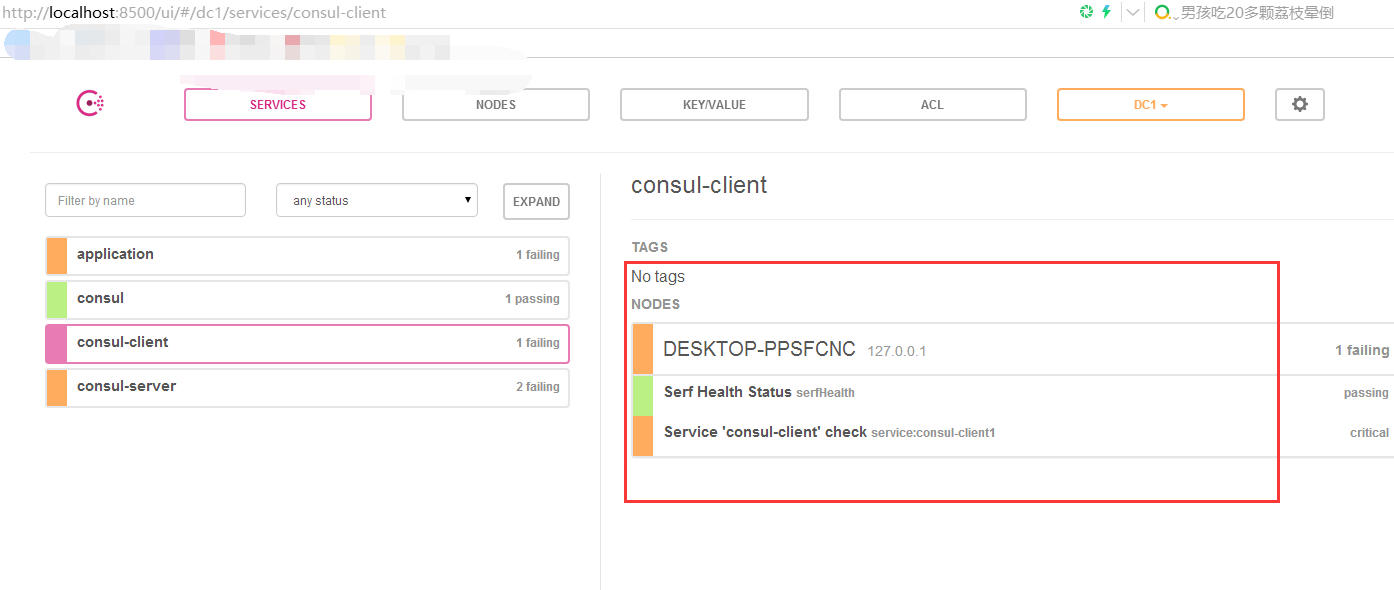
启动之后,观看consul如下:
访问http://localhost:8501/services返回如下:
[{"serviceId":"consul-server","host":"DESKTOP-PPSFCNC","port":8503,"secure":false,"metadata":{},"uri":"http://DESKTOP-PPSFCNC:8503"},{"serviceId":"consul-server","host":"DESKTOP-PPSFCNC","port":8504,"secure":false,"metadata":{},"uri":"http://DESKTOP-PPSFCNC:8504"}]
访问:http://localhost:8501/discover
Spring Cloud Consul 配置
核心参数
| 配置项 | 默认值 |
|---|---|
| spring.cloud.consul.enabled | true |
| spring.cloud.consul.host | localhost |
| spring.cloud.consul.port | 8500 |
服务发现参数
| 配置项 | 默认值 |
|---|---|
| spring.cloud.consul.discovery.acl-token | |
| spring.cloud.consul.discovery.catalog-services-watch-delay | 10 |
| spring.cloud.consul.discovery.catalog-services-watch-timeout | 2 |
| spring.cloud.consul.discovery.datacenters | |
| spring.cloud.consul.discovery.default-query-tag | |
| spring.cloud.consul.discovery.default-zone-metadata-name | zone |
| spring.cloud.consul.discovery.deregister | true |
| spring.cloud.consul.discovery.enabled | true |
| spring.cloud.consul.discovery.fail-fast | true |
| spring.cloud.consul.discovery.health-check-critical-timeout | |
| spring.cloud.consul.discovery.health-check-interval | 10s |
| spring.cloud.consul.discovery.health-check-path | /actuator/health |
| spring.cloud.consul.discovery.health-check-timeout | |
| spring.cloud.consul.discovery.health-check-tls-skip-verify | |
| spring.cloud.consul.discovery.health-check-url | |
| spring.cloud.consul.discovery.heartbeat.enabled | false |
| spring.cloud.consul.discovery.heartbeat.interval-ratio | |
| spring.cloud.consul.discovery.heartbeat.ttl-unit | s |
| spring.cloud.consul.discovery.heartbeat.ttl-value | 30 |
| spring.cloud.consul.discovery.hostname | |
| spring.cloud.consul.discovery.instance-group | |
| spring.cloud.consul.discovery.instance-id | 默认为服务名+环境+端口号 |
| spring.cloud.consul.discovery.instance-zone | |
| spring.cloud.consul.discovery.ip-address | |
| spring.cloud.consul.discovery.lifecycle.enabled | true |
| spring.cloud.consul.discovery.management-port | |
| spring.cloud.consul.discovery.management-suffix | management |
| spring.cloud.consul.discovery.management-tags | |
| spring.cloud.consul.discovery.port | |
| spring.cloud.consul.discovery.prefer-agent-address | false |
| spring.cloud.consul.discovery.prefer-ip-address | false |
| spring.cloud.consul.discovery.query-passing | false |
| spring.cloud.consul.discovery.register | true |
| spring.cloud.consul.discovery.register-health-check | true |
| spring.cloud.consul.discovery.scheme | http |
| spring.cloud.consul.discovery.server-list-query-tags | |
| spring.cloud.consul.discovery.service-name | |
| spring.cloud.consul.discovery.tags |
配置服务参数
| 配置项 | 默认值 |
|---|---|
| spring.cloud.consul.config.enabled | true |
| spring.cloud.consul.config.prefix | config |
| spring.cloud.consul.config.default-context | application |
| spring.cloud.consul.config.profile-separator | , |
| spring.cloud.consul.config.data-key | data |
| spring.cloud.consul.config.format | KEY_VALUE, PROPERTIES, YAML, FILES |
| spring.cloud.consul.config.name | ${spring.application.name} |
| spring.cloud.consul.config.acl-token | |
| spring.cloud.consul.config.fail-fast | false |
| spring.cloud.consul.config.watch.enabled | true |
| spring.cloud.consul.config.watch.wait-time | 55 |
| spring.cloud.consul.config.watch.delay | 1000 |
服务注册发现consul之二:在Spring Cloud中使用Consul实现服务的注册和发现的更多相关文章
- spring cloud 专题二(spring cloud 入门搭建 之 微服务搭建和注册)
一.前言 本文为spring cloud 微服务框架专题的第二篇,主要讲解如何快速搭建微服务以及如何注册. 本文理论不多,主要是傻瓜式的环境搭建,适合新手快速入门. 为了更好的懂得原理,大家可以下载& ...
- spring cloud+dotnet core搭建微服务架构:服务发现(二)
前言 上篇文章实际上只讲了服务治理中的服务注册,服务与服务之间如何调用呢?传统的方式,服务A调用服务B,那么服务A访问的是服务B的负载均衡地址,通过负载均衡来指向到服务B的真实地址,上篇文章已经说了这 ...
- spring cloud+.net core搭建微服务架构:服务发现(二)
前言 上篇文章实际上只讲了服务治理中的服务注册,服务与服务之间如何调用呢?传统的方式,服务A调用服务B,那么服务A访问的是服务B的负载均衡地址,通过负载均衡来指向到服务B的真实地址,上篇文章已经说了这 ...
- spring cloud+.net core搭建微服务架构:服务注册(一)
背景 公司去年开始使用dotnet core开发项目.公司的总体架构采用的是微服务,那时候由于对微服务的理解并不是太深,加上各种组件的不成熟,只是把项目的各个功能通过业务层面拆分,然后通过nginx代 ...
- 使用Spring Cloud Gateway保护反应式微服务(二)
抽丝剥茧,细说架构那些事——[优锐课] 接着上篇文章:使用Spring Cloud Gateway保护反应式微服务(一) 我们继续~ 将Spring Cloud Gateway与反应式微服务一起使用 ...
- 手把手教你使用spring cloud+dotnet core搭建微服务架构:服务治理(-)
背景 公司去年开始使用dotnet core开发项目.公司的总体架构采用的是微服务,那时候由于对微服务的理解并不是太深,加上各种组件的不成熟,只是把项目的各个功能通过业务层面拆分,然后通过nginx代 ...
- spring cloud+dotnet core搭建微服务架构:Api网关(三)
前言 国庆假期,一直没有时间更新. 根据群里面的同学的提问,强烈推荐大家先熟悉下spring cloud.文章下面有纯洁大神的spring cloud系列. 上一章最后说了,因为服务是不对外暴露的,所 ...
- spring cloud+dotnet core搭建微服务架构:配置中心(四)
前言 我们项目中有很多需要配置的地方,最常见的就是各种服务URL地址,这些地址针对不同的运行环境还不一样,不管和打包还是部署都麻烦,需要非常的小心.一般配置都是存储到配置文件里面,不管多小的配置变动, ...
- spring cloud+dotnet core搭建微服务架构:配置中心续(五)
前言 上一章最后讲了,更新配置以后需要重启客户端才能生效,这在实际的场景中是不可取的.由于目前Steeltoe配置的重载只能由客户端发起,没有实现处理程序侦听服务器更改事件,所以还没办法实现彻底实现这 ...
随机推荐
- c# 敏捷3 连接,批量处理,分页
class Program { public class post { public int id { get; set; } public string name { get; set; } pub ...
- 当爬虫遇到js加密
当爬虫遇到js加密 我们在做python爬虫的时候经常会遇到许多的反爬措施,js加密就是其中一种. 破解js加密的方法也有很多种: 1.直接驱动浏览器抓取数据,无视js加密. 2.找到本地加密的js代 ...
- python os模块使用笔记(更新)
import os 添加os模块 walk方法: os.walk(path) path是string形式的目标目录 生成一个某目录下递归树形目录迭代器,方便递归访问子目录,访问目录就能够轻松访问子文件 ...
- AangularJS的表单验证
Angular能够将HTML5表单验证功能同它自己的验证指令结合起来使用 Angular提供了很多表单验证指令: 1. 必填项:验证表单输入是否填写,只需在html标签上标记required 如: ...
- Go Example--切片
package main import ( "fmt" ) func main() { //make来初始化一个切片,必须指名切片的长度 s:= make([]string, 3) ...
- Js 模式匹配
模式匹配: 什么是模式匹配:可以设置查找或替换的规则! 何时使用模式匹配:要查找的关键字可能发生有规律的变化. 如何使用模式匹配: 1.先定义模式:/关键字/模式 比如:var reg=/no/i; ...
- itcast-svn
svn介绍 1.1 svn服务器的工作方式 数据 库 服务 概念 使用数据库,连接服务,服务操作库 独立服务器方式: svnserve 借助Apache方式: mod_dav_svn ...
- zabbix监控mysql最简单的方法
该实验基于我的上一篇文章监控第一台主机的基础上 首先,因为水平有限,我选择直接关闭了防火墙和SELinux. 环境: 两台centos7,服务器端IP是192.168.200.128(以下简称主机), ...
- Scala下划线_使用
下划线这个符号几乎贯穿了任何一本Scala编程书籍,并且在不同的场景下具有不同的含义,绕晕了不少初学者.正因如此,下划线这个特殊符号无形中增加Scala的入门难度.本文希望帮助初学者踏平这个小山坡. ...
- How to scale Complex Event Processing (CEP)/ Streaming SQL Systems?
转自:https://iwringer.wordpress.com/2012/05/18/how-to-scale-complex-event-processing-cep-systems/ What ...