eosjs
【eosjs】
Javascript API,用于帮助访问与 EOSIO RPC API.
1、安装
npm install eosjs@beta
2、Signature Provider
The Signature Provider holds private keys and is responsible for signing transactions.
const defaultPrivateKey = "5JtUScZK2XEp3g9gh7F8bwtPTRAkASmNrrftmx4AxDKD5K4zDnr"; // useraaaaaaaa

const signatureProvider = new JsSignatureProvider([defaultPrivateKey]);
SignatureProvider是一个接口,不能直接使用。

JsSignatureProvider 实现了 SignatureProvider接口。是唯一实现了 SignatureProvider 接口的类。应当使用这个类。
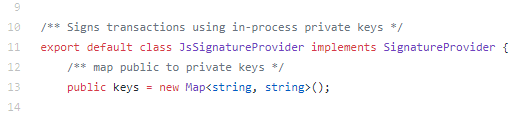
JsSignatureProvider只两个方法:

3、JSON-RPC
Open a connection to JSON-RPC, include fetch when on NodeJS.
const rpc = new JsonRpc('http://127.0.0.1:8888', { fetch });
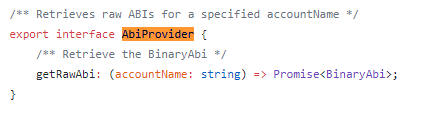
JSON-RPC 实现了 AuthorityProvider、AbiProvider 两个Interface。


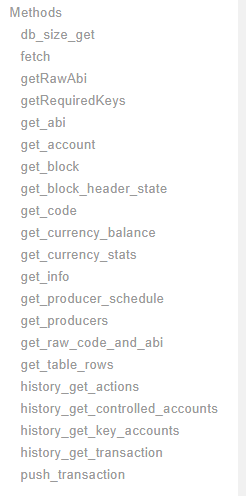
RPC 提供以下的方法:
4、API
实现了签名相关功能的类。
const api = new Api({ rpc, signatureProvider, textDecoder: new TextDecoder(), textEncoder: new TextEncoder() });
transact() is used to sign and push transactions onto the blockchain with an optional configuration object parameter.
通常使用 transaction 方法,发起一个交易:
(async () => {

  const result = await api.transact({

    actions: [{

      account: 'eosio.token',

      name: 'transfer',

      authorization: [{

        actor: 'useraaaaaaaa',

        permission: 'active',

      }],

      data: {

        from: 'useraaaaaaaa',

        to: 'useraaaaaaab',

        quantity: '0.0001 SYS',

        memo: '',

      },

    }]

  }, {

    blocksBehind: 3,

    expireSeconds: 30,

  });

  console.dir(result);

})();
transact是一个 async主法:

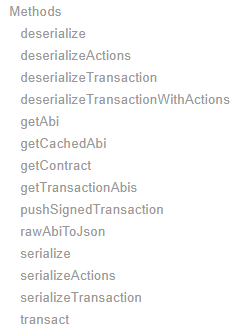
API 对象提供以下主法:
5、通常的使用流程。
使用 JsonRpc 对象、JsSignatureProvider 对象来创建一个 Api对象。
const { Api, JsonRpc } = require('eosjs');

const JsSignatureProvider = require('eosjs/dist/eosjs-jssig');  // development only

const fetch = require('node-fetch');                            // node only; not needed in browsers

const { TextDecoder, TextEncoder } = require('text-encoding');  // node, IE11 and IE Edge Browsers

const privateKeys = [privateKey1];

const signatureProvider = new JsSignatureProvider(privateKeys);

const rpc = new JsonRpc('http://127.0.0.1:8888', { fetch });

const api = new Api({ rpc, signatureProvider, textDecoder: new TextDecoder(), textEncoder: new TextEncoder() });
后续就使用 api.transact 来发起交易:
const result = await api.transact({

  actions: [{

    account: 'eosio',

    name: 'buyrambytes',

    authorization: [{

      actor: 'useraaaaaaaa',

      permission: 'active',

    }],

    data: {

      payer: 'useraaaaaaaa',

      receiver: 'useraaaaaaaa',

      bytes: 8192,

    },

  }]

}, {

  blocksBehind: 3,

  expireSeconds: 30,

});
参考:
1、https://eosio.github.io/eosjs/
2、https://github.com/EOSIO/eosjs/tree/08b474e8c25ccccf2701ca04268fa5149728baa1
eosjs的更多相关文章
- eos TODO EOS区块链上EOSJS和scatter开发dApp
由于我一直在深入研究EOS dApp的开发,我看了不少好文章.在这里,我汇总了下做一些研究后得到的所有知识.在本文中,我将解释如何使用EOSJS和scatter.我假设你对智能合约以及如何在EOS区块 ...
- EOS开发实战
EOS开发实战 在上一篇文章<EOS开发入门>中,我们为大家介绍了EOS的节点启动和合约部署和调用等入门知识.本次我们来实现一个复杂的例子,可以为其取一个高大上的名字-悬赏任务管理系统 ...
- fibos开发踩坑集合
fibos.js API资料: 与eosjs相比,fibos.js没有添加新功能,可以在eosjs项目页面https://developers.eos.io/eosio-nodeos/referenc ...
- Setting up Scatter for Web Applications
[Setting up Scatter for Web Applications] If you are still using scatter-js please move over to scat ...
- 【精解】EOS TPS 多维实测
本文主要研究EOS的tps表现,会从插件.cleos.EOSBenchTool以及eosjs四种方式进行分析研究. 关键字:eos, tps, cleos, txn_test_gen_plugin, ...
- 【源码解读】EOS测试插件:txn_test_gen_plugin.cpp
本文内容本属于<[精解]EOS TPS 多维实测>的内容,但由于在编写时篇幅过长,所以我决定将这一部分单独成文撰写,以便于理解. 关键字:eos, txn_test_gen_plugin, ...
- 怎样使用EOS.JS的API
https://medium.com/coinmonks/how-to-use-eosjs-api-1-770b037b22ad https://blog.csdn.net/mongo_node/ar ...
- eos开发实践
一 下载前端代码 git clone https://github.com/baidang201/eos-todo 二 安装nodejs sudo apt-get install python-sof ...
- EOS源码分析:transaction的一生
最近在处理智能合约的事务上链问题,发现其中仍旧有知识盲点.原有的认识是一个事务请求会从客户端设备打包签名,然后通过RPC传到非出块节点,广播给超级节点,校验打包到可逆区块,共识确认最后变为不可逆区块. ...
随机推荐
- node 创建server 及加载静态页面
1.Demo.js 创建Server let http = require('http'); let url = require("url"); let util = re ...
- VM下如何装虚拟机?
1.打开VM,点击创建新的虚拟机 2.选择典型,点击下一步 3.选择下载好的iso文件,如下: 4.输入如下参数,点击下一步:
- hdu 1166 (单点更新+区间求和+裸题)
敌兵布阵 Time Limit: 2000/1000 MS (Java/Others) Memory Limit: 65536/32768 K (Java/Others) Total Submissi ...
- 面向对象+JAVA基础
泛泛的研究了面向对象的前五章,感觉没有代码的参照理解的知识看过就忘,所以又在推荐下开始了JAVA基础,希望不会鄙视我目前么有一本书能完整看完的记录... public class LeapYear { ...
- list基本代码
#include<iostream> #include<list> //STL之list的基本用法 using namespace std; void outputList(l ...
- Java类加载过程及static详解
类从被加载到JVM中开始,到卸载为止,整个生命周期包括:加载.验证.准备.解析.初始化.使用和卸载七个阶段. 其中类加载过程包括加载.验证.准备.解析和初始化五个阶段. 类加载器的任务就是根据一个类的 ...
- 全志A33开发板Linux内核定时器编程
开发平台 * 芯灵思SinlinxA33开发板 淘宝店铺: https://sinlinx.taobao.com/ 嵌入式linux 开发板交流 QQ:641395230 Linux 内核定时器是内核 ...
- java post json sample
import java.io.OutputStream; import java.net.HttpURLConnection; import java.net.URL; public class Te ...
- pass
空语句 do nothing 保证格式完整 保证语义完整 以if语句为例,在c或c++/java中: if(true) ; //do nothing else { //do something } 1 ...
- 使用openresty && minio && thumbor 构建稳定高效的图片服务器
备注: minio 是一个开源的s3 协议兼容的分布式存储,openresty nginx+lua 高性能可扩展的nginx 衍生版,thumbor 基于python 的图片处理服务器,支持图片的裁剪 ...