php建立简单的用户留言系统
php建立简单的用户留言系统
样例
addMsg.php--添加留言页面
doAction.php--响应添加留言页面
 、
、
viewMsg.php--显示留言页面

目录结构

addMsg.php--添加留言页面
doAction.php--响应添加留言页面
viewMsg.php--显示留言页面
message.txt--数据的本地化存储
代码
addMsg.php
<!DOCTYPE html>
<html>
<head lang="en">
<meta charset="UTF-8">
<title></title>
</head>
<body>
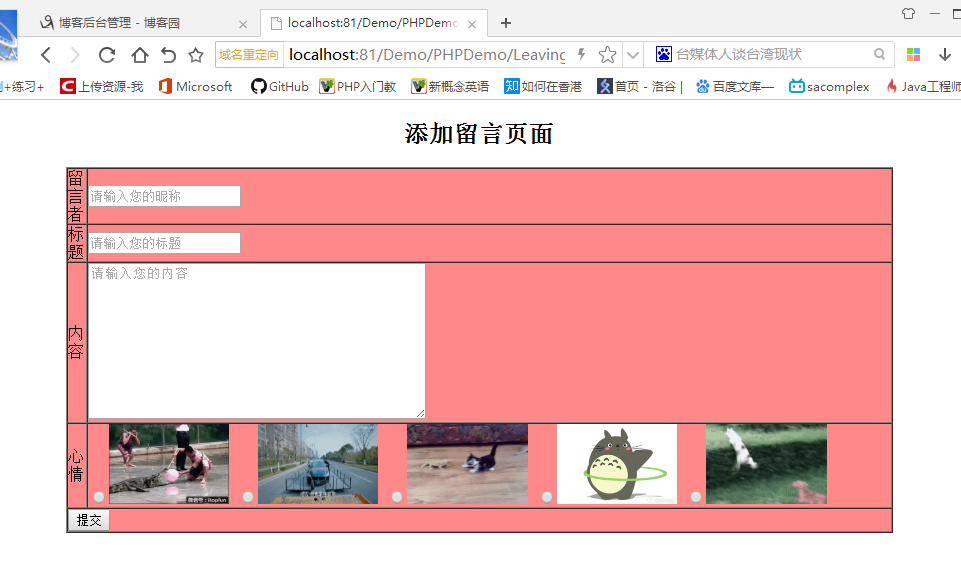
<h2 style="text-align: center;">添加留言页面</h2>
<form action="doAction.php" method="get">
<input type="hidden" name="act" value="add">
<table style="margin: 0 auto;" border="1" width="80%" cellpadding="0" cellspacing="0" bgcolor="#FF8888">
<tr>
<td>留言者</td>
<td><input type="text" name="username" id="" placeholder="请输入您的昵称"/></td>
</tr>
<tr>
<td>标题</td>
<td><input type="text" name="title" id="" placeholder="请输入您的标题"/></td>
</tr>
<tr>
<td>内容</td>
<td><textarea name="content" rows="10" cols="45" placeholder="请输入您的内容"></textarea></td>
</tr>
<tr>
<td>心情</td>
<td>
<input type="radio" name="moon" value="g1.gif" cheched="cheched"/><img width="15%" height="80" alt="" src="img/g1.gif">
<input type="radio" name="moon" value="g2.gif" /><img width="15%" height="80" alt="" src="img/g2.gif">
<input type="radio" name="moon" value="g3.gif" /><img width="15%" height="80" alt="" src="img/g3.gif">
<input type="radio" name="moon" value="g4.gif" /><img width="15%" height="80" alt="" src="img/g4.gif">
<input type="radio" name="moon" value="g5.gif" /><img width="15%" height="80" alt="" src="img/g5.gif">
</td>
</tr>
<tr>
<td colspan="2"><input type="submit"></td>
</tr>
</table>
</form>
</body>
</html>
9、get传值到action
10、hidden元素,便于页面传值
14、placeholder
27、radio元件和ima元件
28、colspan合并单元格
doAction.php
<?php
$username = isset($_GET['username'])?$_GET['username']:'';
$title = isset($_GET['title'])?$_GET['title']:'';
$content = isset($_GET['content'])?$_GET['content']:'';
$moon = isset($_GET['moon'])?$_GET['moon']:'';
$time = date('Y-m-d h:i:s');
$act = isset($_GET['act'])?$_GET['act']:''; $filename = 'message.txt';
// echo $username.$title.$content.$moon;
//来到doAction页面的时候先做一个判断1、message页面是否已经存在 2、文件里面有没有数据 3、有数据的话就把数据取出来
12 if(file_exists($filename)&&filesize($filename)>0){
//从message.txt里面取数据
$str = file_get_contents($filename);
//通过反序列化把字符串转化成我们的二维数组
$arr = unserialize($str);
} if ($act == 'add') {
$arr[]=array(
'username'=>$username,
'title'=>$title,
'content'=>$content,
'moon'=>$moon,
'time'=>$time
);
$data = serialize($arr);
// print_r($arr);
//判断是否添加成功了
if(file_put_contents($filename, $data)){
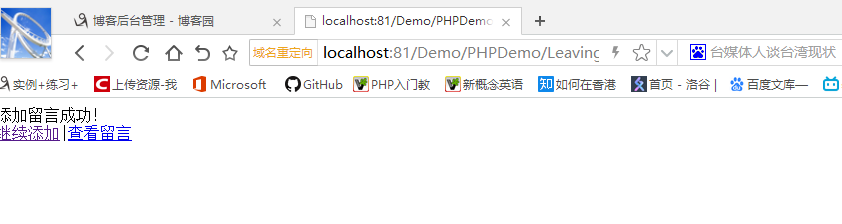
echo '添加留言成功!<br/><a href="addMsg.php">继续添加</a>|<a href="viewMsg.php">查看留言</a>';
}else{
echo '添加留言失败!';
}
}
2、$_GET取其它页面get方式传过来的值,isset确定是否为null,所以配合三元运算符使用
12、如果文件存在并且文件不为空,那就是message.txt中拿到数据
13、file_get_contents从文件中拿到字符串
14、拿到的字符串反序列化就是数组的数据,unserialize
19、如果是添加数据页面,那就添加数据
20、二维数组赋值
27、序列化
30、将序列化的数据存储到本地的文本文件中去
viewMsg.php
 <?php

     $filename = 'message.txt';

     if(file_exists($filename)&&filesize($filename)>0){

         //从message.txt里面取数据

         $str = file_get_contents($filename);

         //通过反序列化把字符串转化成我们的二维数组

         $userInfo = unserialize($str);

     }else{

         $userInfo = null;

     }

 ?>

 <!DOCTYPE html>

 <html>

 <head lang="en">

     <meta charset="UTF-8">

     <title></title>

     <script src="jquery-2.2.3.js" type="text/javascript"></script>

 </head>

 <body>

     <h3 style="text-align:center;">留言列表页-<a href="addMsg.php">添加留言</a></h3>

     <table style="margin: 0 auto;" border="1" width="80%" cellpadding="0" cellspacing="0" backcolor="blue">

         <tr style="text-align:center;">

         <td>编号</td>

         <td>标题</td>

         <td>内容</td>

         <td>留言者</td>

         <td>发布时间</td>

         <td>心情</td>

         </tr>

         <?php

             foreach ($userInfo as $key=>$val){

         ?>

         <tr style="text-align:center;">

         <td><?php echo $key?></td>

         <td><?php echo $val['username'];?></td>

         <td><?php echo $val['title'];?></td>

         <td><?php echo $val['content'];?></td>

         <td><?php echo $val['time'];?></td>

         <td><img width="100" height="50" alt="" src="img/<?php echo $val['moon'];?>"></td>

         </tr>

         <?php }  ?>

     </table>

 </body>

 </html>
5、留言页的数据从文本中拿出
31、foreach遍历数组的内容然后显示到留言页面
message.txt
a:13:{i:0;a:5:{s:8:"username";s:9:"范仁义";s:5:"title";s:2:"23";s:7:"content";s:2:"23";s:4:"moon";s:6:"g1.gif";s:4:"time";s:19:"2018-03-11 01:18:40";}i:1;a:5:{s:8:"username";s:9:"范仁义";s:5:"title";s:2:"23";s:7:"content";s:2:"23";s:4:"moon";s:6:"g1.gif";s:4:"time";s:19:"2018-03-11 01:18:40";}i:2;a:5:{s:8:"username";s:6:"留言";s:5:"title";s:2:"23";s:7:"content";s:2:"23";s:4:"moon";s:6:"g3.gif";s:4:"time";s:19:"2018-03-11 01:19:13";}i:3;a:5:{s:8:"username";s:6:"留言";s:5:"title";s:2:"23";s:7:"content";s:2:"23";s:4:"moon";s:6:"g3.gif";s:4:"time";s:19:"2018-03-11 01:19:13";}i:4;a:5:{s:8:"username";s:12:"不要多啊";s:5:"title";s:2:"21";s:7:"content";s:2:"21";s:4:"moon";s:6:"g1.gif";s:4:"time";s:19:"2018-03-11 01:22:00";}i:5;a:5:{s:8:"username";s:12:"不要多啊";s:5:"title";s:2:"21";s:7:"content";s:2:"21";s:4:"moon";s:6:"g1.gif";s:4:"time";s:19:"2018-03-11 01:22:00";}i:6;a:5:{s:8:"username";s:6:"页面";s:5:"title";s:6:"页面";s:7:"content";s:6:"页面";s:4:"moon";s:6:"g5.gif";s:4:"time";s:19:"2018-03-11 01:23:56";}i:7;a:5:{s:8:"username";s:6:"页面";s:5:"title";s:6:"页面";s:7:"content";s:6:"页面";s:4:"moon";s:6:"g5.gif";s:4:"time";s:19:"2018-03-11 01:23:56";}i:8;a:5:{s:8:"username";s:7:"页面2";s:5:"title";s:7:"页面2";s:7:"content";s:7:"页面2";s:4:"moon";s:6:"g5.gif";s:4:"time";s:19:"2018-03-11 01:33:45";}i:9;a:5:{s:8:"username";s:0:"";s:5:"title";s:0:"";s:7:"content";s:0:"";s:4:"moon";s:0:"";s:4:"time";s:19:"2018-03-11 01:36:11";}i:10;a:5:{s:8:"username";s:0:"";s:5:"title";s:0:"";s:7:"content";s:0:"";s:4:"moon";s:0:"";s:4:"time";s:19:"2018-03-11 01:36:27";}i:11;a:5:{s:8:"username";s:6:"测试";s:5:"title";s:6:"测试";s:7:"content";s:6:"测试";s:4:"moon";s:6:"g4.gif";s:4:"time";s:19:"2018-03-11 01:48:53";}i:12;a:5:{s:8:"username";s:9:"样例一";s:5:"title";s:9:"样例一";s:7:"content";s:45:"样例一样例一样例一样例一样例一";s:4:"moon";s:6:"g4.gif";s:4:"time";s:19:"2018-03-11 04:25:39";}}
总结
php做网站真的比Java块很多方便很多。
php建立简单的用户留言系统的更多相关文章
- Springboot - 建立简单的用户登录系统
在开始编码前,先建立几个Package(可以按个人习惯命名),如图 1.Controllers 用于存放控制器类 2.Models 用于存放数据实体类 3.Repositories 用于存放数据库操作 ...
- Servlet --简单用户留言系统
1.创建用户表和留言表 2.编写数据库连接工具类 public class SqlserverDBConn { private Statement stmt; private Connection c ...
- 【译】建立属于你的个人高效系统——效率专家 Mike Vardy 教你如何设置一个简单的个人高效系统
原文:http://mux.baidu.com/?p=5300 百度MUX 已经有太多的高效系统供人使用,而对于那些刚刚开始,想寻求更好方法完成他们任务,项目,目标的人来说,要做一个高效系统却是相当艰 ...
- django初探-创建简单的博客系统
django第一步 1. django安装 pip install django print(django.get_version()) 查看django版本 2. 创建项目 打开cmd,进入指定目录 ...
- linux用户权限 -> 系统用户管理
用户基本概述: Linux用户属于多用户操作系统,在windows中,可以创建多个用户,但不允许同一时间多个用户进行系统登陆,但是Linux可以同时支持多个用户同时登陆操作系统,登陆后互相之间并不影响 ...
- django初探-创建简单的博客系统(一)
django第一步 1. django安装 pip install django print(django.get_version()) 查看django版本 2. 创建项目 打开cmd,进入指定目录 ...
- Asp.Net MVC+BootStrap+EF6.0实现简单的用户角色权限管理10
今天把用户的菜单显示和页面的按钮显示都做好了,下面先来个效果图 接下来说下我实现的方法: 首先我在每个方法前面都加了这个属性, /// <summary> /// 表示当前Action请求 ...
- 纯jsp用户登录系统
用纯jsp技术实现用户登录系统,需要用到三个.jsp文件.在文本目录下新建三个.jsp文件,分别命名为login.jsp,logincl.jsp和wel.jsp. 1.login.jsp文件用来放界面 ...
- 基于Servlet、JSP、JDBC、MySQL的一个简单的用户注冊模块(附完整源代码)
近期看老罗视频,做了一个简单的用户注冊系统.用户通过网页(JSP)输入用户名.真名和password,Servlet接收后通过JDBC将信息保存到MySQL中.尽管是个简单的不能再简单的东西,但麻雀虽 ...
随机推荐
- 5.13Mysql数据库Database
数据库的基本概念 1.什么是数据库: 用于存储和管理数据的仓库. 2.数据库的特点: 1.持久化存储数据的.其实数据库就是一个文件系统. 2.方便存储和管理数据 3.使用了统一的方式操作数据库---s ...
- Android 关于Fragment重叠问题分析和解决
一.问题描述 相信大家在使用Fragment的过程中,肯定碰到过Fragment重叠的问题,重启应用就好了.然而原因是什么呢? 二.原因分析 首先,Android管理Fragment有两种方式,使用a ...
- Spring logger 配置
1. logback-spring.xml <?xml version="1.0" encoding="UTF-8"?> <configura ...
- 171129-workaround on ubuntu-seting up piston for steem
setup ubuntu environment variables sudo vi /etc/environment Then set all below variables: percentCha ...
- PCL:描述三维离散点的ROPS特征(Code)
前言: 三维点云为三维欧式空间点的集合.对点云的形状描述若使用局部特征,则可分为两种:固定世界坐标系的局部描述和寻找局部主方向的局部描述,ROPS特征为寻找局部主方向的特征描述. 1.寻找主方向(对X ...
- ubuntu16.04安装KDE
由于对KDE界面情有独钟,升级到ubuntu之后,第一件事就是安装kde桌面 命令: add-apt-repository ppa:kubuntu-ppa/backports apt-get upda ...
- ssl_protocols和ssl_ciphers应该怎么配置
http://wiki.nginx.org/HttpSslModule#ssl_ciphers 推荐配置: A) 在Apache 的 SSL 配置中禁用 SSLv3 和 SSLv3SSLProtoco ...
- .NET 人工智能相关资料整理
机器学习组件:https://www.cnblogs.com/asxinyu/p/dotnet_Opensource_project_AccordNET.html ML.NET: ...
- kmp板子
kmp 容易理解板子 详情见知乎 算法思想 对模式串求PMT,但实际上nxt数组是PMT向前移动一位 nxt数组含义:记母串为m[],模式串为p[]; m[i]与p[j]比较失配,需要比较m[i]与p ...
- PAT_A1120#Friend Numbers
Source: PAT A1120 Friend Numbers (20 分) Description: Two integers are called "friend numbers&qu ...