JSON Web Tokens(JWT)
现在API越来越流行,如何安全保护这些API? JSON Web Tokens(JWT)能提供基于JSON格式的安全认证。它有以下特点:
- JWT是跨不同语言的,JWT可以在 .NET, Python, Node.js, Java, PHP, Ruby, Go, JavaScript和Haskell中使用
- JWT是自我包涵的,它们包含了必要的所有信息,这就意味着JWT能够传递关于它自己的基本信息,比如用户信息和签名等。
- JWT传递是容易的,因为JWT是自我包涵,它们能被完美用在HTTP头部中,当需要授权API时,你只要通过URL一起传送它既可。
JWT易于辨识,是三段由小数点组成的字符串:
aaaaaaaaaa.bbbbbbbbbbb.cccccccccccc
这三部分含义分别是header,payload, signature
Header
头部包含了两个方面:类型和使用的哈希算法(如HMAC SHA256):
{

"typ": "JWT",

"alg": "HS256"

}
对这个JSON字符进行base64encode编码,我们就有了首个JWT:
eyJhbGciOiJIUzI1NiIsInR5cCI6IkpXVCJ9
Payload
JWT的第二部分是payload,也称为 JWT Claims,这里放置的是我们需要传输的信息,有多个项目如注册的claim名称,公共claim名称和私有claim名称。
注册claim名称有下面几个部分:
- iss: token的发行者
- sub: token的题目
- aud: token的客户
- exp: 经常使用的,以数字时间定义失效期,也就是当前时间以后的某个时间本token失效。
- nbf: 定义在此时间之前,JWT不会接受处理。开始生效时间
- iat: JWT发布时间,能用于决定JWT年龄
- jti: JWT唯一标识. 能用于防止 JWT重复使用,一次只用一个token;如果签发的时候这个claim的值是“1”,验证的时候如果这个claim的值不是“1”就属于验证失败
公共claim名称用于定义我们自己创造的信息,比如用户信息和其他重要信息。
私有claim名称用于发布者和消费者都同意以私有的方式使用claim名称。
下面是JWT的一个案例:
{

"iss": "scotch.io",

"exp": 1300819380,

"name": "Chris Sevilleja",

"admin": true

}
签名
JWT第三部分最后是签名,签名由以下组件组成:
- header
- payload
- 密钥
下面是我们如何得到JWT的第三部分:
var encodedString = base64UrlEncode(header) + "." + base64UrlEncode(payload); HMACSHA256(encodedString, 'secret');
这里的secret是被服务器签名,我们服务器能够验证存在的token并签名新的token。
TWT支持的算法有:

============================================================================================================
以上是官网的理论部分,下面会有提供一些实例:
首先 导入 依赖:
<dependency>

    <groupId>com.auth0</groupId>

    <artifactId>java-jwt</artifactId>

    <version>3.2.0</version>

</dependency>
1, 指定加密算法:
//HMAC

Algorithm algorithmHS = Algorithm.HMAC256("secret");


-------------------------------------------------------------------------
//RSA

Map<String,Object> keys=RSAUtils.getKeys();
RSAPublicKey publicKey = (RSAPublicKey)keys.get("public"); //Get the key instance
RSAPrivateKey privateKey = (RSAPrivateKey)keys.get("private");//Get the key instance
Algorithm algorithmRS = Algorithm.RSA256(publicKey, privateKey);
2 , 生成token
用HS256生成token
try {

    Algorithm algorithm = Algorithm.HMAC256("secret");

    String token = JWT.create()

        .withIssuer("auth0")

        .sign(algorithm);

} catch (UnsupportedEncodingException exception){

    //UTF-8 encoding not supported

} catch (JWTCreationException exception){

    //Invalid Signing configuration / Couldn't convert Claims.

}
用RS256生成token
 Map<String,Object> keys=RSAUtils.getKeys();

        RSAPublicKey publicKey = (RSAPublicKey)keys.get("public"); //Get the key instance

        RSAPrivateKey privateKey = (RSAPrivateKey)keys.get("private");//Get the key instance

try {

    Algorithm algorithm = Algorithm.RSA256(publicKey, privateKey);

    String token = JWT.create()

        .withIssuer("auth0")

        .sign(algorithm);

} catch (JWTCreationException exception){

    //Invalid Signing configuration / Couldn't convert Claims.

}
3, 验证token
1)普通验证
用HS256验证token
String token = "eyJhbGciOiJIUzI1NiIsInR5cCI6IkpXUyJ9.eyJpc3MiOiJhdXRoMCJ9.AbIJTDMFc7yUa5MhvcP03nJPyCPzZtQcGEp-zWfOkEE";

try {

    Algorithm algorithm = Algorithm.HMAC256("secret");

    JWTVerifier verifier = JWT.require(algorithm)

        .withIssuer("auth0")

        .build(); //Reusable verifier instance

    DecodedJWT jwt = verifier.verify(token);

} catch (UnsupportedEncodingException exception){

    //UTF-8 encoding not supported

} catch (JWTVerificationException exception){

    //Invalid signature/claims

}
用RS256验证token
String token = "eyJhbGciOiJIUzI1NiIsInR5cCI6IkpXUyJ9.eyJpc3MiOiJhdXRoMCJ9.AbIJTDMFc7yUa5MhvcP03nJPyCPzZtQcGEp-zWfOkEE";

RSAPublicKey publicKey = //Get the key instance

RSAPrivateKey privateKey = //Get the key instance

try {

    Algorithm algorithm = Algorithm.RSA256(publicKey, privateKey);

    JWTVerifier verifier = JWT.require(algorithm)

        .withIssuer("auth0")

        .build(); //Reusable verifier instance

    DecodedJWT jwt = verifier.verify(token);

} catch (JWTVerificationException exception){

    //Invalid signature/claims

}
2)在payLoad 是可以自定义数据,用于验证,包括时间等。
在生成token的时候指定数据:
@Test

   public void gen1() throws IOException {

        String token ="";

        SimpleDateFormat sdf = new SimpleDateFormat("yyyy-MM-dd HH:mm:ss");

        //日期转字符串

            Calendar calendar = Calendar.getInstance();

            calendar.add(Calendar.SECOND,30 ); //特定时间的年后

            Date date = calendar.getTime();

        try {

           Algorithm algorithm = Algorithm.HMAC256("mysecrite");

            token = JWT.create()

                   .withIssuer("auth0")

                    .withSubject("xiaoming")

                    .withClaim("name", 123)

                    .withArrayClaim("array", new Integer[]{1, 2, 3})

                    .withExpiresAt(date)

                   .sign(algorithm);

           System.out.println("loglogagel:"+token);

       } catch (UnsupportedEncodingException exception){

           //UTF-8 encoding not supported

       } catch (JWTCreationException exception){

           //Invalid Signing configuration / Couldn't convert Claims.

       }

   }
验证token是否过期,是否有制定的
@Test

  public void gen3(){

      String token = "eyJ0eXAiOiJKV1QiLCJhbGciOiJIUzI1NiJ9.eyJpc3MiOiJhdXRoMCIsImV4cCI6MTQ5NzY4NTQwOX0.DHY-90JAA63_TvI-gRZ2oHCIItMajb45zB1tdCHQ_NQ";

      try {

          Algorithm algorithm = Algorithm.HMAC256("mysecrite");

          JWTVerifier.BaseVerification verification = (JWTVerifier.BaseVerification) JWT.require(algorithm)

                  .withIssuer("auth0")

                  .withSubject("xiaomong");

          Clock clock = new Clock() {

              @Override

              public Date getToday() {

                  return new Date();

              }

          };//Must implement Clock interface

          JWTVerifier verifier = verification.build(clock);

          DecodedJWT jwt = verifier.verify(token);

          System.out.println(jwt.getAlgorithm());

          System.out.println(jwt.getType());

          System.out.println(jwt.getIssuer());

          System.out.println(jwt.getExpiresAt());

      } catch (UnsupportedEncodingException exception){

          //UTF-8 encoding not supported

          exception.printStackTrace();

      } catch (JWTVerificationException exception){

          //Invalid signature/claims

          exception.printStackTrace();

      }

}
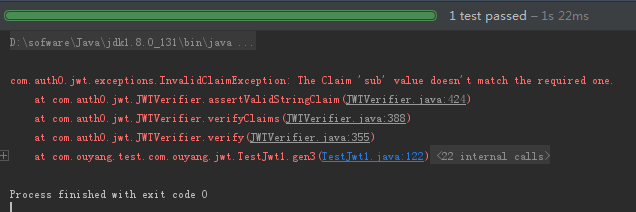
如果 subject验证的不一致,就会报如下错误:
如果时间超过 30 秒,会报如下错误:

对验证的方法稍加修改:
 @Test

  public void gen3(){

      String token = "eyJ0eXAiOiJKV1QiLCJhbGciOiJIUzI1NiJ9.eyJzdWIiOiJ4aWFvbWluZyIsImFycmF5IjpbMSwyLDNdLCJpc3MiOiJhdXRoMCIsIm5hbWUiOiJJYW0gcmlnaHQgZnJvbSBjbGFpbSIsImV4cCI6MTQ5NzY4OTQ4NX0.6lsXISVAgi8B2wAvaZq4tj-h9Pgd6GGaOYZLz_gPFMU";

      try {

          Algorithm algorithm = Algorithm.HMAC256("mysecrite");

          JWTVerifier.BaseVerification verification = (JWTVerifier.BaseVerification) JWT.require(algorithm)

                  .withIssuer("auth0")

                  .withSubject("xiaoming");

          Clock clock = new Clock() {

              @Override

              public Date getToday() {

                  return new Date();

              }

          };//Must implement Clock interface

          JWTVerifier verifier = verification.build(clock);

          DecodedJWT jwt = verifier.verify(token);

          Map<String, Claim> claims = jwt.getClaims();    //Key is the Claim name

          Claim claim = claims.get("name");

          System.out.println(claim.asString());    //打印出claim的值

          System.out.println(jwt.getAlgorithm());

          System.out.println(jwt.getType());

          System.out.println(jwt.getIssuer());

          System.out.println(jwt.getExpiresAt());

      } catch (UnsupportedEncodingException exception){

          //UTF-8 encoding not supported

          exception.printStackTrace();

      } catch (JWTVerificationException exception){

          //Invalid signature/claims

          exception.printStackTrace();

      }
验证后的最后结果:

4,claim的添加,获取
1) 内置的payload主要有以下几个,如果没有就返回null
Issuer ("iss") :发布者
String issuer = jwt.getIssuer();
Subject ("sub")
String subject = jwt.getSubject();
Audience ("aud")
List<String> audience = jwt.getAudience();
Expiration Time ("exp")
Date expiresAt = jwt.getExpiresAt();
Not Before ("nbf")
Date notBefore = jwt.getNotBefore();
Issued At ("iat")
Date issuedAt = jwt.getIssuedAt();
JWT ID ("jti")
String id = jwt.getId();
2)定义私有的claim
添加:
String token = JWT.create()

        .withClaim("name", 123)

        .withArrayClaim("array", new Integer[]{1, 2, 3})

        .sign(algorithm);
获取:
JWTVerifier verifier = JWT.require(algorithm)

    .withClaim("name", 123)

    .withArrayClaim("array", 1, 2, 3)

    .build();

DecodedJWT jwt = verifier.verify("my.jwt.token");
目前,官方支持claim的类型的有:Boolean, Integer, Double, String, Date , String[] 和 Integer.
5, Header Claims
1)header claims 是定义header部分的内容,基本都是默认定义,不需要自己去设置的,内置的有:
Algorithm ("alg")
String algorithm = jwt.getAlgorithm();
Type ("typ")
String type = jwt.getType();
Content Type ("cty")
String contentType = jwt.getContentType();
Key Id ("kid")
String keyId = jwt.getKeyId();
2)添加:
Map<String, Object> headerClaims = new HashMap();

headerClaims.put("owner", "auth0");

String token = JWT.create()

        .withHeader(headerClaims)

        .sign(algorithm);
3)获取:
Claim claim = jwt.getHeaderClaim("owner");
总结: 看了其他人的一些博客,发现他们的api都是相对老一点的版本,生成token是一步一步来,新的确实简单方便很多。分享就这里,欢迎交流。
补充参考链接:
web 中使用jwt: https://github.com/jwtk/jjwt
参考地址:https://github.com/auth0/java-jwt
JSON Web Tokens(JWT)的更多相关文章
- Spring Boot集成JSON Web Token(JWT)
一:认证 在了解JWT之前先来回顾一下传统session认证和基于token认证. 1.1 传统session认证 http协议是一种无状态协议,即浏览器发送请求到服务器,服务器是不知道这个请求是哪个 ...
- 10分钟了解JSON Web令牌(JWT)
JSON Web Token(JWT)是目前最流行的跨域身份验证解决方案.虫虫今天给大家介绍JWT的原理和用法. 1.跨域身份验证 Internet服务无法与用户身份验证分开.一般过程如下. 1.用户 ...
- JSON WEB TOKEN(JWT)的分析
JSON WEB TOKEN(JWT)的分析 一般情况下,客户的会话数据会存在文件中,或者引入redis来存储,实现session的管理,但是这样操作会存在一些问题,使用文件来存储的时候,在多台机器上 ...
- JSON Web Token(JWT)使用步骤说明
在JSON Web Token(JWT)原理和用法介绍中,我们了解了JSON Web Token的原理和用法的基本介绍.本文我们着重讲一下其使用的步骤: 一.JWT基本使用 Gradle下依赖 : c ...
- JSON Web Token(JWT)原理和用法介绍
JSON Web Token(JWT)是目前最流行的跨域身份验证解决方案.今天给大家介绍一下JWT的原理和用法. 官网地址:https://jwt.io/ 一.跨域身份验证 Internet服务无法与 ...
- JSON Web Token(JWT)机制
JSON Web Token(JWT)机制 JWT是一种紧凑且自包含的,用于在多方传递JSON对象的技术.传递的数据可以使用数字签名增加其安全行.可以使用HMAC加密算法或RSA公钥/私钥加密方式. ...
- 了解JSON Web令牌(JWT)
JSON Web Token(JWT)是目前最流行的跨域身份验证解决方案.今天给大家介绍JWT的原理和用法. 1.跨域身份验证 Internet服务无法与用户身份验证分开.一般过程如下. 1.用户向服 ...
- JSON Web令牌(JWT)介绍与使用
手机端接口开发会遇到一个问题是,接口登录后需要返回一个Token.token首先有一点必须唯一,每次请求都需要把token给带上.基于必须唯一的特性,很多朋友在开发是都选择了uuid.是不是token ...
- JSON Web Token(JWT)的详解
1.传统身份验证和JWT的身份验证 传统身份验证: HTTP 是一种没有状态的协议,也就是它并不知道是谁是访问应用.这里我们把用户看成是客户端,客户端使用用户名还有密码通过了身份验证,不过下回这个客户 ...
随机推荐
- 使用keepalived使用主备热备份功能
图: 配置文件: 主服务器的配置如下: global_defs { router_id NodeA}vrrp_instance VI_1 { state MASTER #设置为主服务器 interfa ...
- win10 UWP 发邮件
UWP 下如何发邮件?可以使用mailto:xx?subject=*方式发送? 本文:如何在 UWP 使用默认邮件发邮件. 打开设置,应用,默认应用,选择应用 OutLook.这样就和我的一样,如果出 ...
- Android基础知识笔记01—框架结构与四大组件
-----------Andriod 01--------------->>> Andriod系统架构 linux内核与驱动层. 系统运行库层. 应用框架层. 应用层 内核驱动 ...
- (转)Java Socket编程
原文出自:http://www.cnblogs.com/rocomp/p/4790340.html Socket是网络驱动层提供给应用程序编程接口和一种机制.可以把Socket比喻成一个港口码头,应用 ...
- intelliJ IDEA安装、激活与汉化
1.去intelliJ IDEA 官网下载idea,选择Ultimate版本(非免费版,community免费但功能较少) 2.开始安装 3.选择好路径 4.选择在桌面创建的快捷方式(注意32bit和 ...
- Android 圆角的效果实现
Android 自定义ImageView实现圆角图片昨天给学生布置作业,写微信首页,也就是聊天的界面,listView里的item中联系人的头像是圆角的,图形界面如下: 那么我就仔细研究了圆角的具体实 ...
- 树莓派.安装Samba环境
适用于树莓派3 树莓派装好系统后, 为了方便传文件到树莓派, 建议使用Samba这类文件夹级别的应用, 比ftp方便多了 如果你想把树莓派变成Nas, Samba也是不可或缺的应用 通过samba服务 ...
- LeetCode 339. Nested List Weight Sum (嵌套列表重和)$
Given a nested list of integers, return the sum of all integers in the list weighted by their depth. ...
- Fastify 系列教程三 (验证、序列化和生命周期)
Fastify 系列教程: Fastify 系列教程一 (路由和日志) Fastify 系列教程二 (中间件.钩子函数和装饰器) Fastify 系列教程三 (验证.序列化和生命周期) 验证 Fast ...
- 从零使用Python测试。Testing Using Python.
0. 写在前面 本人使用Python测试已有多年,略有些皮毛经验.每次有新员工入职,都会从头教一遍如何入门上手使用Python进行测试.趁这段有空,整理成文档,也好方便后续新员工学习.文章如有不妥之处 ...