
biancheng-Spring Cloud Alibaba Seata
随着业务的不断发展,单体架构已经无法满足我们的需求,分布式微服务架构逐渐成为大型互联网平台的首选,但所有使用分布式微服务架构的应用都必须面临一个十分棘手的问题,那就是“分布式事务”问题。
在分布式微服务架构中,几乎所有业务操作都需要多个服务协作才能完成。对于其中的某个服务而言,它的数据一致性可以交由其自身数据库事务来保证,但从整个分布式微服务架构来看,其全局数据的一致性却是无法保证的。
例如,用户在某电商系统下单购买了一件商品后,电商系统会执行下 4 步:
- 调用订单服务创建订单数据
- 调用库存服务扣减库存
- 调用账户服务扣减账户金额
- 最后调用订单服务修改订单状态
为了保证数据的正确性和一致性,我们必须保证所有这些操作要么全部成功,要么全部失败,否则就可能出现类似于商品库存已扣减,但用户账户资金尚未扣减的情况。各服务自身的事务特性显然是无法实现这一目标的,此时,我们可以通过分布式事务框架来解决这个问题。
Seata 就是这样一个分布式事务处理框架,它是由阿里巴巴和蚂蚁金服共同开源的分布式事务解决方案,能够在微服务架构下提供高性能且简单易用的分布式事务服务。
Seata 的发展历程
阿里巴巴作为国内最早一批进行应用分布式(微服务化)改造的企业,很早就遇到微服务架构下的分布式事务问题。
阿里巴巴对于分布式事务问题先后发布了以下解决方案:
- 2014 年,阿里中间件团队发布 TXC(Taobao Transaction Constructor),为集团内应用提供分布式事务服务。
- 2016 年,TXC 在经过产品化改造后,以 GTS(Global Transaction Service) 的身份登陆阿里云,成为当时业界唯一一款云上分布式事务产品。在阿云里的公有云、专有云解决方案中,开始服务于众多外部客户。
- 2019 年起,基于 TXC 和 GTS 的技术积累,阿里中间件团队发起了开源项目 Fescar(Fast & EaSy Commit And Rollback, FESCAR),和社区一起建设这个分布式事务解决方案。
- 2019 年 fescar 被重命名为了seata(simple extensiable autonomous transaction architecture)。
- TXC、GTS、Fescar 以及 seata 一脉相承,为解决微服务架构下的分布式事务问题交出了一份与众不同的答卷。
分布式事务相关概念
分布式事务主要涉及以下概念:
- 事务:由一组操作构成的可靠、独立的工作单元,事务具备 ACID 的特性,即原子性、一致性、隔离性和持久性。
- 本地事务:本地事务由本地资源管理器(通常指数据库管理系统 DBMS,例如 MySQL、Oracle 等)管理,严格地支持 ACID 特性,高效可靠。本地事务不具备分布式事务的处理能力,隔离的最小单位受限于资源管理器,即本地事务只能对自己数据库的操作进行控制,对于其他数据库的操作则无能为力。
- 全局事务:全局事务指的是一次性操作多个资源管理器完成的事务,由一组分支事务组成。
- 分支事务:在分布式事务中,就是一个个受全局事务管辖和协调的本地事务。
我们可以将分布式事务理解成一个包含了若干个分支事务的全局事务。全局事务的职责是协调其管辖的各个分支事务达成一致,要么一起成功提交,要么一起失败回滚。此外,通常分支事务本身就是一个满足 ACID 特性的本地事务。
Seata 整体工作流程
Seata 对分布式事务的协调和控制,主要是通过 XID 和 3 个核心组件实现的。
XID
XID 是全局事务的唯一标识,它可以在服务的调用链路中传递,绑定到服务的事务上下文中。
核心组件
Seata 定义了 3 个核心组件:
- TC(Transaction Coordinator):事务协调器,它是事务的协调者(这里指的是 Seata 服务器),主要负责维护全局事务和分支事务的状态,驱动全局事务提交或回滚。
- TM(Transaction Manager):事务管理器,它是事务的发起者,负责定义全局事务的范围,并根据 TC 维护的全局事务和分支事务状态,做出开始事务、提交事务、回滚事务的决议。
- RM(Resource Manager):资源管理器,它是资源的管理者(这里可以将其理解为各服务使用的数据库)。它负责管理分支事务上的资源,向 TC 注册分支事务,汇报分支事务状态,驱动分支事务的提交或回滚。
以上三个组件相互协作,TC 以 Seata 服务器(Server)形式独立部署,TM 和 RM 则是以 Seata Client 的形式集成在微服务中运行,其整体工作流程如下图。
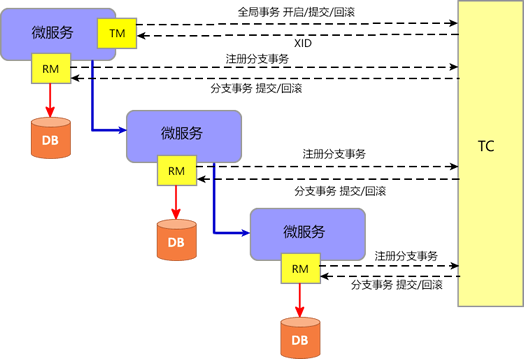
Seata 的整体工作流程如下:
- TM 向 TC 申请开启一个全局事务,全局事务创建成功后,TC 会针对这个全局事务生成一个全局唯一的 XID;
- XID 通过服务的调用链传递到其他服务;
- RM 向 TC 注册一个分支事务,并将其纳入 XID 对应全局事务的管辖;
- TM 根据 TC 收集的各个分支事务的执行结果,向 TC 发起全局事务提交或回滚决议;
- TC 调度 XID 下管辖的所有分支事务完成提交或回滚操作。
Seata AT 模式
Seata 提供了 AT、TCC、SAGA 和 XA 四种事务模式,可以快速有效地对分布式事务进行控制。
在这四种事务模式中使用最多,最方便的就是 AT 模式。与其他事务模式相比,AT 模式可以应对大多数的业务场景,且基本可以做到无业务入侵,开发人员能够有更多的精力关注于业务逻辑开发。
AT 模式的前提
任何应用想要使用 Seata 的 AT 模式对分布式事务进行控制,必须满足以下 2 个前提:
- 必须使用支持本地 ACID 事务特性的关系型数据库,例如 MySQL、Oracle 等;
- 应用程序必须是使用 JDBC 对数据库进行访问的 JAVA 应用。
此外,我们还需要针对业务中涉及的各个数据库表,分别创建一个 UNDO_LOG(回滚日志)表。不同数据库在创建 UNDO_LOG 表时会略有不同,以 MySQL 为例,其 UNDO_LOG 表的创表语句如下:
CREATE TABLE `undo_log` (

  `id` bigint(20) NOT NULL AUTO_INCREMENT,

  `branch_id` bigint(20) NOT NULL,

  `xid` varchar(100) NOT NULL,

  `context` varchar(128) NOT NULL,

  `rollback_info` longblob NOT NULL,

  `log_status` int(11) NOT NULL,

  `log_created` datetime NOT NULL,

  `log_modified` datetime NOT NULL,

  PRIMARY KEY (`id`),

  UNIQUE KEY `ux_undo_log` (`xid`,`branch_id`)

) ENGINE=InnoDB AUTO_INCREMENT=1 DEFAULT CHARSET=utf8;
AT 模式的工作机制
Seata 的 AT 模式工作时大致可以分为以两个阶段,下面我们就结合一个实例来对 AT 模式的工作机制进行介绍。
假设某数据库中存在一张名为 webset 的表,表结构如下。
| 列名 | 类型 | 主键 |
|---|---|---|
| id | bigint(20) | √ |
| name | varchar(255) | |
| url | varchar(255) |
在某次分支事务中,我们需要在 webset 表中执行以下操作。
update webset set url = 'c.biancheng.net' where name = 'C语言中文网';
一阶段
Seata AT 模式一阶段的工作流程如下图所示。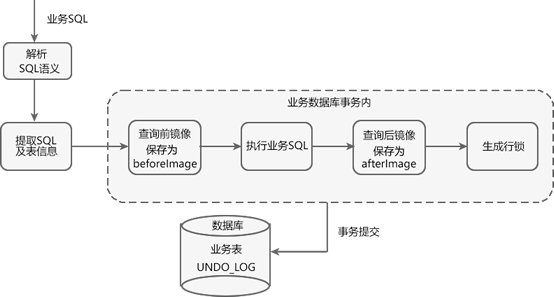
Seata AT 模式一阶段工作流程如下。
1. 获取 SQL 的基本信息:Seata 拦截并解析业务 SQL,得到 SQL 的操作类型(UPDATE)、表名(webset)、判断条件(where name = 'C语言中文网')等相关信息。
2. 查询前镜像:根据得到的业务 SQL 信息,生成“前镜像查询语句”。
select id,name,url from webset where name='C语言中文网';
执行“前镜像查询语句”,得到即将执行操作的数据,并将其保存为“前镜像数据(beforeImage)”。
| id | name | url |
|---|---|---|
| 1 | C语言中文网 | biancheng.net |
3. 执行业务 SQL(update webset set url = 'c.biancheng.net' where name = 'C语言中文网';),将这条记录的 url 修改为 c.biancheng.net。
4. 查询后镜像:根据“前镜像数据”的主键(id : 1),生成“后镜像查询语句”。
select id,name,url from webset where id= 1;
执行“后镜像查询语句”,得到执行业务操作后的数据,并将其保存为“后镜像数据(afterImage)”。
| id | name | url |
|---|---|---|
| 1 | C语言中文网 | c.biancheng.net |
5. 插入回滚日志:将前后镜像数据和业务 SQL 的信息组成一条回滚日志记录,插入到 UNDO_LOG 表中,示例回滚日志如下。
- {
- "@class": "io.seata.rm.datasource.undo.BranchUndoLog",
- "xid": "172.26.54.1:8091:5962967415319516023",
- "branchId": 5962967415319516027,
- "sqlUndoLogs": [
- "java.util.ArrayList",
- [
- {
- "@class": "io.seata.rm.datasource.undo.SQLUndoLog",
- "sqlType": "UPDATE",
- "tableName": "webset",
- "beforeImage": {
- "@class": "io.seata.rm.datasource.sql.struct.TableRecords",
- "tableName": "webset",
- "rows": [
- "java.util.ArrayList",
- [
- {
- "@class": "io.seata.rm.datasource.sql.struct.Row",
- "fields": [
- "java.util.ArrayList",
- [
- {
- "@class": "io.seata.rm.datasource.sql.struct.Field",
- "name": "id",
- "keyType": "PRIMARY_KEY",
- "type": -5,
- "value": [
- "java.lang.Long",
- 1
- ]
- },
- {
- "@class": "io.seata.rm.datasource.sql.struct.Field",
- "name": "url",
- "keyType": "NULL",
- "type": 12,
- "value": "biancheng.net"
- }
- ]
- ]
- }
- ]
- ]
- },
- "afterImage": {
- "@class": "io.seata.rm.datasource.sql.struct.TableRecords",
- "tableName": "webset",
- "rows": [
- "java.util.ArrayList",
- [
- {
- "@class": "io.seata.rm.datasource.sql.struct.Row",
- "fields": [
- "java.util.ArrayList",
- [
- {
- "@class": "io.seata.rm.datasource.sql.struct.Field",
- "name": "id",
- "keyType": "PRIMARY_KEY",
- "type": -5,
- "value": [
- "java.lang.Long",
- 1
- ]
- },
- {
- "@class": "io.seata.rm.datasource.sql.struct.Field",
- "name": "url",
- "keyType": "NULL",
- "type": 12,
- "value": "c.biancheng.net"
- }
- ]
- ]
- }
- ]
- ]
- }
- }
- ]
- ]
- }
6. 注册分支事务,生成行锁:在这次业务操作的本地事务提交前,RM 会向 TC 注册分支事务,并针对主键 id 为 1 的记录生成行锁。
以上所有操作均在同一个数据库事务内完成,可以保证一阶段的操作的原子性。
7. 本地事务提交:将业务数据的更新和前面生成的 UNDO_LOG 一并提交。
8. 上报执行结果:将本地事务提交的结果上报给 TC。
二阶段:提交
当所有的 RM 都将自己分支事务的提交结果上报给 TC 后,TM 根据 TC 收集的各个分支事务的执行结果,来决定向 TC 发起全局事务的提交或回滚。
若所有分支事务都执行成功,TM 向 TC 发起全局事务的提交,并批量删除各个 RM 保存的 UNDO_LOG 记录和行锁;否则全局事务回滚。
二阶段:回滚
若全局事务中的任何一个分支事务失败,则 TM 向 TC 发起全局事务的回滚,并开启一个本地事务,执行如下操作。
1. 查找 UNDO_LOG 记录:通过 XID 和分支事务 ID(Branch ID) 查找所有的 UNDO_LOG 记录。
2. 数据校验:将 UNDO_LOG 中的后镜像数据(afterImage)与当前数据进行比较,如果有不同,则说明数据被当前全局事务之外的动作所修改,需要人工对这些数据进行处理。
3. 生成回滚语句:根据 UNDO_LOG 中的前镜像(beforeImage)和业务 SQL 的相关信息生成回滚语句:
update webset set url= 'biancheng.net' where id = 1;
4. 还原数据:执行回滚语句,并将前镜像数据、后镜像数据以及行锁删除。
5. 提交事务:提交本地事务,并把本地事务的执行结果(即分支事务回滚的结果)上报给 TC。
下载 Seata 服务器
1. 使用浏览器访问“https://github.com/seata/seata/releases/tag/v1.4.2”,在 Seata Server 下载页面分别下载“seata-server-1.4.2.zip”,如下图。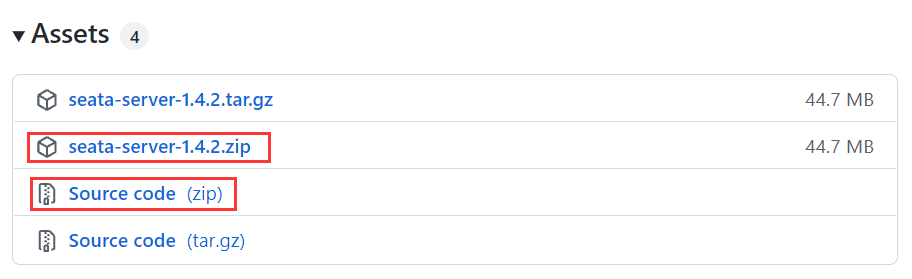
2. 解压 seata-server-1.4.2.zip,其目录结构如下图。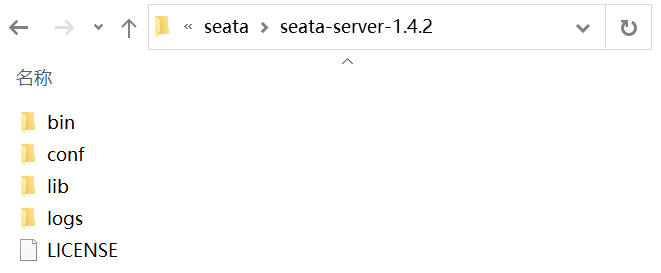
Seata Server 目录中包含以下子目录:
- bin:用于存放 Seata Server 可执行命令。
- conf:用于存放 Seata Server 的配置文件。
- lib:用于存放 Seata Server 依赖的各种 Jar 包。
- logs:用于存放 Seata Server 的日志。
Seata 配置中心
所谓“配置中心”,就像是一个“大衣柜”,内部存放着各种各样的配置文件,我们可以根据自己的需要从其中获取指定的配置文件,加载到对应的客户端中。
Seata 支持多种配置中心:
- nacos
- consul
- apollo
- etcd
- zookeeper
- file (读本地文件,包含 conf、properties、yml 等配置文件)
Seata 整合 Nacos 配置中心
对于 Seata 来说,Nacos 是一种重要的配置中心实现。
Seata 整合 Nacos 配置中心的操作步骤十分简单,大致步骤如下.
添加 Maven 依赖
我们需要将 nacos-client 的 Maven 依赖添加到项目的 pom.xml 文件中:
- <dependency>
- <groupId>io.seata</groupId>
- <artifactId>seata-spring-boot-starter</artifactId>
- <version>最新版</version>
- </dependency>
- <dependency>
- <groupId>com.alibaba.nacos</groupId>
- <artifactId>nacos-client</artifactId>
- <version>1.2.0及以上版本</version>
- </dependency>
在 Spring Cloud 项目中,通常只需要在 pom.xml 中添加 spring-cloud-starter-alibaba-seata 依赖即可,代码如下。
- <!--引入 seata 依赖-->
- <dependency>
- <groupId>com.alibaba.cloud</groupId>
- <artifactId>spring-cloud-starter-alibaba-seata</artifactId>
- </dependency>
Seata Server 配置
在 Seata Server 安装目录下的 config/registry.conf 中,将配置方式(config.type)修改为 Nacos,并对 Nacos 配置中心的相关信息进行配置,示例配置如下。
- config {
- # Seata 支持 file、nacos 、apollo、zk、consul、etcd3 等多种配置中心
- #配置方式修改为 nacos
- type = "nacos"
- nacos {
- #修改为使用的 nacos 服务器地址
- serverAddr = "127.0.0.1:1111"
- #配置中心的命名空间
- namespace = ""
- #配置中心所在的分组
- group = "SEATA_GROUP"
- #Nacos 配置中心的用户名
- username = "nacos"
- #Nacos 配置中心的密码
- password = "nacos"
- }
- }
Seata Client 配置
我们可以在 Seata Client(即微服务架构中的服务)中,通过 application.yml 等配置文件对 Nacos 配置中心进行配置,示例代码如下。
- seata:
- config:
- type: nacos
- nacos:
- server-addr: 127.0.0.1:1111 # Nacos 配置中心的地址
- group : "SEATA_GROUP" #分组
- namespace: ""
- username: "nacos" #Nacos 配置中心的用于名
- password: "nacos" #Nacos 配置中心的密码
上传配置到 Nacos 配置中心
在完成了 Seata 服务端和客户端的相关配置后,接下来,我们就可以将配置上传的 Nacos 配置中心了,操作步骤如下。
1. 我们需要获取一个名为 config.txt 的文本文件,该文件包含了 Seata 配置的所有参数明细。
我们可以通过 Seata Server 源码/script/config-center 目录中获取 config.txt,然后根据自己需要修改其中的配置,如下图。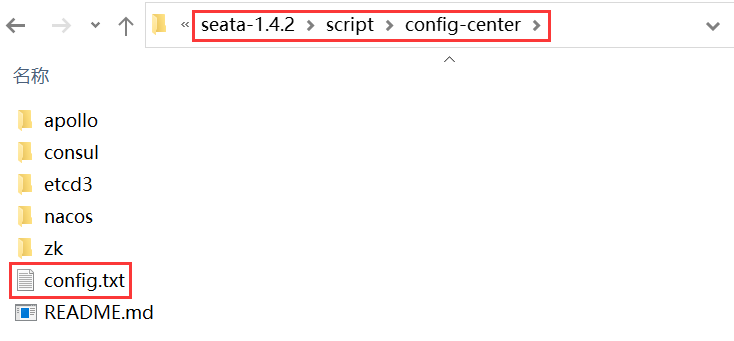
2. 在 /script/config-center/nacos 目录中,有以下 2 个 Seata 脚本:
- nacos-config.py:python 脚本。
- nacos-config.sh:为 Linux 脚本,我们可以在 Windows 下通过 Git 命令,将 config.txt 中的 Seata 配置上传到 Nacos 配置中心。
在 seata-1.4.2\script\config-center\nacos 目录下,右键鼠标选择 Git Bush Here,并在弹出的 Git 命令窗口中执行以下命令,将 config.txt 中的配置上传到 Nacos 配置中心。
sh nacos-config.sh -h 127.0.0.1 -p 1111 -g SEATA_GROUP -u nacos -w nacos
Git 命令各参数说明如下:
- -h:Nacos 的 host,默认取值为 localhost
- -p:端口号,默认取值为 8848
- -g:Nacos 配置的分组,默认取值为 SEATA_GROUP
- -u:Nacos 用户名
- -w:Nacos 密码
验证 Nacos 配置中心
在以上所有步骤完成后,启动 Nacos Server,登陆 Nacos 控制台查看配置列表,结果如下图。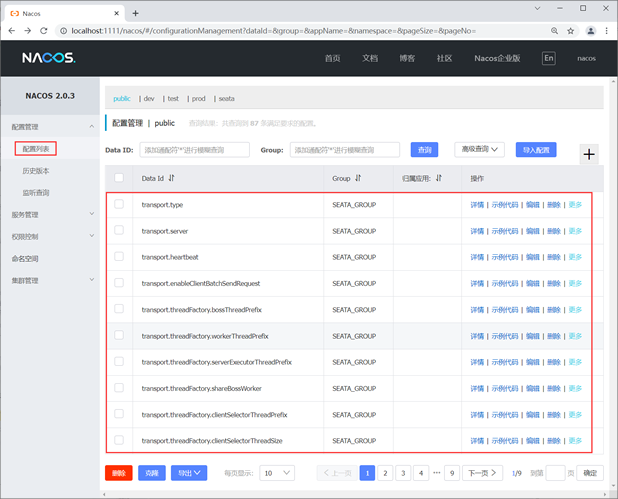
Seata 注册中心
所谓“注册中心”,可以说是微服务架构中的“通讯录”,它记录了服务与服务地址的映射关系。
在分布式微服务架构中,各个微服务都可以将自己注册到注册中心,当其他服务需要调用某个服务时,就可以从这里找到它的服务地址进行调用,常见的服务注册中心有 Nacos、Eureka、zookeeper 等。
Seata 支持多种服务注册中心:
- eureka
- consul
- nacos
- etcd
- zookeeper
- sofa
- redis
- file (直连)
Seata 通过这些服务注册中心,我们可以获取 Seata Sever 的服务地址,进行调用。
Seata 整合 Nacos 注册中心
对于 Seata 来说,Nacos 是一种重要的注册中心实现。
Seata 整合 Nacos 注册中心的步骤十分简单,步骤如下。
添加 Maven 依赖
将 nacos-client 的 Maven 依赖添加到项目的 pom.xml 文件中:
- <dependency>
- <groupId>io.seata</groupId>
- <artifactId>seata-spring-boot-starter</artifactId>
- <version>最新版</version>
- </dependency>
- <dependency>
- <groupId>com.alibaba.nacos</groupId>
- <artifactId>nacos-client</artifactId>
- <version>1.2.0及以上版本</version>
- </dependency>
在 Spring Cloud 项目中,通常只需要在 pom.xml 中添加 spring-cloud-starter-alibaba-seata 依赖即可,代码如下。
- <!--引入 seata 依赖-->
- <dependency>
- <groupId>com.alibaba.cloud</groupId>
- <artifactId>spring-cloud-starter-alibaba-seata</artifactId>
- </dependency>
Seata Server 配置注册中心
在 Seata Server 安装目录下的 config/registry.conf 中,将注册方式(registry.type)修改为 Nacos,并对 Nacos 注册中心的相关信息进行配置,示例配置如下。
- registry {
- # Seata 支持 file 、nacos 、eureka、redis、zk、consul、etcd3、sofa 作为其注册中心
- # 将注册方式修改为 nacos
- type = "nacos"
- nacos {
- application = "seata-server"
- # 修改 nacos 注册中心的地址
- serverAddr = "127.0.0.1:1111"
- group = "SEATA_GROUP"
- namespace = ""
- cluster = "default"
- username = ""
- password = ""
- }
- }
Seata Client 配置注册中心
我们可以在 Seata Client 的 application.yml 中,对 Nacos 注册中心进行配置,示例配置如下。
- seata:
- registry:
- type: nacos
- nacos:
- application: seata-server
- server-addr: 127.0.0.1:1111 # Nacos 注册中心的地址
- group : "SEATA_GROUP" #分组
- namespace: ""
- username: "nacos" #Nacos 注册中心的用户名
- password: "nacos" # Nacos 注册中心的密码
验证 Nacos 注册中心
在以上所有步骤完成后,先启动 Nacos Server 再启动 Seata Server,登录 Nacos 控制台查看服务列表,结果如下图。
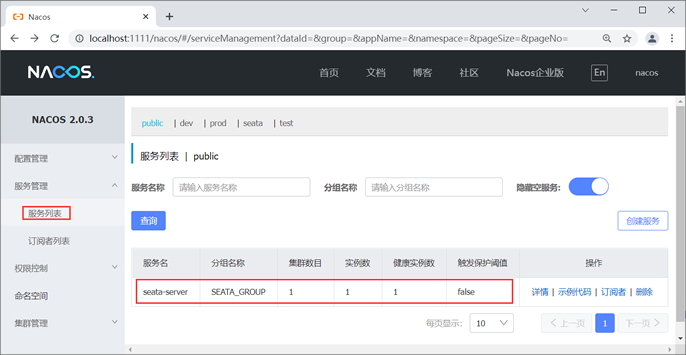
从图 9 可以看出,seata-server 服务已经注册到了 Nacos 注册中心。
Seata 事务分组
事务分组是 Seata 提供的一种 TC(Seata Server) 服务查找机制。
Seata 通过事务分组获取 TC 服务,流程如下:
- 在应用中配置事务分组。
- 应用通过配置中心去查找配置:
service.vgroupMapping.{事务分组},该配置的值就是 TC 集群的名称。 - 获得集群名称后,应用通过一定的前后缀 + 集群名称去构造服务名。
- 得到服务名后,去注册中心去拉取服务列表,获得后端真实的 TC 服务列表。
下面我们以 Nacos 服务注册中心为例,介绍 Seata 事务的使用。
Seata Server 配置
在 Seata Server 的 config/registry.conf 中,进行如下配置。
- registry {
- # file 、nacos 、eureka、redis、zk、consul、etcd3、sofa
- type = "nacos" #使用 Nacos作为注册中心
- nacos {
- serverAddr = "127.0.0.1:1111" # Nacos 注册中心的地址
- namespace = "" # Nacos 命名空间id,"" 为 Nacos 保留 public 空间控件,用户勿配置 namespace = "public"
- cluster = "c.biancheng.net" # seata-server在 Nacos 的集群名
- }
- }
- config {
- # file、nacos 、apollo、zk、consul、etcd3
- type = "nacos" # 使用nacos作为配置中心
- nacos {
- serverAddr = "localhost"
- namespace = ""
- cluster = "default"
- }
- }
Seata Client 配置
Seata Client 中 application.yml 的配置如下。
- spring:
- alibaba:
- seata:
- tx-service-group: service-order-group #事务分组名
- seata:
- registry:
- type: nacos #从 Nacos 获取 TC 服务
- nacos:
- server-addr: 127.0.0.1:1111
- config:
- type: nacos #使用 Nacos 作为配置中心
- nacos:
- server-addr: 127.0.0.1:1111
- name
在以上配置中,我们通过 spring.cloud.alibaba.seata.tx-service-group 来配置 Seata 事务分组名,其默认取值为:服务名-fescar-service-group。
上传配置到 Nacos
将以下配置上传到 Nacos 配置中心。
service.vgroupMapping.service-order-group=c.biancheng.net
在以上配置中,
- service-order-group:为事务分组的名称;
- c.biancheng.net:为 TC 集群的名称。
获取事务分组
1. 先启动 Nacos,再启动 Seata Server,最后再启动 Seata Client。
2. Seata Client 在启动时,会从 application.yml 的配置中,根据 spring.cloud.alibaba.seata.tx-service-group 获取事务分组的名称:service-order-group。
获取 TC 集群名
使用事务分组名“service-order-group”拼接成“service.vgroupMapping.service-order-group”,并从 Nacos 配置中心获取该配置的取值,这个值就是 TC 集群的名称:“c.biancheng.net”。
查找 TC 服务
根据 TC 集群名、Nacos 注册中心的地址(server-addr)以及命名空间(namespace),在 Nacos 注册中心找到真实的 TC 服务列表。
总结
通过事务分组获取服务名,共需要以下 3 步:
- 服务启动时,从配置文件中获取服务分组的名称;
- 从配置中心,通过事务分组名获取 TC 集群名;
- 根据 TC 群组名以及其他信息构建服务名,获取真实的 TC 服务列表。
启动 Seata Server
1. 建表
Seata Server 共有以下 3 种存储模式(store.mode):
| 模式 | 说明 | 准备工作 |
|---|---|---|
| file | 文件存储模式,默认存储模式; 该模式为单机模式,全局事务的会话信息在内存中读写,并持久化本地文件 root.data,性能较高 |
- |
| db | 数据库存储模式; 该模式为高可用模式,全局事务会话信息通过数据库共享,性能较低。 |
建数据库表 |
| redis | 缓存处处模式; Seata Server 1.3 及以上版本支持该模式,性能较高,但存在事务信息丢失风险, |
配置 redis 持久化配置 |
在 db 模式下,我们需要针对全局事务的会话信息创建以下 3 张数据库表。
- 全局事务表,对应的表为:global_table
- 分支事务表,对应的表为:branch_table
- 全局锁表,对应的表为:lock_table
在 MySQL 中,创建一个名为 seata 的数据库实例,并在该数据库内执行以下 SQL。
global_table 的建表 SQL 如下。
-- -------------------------------- The script used when storeMode is 'db' --------------------------------

-- the table to store GlobalSession data

CREATE TABLE IF NOT EXISTS `global_table`

(

    `xid`                       VARCHAR(128) NOT NULL,

    `transaction_id`            BIGINT,

    `status`                    TINYINT      NOT NULL,

    `application_id`            VARCHAR(32),

    `transaction_service_group` VARCHAR(32),

    `transaction_name`          VARCHAR(128),

    `timeout`                   INT,

    `begin_time`                BIGINT,

    `application_data`          VARCHAR(2000),

    `gmt_create`                DATETIME,

    `gmt_modified`              DATETIME,

    PRIMARY KEY (`xid`),

    KEY `idx_gmt_modified_status` (`gmt_modified`, `status`),

    KEY `idx_transaction_id` (`transaction_id`)

) ENGINE = InnoDB

  DEFAULT CHARSET = utf8;
branch_table 的建表 SQL 如下。
-- the table to store BranchSession data

CREATE TABLE IF NOT EXISTS `branch_table`

(

    `branch_id`         BIGINT       NOT NULL,

    `xid`               VARCHAR(128) NOT NULL,

    `transaction_id`    BIGINT,

    `resource_group_id` VARCHAR(32),

    `resource_id`       VARCHAR(256),

    `branch_type`       VARCHAR(8),

    `status`            TINYINT,

    `client_id`         VARCHAR(64),

    `application_data`  VARCHAR(2000),

    `gmt_create`        DATETIME(6),

    `gmt_modified`      DATETIME(6),

    PRIMARY KEY (`branch_id`),

    KEY `idx_xid` (`xid`)

) ENGINE = InnoDB

  DEFAULT CHARSET = utf8;
lock_table 的建表 SQL 如下。
-- the table to store lock data

CREATE TABLE IF NOT EXISTS `lock_table`

(

    `row_key`        VARCHAR(128) NOT NULL,

    `xid`            VARCHAR(96),

    `transaction_id` BIGINT,

    `branch_id`      BIGINT       NOT NULL,

    `resource_id`    VARCHAR(256),

    `table_name`     VARCHAR(32),

    `pk`             VARCHAR(36),

    `gmt_create`     DATETIME,

    `gmt_modified`   DATETIME,

    PRIMARY KEY (`row_key`),

    KEY `idx_branch_id` (`branch_id`)

) ENGINE = InnoDB

  DEFAULT CHARSET = utf8;
2. 修改 Seata Server 配置
在 seata-server-1.4.2/conf/ 目录下的 registry.conf 中,将 Seata Server 的服务注册方式(registry.type)和配置方式(config.type)都修改为 Nacos,修改内容如下。
- registry {
- # file 、nacos 、eureka、redis、zk、consul、etcd3、sofa
- # 将注册方式修改为 nacos
- type = "nacos"
- nacos {
- application = "seata-server"
- # 修改 nacos 的地址
- serverAddr = "127.0.0.1:1111"
- group = "SEATA_GROUP"
- namespace = ""
- cluster = "default"
- username = ""
- password = ""
- }
- }
- config {
- # file、nacos 、apollo、zk、consul、etcd3
- #配置方式修改为 nacos
- type = "nacos"
- nacos {
- #修改为使用的 nacos 服务器地址
- serverAddr = "127.0.0.1:1111"
- namespace = ""
- group = "SEATA_GROUP"
- username = "nacos"
- password = "nacos"
- #不使用 seataServer.properties 方式配置
- #dataId = "seataServer.properties"
- }
- }
3. 将 Seata 配置上传到 Nacos
1) 下载并解压 Seata Server 的源码 seata-1.4.2.zip,然后修改 seata-1.4.2/script/config-center 目录下的 config.txt,修改内容如下。
#将 Seata Server 的存储模式修改为 db

store.mode=db

# 数据库驱动

store.db.driverClassName=com.mysql.cj.jdbc.Driver

# 数据库 url

store.db.url=jdbc:mysql://127.0.0.1:3306/seata?useSSL=false&characterEncoding=UTF-8&useUnicode=true&serverTimezone=UTC

# 数据库的用户名

store.db.user=root

# 数据库的密码

store.db.password=root

# 自定义事务分组

service.vgroupMapping.service-order-group=default

service.vgroupMapping.service-storage-group=default

service.vgroupMapping.service-account-group=default
2) 在 seata-1.4.2\script\config-center\nacos 目录下,右键鼠标选择 Git Bush Here,在弹出的 Git 命令窗口中执行以下命令,将 config.txt 中的配置上传到 Nacos 配置中心。
sh nacos-config.sh -h 127.0.0.1 -p 1111 -g SEATA_GROUP -u nacos -w nacos
3) 当 Git 命令窗口出现以下执行日志时,则说明配置上传成功。
=========================================================================

Complete initialization parameters,  total-count:87 ,  failure-count:0

=========================================================================

Init nacos config finished, please start seata-server.
4) 使用浏览器访问 Nacos 服务器主页,查看 Nacos 配置列表,如下图。
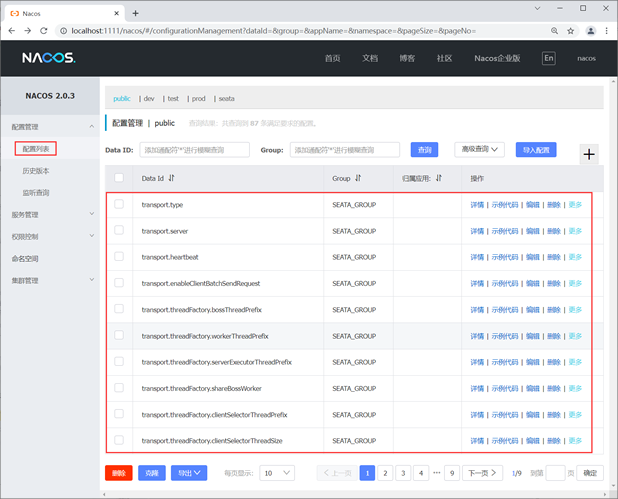
注意:在使用 Git 命令将配置上传到 Nacos 前,应该先确保 Nacos 服务器已启动。
4. 启动 Seata Server
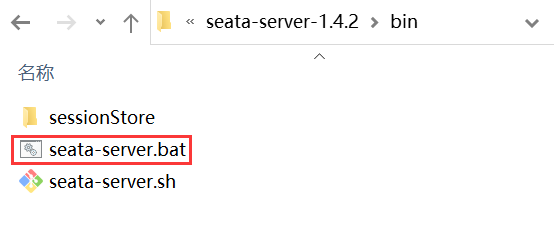
双击 Seata Server 端 bin 目录下的启动脚本 seata-server.bat ,启动 Seata Server。
Seata Server 启动日志如下。
16:52:48,549 |-INFO in ch.qos.logback.classic.LoggerContext[default] - Could NOT find resource [logback-test.xml]

16:52:48,549 |-INFO in ch.qos.logback.classic.LoggerContext[default] - Could NOT find resource [logback.groovy]

16:52:48,550 |-INFO in ch.qos.logback.classic.LoggerContext[default] - Found resource [logback.xml] at [file:/C:/Users/79330/Desktop/seata-server-1.4.2/conf/logback.xml]

16:52:48,551 |-WARN in ch.qos.logback.classic.LoggerContext[default] - Resource [logback.xml] occurs multiple times on the classpath.

16:52:48,551 |-WARN in ch.qos.logback.classic.LoggerContext[default] - Resource [logback.xml] occurs at [jar:file:/C:/Users/79330/Desktop/seata-server-1.4.2/lib/seata-server-1.4.2.jar!/logback.xml]

……

SLF4J: A number (18) of logging calls during the initialization phase have been intercepted and are

SLF4J: now being replayed. These are subject to the filtering rules of the underlying logging system.

SLF4J: See also http://www.slf4j.org/codes.html#replay

16:52:49.003  INFO --- [                     main] io.seata.config.FileConfiguration        : The file name of the operation is registry

16:52:49.008  INFO --- [                     main] io.seata.config.FileConfiguration        : The configuration file used is C:\Users\79330\Desktop\seata-server-1.4.2\conf\registry.conf

16:52:51.063  INFO --- [                     main] com.alibaba.druid.pool.DruidDataSource   : {dataSource-1} inited

16:52:51.981  INFO --- [                     main] i.s.core.rpc.netty.NettyServerBootstrap  : Server started, listen port: 8091
业务系统集成 Seata
接下来,我们就以电商系统为例,来演示下业务系统是如何集成 Seata 的。
在电商系统中,用户下单购买一件商品,需要以下 3 个服务提供支持:
- Order(订单服务):创建和修改订单。
- Storage(库存服务):对指定的商品扣除仓库库存。
- Account(账户服务) :从用户帐户中扣除商品金额。
这三个微服务分别使用三个不同的数据库,架构图如下所示。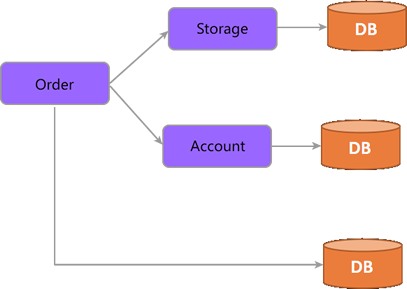
当用户从这个电商网站购买了一件商品后,其服务调用步骤如下:
- 调用 Order 服务,创建一条订单数据,订单状态为“未完成”;
- 调用 Storage 服务,扣减商品库存;
- 调用 Account 服务,从用户账户中扣除商品金额;
- 调用 Order 服务,将订单状态修改为“已完成”。
创建订单(Order)服务
1. 在 MySQL 数据库中,新建一个名为 seata-order 的数据库实例,并通过以下 SQL 语句创建 2 张表:t_order(订单表)和 undo_log(回滚日志表)。
-- ----------------------------

-- Table structure for t_order

-- ----------------------------

DROP TABLE IF EXISTS `t_order`;

CREATE TABLE `t_order` (

  `id` bigint NOT NULL AUTO_INCREMENT,

  `user_id` bigint DEFAULT NULL COMMENT '用户id',

  `product_id` bigint DEFAULT NULL COMMENT '产品id',

  `count` int DEFAULT NULL COMMENT '数量',

  `money` decimal(11,0) DEFAULT NULL COMMENT '金额',

  `status` int DEFAULT NULL COMMENT '订单状态:0:未完成;1:已完结',

  PRIMARY KEY (`id`)

) ENGINE=InnoDB AUTO_INCREMENT=32 DEFAULT CHARSET=utf8;

-- ----------------------------

-- Table structure for undo_log

-- ----------------------------

DROP TABLE IF EXISTS `undo_log`;

CREATE TABLE `undo_log` (

  `branch_id` bigint NOT NULL COMMENT 'branch transaction id',

  `xid` varchar(128) NOT NULL COMMENT 'global transaction id',

  `context` varchar(128) NOT NULL COMMENT 'undo_log context,such as serialization',

  `rollback_info` longblob NOT NULL COMMENT 'rollback info',

  `log_status` int NOT NULL COMMENT '0:normal status,1:defense status',

  `log_created` datetime(6) NOT NULL COMMENT 'create datetime',

  `log_modified` datetime(6) NOT NULL COMMENT 'modify datetime',

  UNIQUE KEY `ux_undo_log` (`xid`,`branch_id`)

) ENGINE=InnoDB DEFAULT CHARSET=utf8 ;
2. 在主工程 spring-cloud-alibaba-demo 下,创建一个名为 spring-cloud-alibaba-seata-order-8005 的 Spring Boot 模块,并在其 pom.xml 中添加以下依赖,内容如下。
- <?xml version="1.0" encoding="UTF-8"?>
- <project xmlns="http://maven.apache.org/POM/4.0.0" xmlns:xsi="http://www.w3.org/2001/XMLSchema-instance"
- xsi:schemaLocation="http://maven.apache.org/POM/4.0.0 https://maven.apache.org/xsd/maven-4.0.0.xsd">
- <modelVersion>4.0.0</modelVersion>
- <parent>
- <groupId>net.biancheng.c</groupId>
- <version>1.0-SNAPSHOT</version>
- <artifactId>spring-cloud-alibaba-demo</artifactId>
- </parent>
- <groupId>net.biancheng.c</groupId>
- <artifactId>spring-cloud-alibaba-seata-order-8005</artifactId>
- <version>0.0.1-SNAPSHOT</version>
- <name>spring-cloud-alibaba-seata-order-8005</name>
- <description>Demo project for Spring Boot</description>
- <properties>
- <java.version>1.8</java.version>
- <seata.version>1.4.2</seata.version>
- </properties>
- <dependencies>
- <!--nacos 服务注册中心-->
- <dependency>
- <groupId>com.alibaba.cloud</groupId>
- <artifactId>spring-cloud-starter-alibaba-nacos-discovery</artifactId>
- <exclusions>
- <exclusion>
- <groupId>org.springframework.cloud</groupId>
- <artifactId>spring-cloud-starter-netflix-ribbon</artifactId>
- </exclusion>
- </exclusions>
- </dependency>
- <dependency>
- <groupId>org.springframework.boot</groupId>
- <artifactId>spring-boot-starter-web</artifactId>
- </dependency>
- <!--引入 OpenFeign 的依赖-->
- <dependency>
- <groupId>org.springframework.cloud</groupId>
- <artifactId>spring-cloud-starter-openfeign</artifactId>
- </dependency>
- <dependency>
- <groupId>org.springframework.cloud</groupId>
- <artifactId>spring-cloud-loadbalancer</artifactId>
- </dependency>
- <!--引入 seata 依赖-->
- <dependency>
- <groupId>com.alibaba.cloud</groupId>
- <artifactId>spring-cloud-starter-alibaba-seata</artifactId>
- </dependency>
- <dependency>
- <groupId>org.springframework.boot</groupId>
- <artifactId>spring-boot-devtools</artifactId>
- <scope>runtime</scope>
- <optional>true</optional>
- </dependency>
- <dependency>
- <groupId>org.projectlombok</groupId>
- <artifactId>lombok</artifactId>
- <optional>true</optional>
- </dependency>
- <dependency>
- <groupId>org.springframework.boot</groupId>
- <artifactId>spring-boot-starter-test</artifactId>
- <scope>test</scope>
- </dependency>
- <dependency>
- <groupId>net.biancheng.c</groupId>
- <artifactId>spring-cloud-alibaba-api</artifactId>
- <version>${project.version}</version>
- </dependency>
- <dependency>
- <groupId>junit</groupId>
- <artifactId>junit</artifactId>
- <version>4.12</version>
- </dependency>
- <dependency>
- <groupId>mysql</groupId>
- <artifactId>mysql-connector-java</artifactId>
- <version>8.0.19</version>
- </dependency>
- <dependency>
- <groupId>ch.qos.logback</groupId>
- <artifactId>logback-core</artifactId>
- </dependency>
- <dependency>
- <groupId>org.mybatis.spring.boot</groupId>
- <artifactId>mybatis-spring-boot-starter</artifactId>
- <version>2.2.0</version>
- </dependency>
- <!--添加 Spring Boot 的监控模块-->
- <!-- https://mvnrepository.com/artifact/org.springframework.boot/spring-boot-starter-actuator -->
- <dependency>
- <groupId>org.springframework.boot</groupId>
- <artifactId>spring-boot-starter-actuator</artifactId>
- </dependency>
- <!--SpringCloud ailibaba sentinel -->
- <dependency>
- <groupId>com.alibaba.cloud</groupId>
- <artifactId>spring-cloud-starter-alibaba-sentinel</artifactId>
- </dependency>
- <!--配置中心 nacos-->
- <dependency>
- <groupId>com.alibaba.cloud</groupId>
- <artifactId>spring-cloud-starter-alibaba-nacos-config</artifactId>
- </dependency>
- </dependencies>
- <build>
- <plugins>
- <!--mybatis自动生成代码插件-->
- <plugin>
- <groupId>org.mybatis.generator</groupId>
- <artifactId>mybatis-generator-maven-plugin</artifactId>
- <version>1.4.0</version>
- <configuration>
- <configurationFile>src/main/resources/mybatis-generator/generatorConfig.xml</configurationFile>
- <verbose>true</verbose>
- <!-- 是否覆盖,true表示会替换生成的JAVA文件,false则不覆盖 -->
- <overwrite>true</overwrite>
- </configuration>
- <dependencies>
- <!--mysql驱动包-->
- <dependency>
- <groupId>mysql</groupId>
- <artifactId>mysql-connector-java</artifactId>
- <version>8.0.19</version>
- </dependency>
- <dependency>
- <groupId>org.mybatis.generator</groupId>
- <artifactId>mybatis-generator-core</artifactId>
- <version>1.4.0</version>
- </dependency>
- </dependencies>
- </plugin>
- <plugin>
- <groupId>org.springframework.boot</groupId>
- <artifactId>spring-boot-maven-plugin</artifactId>
- </plugin>
- </plugins>
- </build>
- </project>
3. 在 spring-cloud-alibaba-seata-order-8005 的类路径(/resources 目录)下,创建一个配置文件 bootstrap.yml,配置内容如下。
- spring:
- cloud:
- ## Nacos认证信息
- nacos:
- config:
- username: nacos
- password: nacos
- context-path: /nacos
- server-addr: 127.0.0.1:1111 # 设置配置中心服务端地址
- namespace: # Nacos 配置中心的namespace。需要注意,如果使用 public 的 namcespace ,请不要填写这个值,直接留空即可
4. 在 spring-cloud-alibaba-seata-order-8005 的类路径(/resources 目录)下,创建一个配置文件 application.yml,配置内容如下。
- spring:
- application:
- name: spring-cloud-alibaba-seata-order-8005 #服务名
- #数据源配置
- datasource:
- driver-class-name: com.mysql.jdbc.Driver #数据库驱动
- name: defaultDataSource
- url: jdbc:mysql://localhost:3306/seata_order?serverTimezone=UTC #数据库连接地址
- username: root #数据库的用户名
- password: root #数据库密码
- cloud:
- nacos:
- discovery:
- server-addr: 127.0.0.1:1111 #nacos 服务器地址
- namespace: public #nacos 命名空间
- username:
- password:
- sentinel:
- transport:
- dashboard: 127.0.0.1:8080 #Sentinel 控制台地址
- port: 8719
- alibaba:
- seata:
- #自定义服务群组,该值必须与 Nacos 配置中的 service.vgroupMapping.{my-service-group}=default 中的 {my-service-group}相同
- tx-service-group: service-order-group
- server:
- port: 8005 #端口
- seata:
- application-id: ${spring.application.name}
- #自定义服务群组,该值必须与 Nacos 配置中的 service.vgroupMapping.{my-service-group}=default 中的 {my-service-group}相同
- tx-service-group: service-order-group
- service:
- grouplist:
- #Seata 服务器地址
- seata-server: 127.0.0.1:8091
- # Seata 的注册方式为 nacos
- registry:
- type: nacos
- nacos:
- server-addr: 127.0.0.1:1111
- # Seata 的配置中心为 nacos
- config:
- type: nacos
- nacos:
- server-addr: 127.0.0.1:1111
- feign:
- sentinel:
- enabled: true #开启 OpenFeign 功能
- management:
- endpoints:
- web:
- exposure:
- include: "*"
- ###################################### MyBatis 配置 ######################################
- mybatis:
- # 指定 mapper.xml 的位置
- mapper-locations: classpath:mybatis/mapper/*.xml
- #扫描实体类的位置,在此处指明扫描实体类的包,在 mapper.xml 中就可以不写实体类的全路径名
- type-aliases-package: net.biancheng.c.entity
- configuration:
- #默认开启驼峰命名法,可以不用设置该属性
- map-underscore-to-camel-case: true
5. 在 net.biancheng.c.entity 包下,创建一个名为 Order 的实体类,代码如下。
- package net.biancheng.c.entity;
- import java.math.BigDecimal;
- public class Order {
- private Long id;
- private Long userId;
- private Long productId;
- private Integer count;
- private BigDecimal money;
- private Integer status;
- public Long getId() {
- return id;
- }
- public void setId(Long id) {
- this.id = id;
- }
- public Long getUserId() {
- return userId;
- }
- public void setUserId(Long userId) {
- this.userId = userId;
- }
- public Long getProductId() {
- return productId;
- }
- public void setProductId(Long productId) {
- this.productId = productId;
- }
- public Integer getCount() {
- return count;
- }
- public void setCount(Integer count) {
- this.count = count;
- }
- public BigDecimal getMoney() {
- return money;
- }
- public void setMoney(BigDecimal money) {
- this.money = money;
- }
- public Integer getStatus() {
- return status;
- }
- public void setStatus(Integer status) {
- this.status = status;
- }
- }
6. 在 net.biancheng.c.mapper 包下,创建一个名为 OrderMapper 的 Mapper 接口,代码如下。
- package net.biancheng.c.mapper;
- import net.biancheng.c.entity.Order;
- import org.apache.ibatis.annotations.Mapper;
- import org.apache.ibatis.annotations.Param;
- @Mapper
- public interface OrderMapper {
- int deleteByPrimaryKey(Long id);
- int insert(Order record);
- int create(Order order);
- int insertSelective(Order record);
- //2 修改订单状态,从零改为1
- void update(@Param("userId") Long userId, @Param("status") Integer status);
- Order selectByPrimaryKey(Long id);
- int updateByPrimaryKeySelective(Order record);
- int updateByPrimaryKey(Order record);
- }
7. 在 /resouces/mybatis/mapper 目录下,创建一个名为 OrderMapper.xml 的 MyBatis 映射文件,代码如下。
- <?xml version="1.0" encoding="UTF-8"?>
- <!DOCTYPE mapper PUBLIC "-//mybatis.org//DTD Mapper 3.0//EN" "http://mybatis.org/dtd/mybatis-3-mapper.dtd">
- <mapper namespace="net.biancheng.c.mapper.OrderMapper">
- <resultMap id="BaseResultMap" type="net.biancheng.c.entity.Order">
- <id column="id" jdbcType="BIGINT" property="id"/>
- <result column="user_id" jdbcType="BIGINT" property="userId"/>
- <result column="product_id" jdbcType="BIGINT" property="productId"/>
- <result column="count" jdbcType="INTEGER" property="count"/>
- <result column="money" jdbcType="DECIMAL" property="money"/>
- <result column="status" jdbcType="INTEGER" property="status"/>
- </resultMap>
- <sql id="Base_Column_List">
- id
- , user_id, product_id, count, money, status
- </sql>
- <select id="selectByPrimaryKey" parameterType="java.lang.Long" resultMap="BaseResultMap">
- select
- <include refid="Base_Column_List"/>
- from t_order
- where id = #{id,jdbcType=BIGINT}
- </select>
- <delete id="deleteByPrimaryKey" parameterType="java.lang.Long">
- delete
- from t_order
- where id = #{id,jdbcType=BIGINT}
- </delete>
- <insert id="insert" parameterType="net.biancheng.c.entity.Order">
- insert into t_order (id, user_id, product_id,
- count, money, status)
- values (#{id,jdbcType=BIGINT}, #{userId,jdbcType=BIGINT}, #{productId,jdbcType=BIGINT},
- #{count,jdbcType=INTEGER}, #{money,jdbcType=DECIMAL}, #{status,jdbcType=INTEGER})
- </insert>
- <insert id="insertSelective" parameterType="net.biancheng.c.entity.Order">
- insert into t_order
- <trim prefix="(" suffix=")" suffixOverrides=",">
- <if test="id != null">
- id,
- </if>
- <if test="userId != null">
- user_id,
- </if>
- <if test="productId != null">
- product_id,
- </if>
- <if test="count != null">
- count,
- </if>
- <if test="money != null">
- money,
- </if>
- <if test="status != null">
- status,
- </if>
- </trim>
- <trim prefix="values (" suffix=")" suffixOverrides=",">
- <if test="id != null">
- #{id,jdbcType=BIGINT},
- </if>
- <if test="userId != null">
- #{userId,jdbcType=BIGINT},
- </if>
- <if test="productId != null">
- #{productId,jdbcType=BIGINT},
- </if>
- <if test="count != null">
- #{count,jdbcType=INTEGER},
- </if>
- <if test="money != null">
- #{money,jdbcType=DECIMAL},
- </if>
- <if test="status != null">
- #{status,jdbcType=INTEGER},
- </if>
- </trim>
- </insert>
- <insert id="create" parameterType="net.biancheng.c.entity.Order">
- insert into t_order (user_id, product_id,
- count, money, status)
- values (#{userId,jdbcType=BIGINT}, #{productId,jdbcType=BIGINT},
- #{count,jdbcType=INTEGER}, #{money,jdbcType=DECIMAL}, #{status,jdbcType=INTEGER})
- </insert>
- <update id="updateByPrimaryKeySelective" parameterType="net.biancheng.c.entity.Order">
- update t_order
- <set>
- <if test="userId != null">
- user_id = #{userId,jdbcType=BIGINT},
- </if>
- <if test="productId != null">
- product_id = #{productId,jdbcType=BIGINT},
- </if>
- <if test="count != null">
- count = #{count,jdbcType=INTEGER},
- </if>
- <if test="money != null">
- money = #{money,jdbcType=DECIMAL},
- </if>
- <if test="status != null">
- status = #{status,jdbcType=INTEGER},
- </if>
- </set>
- where id = #{id,jdbcType=BIGINT}
- </update>
- <update id="updateByPrimaryKey" parameterType="net.biancheng.c.entity.Order">
- update t_order
- set user_id = #{userId,jdbcType=BIGINT},
- product_id = #{productId,jdbcType=BIGINT},
- count = #{count,jdbcType=INTEGER},
- money = #{money,jdbcType=DECIMAL},
- status = #{status,jdbcType=INTEGER}
- where id = #{id,jdbcType=BIGINT}
- </update>
- <update id="update">
- update t_order
- set status = 1
- where user_id = #{userId}
- and status = #{status};
- </update>
- </mapper>
8. 在 net.biancheng.c.service 包下,创建一个名为 OrderService 的 Service 接口,代码如下。
- package net.biancheng.c.service;
- import net.biancheng.c.entity.Order;
- public interface OrderService {
- /**
- * 创建订单数据
- * @param order
- */
- CommonResult create(Order order);
- }
9. 在 net.biancheng.c.service 包下,创建一个名为 StorageService 的接口,代码如下。
- package net.biancheng.c.service;
- import net.biancheng.c.entity.CommonResult;
- import org.springframework.cloud.openfeign.FeignClient;
- import org.springframework.web.bind.annotation.PostMapping;
- import org.springframework.web.bind.annotation.RequestParam;
- @FeignClient(value = "spring-cloud-alibaba-seata-storage-8006")
- public interface StorageService {
- @PostMapping(value = "/storage/decrease")
- CommonResult decrease(@RequestParam("productId") Long productId, @RequestParam("count") Integer count);
- }
10. 在 net.biancheng.c.service 包下,创建一个名为 AccountService 的接口,代码如下。
- package net.biancheng.c.service;
- import net.biancheng.c.entity.CommonResult;
- import org.springframework.cloud.openfeign.FeignClient;
- import org.springframework.web.bind.annotation.PostMapping;
- import org.springframework.web.bind.annotation.RequestParam;
- import java.math.BigDecimal;
- @FeignClient(value = "spring-cloud-alibaba-seata-account-8007")
- public interface AccountService {
- @PostMapping(value = "/account/decrease")
- CommonResult decrease(@RequestParam("userId") Long userId, @RequestParam("money") BigDecimal money);
- }
11. 在 net.biancheng.c.service.impl 包下,创建 OrderService 接口的实现类 OrderServiceImpl,代码如下。
- package net.biancheng.c.service.impl;
- import io.seata.spring.annotation.GlobalTransactional;
- import lombok.extern.slf4j.Slf4j;
- import net.biancheng.c.entity.Order;
- import net.biancheng.c.mapper.OrderMapper;
- import net.biancheng.c.service.AccountService;
- import net.biancheng.c.service.OrderService;
- import net.biancheng.c.service.StorageService;
- import org.springframework.stereotype.Service;
- import javax.annotation.Resource;
- @Service
- @Slf4j
- public class OrderServiceImpl implements OrderService {
- @Resource
- private OrderMapper orderMapper;
- @Resource
- private StorageService storageService;
- @Resource
- private AccountService accountService;
- /**
- * 创建订单->调用库存服务扣减库存->调用账户服务扣减账户余额->修改订单状态
- * 简单说:下订单->扣库存->减余额->改订单状态
- */
- @Override
- @GlobalTransactional(name = "fsp-create-order", rollbackFor = Exception.class)
- public CommonResult create(Order order) {
- log.info("----->开始新建订单");
- //1 新建订单
- order.setUserId(new Long(1));
- order.setStatus(0);
- orderMapper.create(order);
- //2 扣减库存
- log.info("----->订单服务开始调用库存服务,开始扣减库存");
- storageService.decrease(order.getProductId(), order.getCount());
- log.info("----->订单微服务开始调用库存,扣减库存结束");
- //3 扣减账户
- log.info("----->订单服务开始调用账户服务,开始从账户扣减商品金额");
- accountService.decrease(order.getUserId(), order.getMoney());
- log.info("----->订单微服务开始调用账户,账户扣减商品金额结束");
- //4 修改订单状态,从零到1,1代表已经完成
- log.info("----->修改订单状态开始");
- orderMapper.update(order.getUserId(), 0);
- log.info("----->修改订单状态结束");
- log.info("----->下订单结束了------->");
- return new CommonResult(200, "订单创建成功");
- }
- }
12. 在 net.biancheng.c.controller 包下,创建一个名为 OrderController 的 Controller,代码如下。
- package net.biancheng.c.controller;
- import net.biancheng.c.entity.CommonResult;
- import net.biancheng.c.entity.Order;
- import net.biancheng.c.service.OrderService;
- import org.springframework.beans.factory.annotation.Autowired;
- import org.springframework.web.bind.annotation.GetMapping;
- import org.springframework.web.bind.annotation.PathVariable;
- import org.springframework.web.bind.annotation.RestController;
- import java.math.BigDecimal;
- @RestController
- public class OrderController {
- @Autowired
- private OrderService orderService;
- @GetMapping("/order/create/{productId}/{count}/{money}")
- public CommonResult create(@PathVariable("productId") Integer productId, @PathVariable("count") Integer count
- , @PathVariable("money") BigDecimal money) {
- Order order = new Order();
- order.setProductId(Integer.valueOf(productId).longValue());
- order.setCount(count);
- order.setMoney(money);
- return orderService.create(order);
- }
- }
13. 主启动类代码如下。
- package net.biancheng.c;
- import org.springframework.boot.SpringApplication;
- import org.springframework.boot.autoconfigure.SpringBootApplication;
- import org.springframework.cloud.client.discovery.EnableDiscoveryClient;
- import org.springframework.cloud.openfeign.EnableFeignClients;
- @EnableDiscoveryClient
- @EnableFeignClients
- @SpringBootApplication(scanBasePackages = "net.biancheng")
- public class SpringCloudAlibabaSeataOrder8005Application {
- public static void main(String[] args) {
- SpringApplication.run(SpringCloudAlibabaSeataOrder8005Application.class, args);
- }
- }
搭建库存(Storage)服务
1. 在 MySQL 数据库中,新建一个名为 seata-storage 的数据库实例,并通过以下 SQL 语句创建 2 张表:t_storage(库存表)和 undo_log(回滚日志表)。
-- ----------------------------

-- Table structure for t_storage

-- ----------------------------

DROP TABLE IF EXISTS `t_storage`;

CREATE TABLE `t_storage` (

  `id` bigint NOT NULL AUTO_INCREMENT,

  `product_id` bigint DEFAULT NULL COMMENT '产品id',

  `total` int DEFAULT NULL COMMENT '总库存',

  `used` int DEFAULT NULL COMMENT '已用库存',

  `residue` int DEFAULT NULL COMMENT '剩余库存',

  PRIMARY KEY (`id`)

) ENGINE=InnoDB AUTO_INCREMENT=2 DEFAULT CHARSET=utf8;

-- ----------------------------

-- Records of t_storage

-- ----------------------------

INSERT INTO `t_storage` VALUES ('1', '1', '100', '0', '100');

-- Table structure for undo_log

-- ----------------------------

DROP TABLE IF EXISTS `undo_log`;

CREATE TABLE `undo_log` (

  `branch_id` bigint NOT NULL COMMENT 'branch transaction id',

  `xid` varchar(128) NOT NULL COMMENT 'global transaction id',

  `context` varchar(128) NOT NULL COMMENT 'undo_log context,such as serialization',

  `rollback_info` longblob NOT NULL COMMENT 'rollback info',

  `log_status` int NOT NULL COMMENT '0:normal status,1:defense status',

  `log_created` datetime(6) NOT NULL COMMENT 'create datetime',

  `log_modified` datetime(6) NOT NULL COMMENT 'modify datetime',

  UNIQUE KEY `ux_undo_log` (`xid`,`branch_id`)

) ENGINE=InnoDB DEFAULT CHARSET=utf8 COMMENT='AT transaction mode undo table';
2. 在主工程 spring-cloud-alibaba-demo 下,创建一个名为 spring-cloud-alibaba-seata-storage-8006 的 Spring Boot 模块,并在其 pom.xml 中添加以下依赖,内容如下。
- <?xml version="1.0" encoding="UTF-8"?>
- <project xmlns="http://maven.apache.org/POM/4.0.0" xmlns:xsi="http://www.w3.org/2001/XMLSchema-instance"
- xsi:schemaLocation="http://maven.apache.org/POM/4.0.0 https://maven.apache.org/xsd/maven-4.0.0.xsd">
- <modelVersion>4.0.0</modelVersion>
- <parent>
- <groupId>net.biancheng.c</groupId>
- <version>1.0-SNAPSHOT</version>
- <artifactId>spring-cloud-alibaba-demo</artifactId>
- </parent>
- <groupId>net.biancheng.c</groupId>
- <artifactId>spring-cloud-alibaba-seata-storage-8006</artifactId>
- <version>0.0.1-SNAPSHOT</version>
- <name>spring-cloud-alibaba-seata-storage-8006</name>
- <description>Demo project for Spring Boot</description>
- <properties>
- <java.version>1.8</java.version>
- <seata.version>1.4.2</seata.version>
- </properties>
- <dependencies>
- <!--nacos 服务注册中心-->
- <dependency>
- <groupId>com.alibaba.cloud</groupId>
- <artifactId>spring-cloud-starter-alibaba-nacos-discovery</artifactId>
- <exclusions>
- <exclusion>
- <groupId>org.springframework.cloud</groupId>
- <artifactId>spring-cloud-starter-netflix-ribbon</artifactId>
- </exclusion>
- </exclusions>
- </dependency>
- <dependency>
- <groupId>org.springframework.boot</groupId>
- <artifactId>spring-boot-starter-web</artifactId>
- </dependency>
- <!--引入 OpenFeign 的依赖-->
- <dependency>
- <groupId>org.springframework.cloud</groupId>
- <artifactId>spring-cloud-starter-openfeign</artifactId>
- </dependency>
- <dependency>
- <groupId>org.springframework.cloud</groupId>
- <artifactId>spring-cloud-loadbalancer</artifactId>
- </dependency>
- <!--seata 依赖-->
- <dependency>
- <groupId>com.alibaba.cloud</groupId>
- <artifactId>spring-cloud-starter-alibaba-seata</artifactId>
- </dependency>
- <dependency>
- <groupId>org.springframework.boot</groupId>
- <artifactId>spring-boot-devtools</artifactId>
- <scope>runtime</scope>
- <optional>true</optional>
- </dependency>
- <dependency>
- <groupId>org.projectlombok</groupId>
- <artifactId>lombok</artifactId>
- <optional>true</optional>
- </dependency>
- <dependency>
- <groupId>org.springframework.boot</groupId>
- <artifactId>spring-boot-starter-test</artifactId>
- <scope>test</scope>
- </dependency>
- <dependency>
- <groupId>net.biancheng.c</groupId>
- <artifactId>spring-cloud-alibaba-api</artifactId>
- <version>${project.version}</version>
- </dependency>
- <dependency>
- <groupId>junit</groupId>
- <artifactId>junit</artifactId>
- <version>4.12</version>
- </dependency>
- <dependency>
- <groupId>mysql</groupId>
- <artifactId>mysql-connector-java</artifactId>
- <version>8.0.19</version>
- </dependency>
- <dependency>
- <groupId>ch.qos.logback</groupId>
- <artifactId>logback-core</artifactId>
- </dependency>
- <dependency>
- <groupId>org.mybatis.spring.boot</groupId>
- <artifactId>mybatis-spring-boot-starter</artifactId>
- <version>2.2.0</version>
- </dependency>
- <!--添加 Spring Boot 的监控模块-->
- <!-- https://mvnrepository.com/artifact/org.springframework.boot/spring-boot-starter-actuator -->
- <dependency>
- <groupId>org.springframework.boot</groupId>
- <artifactId>spring-boot-starter-actuator</artifactId>
- </dependency>
- <!--SpringCloud ailibaba sentinel -->
- <dependency>
- <groupId>com.alibaba.cloud</groupId>
- <artifactId>spring-cloud-starter-alibaba-sentinel</artifactId>
- </dependency>
- <!--配置中心 nacos-->
- <dependency>
- <groupId>com.alibaba.cloud</groupId>
- <artifactId>spring-cloud-starter-alibaba-nacos-config</artifactId>
- </dependency>
- </dependencies>
- <build>
- <plugins>
- <!--mybatis自动生成代码插件-->
- <plugin>
- <groupId>org.mybatis.generator</groupId>
- <artifactId>mybatis-generator-maven-plugin</artifactId>
- <version>1.4.0</version>
- <configuration>
- <configurationFile>src/main/resources/mybatis-generator/generatorConfig.xml</configurationFile>
- <verbose>true</verbose>
- <!-- 是否覆盖,true表示会替换生成的JAVA文件,false则不覆盖 -->
- <overwrite>true</overwrite>
- </configuration>
- <dependencies>
- <!--mysql驱动包-->
- <dependency>
- <groupId>mysql</groupId>
- <artifactId>mysql-connector-java</artifactId>
- <version>8.0.19</version>
- </dependency>
- <dependency>
- <groupId>org.mybatis.generator</groupId>
- <artifactId>mybatis-generator-core</artifactId>
- <version>1.4.0</version>
- </dependency>
- </dependencies>
- </plugin>
- <plugin>
- <groupId>org.springframework.boot</groupId>
- <artifactId>spring-boot-maven-plugin</artifactId>
- </plugin>
- </plugins>
- </build>
- </project>
3. 在 spring-cloud-alibaba-seata-storage-8006 的类路径(/resources 目录)下,创建一个配置文件 bootstrap.yml,配置内容如下。
- spring:
- cloud:
- ## Nacos认证信息
- nacos:
- config:
- username: nacos
- password: nacos
- context-path: /nacos
- server-addr: 127.0.0.1:1111 # 设置配置中心服务端地址
- namespace: # Nacos 配置中心的namespace。需要注意,如果使用 public 的 namcespace ,请不要填写这个值,直接留空即可
4. 在 spring-cloud-alibaba-seata-storage-8006 的类路径(/resources 目录)下,创建一个配置文件 application.yml,配置内容如下。
- spring:
- application:
- name: spring-cloud-alibaba-seata-storage-8006
- datasource:
- driver-class-name: com.mysql.jdbc.Driver
- name: defaultDataSource
- url: jdbc:mysql://localhost:3306/seata_storage?serverTimezone=UTC
- username: root
- password: root
- cloud:
- nacos:
- discovery:
- server-addr: 127.0.0.1:1111
- namespace: public
- username:
- password:
- sentinel:
- transport:
- dashboard: 127.0.0.1:8080
- port: 8719
- alibaba:
- seata:
- tx-service-group: service-storage-group
- server:
- port: 8006
- seata:
- application-id: ${spring.application.name}
- tx-service-group: service-storage-group
- service:
- grouplist:
- seata-server: 127.0.0.1:8091
- registry:
- type: nacos
- nacos:
- server-addr: 127.0.0.1:1111
- config:
- type: nacos
- nacos:
- server-addr: 127.0.0.1:1111
- feign:
- sentinel:
- enabled: true
- management:
- endpoints:
- web:
- exposure:
- include: "*"
- ###################################### MyBatis 配置 ######################################
- mybatis:
- # 指定 mapper.xml 的位置
- mapper-locations: classpath:mybatis/mapper/*.xml
- #扫描实体类的位置,在此处指明扫描实体类的包,在 mapper.xml 中就可以不写实体类的全路径名
- type-aliases-package: net.biancheng.c.entity
- configuration:
- #默认开启驼峰命名法,可以不用设置该属性
- map-underscore-to-camel-case: true
5. 在 net.biancheng.c.entity 包下,创建一个名为 Storage 的实体类,代码如下。
- package net.biancheng.c.entity;
- public class Storage {
- private Long id;
- private Long productId;
- private Integer total;
- private Integer used;
- private Integer residue;
- public Long getId() {
- return id;
- }
- public void setId(Long id) {
- this.id = id;
- }
- public Long getProductId() {
- return productId;
- }
- public void setProductId(Long productId) {
- this.productId = productId;
- }
- public Integer getTotal() {
- return total;
- }
- public void setTotal(Integer total) {
- this.total = total;
- }
- public Integer getUsed() {
- return used;
- }
- public void setUsed(Integer used) {
- this.used = used;
- }
- public Integer getResidue() {
- return residue;
- }
- public void setResidue(Integer residue) {
- this.residue = residue;
- }
- }
6. 在 net.biancheng.c.mapper 包下,创建一个名为 StorageMapper 的接口,代码如下。
- package net.biancheng.c.mapper;
- import net.biancheng.c.entity.Storage;
- import org.apache.ibatis.annotations.Mapper;
- @Mapper
- public interface StorageMapper {
- Storage selectByProductId(Long productId);
- int decrease(Storage record);
- }
7. 在 /resouces/mybatis/mapper 目录下,创建一个名为 StorageMapper.xml 的 MyBatis 映射文件,代码如下。
- <?xml version="1.0" encoding="UTF-8"?>
- <!DOCTYPE mapper PUBLIC "-//mybatis.org//DTD Mapper 3.0//EN" "http://mybatis.org/dtd/mybatis-3-mapper.dtd">
- <mapper namespace="net.biancheng.c.mapper.StorageMapper">
- <resultMap id="BaseResultMap" type="net.biancheng.c.entity.Storage">
- <id column="id" jdbcType="BIGINT" property="id"/>
- <result column="product_id" jdbcType="BIGINT" property="productId"/>
- <result column="total" jdbcType="INTEGER" property="total"/>
- <result column="used" jdbcType="INTEGER" property="used"/>
- <result column="residue" jdbcType="INTEGER" property="residue"/>
- </resultMap>
- <sql id="Base_Column_List">
- id
- , product_id, total, used, residue
- </sql>
- <update id="decrease" parameterType="net.biancheng.c.entity.Storage">
- update t_storage
- <set>
- <if test="total != null">
- total = #{total,jdbcType=INTEGER},
- </if>
- <if test="used != null">
- used = #{used,jdbcType=INTEGER},
- </if>
- <if test="residue != null">
- residue = #{residue,jdbcType=INTEGER},
- </if>
- </set>
- where product_id = #{productId,jdbcType=BIGINT}
- </update>
- <select id="selectByProductId" parameterType="java.lang.Long" resultMap="BaseResultMap">
- select
- <include refid="Base_Column_List"/>
- from t_storage
- where product_id = #{productId,jdbcType=BIGINT}
- </select>
- </mapper>
8. 在 net.biancheng.c.service 包下,创建一个名为 StorageService 的 Service 接口,代码如下。
- package net.biancheng.c.service;
- public interface StorageService {
- int decrease(Long productId, Integer count);
- }
9. 在 net.biancheng.c.service.impl 包下,创建 StorageService 的实现类 StorageServiceImpl,代码如下。
- package net.biancheng.c.service.impl;
- import lombok.extern.slf4j.Slf4j;
- import net.biancheng.c.entity.Storage;
- import net.biancheng.c.mapper.StorageMapper;
- import net.biancheng.c.service.StorageService;
- import org.springframework.stereotype.Service;
- import javax.annotation.Resource;
- @Service
- @Slf4j
- public class StorageServiceImpl implements StorageService {
- @Resource
- StorageMapper storageMapper;
- @Override
- public int decrease(Long productId, Integer count) {
- log.info("------->storage-service中扣减库存开始");
- log.info("------->storage-service 开始查询商品是否存在");
- Storage storage = storageMapper.selectByProductId(productId);
- if (storage != null && storage.getResidue().intValue() >= count.intValue()) {
- Storage storage2 = new Storage();
- storage2.setProductId(productId);
- storage.setUsed(storage.getUsed() + count);
- storage.setResidue(storage.getTotal().intValue() - storage.getUsed());
- int decrease = storageMapper.decrease(storage);
- log.info("------->storage-service 扣减库存成功");
- return decrease;
- } else {
- log.info("------->storage-service 库存不足,开始回滚!");
- throw new RuntimeException("库存不足,扣减库存失败!");
- }
- }
- }
10. 在 net.biancheng.c.controller 包下,创建一个名为 StorageController 的 Controller 类,代码如下。
- package net.biancheng.c.controller;
- import lombok.extern.slf4j.Slf4j;
- import net.biancheng.c.entity.CommonResult;
- import net.biancheng.c.service.StorageService;
- import org.springframework.beans.factory.annotation.Value;
- import org.springframework.web.bind.annotation.*;
- import javax.annotation.Resource;
- @RestController
- @Slf4j
- public class StorageController {
- @Resource
- private StorageService storageService;
- @Value("${server.port}")
- private String serverPort;
- @PostMapping(value = "/storage/decrease")
- CommonResult decrease(@RequestParam("productId") Long productId, @RequestParam("count") Integer count) {
- int decrease = storageService.decrease(productId, count);
- CommonResult result;
- if (decrease > 0) {
- result = new CommonResult(200, "from mysql,serverPort: " + serverPort, decrease);
- } else {
- result = new CommonResult(505, "from mysql,serverPort: " + serverPort, "库存扣减失败");
- }
- return result;
- }
- }
11. 主启动类的代码如下。
- package net.biancheng.c;
- import org.springframework.boot.SpringApplication;
- import org.springframework.boot.autoconfigure.SpringBootApplication;
- import org.springframework.cloud.client.discovery.EnableDiscoveryClient;
- import org.springframework.cloud.openfeign.EnableFeignClients;
- @EnableDiscoveryClient
- @EnableFeignClients
- @SpringBootApplication(scanBasePackages = "net.biancheng")
- public class SpringCloudAlibabaSeataStorage8006Application {
- public static void main(String[] args) {
- SpringApplication.run(SpringCloudAlibabaSeataStorage8006Application.class, args);
- }
- }
搭建账户(Account)服务
1. 在 MySQL 数据库中,新建一个名为 seata-account 的数据库实例,并通过以下 SQL 语句创建 2 张表:t_account(账户表)和 undo_log(回滚日志表)。
DROP TABLE IF EXISTS `t_account`;

CREATE TABLE `t_account` (

  `id` bigint NOT NULL AUTO_INCREMENT COMMENT 'id',

  `user_id` bigint DEFAULT NULL COMMENT '用户id',

  `total` decimal(10,0) DEFAULT NULL COMMENT '总额度',

  `used` decimal(10,0) DEFAULT NULL COMMENT '已用余额',

  `residue` decimal(10,0) DEFAULT '0' COMMENT '剩余可用额度',

  PRIMARY KEY (`id`)

) ENGINE=InnoDB AUTO_INCREMENT=2 DEFAULT CHARSET=utf8;

-- ----------------------------

-- Records of t_account

-- ----------------------------

INSERT INTO `t_account` VALUES ('1', '1', '1000', '0', '1000');

-- ----------------------------

-- Table structure for undo_log

-- ----------------------------

DROP TABLE IF EXISTS `undo_log`;

CREATE TABLE `undo_log` (

  `branch_id` bigint NOT NULL COMMENT 'branch transaction id',

  `xid` varchar(128) NOT NULL COMMENT 'global transaction id',

  `context` varchar(128) NOT NULL COMMENT 'undo_log context,such as serialization',

  `rollback_info` longblob NOT NULL COMMENT 'rollback info',

  `log_status` int NOT NULL COMMENT '0:normal status,1:defense status',

  `log_created` datetime(6) NOT NULL COMMENT 'create datetime',

  `log_modified` datetime(6) NOT NULL COMMENT 'modify datetime',

  UNIQUE KEY `ux_undo_log` (`xid`,`branch_id`)

) ENGINE=InnoDB DEFAULT CHARSET=utf8;
2. 在主启动类 spring-cloud-alibaba-seata-account-8007 下,创建一个名为 spring-cloud-alibaba-seata-account-8007 的 Spring Boot 模块,并在其 pom.xml 中添加以下依赖,代码如下。
- <?xml version="1.0" encoding="UTF-8"?>
- <project xmlns="http://maven.apache.org/POM/4.0.0" xmlns:xsi="http://www.w3.org/2001/XMLSchema-instance"
- xsi:schemaLocation="http://maven.apache.org/POM/4.0.0 https://maven.apache.org/xsd/maven-4.0.0.xsd">
- <modelVersion>4.0.0</modelVersion>
- <parent>
- <groupId>net.biancheng.c</groupId>
- <version>1.0-SNAPSHOT</version>
- <artifactId>spring-cloud-alibaba-demo</artifactId>
- </parent>
- <groupId>net.biancheng.c</groupId>
- <artifactId>spring-cloud-alibaba-seata-account-8007</artifactId>
- <version>0.0.1-SNAPSHOT</version>
- <name>spring-cloud-alibaba-seata-account-8007</name>
- <description>Demo project for Spring Boot</description>
- <properties>
- <java.version>1.8</java.version>
- <seata.version>1.4.2</seata.version>
- </properties>
- <dependencies>
- <!--nacos 服务注册中心-->
- <dependency>
- <groupId>com.alibaba.cloud</groupId>
- <artifactId>spring-cloud-starter-alibaba-nacos-discovery</artifactId>
- <exclusions>
- <exclusion>
- <groupId>org.springframework.cloud</groupId>
- <artifactId>spring-cloud-starter-netflix-ribbon</artifactId>
- </exclusion>
- </exclusions>
- </dependency>
- <dependency>
- <groupId>org.springframework.boot</groupId>
- <artifactId>spring-boot-starter-web</artifactId>
- </dependency>
- <!--引入 OpenFeign 的依赖-->
- <dependency>
- <groupId>org.springframework.cloud</groupId>
- <artifactId>spring-cloud-starter-openfeign</artifactId>
- </dependency>
- <dependency>
- <groupId>org.springframework.cloud</groupId>
- <artifactId>spring-cloud-loadbalancer</artifactId>
- </dependency>
- <!--seata-->
- <dependency>
- <groupId>com.alibaba.cloud</groupId>
- <artifactId>spring-cloud-starter-alibaba-seata</artifactId>
- </dependency>
- <dependency>
- <groupId>org.springframework.boot</groupId>
- <artifactId>spring-boot-devtools</artifactId>
- <scope>runtime</scope>
- <optional>true</optional>
- </dependency>
- <dependency>
- <groupId>org.projectlombok</groupId>
- <artifactId>lombok</artifactId>
- <optional>true</optional>
- </dependency>
- <dependency>
- <groupId>org.springframework.boot</groupId>
- <artifactId>spring-boot-starter-test</artifactId>
- <scope>test</scope>
- </dependency>
- <dependency>
- <groupId>net.biancheng.c</groupId>
- <artifactId>spring-cloud-alibaba-api</artifactId>
- <version>${project.version}</version>
- </dependency>
- <dependency>
- <groupId>junit</groupId>
- <artifactId>junit</artifactId>
- <version>4.12</version>
- </dependency>
- <dependency>
- <groupId>mysql</groupId>
- <artifactId>mysql-connector-java</artifactId>
- <version>8.0.19</version>
- </dependency>
- <dependency>
- <groupId>ch.qos.logback</groupId>
- <artifactId>logback-core</artifactId>
- </dependency>
- <dependency>
- <groupId>org.mybatis.spring.boot</groupId>
- <artifactId>mybatis-spring-boot-starter</artifactId>
- <version>2.2.0</version>
- </dependency>
- <!--添加 Spring Boot 的监控模块-->
- <!-- https://mvnrepository.com/artifact/org.springframework.boot/spring-boot-starter-actuator -->
- <dependency>
- <groupId>org.springframework.boot</groupId>
- <artifactId>spring-boot-starter-actuator</artifactId>
- </dependency>
- <!--SpringCloud ailibaba sentinel -->
- <dependency>
- <groupId>com.alibaba.cloud</groupId>
- <artifactId>spring-cloud-starter-alibaba-sentinel</artifactId>
- </dependency>
- <dependency>
- <groupId>com.alibaba.cloud</groupId>
- <artifactId>spring-cloud-starter-alibaba-nacos-config</artifactId>
- </dependency>
- </dependencies>
- <build>
- <plugins>
- <!--mybatis自动生成代码插件-->
- <plugin>
- <groupId>org.mybatis.generator</groupId>
- <artifactId>mybatis-generator-maven-plugin</artifactId>
- <version>1.4.0</version>
- <configuration>
- <configurationFile>src/main/resources/mybatis-generator/generatorConfig.xml</configurationFile>
- <verbose>true</verbose>
- <!-- 是否覆盖,true表示会替换生成的JAVA文件,false则不覆盖 -->
- <overwrite>true</overwrite>
- </configuration>
- <dependencies>
- <!--mysql驱动包-->
- <dependency>
- <groupId>mysql</groupId>
- <artifactId>mysql-connector-java</artifactId>
- <version>8.0.19</version>
- </dependency>
- <dependency>
- <groupId>org.mybatis.generator</groupId>
- <artifactId>mybatis-generator-core</artifactId>
- <version>1.4.0</version>
- </dependency>
- </dependencies>
- </plugin>
- <plugin>
- <groupId>org.springframework.boot</groupId>
- <artifactId>spring-boot-maven-plugin</artifactId>
- </plugin>
- </plugins>
- </build>
- </project>
3. 在 spring-cloud-alibaba-seata-account-8007 的类路径(/resources 目录)下,创建一个配置文件 bootstrap.yml,配置内容如下。
- spring:
- cloud:
- ## Nacos认证信息
- nacos:
- config:
- username: nacos
- password: nacos
- context-path: /nacos
- server-addr: 127.0.0.1:1111 # 设置配置中心服务端地址
- namespace: # Nacos 配置中心的namespace。需要注意,如果使用 public 的 namcespace ,请不要填写这个值,直接留空即可
4. 在 spring-cloud-alibaba-seata-account-8007 的类路径(/resources 目录)下,创建一个配置文件 application.yml,配置内容如下。
- spring:
- application:
- name: spring-cloud-alibaba-seata-account-8007
- datasource:
- driver-class-name: com.mysql.cj.jdbc.Driver
- name: defaultDataSource
- url: jdbc:mysql://localhost:3306/seata_account?serverTimezone=UTC
- username: root
- password: root
- cloud:
- nacos:
- discovery:
- server-addr: 127.0.0.1:1111
- namespace: public
- username:
- password:
- sentinel:
- transport:
- dashboard: 127.0.0.1:8080
- port: 8719
- alibaba:
- seata:
- tx-service-group: service-account-group
- server:
- port: 8007
- seata:
- application-id: ${spring.application.name}
- tx-service-group: service-account-group
- service:
- grouplist:
- seata-server: 127.0.0.1:8091
- registry:
- type: nacos
- nacos:
- server-addr: 127.0.0.1:1111
- config:
- type: nacos
- nacos:
- server-addr: 127.0.0.1:1111
- feign:
- sentinel:
- enabled: true
- management:
- endpoints:
- web:
- exposure:
- include: "*"
- ###################################### MyBatis 配置 ######################################
- mybatis:
- # 指定 mapper.xml 的位置
- mapper-locations: classpath:mybatis/mapper/*.xml
- #扫描实体类的位置,在此处指明扫描实体类的包,在 mapper.xml 中就可以不写实体类的全路径名
- type-aliases-package: net.biancheng.c.entity
- configuration:
- #默认开启驼峰命名法,可以不用设置该属性
- map-underscore-to-camel-case: true
5. 在 net.biancheng.c.entity 包下,创建一个名为 Account 的实体类,代码如下。
- package net.biancheng.c.entity;
- import java.math.BigDecimal;
- public class Account {
- private Long id;
- private Long userId;
- private BigDecimal total;
- private BigDecimal used;
- private BigDecimal residue;
- public Long getId() {
- return id;
- }
- public void setId(Long id) {
- this.id = id;
- }
- public Long getUserId() {
- return userId;
- }
- public void setUserId(Long userId) {
- this.userId = userId;
- }
- public BigDecimal getTotal() {
- return total;
- }
- public void setTotal(BigDecimal total) {
- this.total = total;
- }
- public BigDecimal getUsed() {
- return used;
- }
- public void setUsed(BigDecimal used) {
- this.used = used;
- }
- public BigDecimal getResidue() {
- return residue;
- }
- public void setResidue(BigDecimal residue) {
- this.residue = residue;
- }
- }
6. 在 net.biancheng.c.mapper 包下,创建一个名为 AccountMapper 的接口,代码如下。
- package net.biancheng.c.mapper;
- import net.biancheng.c.entity.Account;
- import org.apache.ibatis.annotations.Mapper;
- import java.math.BigDecimal;
- @Mapper
- public interface AccountMapper {
- Account selectByUserId(Long userId);
- int decrease(Long userId, BigDecimal money);
- }
7. 在 /resouces/mybatis/mapper 目录下,创建一个名为 AccountMapper.xml 的 MyBatis 映射文件,代码如下。
- <?xml version="1.0" encoding="UTF-8"?>
- <!DOCTYPE mapper PUBLIC "-//mybatis.org//DTD Mapper 3.0//EN" "http://mybatis.org/dtd/mybatis-3-mapper.dtd">
- <mapper namespace="net.biancheng.c.mapper.AccountMapper">
- <resultMap id="BaseResultMap" type="net.biancheng.c.entity.Account">
- <id column="id" jdbcType="BIGINT" property="id"/>
- <result column="user_id" jdbcType="BIGINT" property="userId"/>
- <result column="total" jdbcType="DECIMAL" property="total"/>
- <result column="used" jdbcType="DECIMAL" property="used"/>
- <result column="residue" jdbcType="DECIMAL" property="residue"/>
- </resultMap>
- <sql id="Base_Column_List">
- id
- , user_id, total, used, residue
- </sql>
- <select id="selectByUserId" resultType="net.biancheng.c.entity.Account">
- select
- <include refid="Base_Column_List"/>
- from t_account
- where user_id = #{userId,jdbcType=BIGINT}
- </select>
- <update id="decrease">
- UPDATE t_account
- SET residue = residue - #{money},
- used = used + #{money}
- WHERE user_id = #{userId};
- </update>
- </mapper>
8. 在 net.biancheng.c.service 包下,创建一个名为 AccountService 的接口,代码如下。
- package net.biancheng.c.service;
- import org.springframework.web.bind.annotation.RequestParam;
- import java.math.BigDecimal;
- public interface AccountService {
- /**
- * 扣减账户余额
- *
- * @param userId 用户id
- * @param money 金额
- */
- int decrease(@RequestParam("userId") Long userId, @RequestParam("money") BigDecimal money);
- }
9. 在 net.biancheng.c.service.impl 包下,创建 AccountService 的实现类 AccountServiceImpl,代码如下。
- package net.biancheng.c.service.impl;
- import lombok.extern.slf4j.Slf4j;
- import net.biancheng.c.entity.Account;
- import net.biancheng.c.mapper.AccountMapper;
- import net.biancheng.c.service.AccountService;
- import org.springframework.stereotype.Service;
- import javax.annotation.Resource;
- import java.math.BigDecimal;
- @Service
- @Slf4j
- public class AccountServiceImpl implements AccountService {
- @Resource
- AccountMapper accountMapper;
- @Override
- public int decrease(Long userId, BigDecimal money) {
- log.info("------->account-service 开始查询账户余额");
- Account account = accountMapper.selectByUserId(userId);
- log.info("------->account-service 账户余额查询完成," + account);
- if (account != null && account.getResidue().intValue() >= money.intValue()) {
- log.info("------->account-service 开始从账户余额中扣钱!");
- int decrease = accountMapper.decrease(userId, money);
- log.info("------->account-service 从账户余额中扣钱完成");
- return decrease;
- } else {
- log.info("账户余额不足,开始回滚!");
- throw new RuntimeException("账户余额不足!");
- }
- }
- }
10. 主启动类代码如下。
- package net.biancheng.c;
- import org.springframework.boot.SpringApplication;
- import org.springframework.boot.autoconfigure.SpringBootApplication;
- import org.springframework.cloud.client.discovery.EnableDiscoveryClient;
- import org.springframework.cloud.openfeign.EnableFeignClients;
- @EnableDiscoveryClient
- @EnableFeignClients
- @SpringBootApplication(scanBasePackages = "net.biancheng")
- public class SpringCloudAlibabaSeataAccount8007Application {
- public static void main(String[] args) {
- SpringApplication.run(SpringCloudAlibabaSeataAccount8007Application.class, args);
- }
- }
11. 依次启动 Nacos Server(集群)和 Seata Server(集群),最后启动 spring-cloud-alibaba-seata-order-8005,当控制台出现以下日志时,说明该服务已经成功连接上 Seata Server(TC)。
2021-11-25 15:16:27.389  INFO 19564 --- [  restartedMain] com.zaxxer.hikari.HikariDataSource    : defaultDataSource - Start completed.

2021-11-25 15:16:27.553  INFO 19564 --- [  restartedMain] i.s.c.r.netty.NettyClientChannelManager : will connect to 172.30.194.1:8091

2021-11-25 15:16:27.553  INFO 19564 --- [  restartedMain] i.s.c.rpc.netty.RmNettyRemotingClient  : RM will register :jdbc:mysql://localhost:3306/seata_order

2021-11-25 15:16:27.557  INFO 19564 --- [  restartedMain] i.s.core.rpc.netty.NettyPoolableFactory : NettyPool create channel to transactionRole:RMROLE,address:172.30.194.1:8091,msg:< RegisterRMRequest{resourceIds='jdbc:mysql://localhost:3306/seata_order', applicationId='spring-cloud-alibaba-seata-order-8005', transactionServiceGroup='service-order-group'} >

2021-11-25 15:16:28.699  INFO 19564 --- [  restartedMain] i.s.c.rpc.netty.RmNettyRemotingClient  : register RM success. client version:1.3.0, server version:1.4.2,channel:[id: 0xc6da1cb4, L:/172.30.194.1:49945 - R:/172.30.194.1:8091]

2021-11-25 15:16:28.707  INFO 19564 --- [  restartedMain] i.s.core.rpc.netty.NettyPoolableFactory : register success, cost 78 ms, version:1.4.2,role:RMROLE,channel:[id: 0xc6da1cb4, L:/172.30.194.1:49945 - R:/172.30.194.1:8091]
12. 启动 spring-cloud-alibaba-seata-storage-8006,当控制台出现以下日志时,说明该服务已经成功连接上 Seata Server(TC)。
2021-11-25 15:16:28.621  INFO 14772 --- [  restartedMain] com.zaxxer.hikari.HikariDataSource       : defaultDataSource - Start completed.

2021-11-25 15:16:28.969  INFO 14772 --- [  restartedMain] i.s.c.r.netty.NettyClientChannelManager  : will connect to 172.30.194.1:8091

2021-11-25 15:16:28.970  INFO 14772 --- [  restartedMain] i.s.c.rpc.netty.RmNettyRemotingClient    : RM will register :jdbc:mysql://localhost:3306/seata_storage

2021-11-25 15:16:28.974  INFO 14772 --- [  restartedMain] i.s.core.rpc.netty.NettyPoolableFactory  : NettyPool create channel to transactionRole:RMROLE,address:172.30.194.1:8091,msg:< RegisterRMRequest{resourceIds='jdbc:mysql://localhost:3306/seata_storage', applicationId='spring-cloud-alibaba-seata-storage-8006', transactionServiceGroup='service-storage-group'} >

2021-11-25 15:16:30.171  INFO 14772 --- [  restartedMain] i.s.c.rpc.netty.RmNettyRemotingClient    : register RM success. client version:1.3.0, server version:1.4.2,channel:[id: 0x7311ae2a, L:/172.30.194.1:52026 - R:/172.30.194.1:8091]

2021-11-25 15:16:30.182  INFO 14772 --- [  restartedMain] i.s.core.rpc.netty.NettyPoolableFactory  : register success, cost 174 ms, version:1.4.2,role:RMROLE,channel:[id: 0x7311ae2a, L:/172.30.194.1:52026 - R:/172.30.194.1:8091]
13. 启动 spring-cloud-alibaba-seata-account-8007,当控制台出现以下日志时,说明该服务已经成功连接上 Seata Server(TC)。
2021-11-25 15:16:29.914  INFO 8616 --- [  restartedMain] com.zaxxer.hikari.HikariDataSource       : defaultDataSource - Start completed.

2021-11-25 15:16:30.253  INFO 8616 --- [  restartedMain] i.s.c.r.netty.NettyClientChannelManager  : will connect to 172.30.194.1:8091

2021-11-25 15:16:30.253  INFO 8616 --- [  restartedMain] i.s.c.rpc.netty.RmNettyRemotingClient    : RM will register :jdbc:mysql://localhost:3306/seata_account

2021-11-25 15:16:30.257  INFO 8616 --- [  restartedMain] i.s.core.rpc.netty.NettyPoolableFactory  : NettyPool create channel to transactionRole:RMROLE,address:172.30.194.1:8091,msg:< RegisterRMRequest{resourceIds='jdbc:mysql://localhost:3306/seata_account', applicationId='spring-cloud-alibaba-seata-account-8007', transactionServiceGroup='service-account-group'} >

2021-11-25 15:16:31.930  INFO 8616 --- [  restartedMain] i.s.c.rpc.netty.RmNettyRemotingClient    : register RM success. client version:1.3.0, server version:1.4.2,channel:[id: 0xa57ead6d, L:/172.30.194.1:52057 - R:/172.30.194.1:8091]

2021-11-25 15:16:31.941  INFO 8616 --- [  restartedMain] i.s.core.rpc.netty.NettyPoolableFactory  : register success, cost 114 ms, version:1.4.2,role:RMROLE,channel:[id: 0xa57ead6d, L:/172.30.194.1:52057 - R:/172.30.194.1:8091]
14. 使用浏览器访问“http://localhost:8005/order/createByAnnotation/1/2/20”,结果如下。
{"code":200,"message":"订单创建成功","data":null}
15. 执行以下 SQL 语句,查询 seata_order 数据库中的 t_order 表。
SELECT * FROM seata_order.t_order;
结果如下。
| id | user_id | product_id | count | money | status |
|---|---|---|---|---|---|
| 1 | 1 | 2 | 20 | 1 |
从上表可以看出,已经创建一条订单数据,且订单状态(status)已修改为“已完成”。
16. 执行以下 SQL 语句,查询 seata_storage 数据库中的 t_storage 表。
SELECT * FROM seata_storage.t_storage;
结果如下。
| id | product_id | total | used | residue |
|---|---|---|---|---|
| 1 | 1 | 100 | 2 | 98 |
从上表可以看出,商品库存已经扣减 2 件,仓库中商品储量从 100 件减少到了 98 件。
17. 执行以下 SQL 语句,查询 seata_account 数据库中的 t_account 表,
SELECT * FROM seata_account.t_account;
结果如下。
| id | user_id | total | used | residue |
|---|---|---|---|---|
| 1 | 1 | 1000 | 20 | 980 |
从上表可以看出,账户余额已经扣减,金额从 1000 元减少到了 980 元。
18. 使用浏览器访问“http://localhost:8005/order/createByAnnotation/1/10/1000”,结果如下。
Whitelabel Error Page

This application has no explicit mapping for /error, so you are seeing this as a fallback.

Thu Nov 25 15:27:03 CST 2021

There was an unexpected error (type=Internal Server Error, status=500).

[500] during [POST] to [http://spring-cloud-alibaba-seata-account-8007/account/decrease?userId=1&money=1000] [AccountService#decrease(Long,BigDecimal)]: [{"timestamp":"2021-11-25T07:27:03.512+00:00","status":500,"error":"Internal Server Error","trace":"java.lang.RuntimeException: 账户余额不足!\r\n\tat net.biancheng.c.service.impl.AccountServiceImpl.decrease(... (5673 bytes)]

feign.FeignException$InternalServerError: [500] during [POST] to [http://spring-cloud-alibaba-seata-account-8007/account/decrease?userId=1&money=1000] [AccountService#decrease(Long,BigDecimal)]: [{"timestamp":"2021-11-25T07:27:03.512+00:00","status":500,"error":"Internal Server Error","trace":"java.lang.RuntimeException: 账户余额不足!\r\n\tat net.biancheng.c.service.impl.AccountServiceImpl.decrease(... (5673 bytes)]
注:在本次请求中,用户购买 10 件商品(商品 ID 为 1),商品总价为 1000 元,此时用户账户余额 为 980 元,因此账户服务会抛出“账户余额不足!”的运行时异常。
19. 再次查询 t_order、t_storage 和 t_account 表,结果如下。
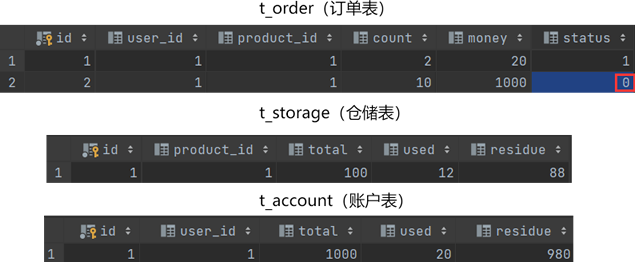
图11:分布式事务问题
从上图可以看出:
- t_order(订单表):订单服务生成了一条订单数据(id 为 2),但订单状态(status)为未完成(0);
- t_storage(库存表):商品库存已扣减;
- t_account(账户表):账户金额不足,账户(Account)服务出现异常,进而导致账户金额并未扣减。
@GlobalTransactional 注解
在分布式微服务架构中,我们可以使用 Seata 提供的 @GlobalTransactional 注解实现分布式事务的开启、管理和控制。
当调用 @GlobalTransaction 注解的方法时,TM 会先向 TC 注册全局事务,TC 生成一个全局唯一的 XID,返回给 TM。
@GlobalTransactional 注解既可以在类上使用,也可以在类方法上使用,该注解的使用位置决定了全局事务的范围,具体关系如下:
- 在类中某个方法使用时,全局事务的范围就是该方法以及它所涉及的所有服务。
- 在类上使用时,全局事务的范围就是这个类中的所有方法以及这些方法涉及的服务。
接下来,我们就使用 @GlobalTransactional 注解对业务系统进行改造,步骤如下。
1. 在 spring-cloud-alibaba-seata-order-8005 的 net.biacheng.c 包下的 OrderController 中,添加一个名为 createByAnnotation 的方法,代码如下。
- /**
- * 使用 @GlobalTransactional 注解对分布式事务进行管理
- * @param productId
- * @param count
- * @param money
- * @return
- */
- @GetMapping("/order/createByAnnotation/{productId}/{count}/{money}")
- @GlobalTransactional(name = "c-biancheng-net-create-order", rollbackFor = Exception.class)
- public CommonResult createByAnnotation(@PathVariable("productId") Integer productId, @PathVariable("count") Integer count
- , @PathVariable("money") BigDecimal money) {
- Order order = new Order();
- order.setProductId(Integer.valueOf(productId).longValue());
- order.setCount(count);
- order.setMoney(money);
- return orderService.create(order);
- }
从以上代码可以看出,添加的 createByAnnotation() 方法与 create() 方法无论是参数还是代码逻辑都一摸一样,唯一的不同就是前者标注了 @GlobalTransactional 注解。
2. 将数据恢复到浏览器访问“http://localhost:8005/order/createByAnnotation/1/2/20”之后。
3. 重启订单(Order)服务、库存(Storage)服务和账户(Account)服务,并使用浏览器访问“http://localhost:8005/order/createByAnnotation/1/10/1000”,结果如下。
Whitelabel Error Page

This application has no explicit mapping for /error, so you are seeing this as a fallback.

Thu Nov 25 15:27:03 CST 2021

There was an unexpected error (type=Internal Server Error, status=500).

[500] during [POST] to [http://spring-cloud-alibaba-seata-account-8007/account/decrease?userId=1&money=1000] [AccountService#decrease(Long,BigDecimal)]: [{"timestamp":"2021-11-25T07:27:03.512+00:00","status":500,"error":"Internal Server Error","trace":"java.lang.RuntimeException: 账户余额不足!\r\n\tat net.biancheng.c.service.impl.AccountServiceImpl.decrease(... (5673 bytes)]

feign.FeignException$InternalServerError: [500] during [POST] to [http://spring-cloud-alibaba-seata-account-8007/account/decrease?userId=1&money=1000] [AccountService#decrease(Long,BigDecimal)]: [{"timestamp":"2021-11-25T07:27:03.512+00:00","status":500,"error":"Internal Server Error","trace":"java.lang.RuntimeException: 账户余额不足!\r\n\tat net.biancheng.c.service.impl.AccountServiceImpl.decrease(... (5673 bytes)]
在本次请求中,用户购买商品的总价为 1000 元,但用户账户余额只有 980 元,因此账户服务会抛出运行时异常,异常信息为“账户余额不足!”。
4. spring-cloud-alibaba-seata-order-8005 控制台输出如下(标红部分为回滚日志)。
2021-11-25 15:26:57.586  INFO 19564 --- [nio-8005-exec-1] n.b.c.service.impl.OrderServiceImpl      : ----->开始新建订单

2021-11-25 15:26:58.276  INFO 19564 --- [nio-8005-exec-1] n.b.c.service.impl.OrderServiceImpl      : ----->订单服务开始调用库存服务,开始扣减库存

2021-11-25 15:26:58.413  WARN 19564 --- [nio-8005-exec-1] c.l.c.ServiceInstanceListSupplierBuilder : LoadBalancerCacheManager not available, returning delegate without caching.

2021-11-25 15:27:00.705  INFO 19564 --- [nio-8005-exec-1] n.b.c.service.impl.OrderServiceImpl      : ----->订单微服务开始调用库存,扣减库存结束

2021-11-25 15:27:00.705  INFO 19564 --- [nio-8005-exec-1] n.b.c.service.impl.OrderServiceImpl      : ----->订单服务开始调用账户服务,开始从账户扣减商品金额

2021-11-25 15:27:00.723  WARN 19564 --- [nio-8005-exec-1] c.l.c.ServiceInstanceListSupplierBuilder : LoadBalancerCacheManager not available, returning delegate without caching.

2021-11-25 15:27:03.665  INFO 19564 --- [h_RMROLE_1_1_16] i.s.c.r.p.c.RmBranchRollbackProcessor    : rm handle branch rollback process:xid=172.30.194.1:8091:2702361983450404762,branchId=2702361983450404764,branchType=AT,resourceId=jdbc:mysql://localhost:3306/seata_order,applicationData=null

2021-11-25 15:27:03.670  INFO 19564 --- [h_RMROLE_1_1_16] io.seata.rm.AbstractRMHandler            : Branch Rollbacking: 172.30.194.1:8091:2702361983450404762 2702361983450404764 jdbc:mysql://localhost:3306/seata_order

2021-11-25 15:27:03.738  INFO 19564 --- [h_RMROLE_1_1_16] i.s.r.d.undo.AbstractUndoLogManager      : xid 172.30.194.1:8091:2702361983450404762 branch 2702361983450404764, undo_log deleted with GlobalFinished

2021-11-25 15:27:03.742  INFO 19564 --- [h_RMROLE_1_1_16] io.seata.rm.AbstractRMHandler            : Branch Rollbacked result: PhaseTwo_Rollbacked

2021-11-25 15:27:03.817  INFO 19564 --- [nio-8005-exec-1] i.seata.tm.api.DefaultGlobalTransaction  : [172.30.194.1:8091:2702361983450404762] rollback status: Rollbacked

2021-11-25 15:27:03.853 ERROR 19564 --- [nio-8005-exec-1] o.a.c.c.C.[.[.[/].[dispatcherServlet]    : Servlet.service() for servlet [dispatcherServlet] in context with path [] threw exception [Request processing failed; nested exception is feign.FeignException$InternalServerError: [500] during [POST] to [http://spring-cloud-alibaba-seata-account-8007/account/decrease?userId=1&money=1000] [AccountService#decrease(Long,BigDecimal)]: [{"timestamp":"2021-11-25T07:27:03.512+00:00","status":500,"error":"Internal Server Error","trace":"java.lang.RuntimeException: 账户余额不足!\r\n\tat net.biancheng.c.service.impl.AccountServiceImpl.decrease(... (5673 bytes)]] with root cause
5. spring-cloud-alibaba-seata-storage-8006 控制台输出如下。(标红部分为回滚日志)
2021-11-25 15:26:59.315  INFO 14772 --- [nio-8006-exec-1] n.b.c.service.impl.StorageServiceImpl    : ------->storage-service中扣减库存开始

2021-11-25 15:26:59.316  INFO 14772 --- [nio-8006-exec-1] n.b.c.service.impl.StorageServiceImpl    : ------->storage-service 开始查询商品是否存在

2021-11-25 15:27:00.652  INFO 14772 --- [nio-8006-exec-1] n.b.c.service.impl.StorageServiceImpl    : ------->storage-service 扣减库存成功

2021-11-25 15:27:03.568  INFO 14772 --- [h_RMROLE_1_1_16] i.s.c.r.p.c.RmBranchRollbackProcessor    : rm handle branch rollback process:xid=172.30.194.1:8091:2702361983450404762,branchId=2702361983450404769,branchType=AT,resourceId=jdbc:mysql://localhost:3306/seata_storage,applicationData=null

2021-11-25 15:27:03.572  INFO 14772 --- [h_RMROLE_1_1_16] io.seata.rm.AbstractRMHandler            : Branch Rollbacking: 172.30.194.1:8091:2702361983450404762 2702361983450404769 jdbc:mysql://localhost:3306/seata_storage

2021-11-25 15:27:03.631  INFO 14772 --- [h_RMROLE_1_1_16] i.s.r.d.undo.AbstractUndoLogManager      : xid 172.30.194.1:8091:2702361983450404762 branch 2702361983450404769, undo_log deleted with GlobalFinished

2021-11-25 15:27:03.635  INFO 14772 --- [h_RMROLE_1_1_16] io.seata.rm.AbstractRMHandler            : Branch Rollbacked result: PhaseTwo_Rollbacked
6. spring-cloud-alibaba-seata-account-8007 控制台输出如下(标红部分为回滚日志)。
2021-11-25 15:27:03.366  INFO 8616 --- [nio-8007-exec-1] n.b.c.service.impl.AccountServiceImpl    : ------->account-service 开始查询账户余额

2021-11-25 15:27:03.484  INFO 8616 --- [nio-8007-exec-1] n.b.c.service.impl.AccountServiceImpl    : ------->account-service 账户余额查询完成,net.biancheng.c.entity.Account@2a95537f

2021-11-25 15:27:03.485  INFO 8616 --- [nio-8007-exec-1] n.b.c.service.impl.AccountServiceImpl    : 账户余额不足,开始回滚!

2021-11-25 15:27:03.499 ERROR 8616 --- [nio-8007-exec-1] o.a.c.c.C.[.[.[/].[dispatcherServlet]    : Servlet.service() for servlet [dispatcherServlet] in context with path [] threw exception [Request processing failed; nested exception is java.lang.RuntimeException: 账户余额不足!] with root cause

java.lang.RuntimeException: 账户余额不足!
7. 到 MySQL 数据库中,再次查询 t_order、t_storage 和 t_account 表,结果如下。
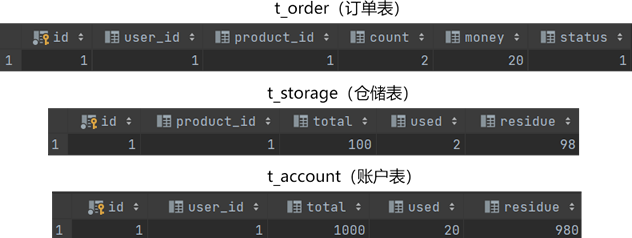
图12:Seata 事务回滚
从图 12 可以看出,这次并没有出现分布式事务造成的数据不一致问题。
biancheng-Spring Cloud Alibaba Seata的更多相关文章
- Spring Cloud Alibaba Seata
一.简介 官网地址:http://seata.io/zh-cn/ 1,概念 Seata是一款开源的分布式事务解决方案,致力于在微服务架构在提供高性能和简单一样的分布式事务服务. 2,处理过程 Tran ...
- Spring Cloud Alibaba | 微服务分布式事务之Seata
Spring Cloud Alibaba | 微服务分布式事务之Seata 本篇实战所使用Spring有关版本: SpringBoot:2.1.7.RELEASE Spring Cloud:Green ...
- Spring Cloud Alibaba 初体验(六) Seata 及结合 MyBatis 与 MyBatis-Plus 的使用
一.下载与运行 本文使用 Seata 1.1.0:https://github.com/seata/seata/releases Windows 环境下双击 bin/seata-server.bat ...
- Spring Cloud Alibaba 整合 Seata 实现分布式事务
在Spring Boot单体服务中,添加@Transactional注解就能实现事务.在单体服务中,执行事务都是在同一个数据库下进行.但是随着业务越来越复杂,数据量越来越大会进行分库分表.在微服务场景 ...
- 厉害了,Spring Cloud Alibaba 发布 GA 版本!
? 小马哥 & Josh Long ? 喜欢写一首诗一般的代码,更喜欢和你共同 code review,英雄的相惜,犹如时间沉淀下来的对话,历久方弥新. 相见如故,@杭州. 4 月 18 日, ...
- Spring 社区的唯一一个国产开源项目 - Spring Cloud Alibaba 毕业了
阿里妹导读:一年多前,Java 界最近发生了一件大事,阿里开源 Spring Cloud Alibaba,并推出首个预览版.Spring Cloud 本身是一套微服务规范,并不是一个拿来即可用的框架, ...
- Spring Cloud Alibaba 新版本发布:众多期待内容整合打包加入!
在Nacos 1.0.0 Release之后,Spring Cloud Alibaba也终于发布了最新的版本.该版本距离上一次发布,过去了整整4个月!下面就随我一起看看,这个大家期待已久的版本都有哪些 ...
- Spring Cloud Alibaba | 序言
目录 Spring Cloud Alibaba | 序言 1. Spring Cloud Alibaba是什么? 2. 主要功能 3. 组件 4. 版本说明 4.1 版本依赖关系 4.2 组件版本关系 ...
- spring cloud alibaba 简介
### Spring Cloud Alibaba [官方github地址](https://github.com/alibaba/spring-cloud-alibaba) Spring Cloud ...
- Spring Cloud Alibaba 新一代微服务解决方案
本篇是「跟我学 Spring Cloud Alibaba」系列的第一篇, 每期文章会在公众号「架构进化论」进行首发更新,欢迎关注. 1.Spring Cloud Alibaba 是什么 Spring ...
随机推荐
- 3.19 Linux命令的执行过程是怎样的?(新手必读)
前面讲过,在 Linux 系统中"一切皆文件",Linux 命令也不例外.那么,当编辑完成 Linux 命令并回车后,系统底层到底发生了什么事情呢? 简单来说,Linux 命令的执 ...
- CLIPFit:不绕弯子,直接微调比提示微调和适配器微调更好 | EMNLP'24
来源:晓飞的算法工程笔记 公众号,转载请注明出处 论文: Vision-Language Model Fine-Tuning via Simple Parameter-Efficient Modifi ...
- Java net.sf.jxls 生成模板 并导出excel
如果是 maven项目需要引入下面这个就可以 <dependency> <groupId>net.sf.jxls</groupId> <artifactId& ...
- Help document of CAD Plus
中文使用帮助 Help for Mobile Update time: 2023-07-29; This article will help you how to use the CAD Plus a ...
- zkw 线段树-原理及其扩展
前言 许多算法的本质是统计.线段树用于统计,是沟通原数组与前缀和的桥梁. <统计的力量>清华大学-张昆玮 关于线段树 前置知识:线段树 OIWiki. 线段树是一种专门维护区间问题的数据结 ...
- 8、tnsnames文件配置
监听的配置文件 2.tnsnames.ora文件 tnsnames.ora文件:客户端的 配置tnsnames.ora监听文件 1.使用netca命令 指定图像映射机器 [oracle@db11g a ...
- 使用JConsole监控进程、线程、内存、cpu、类情况
Jconsole简介: Jconsole是一个JMX兼容的监视工具.它使用Java虚拟机的JMX机制来提供运行在Java平台的应用程序的性能与资源耗费信息. 监控进程使用方法如下:由于JConsole ...
- Git中使用tag
什么是tag git仓库的tag是git版本库的一个标记,指向某个commit id标记的快照记录指针,所以,标签也是版本库的一个快照. tag主要用于发布版本的管理,一个当版本发布后,可以为git当 ...
- groovy 内存回收测试
问题 在使用我们的开发平台时,客户怀疑我们的动态执行脚本会导致系统内存回收的问题,导致系统不响应,为此我专门针对这个问题,做一下详细的测试,看看是不是到底有什么影响. 测试步骤 1.使用编写一个控制器 ...
- [Cnblogs.Architecture][v20.5.1] 使用 AddLongToJsonConverter() 将 long 序列化为 string
场景 浏览器的 JSON 反序列化无法完整将 long 类型转换为 number,最后一位会被四舍五入. 因此需要将 long 类型转为 string 发送到前端. 适用版本 v20.5.1 使用方法 ...