解读sample3
说明
| 被测试代码文件 | sample3-inl.h |
| 测试代码文件 | sample3_unittest.cc |
官网上如是描述sample3:
Sample #3 uses a test fixture.
sample3演示了gtest里面一种叫做test fixture的技术。
sample3的代码文件可以直接添加到前面sample使用的工程中进行编译。

理解被测试代码
被测试代码里面有两个模版类:
- class QueueNode:面向队列结点的封装
- class Queue:面向队列的封装
队列是一种常见的数据结构,这里我就不耽搁大家时间了。
理解测试代码:test fixture简介
直接编译运行sample工程,我们可以从gtest的输出内容中推导出samples3测试代码的组织关系:
| 被测试的类 | class Queue |
| test fixture | QueueTest |
| - test name 1 | DefaultConstructor:测试默认构造函数 |
| - test name 2 | Dequeue:测试成员函数E* Dequeue() |
| - test name 3 | Map:测试成员函数Queue* Map(F function) |
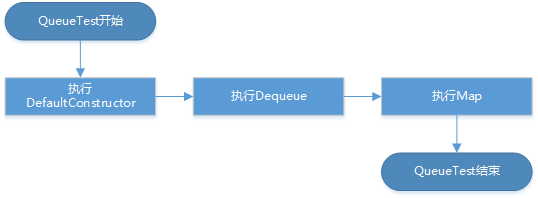
根据前面所学的知识,如果使用TEST宏来组织代码的话,代码的执行顺序预期会是这样:
sample3_unittest.cc用到了gtest里面的test fixture,这种技术能够让测试代码按照下图的顺序执行:
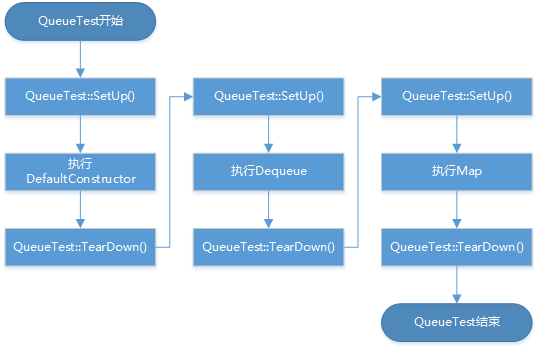
对比以上两个流程图,不难理解下面两个test fixture的特性:
- 在每个test函数执行之前,固定地执行SetUp();
- 在每个test函数执行之后,固定地执行TearDown()。
某些时候,我们想在不同的test函数执行前创建相同的配置环境,在test函数结束后执行相应的清理工作,test fixture的这种设计恰好提供了这种能力。
test fixture的使用大体可以分成两个部分:
- 编写fixture class;
- 使用TEST_F宏。
使用test fixture:编写fixture class
sample3_unittest.cc中的class QueueTest就是一个fixture class,我们可以参考下面步骤来编写一个fixture class:
Step1:fixture class必须继承自gtest的testing::Test,sample3里面的fixture class名为“QueueTest”,其中“Queue”是被测试的类名,这是一种简单明了的命名方式,值得学习:
// To use a test fixture, derive a class from testing::Test.

class QueueTest : public testing::Test {

  …… ……

};
Step2:定义各个test函数里都需要用到的数据:
  // Declares the variables your tests want to use.

  Queue<int> q0_;

  Queue<int> q1_;

  Queue<int> q2_;
Step3:重载virtual void SetUp(),在函数里面添加数据的初始化代码,这里我更建议大家使用“override”关键字:
  // virtual void SetUp() will be called before each test is run.  You

  // should define it if you need to initialize the varaibles.

  // Otherwise, this can be skipped.

  virtual void SetUp() override {

    q1_.Enqueue(1);

    q2_.Enqueue(2);

    q2_.Enqueue(3);

  }
Step4:重载virtual void TearDown(),在函数里面添加数据的反初始化代码,如果数据不需要反初始化,那么可以不重载TearDown():
  // virtual void TearDown() will be called after each test is run.

  // You should define it if there is cleanup work to do.  Otherwise,

  // you don't have to provide it.

  //

  // virtual void TearDown() {

  // }
Step5:如果有需要,还可以在QueueTest中定义其他成员函数,这些成员函数是可以在test函数里面直接调用的:
  // A helper function for testing Queue::Map().

  void MapTester(const Queue<int> * q) {

    // Creates a new queue, where each element is twice as big as the

    // corresponding one in q.

    const Queue<int> * const new_q = q->Map(Double);

    // Verifies that the new queue has the same size as q.

    ASSERT_EQ(q->Size(), new_q->Size());

    // Verifies the relationship between the elements of the two queues.

    for ( const QueueNode<int> * n1 = q->Head(), * n2 = new_q->Head();

          n1 != NULL; n1 = n1->next(), n2 = n2->next() ) {

      EXPECT_EQ(2 * n1->element(), n2->element());

    }

    delete new_q;

  }
Step6:最后值得一提的地方是,QueueTest的所有成员都不能是private的,原因在于:
protected:  // You should make the members protected s.t. they can be

             // accessed from sub-classes.
使用test fixture:TEST_F宏
TEST_F宏有两个参数:
- 参数1:test_fixture,必须是fixture class的名字;
- 参数2:test_name,含义与TEST宏相同,详情请参考《解读sample1》(链接:http://www.cnblogs.com/duxiuxing/p/4273228.html)。
使用test fixture:其他
在以下sample3_unittest.cc的代码片段中,两个test函数里面都访问了QueueTest的成员变量Queue<int> q0_:
1 TEST_F(QueueTest, DefaultConstructor) {

2   EXPECT_EQ(0u, q0_.Size()); // 此处访问了QueueTest::q0_

3 }
1 TEST_F(QueueTest, Dequeue) {

2   int * n = q0_.Dequeue(); // 此处也访问了QueueTest::q0_

3   EXPECT_TRUE(n == NULL);

4

5   // …… ……

6 }
这里需要强调的是,两处q0_属于不同的QueueTest实例。gtest的官方文档里面是这么描述的:
Note that different tests in the same test case have different test fixture objects, and Google Test always deletes a test fixture before it creates the next one. Google Test does not reuse the same test fixture for multiple tests. Any changes one test makes to the fixture do not affect other tests.
为了验证这个说法,我给class QueueTest加上了构造函数和析构函数,Debug跟踪调试证明,代码的执行顺序如下图所示:

我把SetUp()的代码都移到构造函数里面去,把TearDown()的代码都移到析构函数里面去,经验证,sample3的单元测试代码也是能够正常跑起来的。
于是乎我们会提出这样的疑问:Should I use the constructor/destructor of the test fixture or the set-up/tear-down function?
对于gtest的文档完善性,在此表示崇高的敬意,我们可以在gtest官方的FAQ文档里面找到关于这个问题的解释:
The first thing to remember is that Google Test does not reuse the same test fixture object across multiple tests. For each TEST_F, Google Test will create a fresh test fixture object, immediately call SetUp(), run the test, call TearDown(), and then immediately delete the test fixture object. Therefore, there is no need to write a SetUp() or TearDown() function if the constructor or destructor already does the job.
You may still want to use SetUp()/TearDown() in the following cases:
- If the tear-down operation could throw an exception, you must use TearDown() as opposed to the destructor, as throwing in a destructor leads to undefined behavior and usually will kill your program right away. Note that many standard libraries (like STL) may throw when exceptions are enabled in the compiler. Therefore you should prefer TearDown() if you want to write portable tests that work with or without exceptions.
- The assertion macros throw an exception when flag --gtest_throw_on_failure is specified. Therefore, you shouldn't use Google Test assertions in a destructor if you plan to run your tests with this flag.
- In a constructor or destructor, you cannot make a virtual function call on this object. (You can call a method declared as virtual, but it will be statically bound.) Therefore, if you need to call a method that will be overriden in a derived class, you have to use SetUp()/TearDown().
不应该被忽略的注释
sample3的解读,上面啰啰嗦嗦讲了这么多,但我感觉还是需要把sample3_unittest.cc的这段注释补充上来才完整:
// In this example, we use a more advanced feature of Google Test called

// test fixture.

//

// A test fixture is a place to hold objects and functions shared by

// all tests in a test case.  Using a test fixture avoids duplicating

// the test code necessary to initialize and cleanup those common

// objects for each test.  It is also useful for defining sub-routines

// that your tests need to invoke a lot.

//

// <TechnicalDetails>

//

// The tests share the test fixture in the sense of code sharing, not

// data sharing.  Each test is given its own fresh copy of the

// fixture.  You cannot expect the data modified by one test to be

// passed on to another test, which is a bad idea.

//

// The reason for this design is that tests should be independent and

// repeatable.  In particular, a test should not fail as the result of

// another test's failure.  If one test depends on info produced by

// another test, then the two tests should really be one big test.

//

// The macros for indicating the success/failure of a test

// (EXPECT_TRUE, FAIL, etc) need to know what the current test is

// (when Google Test prints the test result, it tells you which test

// each failure belongs to).  Technically, these macros invoke a

// member function of the Test class.  Therefore, you cannot use them

// in a global function.  That's why you should put test sub-routines

// in a test fixture.

//

// </TechnicalDetails>
系列文章索引:http://www.cnblogs.com/duxiuxing/p/4270836.html
解读sample3的更多相关文章
- 解读sample5
说明 被测试代码文件 sample1.h.sample1.cc和sample3-inl.h 测试代码文件 sample5_unittest.cc 官网上如是描述sample5: Sample #5 i ...
- SDWebImage源码解读之SDWebImageDownloaderOperation
第七篇 前言 本篇文章主要讲解下载操作的相关知识,SDWebImageDownloaderOperation的主要任务是把一张图片从服务器下载到内存中.下载数据并不难,如何对下载这一系列的任务进行设计 ...
- SDWebImage源码解读 之 NSData+ImageContentType
第一篇 前言 从今天开始,我将开启一段源码解读的旅途了.在这里先暂时不透露具体解读的源码到底是哪些?因为也可能随着解读的进行会更改计划.但能够肯定的是,这一系列之中肯定会有Swift版本的代码. 说说 ...
- SDWebImage源码解读 之 UIImage+GIF
第二篇 前言 本篇是和GIF相关的一个UIImage的分类.主要提供了三个方法: + (UIImage *)sd_animatedGIFNamed:(NSString *)name ----- 根据名 ...
- SDWebImage源码解读 之 SDWebImageCompat
第三篇 前言 本篇主要解读SDWebImage的配置文件.正如compat的定义,该配置文件主要是兼容Apple的其他设备.也许我们真实的开发平台只有一个,但考虑各个平台的兼容性,对于框架有着很重要的 ...
- SDWebImage源码解读_之SDWebImageDecoder
第四篇 前言 首先,我们要弄明白一个问题? 为什么要对UIImage进行解码呢?难道不能直接使用吗? 其实不解码也是可以使用的,假如说我们通过imageNamed:来加载image,系统默认会在主线程 ...
- SDWebImage源码解读之SDWebImageCache(上)
第五篇 前言 本篇主要讲解图片缓存类的知识,虽然只涉及了图片方面的缓存的设计,但思想同样适用于别的方面的设计.在架构上来说,缓存算是存储设计的一部分.我们把各种不同的存储内容按照功能进行切割后,图片缓 ...
- SDWebImage源码解读之SDWebImageCache(下)
第六篇 前言 我们在SDWebImageCache(上)中了解了这个缓存类大概的功能是什么?那么接下来就要看看这些功能是如何实现的? 再次强调,不管是图片的缓存还是其他各种不同形式的缓存,在原理上都极 ...
- AFNetworking 3.0 源码解读 总结(干货)(下)
承接上一篇AFNetworking 3.0 源码解读 总结(干货)(上) 21.网络服务类型NSURLRequestNetworkServiceType 示例代码: typedef NS_ENUM(N ...
随机推荐
- 数据存储简单了解(NSUserDefaults)
数据存储-使用NSUserDefaults 两个类介绍: NSUserDefaults适合存储轻量级的本地数据,比如要保存一个登陆界面的数据,用户名.密码之类的,个人觉得使用NSUserDefault ...
- Java基础知识强化之集合框架笔记09:Collection集合迭代器使用的问题探讨
1.Collection集合迭代器使用的问题探讨: (1)问题1:能用while循环写这个程序,我能不能用for循环呢? 可以使用for循环替代. (2)问题2:不要 ...
- python-查询员工信息表
python查询员工信息表 基本要求: 用户可以模糊查询员工信息 显示匹配了多少条,匹配字符需要高亮显示 代码: #!/usr/env python #coding:utf-8 import time ...
- (Excel导出失败)检索COM类工厂中CLSID为{00024500-0000-0000-C000-000000000046}的组件时失
在DCOM 中不存在WORD.EXCEL等OFFICE组件 最近在做一个关于office转存PDF的Web项目.开发过程一切顺利. 起初在网上找到一些Word,PPT转PDF的代码.很好用.一切顺 ...
- linux list all users.
cat /etc/passwd sample of list users in linux. ref: Linux Command: List All Users In The System
- NPOI对excel文件的导入导出
现理解:将一个Excel文件(工作簿-IWorkBook)看做是一个你要操作的对象,每个工作簿包含多个工作表(ISheet)对象,每个工作表中又包含多个行对象(IRow),每行又包含多个单元格(ICe ...
- JavaScript那些事儿(01): 对象
一. 对象是什么 是单身童鞋们正在查找的“对象”吗?是的,他/她就是活生生的对象. Javascript是一种基于对象的语言, 你遇到的所有东西几乎都是对象. 但它又不同于基于类的语言.那么“类”又是 ...
- 3.题目:求s=a+aa+aaa+aaaa+aa...a的值,其中a是一个数字。例如2+22+222+2222+22222(此时共有5个数相加),几个数相加有键盘控制。
public static void main(String[] args) { Scanner scanner=new Scanner(System.in); ...
- 在iframe里调用parent.func()引出的js函数运行在它们被定义的作用域里,而不是它们被执行的作用域里
有个document里定义了一个函数func(),同时在document里嵌入了一个iframe,在这个iframe里调用父窗口的方法:parent.func(),本来我以为这个函数的运行环境是在这个 ...
- ASP.NET程序从IIS6移植到IIS7时出现500.22错误
最可能的原因: • 此应用程序在 system.web/httpModules 节中定义配置. 可尝试的操作: • 将配置迁移到 system.webServer/modules 节 ...