
搭建ubuntu14.04服务器必备环境
1. 设置网络
设置网络时,一定要设置好网卡,第一个网卡一定要设置为‘br0’(如下图),设置为其他的上不去网。
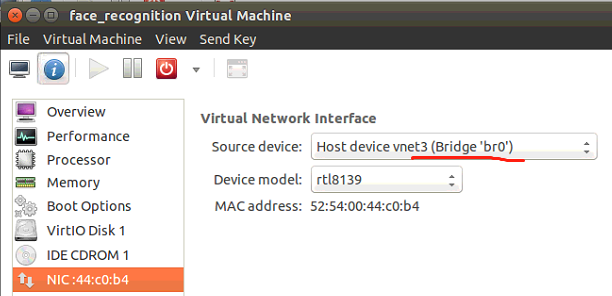
修改网络配置文件,命令:sudo gedit /etc/network/interfaces
- 单个网卡配置文件
# interfaces() file used by ifup() and ifdown()

auto lo

iface lo inet loopback  #设置本地环回

auto eth0

iface eth0 inet static  #设置静态IP

address 192.168.0.118  #静态IP地址

netmask 255.255.255.0   #子网掩码

gateway 192.168.0.1     #网关
- 双网卡配置文件
# interfaces() file used by ifup() and ifdown()

auto lo

iface lo inet loopback

auto eth0  #第一个网卡(接外网)

iface eth0 inet static

address 192.168.0.118

netmask 255.255.255.0

gateway 192.168.0.1

auto eth1  #第二个网卡(接内网)

iface eth1 inet static
address 192.168.213.103

netmask 255.255.255.0
auto br0

iface br0 inet dhcp

bridge_ports eth0

bridge_stp off

bridge_fd

auto br1

iface br1 inet static

bridge_ports eth1

bridge_stp off

bridge_fd
2. 更新为国内源,并安装vim
 sudo cp /etc/apt/sources.list /etc/apt/sources.list.bak #备份

 sudo vim /etc/apt/sources.list #修改

 sudo apt-get update #更新列表
# 阿里源

deb http://mirrors.aliyun.com/ubuntu/ trusty main restricted universe multiverse

deb http://mirrors.aliyun.com/ubuntu/ trusty-security main restricted universe multiverse

deb http://mirrors.aliyun.com/ubuntu/ trusty-updates main restricted universe multiverse

deb http://mirrors.aliyun.com/ubuntu/ trusty-proposed main restricted universe multiverse

deb http://mirrors.aliyun.com/ubuntu/ trusty-backports main restricted universe multiverse

deb-src http://mirrors.aliyun.com/ubuntu/ trusty main restricted universe multiverse

deb-src http://mirrors.aliyun.com/ubuntu/ trusty-security main restricted universe multiverse

deb-src http://mirrors.aliyun.com/ubuntu/ trusty-updates main restricted universe multiverse

deb-src http://mirrors.aliyun.com/ubuntu/ trusty-proposed main restricted universe multiverse

deb-src http://mirrors.aliyun.com/ubuntu/ trusty-backports main restricted universe multiverse
3. 下载并安装搜狗输入法
百度“搜狗输入法”,下载linux版,双击打开deb包,在ubuntu中心安装即可,安装成功后,重启生效。
4. ubuntu14.04/16.04安装mysql
安装链接:https://www.linuxidc.com/Linux/2017-06/144805.htm
5. 安装anaconda工具包
百度“anaconda 清华源”,下载最新版的linux版的anaconda包,下载好后,在终端输入:bash 包名,一步步往下走即可;
6. 安装cmake
Installation of Cmake:(it tooks a while to install ~1.5 min)
1 sudo wget  https://cmake.org/files/v3.9/cmake-3.9.0-rc5.tar.gz -O cmake.tar.gz

2 sudo tar -xvf cmake.tar.gz

3 cd cmake-3.9.0-rc5/

4 sudo chmod +x bootstrap

5 sudo ./bootstrap

6 sudo make

7 sudo make install

注:安装好cmake后,输入cmake -version查看cmake版本是否安装成功。
*7. 安装dlib库
- 下面通过手动编译dlib的方式进行安装dlib
1 git clone https://github.com/davisking/dlib.git     //Clone the code from github

2 cd dlib

3 mkdir build

4 cd build

5 cmake .. -DDLIB_USE_CUDA=0 -DUSE_AVX_INSTRUCTIONS=1  //以AVX指令的方式编译dlib

6 cmake --build .

7 cd ..

8 sudo python3 setup.py install --yes USE_AVX_INSTRUCTIONS --no DLIB_USE_CUDA

注:最后一步需要等待一些时间。如果使用python3.x版本,最后一步命令python改为python3
安装完成后,运行python3,输入
import dlib
*8. 安装face_recognition人脸识别库
- 安装face_recognition
$ sudo pip install face_recognition
安装完成后,运行python3,输入
import face_recognition
*9. 安装setuptools包
wget https://bootstrap.pypa.io/ez_setup.py -O - | sudo python
*10. 安装teamviewer
*11. 安装vlc
终端输入:sudo apt-get install vlc
搭建ubuntu14.04服务器必备环境的更多相关文章
- Caffe+Ubuntu14.04+CUDA7.5 环境搭建(新人向)指南
序 本文针对想学习使用caffe框架的纯新手,如果文中有错误欢迎大家指出. 由于我在搭建这个环境的时候参考了许多网上的教程,但是没有截图,所以文中图片大多来源于网络. 本文没有安装matlab的步骤, ...
- ubuntu14.04建立交叉编译环境, 注意事项
ubuntu14.04建立交叉编译环境, 注意事项 ~$ arm-linux-gcc/opt/FriendlyARM/toolschain/4.4.3/bin/arm-linux-gcc: 15: e ...
- 搭建ubuntu14.04的hadoop集群【docker容器充当服务器】
首先弄出来装有hadoop.java.ssh.vim的镜像起名badboyf/hadoop.做镜像有两种方法,一种是用Dockerfile来生成一个镜像,一种是基于ubuntu14.04的基础镜像生成 ...
- ubuntu14.04配置face_recognition环境
Github项目地址:https://github.com/MiChongGET/face_collection 环境搭建 1. 环境 ubuntu14.04 LTS python2.7 pip ...
- hadoop2.7.0分布式系统搭建(ubuntu14.04)
因为使用需要,在自己小本上建了四个虚拟机,打算搭建一个1+3的hadoop分布式系统. 环境:hadoop2.7.0+ubuntu14.04 (64位) 首先分别为搭建好的虚拟机的各主机重命名 方法: ...
- PHP学习记录第一篇:Ubuntu14.04下LAMP环境的搭建
最近一段时间会学习一下PHP全栈开发,将会写一系列的文章来总结学习的过程,以自勉. 第一篇记录一下LAMP环境的安装 0. 安装Apache Web服务器 安装之前先更新一下系统 sudo apt-g ...
- ubuntu-14.04服务器版下搭建apache2+svn+svnmanager服务
本人linux小白,新进公司,被分配此任务,好崩溃,只能一边百度linux命令一边完成任务.从装系统开始一直到搭建好服务,也快一周了,足见水平之差,以下博文基本靠网络,再加上自己的摸索,直至搭建成功. ...
- ubuntu14.04 qt4开发环境搭建(vnc use gnome)
1,安装qt开发环境软件包:apt-get install qt4-dev-tools qt4-doc qt4-qtconfig qt4-demos qt4-designer qtcreator; 2 ...
- 在ubuntu14.04上漏洞环境vulndocker的DOCKER搭建
一.下载git包以及安装: git clone https://github.com/leveryd/vulndocker.git cd vulndocker apt-get install uwsg ...
随机推荐
- logistics回归简单应用(二)
警告:本文为小白入门学习笔记 网上下载的数据集链接:https://pan.baidu.com/s/1NwSXJOCzgihPFZfw3NfnfA 密码: jmwz 不知道这个数据集干什么用的,根据直 ...
- MYSQL Innodb逻辑存储结构
转载于网络 这几天在读<MySQL技术内幕 InnoDB存储引擎>,对 Innodb逻辑存储结构有了些了解,顺便也记录一下: 从InnoDB存储引擎的逻辑存储结构看,所有数据都被逻辑地存放 ...
- nginx配置打印请求响应内容
#放在http{}里面 log_format kyh ' [$time_local] "$request" $status \n' 'req_header:"$req_h ...
- flask SQLALchemy外键及约束
from flask import Flask,session from flask_sqlalchemy import SQLAlchemy import config app = Flask(__ ...
- docker 基础 之安装
一.安装 系统要求 Docker CE 支持 64 位版本 CentOS 7,并且要求内核版本不低于 3.10. CentOS 7 满足最低内核的要求,但由于内核版本比较低,部分功(如 overlay ...
- java虚拟机的内存模型
一.为什么要了解java虚拟机的内存模型 java虚拟机作为java代码运行的平台,是java技术的基石.了解java虚拟机的内存模型也就变得十分必要.它能帮助我们更好的了解java代码的运行机制,更 ...
- HDFS 开发中的文件配置优先级
一.先看集群上的配置,这里设置了文件块副本数为 3 上传一个文件试试 public class ConfigPriority { private Configuration conf; private ...
- 8.Hystrix-Feign配置服务降级
项目中用到Feign调用服务端方法并做服务降级处理 1.application.properties配置: feign.hystrix.enabled=true 2.pom: <!--feign ...
- Dubbo服务启动脚本
## /usr/wangfajun/service/user #!/bin/sh ## java env export JAVA_HOME=/usr/java/jdk1..0_79 export JR ...
- eclipse+tomcat+maven+springmvc+mybatis+mysql集成WebService插件(Axis2+CXF)
$1 环境介绍 $1.1 Eclipse Java EE IDE for Web Developers:Neon.2 Release (4.6.2) $1.2 Maven:3.3.9 $1.3 Spr ...