Linux驱动之平台设备驱动模型简析(驱动分离分层概念的建立)
Linux设备模型的目的:为内核建立一个统一的设备模型,从而有一个对系统结构的一般性抽象描述。换句话说,Linux设备模型提取了设备操作的共同属性,进行抽象,并将这部分共同的属性在内核中实现,而为需要新添加设备或驱动提供一般性的统一接口,这使得驱动程序的开发变得更简单了,而程序员只需要去学习接口就行了。
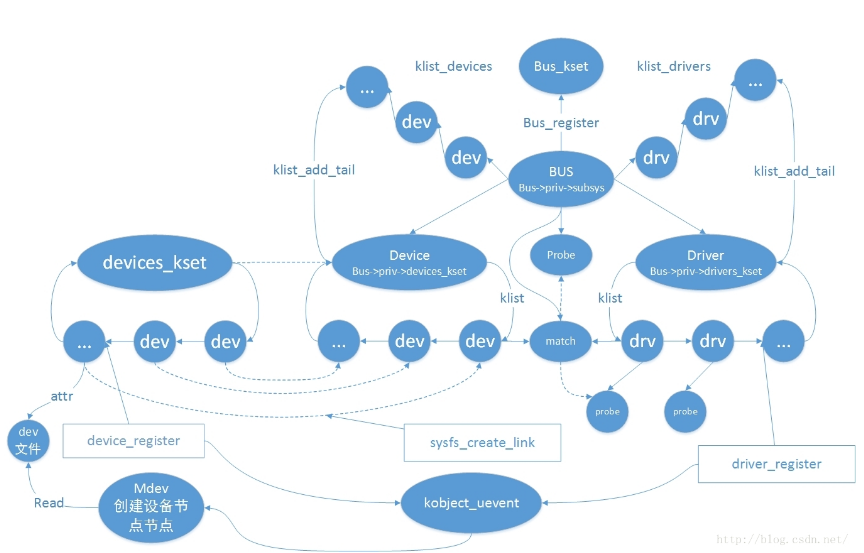
对于整个设备总线驱动模型的样子,如下图。简单来说,bus 负责维护注册进来的devcie 与 driver,每注册进来一个device 或者 driver 都会调用 Bus->match 函数 将device 与 driver 进行配对,并将它们加入链表,如果配对成功,调用Bus->probe或者driver->probe函数。注意:一个device 只能配对一个driver;而一个driver可以对应多个device。其它诸如devices_kset、kobject_uevent这里不关心,这个涉及的内容比较深入,暂时不去分析。
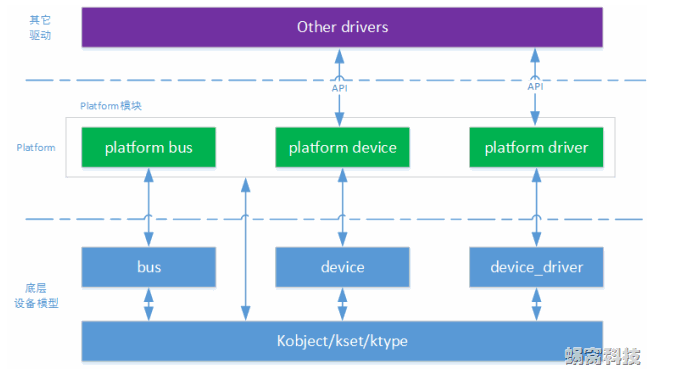
platform平台设备驱动是基于设备总线驱动模型的,如下图,这篇主要是记录平台设备的驱动与设备的注册匹配过程
以上参考自
platform_bus提供platform_device_register、platform_driver_register等函数供platform_device层与platform_driver调用。
platform_driver属于驱动层,会在里面提供file_operations结构体供应用层调用、创建设备节点文件对应相应的驱动
platform_device属于设备层,会在里面提供resource资源文件供驱动层调用
下面是一个例子,分别编写了Led_dev.c设备文件和Led_drv.c驱动文件。列出程序源码,再根据源码分析Led_dev与Led_drv注册与匹配过程
Led_dev.c的程序源码:
#include <linux/module.h>

#include <linux/version.h>

#include <linux/init.h>

#include <linux/kernel.h>

#include <linux/types.h>

#include <linux/interrupt.h>

#include <linux/list.h>

#include <linux/timer.h>

#include <linux/init.h>

#include <linux/serial_core.h>

#include <linux/platform_device.h>

/* 分配/设置/注册一个platform_device */

static struct resource led_resource[] = {

    [] = {

        .start = 0x56000050,

        .end   = 0x56000050 +  - ,

        .flags = IORESOURCE_MEM,

    },

    [] = {

        .start = ,

        .end   = ,

        .flags = IORESOURCE_IRQ,

    }

};

static void led_release(struct device * dev)

{

}

static struct platform_device led_dev = {

    .name         = "myled",

    .id       = -,

    .num_resources    = ARRAY_SIZE(led_resource),

    .resource     = led_resource,

    .dev = {

        .release = led_release,

    },

};

static int led_dev_init(void)

{

    platform_device_register(&led_dev);

    return ;

}

static void led_dev_exit(void)

{

    platform_device_unregister(&led_dev);

}

module_init(led_dev_init);

module_exit(led_dev_exit);

MODULE_LICENSE("GPL");
Led_drv.c的程序源码:
/* 分配/设置/注册一个platform_driver */

#include <linux/module.h>

#include <linux/version.h>

#include <linux/init.h>

#include <linux/fs.h>

#include <linux/interrupt.h>

#include <linux/irq.h>

#include <linux/sched.h>

#include <linux/pm.h>

#include <linux/sysctl.h>

#include <linux/proc_fs.h>

#include <linux/delay.h>

#include <linux/platform_device.h>

#include <linux/input.h>

#include <linux/irq.h>

#include <asm/uaccess.h>

#include <asm/io.h>

static int major;

static struct class *cls;

static volatile unsigned long *gpio_con;

static volatile unsigned long *gpio_dat;

static int pin;

static int led_open(struct inode *inode, struct file *file)

{

    //printk("first_drv_open\n");

    /* 配置为输出 */

    *gpio_con &= ~(0x3<<(pin*));

    *gpio_con |= (0x1<<(pin*));

    return ;

}

static ssize_t led_write(struct file *file, const char __user *buf, size_t count, loff_t * ppos)

{

    int val;

    //printk("first_drv_write\n");

    copy_from_user(&val, buf, count); //    copy_to_user();

    if (val == )

    {

        // 点灯

        *gpio_dat &= ~(<<pin);

    }

    else

    {

        // 灭灯

        *gpio_dat |= (<<pin);

    }

    return ;

}

static struct file_operations led_fops = {

    .owner  =   THIS_MODULE,    /* 这是一个宏,推向编译模块时自动创建的__this_module变量 */

    .open   =   led_open,

    .write    =    led_write,

};

static int led_probe(struct platform_device *pdev)

{

    struct resource        *res;

    /* 根据platform_device的资源进行ioremap */

    res = platform_get_resource(pdev, IORESOURCE_MEM, );

    gpio_con = ioremap(res->start, res->end - res->start + );

    gpio_dat = gpio_con + ;

    res = platform_get_resource(pdev, IORESOURCE_IRQ, );

    pin = res->start;

    /* 注册字符设备驱动程序 */

    printk("led_probe, found led\n");

    major = register_chrdev(, "myled", &led_fops);

    cls = class_create(THIS_MODULE, "myled");

    class_device_create(cls, NULL, MKDEV(major, ), NULL, "led"); /* /dev/led */

    return ;

}

static int led_remove(struct platform_device *pdev)

{

    /* 卸载字符设备驱动程序 */

    /* iounmap */

    printk("led_remove, remove led\n");

    class_device_destroy(cls, MKDEV(major, ));

    class_destroy(cls);

    unregister_chrdev(major, "myled");

    iounmap(gpio_con);

    return ;

}

struct platform_driver led_drv = {

    .probe        = led_probe,

    .remove        = led_remove,

    .driver        = {

        .name    = "myled",

    }

};

static int led_drv_init(void)

{

    platform_driver_register(&led_drv);

    return ;

}

static void led_drv_exit(void)

{

    platform_driver_unregister(&led_drv);

}

module_init(led_drv_init);

module_exit(led_drv_exit);

MODULE_LICENSE("GPL");
将上面两个程序编译后得到Led_dev.ko和Led_drv.ko两个模块,假设先加载Led_dev.ko文件:insmod Led_drv.ko。
列出执行加载操作后的程序流程:加载后会先调用led_drv_init函数,这个函数只是调用platform_driver_register函数。
platform_driver_register(&led_drv);

    led_drv->driver.bus = &platform_bus_type;//platform_bus_type里面含有platform_match匹配函数

    led_drv->driver.probe = platform_drv_probe;

    led_drv->driver.remove = platform_drv_remove;

    driver_register(&led_drv->driver);

        bus_add_driver(&led_drv->driver);

            driver_attach(&led_drv->driver);

                bus_for_each_dev(led_drv->driver->bus, NULL, &led_drv->driver, __driver_attach);

                    while ((dev = next_device(&i)) && !error)

                    {

                             __driver_attach(dev, led_drv->driver);

                                     driver_probe_device(drv, dev);

                                         drv->bus->match(&led_dev->dev, drv);//最终调用到这个函数匹配,找到这个函数其实是platform_match函数

                                         really_probe(&led_dev->dev, drv);//匹配成功调用

                            dev->driver = drv;//匹配驱动

                                             drv->probe(dev);//调用led_drv->driver.probe函数

                    }
首先platform_driver_register函数会初始化driver.bus、driver.probe、driver.remove等变量
int platform_driver_register(struct platform_driver *drv)

{

    drv->driver.bus = &platform_bus_type;

    if (drv->probe)

        drv->driver.probe = platform_drv_probe;

    if (drv->remove)

        drv->driver.remove = platform_drv_remove;

    if (drv->shutdown)

        drv->driver.shutdown = platform_drv_shutdown;

    if (drv->suspend)

        drv->driver.suspend = platform_drv_suspend;

    if (drv->resume)

        drv->driver.resume = platform_drv_resume;

    return driver_register(&drv->driver);

}
其中platform_bus_type里含有platform_match函数,这个函数最终会被调用用来匹配Led_dev与Led_drv。
struct bus_type platform_bus_type = {

    .name        = "platform",

    .dev_attrs    = platform_dev_attrs,

    .match        = platform_match,

    .uevent        = platform_uevent,

    .suspend    = platform_suspend,

    .suspend_late    = platform_suspend_late,

    .resume_early    = platform_resume_early,

    .resume        = platform_resume,

};
static int platform_match(struct device * dev, struct device_driver * drv)

{

    struct platform_device *pdev = container_of(dev, struct platform_device, dev);

    return (strncmp(pdev->name, drv->name, BUS_ID_SIZE) == );//根据名称匹配dev与drv

}
接着看到driver_register函数,通过层层调用,最终会从dev链表搜索,通过platform_match函数找到与Led_drv匹配的Led_dev。找到后调用really_probe函数,really_probe函数先是执行dev->driver = drv;这样就将dev与drv联系起来了,接着调用led_probe函数,初始化驱动。因为这时候还没有注册Led_dev.ko所以不会匹配成功。
接着加载Led_dev.ko文件:insmod Led_dev.ko。列出执行加载操作后的程序流程:加载后会先调用led_dev_init函数,这个函数只是调用platform_device_register函数。
platform_device_register(&led_dev);

    platform_device_add(&led_dev)

        device_add(&led_dev->dev);

            bus_attach_device(&led_dev->dev);

                device_attach(&led_dev->dev);

                        if (dev->driver) {//如果设备的驱动程序已经存在

                        {

                            device_bind_driver( &led_dev->dev);//试着链接驱动

                        }

                    bus_for_each_drv(led_dev->dev->bus, NULL, &led_dev->dev, __device_attach);

                        while ((drv = next_driver(&i)) && !error)

                        {

                            __device_attach(drv, &led_dev->dev);

                                driver_probe_device(drv, &led_dev->dev);

                                    drv->bus->match(&led_dev->dev, drv);//最终调用到这个函数匹配,找到这个函数其实是platform_match函数

                                    really_probe(&led_dev->dev, drv);//匹配成功调用

                                        rv->bus->match(&led_dev->dev, drv);//最终调用到这个函数匹配,找到这个函数其实是platform_match函数

                                      really_probe(&led_dev->dev, drv);//匹配成功调用

                        }
通过层层调用,最终定位到device_attach函数与Led_drv不同的是,Led_dev首先会确认自己是否已经有驱动存在,如果不存在才会从drv链表搜索,通过platform_match函数找到与Led_dev匹配的Led_drv。找到后调用really_probe函数,really_probe函数先是执行dev->driver = drv;这样就将dev与drv联系起来了,接着调用led_probe函数,初始化驱动。
static int led_probe(struct platform_device *pdev)

{

    struct resource        *res;

    /* 根据platform_device的资源进行ioremap */

    res = platform_get_resource(pdev, IORESOURCE_MEM, );

    gpio_con = ioremap(res->start, res->end - res->start + );

    gpio_dat = gpio_con + ;

    res = platform_get_resource(pdev, IORESOURCE_IRQ, );

    pin = res->start;

    /* 注册字符设备驱动程序 */

    printk("led_probe, found led\n");

    major = register_chrdev(, "myled", &led_fops);

    cls = class_create(THIS_MODULE, "myled");

    class_device_create(cls, NULL, MKDEV(major, ), NULL, "led"); /* /dev/led */

    return ;

}
在led_probe中,首先会从Led_dev的led_probe中获得相应的led_resource信息来配置IO端口,接着注册字符设备,然后创建设备描述符文件。这就是平台设备驱动模型整个注册匹配的过程。
与注册过程相反rmmod Led_drv最终会调用led_remove函数
static int led_remove(struct platform_device *pdev)

{

    /* 卸载字符设备驱动程序 */

    /* iounmap */

    printk("led_remove, remove led\n");

    class_device_destroy(cls, MKDEV(major, ));

    class_destroy(cls);

    unregister_chrdev(major, "myled");

    iounmap(gpio_con);

    return ;

}
而执行rmmod Led_dev最终会通过层层调用到led_release函数,所以led_release函数必不可少,即使它是空的函数,什么也没做
static void led_release(struct device * dev)

{

}
以上全部就是对驱动的分离分层的实现。通过平台设备驱动模型实现。
Linux驱动之平台设备驱动模型简析(驱动分离分层概念的建立)的更多相关文章
- 字符设备驱动、平台设备驱动、设备驱动模型、sysfs的比较和关联
转载自:http://www.kancloud.cn/yueqian_scut/emlinux/106829 学习Linux设备驱动开发的过程中自然会遇到字符设备驱动.平台设备驱动.设备驱动模型和sy ...
- [kernel]字符设备驱动、平台设备驱动、设备驱动模型、sysfs几者之间的比较和关联
转自:http://www.2cto.com/kf/201510/444943.html Linux驱动开发经验总结,绝对干货! 学习Linux设备驱动开发的过程中自然会遇到字符设备驱动.平台设备驱动 ...
- Linux Platform devices 平台设备驱动
设备总线驱动模型:http://blog.csdn.net/lizuobin2/article/details/51570196 本文主要参考:http://www.wowotech.net/devi ...
- Linux驱动之平台设备
<平台设备设备驱动> a:背景: 平台总线是Linux2.6的设备驱动模型中,关心总线,设备和驱动这3个实体.一个现实的Linux设备和驱动通常需要挂接在一种总线上(比如本身依附于PCI, ...
- 【Linux高级驱动】平台设备驱动机制的编程流程与编译进内核
[平台设备驱动机制的编程流程] [如何将驱动静态的编译进内核镜像] 1.添加资源(dev-led.c) 1.1:一般来说,系统习惯上将资源放在arch/arm/plat-samsung/目录中 cp ...
- Linux驱动之USB总线驱动程序框架简析
通用串行总线(USB)是主机和外围设备之间的一种连接.USB总线规范有1.1版和2.0版,当然现在已经有了3.0版本.USB1.1支持两种传输速度:低速为1.5Mbps,高速为12Mbps.USB2. ...
- linux驱动的分离分层概念之LED
bus_drv_dev模型:功能改写只需改dev硬件代码即可,drv不需改写. LED例子 下面用一个点亮LED的例子来说明这个分离的的例子: led_dev.c 定义这个平台设备的资源: stat ...
- Java内存模型简析
1.多线程基础 线程通信,是指线程之间以何种机制来交换信息.其中通信的机制有两种:内存共享和消息传递.内存共享是指线程之间通过写-读内存中的公共状态隐式进行通讯(Java):消息传递在线程之间没有公共 ...
- Linux中 /proc/[pid] 目录各文件简析
Linux 内核提供了一种通过 proc 文件系统,在运行时访问内核内部数据结构.改变内核设置的机制.proc 文件系统是一个伪文件系统,它只存在内存当中,而不占用外存空间.它以文件系统的方式为访问系 ...
随机推荐
- eclipse注解模板,实实在在的
1.可以引用其他codetemplate.xml 2.可以自己配置,很快,就几个主要的,个人建议这个,配一次妥妥的,以后就会了,也不用搭理模板了 3.按照公司要求 拿去https://www.jian ...
- day72Django之ORM
Django框架之ORM(day72)一 ORM即Object Relational Mapping,全称对象关系映射. 1 不用写sql,不会sql的人也可以写程序 2 开发效率高 3 可能sql的 ...
- 基于kettle的简单HTTP接口监控
需求:监控系统中使用的所有http接口,要求简单,易用. 一般的思路也就是发送get/post请求,然后检查接口的响应结果. 如果写代码,要处理http请求,检查http响应,实现发邮件,写d ...
- 性能测试Jmeter压测ZooKeeper-自定义java请求
要想通过自定义java请求来压测ZooKeeper,那么我们就需要做两件事情,第一我们需要知道java如何操作ZooKeeper,第二就是怎么能将我们写的jar包让jmeter识别,首先我们先来干第 ...
- springboot学习随笔(一):springboot环境构建:eclipse+maven+jdk1.8
一:所需环境 1.jdk1.8(配置环境变量,可自行搜索相关文档) 2.maven(maven的配置不在赘述,可自行搜索相关文档) 3.eclipse(第三种方式,eclipse集成sts时需要,直接 ...
- Python module ---- abc
python中并没有提供抽象类与抽象方法,但是提供了内置模块abc(abstract base class)来模拟实现抽象类. ABC,Abstract Base Class(抽象基类),主要定义了 ...
- socket.io诡异的问题
在socket.io客户端连接的时候,如果传入的query包含“sid”这个键时会报错,不知道具体原因.
- GDI+_VB6_ARGB
在写一个用GDI+代替VB的Line函数的方法时,遇到了一个问题. GdipCreateSolidFill 参数 color [in]ARGB颜色,指定此实体画笔的初始颜色. brush [out]指 ...
- linux 查看文件方法
vi 文件名 #编辑方式查看,可修改cat 文件名 #显示全部文件内容more 文件名 #分页显示文件内容tail 文件名 #仅查看尾部,还可以指定行数head 文件名 #仅查看头部,还可以指定行数s ...
- WebApp与Native App有何区别呢?
Native App(其实就是用java其他语言开发的安卓系统或ios系统): 1.开发成本非常大. 一般使用的开发语言为JAVA.C++.Objective-C. 2 ...