GitLab 环境搭建【CentOS7】
RPM安装方式
https://mirrors.tuna.tsinghua.edu.cn/gitlab-ce/yum/el7

【最好给服务器分配至少4G内存】
先检查一下依赖:sshd
[root@localhost soft]# rpm -qa|grep openssh-server

openssh-server-.4p1-.el7.x86_64

[root@localhost soft]# ps -e|grep sshd

   ?        :: sshd

  ?        :: sshd

  ?        :: sshd
如果你没有,那么:
sudo yum install -y curl policycoreutils-python openssh-server

sudo systemctl enable sshd

sudo systemctl start sshd

sudo firewall-cmd --permanent --add-service=http

sudo systemctl reload firewalld
再检查一下postfix
[root@localhost soft]# rpm -qa|grep postfix

postfix-2.10.-.el7.x86_64

[root@localhost soft]# ps -e|grep postfix
如果你没有,那么
sudo yum install postfix

sudo systemctl enable postfix

sudo systemctl start postfix
..
最后找到你存放rpm目录并进入
[root@localhost soft]# wget https://mirrors.tuna.tsinghua.edu.cn/gitlab-ce/yum/el7/gitlab-ce-11.0.6-ce.0.el7.x86_64.rpm

---- ::--  https://mirrors.tuna.tsinghua.edu.cn/gitlab-ce/yum/el7/gitlab-ce-11.0.6-ce.0.el7.x86_64.rpm

Resolving mirrors.tuna.tsinghua.edu.cn (mirrors.tuna.tsinghua.edu.cn)... 101.6.8.193, :f000:::::

Connecting to mirrors.tuna.tsinghua.edu.cn (mirrors.tuna.tsinghua.edu.cn)|101.6.8.193|:... connected.

HTTP request sent, awaiting response...  OK

Length:  (416M) [application/x-redhat-package-manager]

Saving to: ‘gitlab-ce-11.0.-ce..el7.x86_64.rpm’

%[=========================================================================================================================================================>] ,, .50MB/s   in 4m 37s

-- :: (1.50 MB/s) - ‘gitlab-ce-11.0.-ce..el7.x86_64.rpm’ saved [/]
..查看
[root@localhost soft]# ll

total

-rw-r--r--.  root root  Sep   : gitlab-ce-11.0.6-ce.0.el7.x86_64.rpm

-rw-r--r--.  root root  Mar  : jdk-8u161-linux-x64.tar.gz

-rw-r--r--.  root root   Mar  : kafka_2.11-1.0.1.tgz

-rw-r--r--.  root root   Mar  : zookeeper-3.4.11.tar.gz

[root@localhost soft]#
安装
[root@localhost soft]# rpm -ivh gitlab-ce-11.0.-ce..el7.x86_64.rpm

warning: gitlab-ce-11.0.-ce..el7.x86_64.rpm: Header V4 RSA/SHA1 Signature, key ID f27eab47: NOKEY

Preparing...                          ################################# [%]

Updating / installing...

   :gitlab-ce-11.0.-ce..el7        ################################# [%]

It looks like GitLab has not been configured yet; skipping the upgrade script.

       *.                  *.

      ***                 ***

     *****               *****

    .******             *******

    ********            ********

   ,,,,,,,,,***********,,,,,,,,,

  ,,,,,,,,,,,*********,,,,,,,,,,,

  .,,,,,,,,,,,*******,,,,,,,,,,,,

      ,,,,,,,,,*****,,,,,,,,,.

         ,,,,,,,****,,,,,,

            .,,,***,,,,

                ,*,.

     _______ __  __          __

    / ____(_) /_/ /   ____ _/ /_

   / / __/ / __/ /   / __ `/ __ \

  / /_/ / / /_/ /___/ /_/ / /_/ /

  \____/_/\__/_____/\__,_/_.___/

Thank you for installing GitLab!

GitLab was unable to detect a valid hostname for your instance.

Please configure a URL for your GitLab instance by setting `external_url`

configuration in /etc/gitlab/gitlab.rb file.

Then, you can start your GitLab instance by running the following command:

  sudo gitlab-ctl reconfigure

For a comprehensive list of configuration options please see the Omnibus GitLab readme

https://gitlab.com/gitlab-org/omnibus-gitlab/blob/master/README.md
然后编辑
vim /etc/gitlab/gitlab.rb
修改

然后执行
gitlab-ctl reconfigure
..
..启动
gitlab-ctl restart
..
..
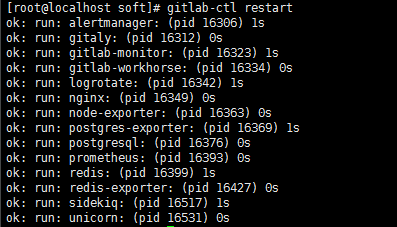
查看端口占用
[root@localhost soft]# netstat -tunlp

Active Internet connections (only servers)

Proto Recv-Q Send-Q Local Address           Foreign Address         State       PID/Program name

tcp               127.0.0.1:          0.0.0.0:*               LISTEN      /node_exporter

tcp               127.0.0.1:          0.0.0.0:*               LISTEN      /gitlab-workho

tcp               0.0.0.0:             0.0.0.0:*               LISTEN      /systemd

tcp               127.0.0.1:          0.0.0.0:*               LISTEN      /unicorn maste

tcp               127.0.0.1:          0.0.0.0:*               LISTEN      /ruby

tcp        0      0 0.0.0.0:80              0.0.0.0:*               LISTEN      18765/nginx: master

tcp               127.0.0.1:          0.0.0.0:*               LISTEN      /sidekiq 5.1.

tcp               127.0.0.1:          0.0.0.0:*               LISTEN      /gitaly

tcp               192.168.122.1:        0.0.0.0:*               LISTEN      /dnsmasq

tcp               0.0.0.0:              0.0.0.0:*               LISTEN      /sshd

tcp               127.0.0.1:           0.0.0.0:*               LISTEN      /cupsd

tcp               127.0.0.1:            0.0.0.0:*               LISTEN      /master

tcp               0.0.0.0:            0.0.0.0:*               LISTEN      /nginx: master

tcp               0.0.0.0:            0.0.0.0:*               LISTEN      /alertmanager

tcp               127.0.0.1:          0.0.0.0:*               LISTEN      /redis_exporte

tcp               127.0.0.1:          0.0.0.0:*               LISTEN      /prometheus

tcp               127.0.0.1:          0.0.0.0:*               LISTEN      /postgres_expo

tcp               127.0.0.1:          0.0.0.0:*               LISTEN      /alertmanager

tcp6              :::                  :::*                    LISTEN      /systemd

tcp6              :::                :::*                    LISTEN      /ruby

tcp6              :::                   :::*                    LISTEN      /sshd

tcp6              :::                 :::*                    LISTEN      /cupsd

tcp6              :::                  :::*                    LISTEN      /master

udp               0.0.0.0:           0.0.0.0:*                           /avahi-daemon: r

udp               0.0.0.0:            0.0.0.0:*                           /avahi-daemon: r

udp               192.168.122.1:        0.0.0.0:*                           /dnsmasq

udp               0.0.0.0:              0.0.0.0:*                           /dnsmasq

udp               0.0.0.0:              0.0.0.0:*                           /dhclient

udp               0.0.0.0:           0.0.0.0:*                           /dhclient

udp               127.0.0.1:           0.0.0.0:*                           /chronyd

udp6              :::                :::*                                /dhclient

udp6              :::                 :::*                                /chronyd
..
查看防火墙
[root@localhost soft]#  firewall-cmd --zone=public --list-ports

/tcp /tcp /tcp

[root@localhost soft]# firewall-cmd --zone=public --add-port=/tcp --permanent

success

[root@localhost soft]# firewall-cmd --reload

success
打开浏览器,访问

..会让你重置密码,并且至少8位,我输入的12345678。然后会让你登录,用户名是root,密码是你重置的那个

你可以创建用户,创建项目。还可以设置SSH Key。

到此就完成啦。
脚本安装
打开:https://packages.gitlab.com/gitlab/gitlab-ce/install
现在我们换一台机器
[root@localhost admin]# cd /soft/

[root@localhost soft]# curl -s https://packages.gitlab.com/install/repositories/gitlab/gitlab-ce/script.rpm.sh | bash

Detected operating system as centos/.

Checking for curl...

Detected curl...

Downloading repository file: https://packages.gitlab.com/install/repositories/gitlab/gitlab-ce/config_file.repo?os=centos&dist=7&source=script

done.

Installing pygpgme to verify GPG signatures...

Loaded plugins: fastestmirror, langpacks

base                                                                                                                                                                        | 3.6 kB  ::

extras                                                                                                                                                                      | 3.4 kB  ::

https://packages.gitlab.com/gitlab/gitlab-ce/el/7/SRPMS/repodata/repomd.xml: [Errno 12] Timeout on https://packages-gitlab-com.s3-accelerate.amazonaws.com/empty/rpm/repomd.xml?AWSAccessKeyId=AKIAJ74R7IHMTQVGFCEA&Signature=iiqnja2rIZZgVhZPOxxLPMg8vWI=&Expires=1537345200: (28, 'Operation timed out after 30827 milliseconds with 0 out of 0 bytes received')

Trying other mirror.
问题在于访问超时
我不玩了好吧~
GitLab 环境搭建【CentOS7】的更多相关文章
- 基于【 centos7】五 || GitLab环境搭建
一.基于Docker部署GitLab环境搭建 1.下载镜像 docker pull beginor/gitlab-ce:11.0.1-ce.0 2.创建GitLab 的配置 (etc) . 日志 (l ...
- 基于CentOS7.x gitlab环境搭建,卸载,汉化 --汉化篇
gitlab环境搭建,卸载,汉化--汉化篇 注意gitlab的版本需和汉化版本一致 安装git yum install -y git 下载最新的汉化包 cd git clone https://git ...
- 基于CentOS7.x gitlab环境搭建,卸载,汉化 --卸载篇
gitlab环境搭建,卸载,汉化 --卸载篇 完全卸载 停止gitlab gitlab-ctl stop 卸载gitlab rpm -e gitlab-ce 查看gitlab进程 ps aux | ...
- 基于CentOS7.x gitlab环境搭建,卸载,汉化 --搭建篇
gitlab环境搭建,卸载,汉化 --搭建篇 环境搭建 安装依赖软件 yum -y install policycoreutils openssh-server openssh-clients pos ...
- LNMP环境搭建--Centos7
LNMP环境搭建--Centos7 | 刘鹏--博客 盒子 盒子 博客 分类 搜索 文章目录 在Centos7环境安装LAMP环境,备忘哈哈. 准备 首先去官网下载php,nginx 编译安装php ...
- 基于Bitnami gitlab OVA包的gitlab 环境搭建
前言 最近在折腾gitlab,本篇记录搭建的过程方便以后查找 环境 Windows server + VMware 安装 为方便本次我们直接采用Bitnami的VOA安装包(VOA格式可同时兼容Vir ...
- gitlab环境搭建
企业级的git管理程序.最好用的之一吧.估计其它的也得叫之二. 怎么搭建呢? 2G以上配置的机器才可以搞. . 如下 安装需要注意的是.如果开了80端口,8080的需要修改配置文件 下面会提到 1. ...
- Hyperledger Fabric 开发环境搭建 centos7系统
一.安装GO语言 下载最新版的go 打开Terminal,输入命令(以下命令都是以root管理员的角色进行的) su 输入密码:***** wget https://storage.googleapi ...
- EOS2.0环境搭建-centos7
需要安装启动的有三个组件 nodes,keosd,cleos,看看三者的关系 nodeos:核心程序,用于启动eos节点服务,在后台运行,可以配置不同 插件.该进程负责账户管理.区块生成.共识建立,并 ...
随机推荐
- C# 中那些常用的工具类(Utility Class)(二)
今天按照这一年来经常用到的那些静态的工具类再来做一次总结,这些小的工具来可以作为自己学习的很好的例子,通过总结这些东西,能够很大程度上梳理自己的知识体系,当然这个是经常用到的,接下来就一个个去分析这些 ...
- java中的序列化和反序列化
package cn.zhou; import java.io.FileInputStream; import java.io.FileOutputStream; import java.io.Fil ...
- size_t的使用
size_t的取值range是目标平台下最大可能的数组尺寸 典型的例子:x64平台下size_t是8位,而x32平台下是4位: int在两个平台下均为4位 所以在使用的时候一定要配置好对应的平台,否则 ...
- AgilePoint数据库模式中当前所有表的列表
表名 描述 WF_ACTIVITY_INSTS 包含有关活动实例的信息. WF_ASSIGNED_OBJECTS 包含有关用户角色的分配对象的信息. WF_AUDIT_TRAILS 包含有关流程模板的 ...
- 工厂类,配置文件,静态方法,反射构成编译器解耦;ioc的一个概念 ;通过xml创建容器里面存储对象
工厂类,配置文件,静态,反射方法构成编译器解耦;ioc的一个概念
- hdu-3294(最长回文子串)
题意:给你一个字符和一个字符串让你求出最长回文子串并且输出来,答案需要根据给出的字符转换一下,就是将给出的字符认定为a,然后依次向后推: 解题思路:manacher模板+一些处理 代码: #inclu ...
- hdu-1058(map)
题意:输出第n个能拆分成由,2,3,5,7中的一个或者多个组成的数: 解题思路:a[i+1]=a[i]*2;a[i+2]=a[i]*3;a[i+3]=a[i]*5;a[i+4]=a[i]*7;然后把重 ...
- System.Diagnostics.Process启动Civil 3D及AutoCAD
QQ群友提出问题, 如何启动Civil 3D或者AutoCAD, Kean的博客里有相关的文章 http://through-the-interface.typepad.com/through_the ...
- Vue——显示微信用户名称中enjoin表情
后端做了处理转为了Unicode编码存入数据库,但是取出来没做处理,所以前端就做下简单的处理 转换代码: function decodeUnicode(str) { str = str.replace ...
- springMVC整理05--数据校验、格式化 & 其他注解 & 数据绑定流程
1. 数据校验.数据格式化 参考博客 http://www.importnew.com/19477.html 1.1 数据校验 使用 spring 数据校验,先要导入校验器的 jar: <! ...