应用监控CAT之cat-client源码阅读(一)
CAT 由大众点评开发的,基于 Java 的实时应用监控平台,包括实时应用监控,业务监控。对于及时发现线上问题非常有用。(不知道大家有没有在用)
应用自然是最初级的,用完之后,还想了解下其背后的原理,所以有了源码阅读一说。
今天来看看 cat-client 模块,重在调用方。
打开文件,首先看一下使用说明,背景,资料。ok,进入正题。
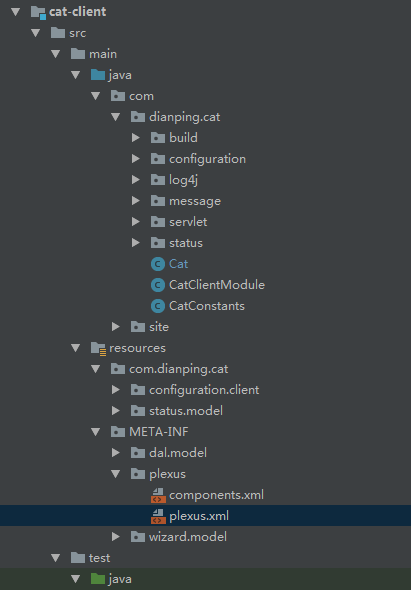
先大致看一下目录结构:
接下来,从样例开始着手,在这里从单元测试开始干活。
public class CatTest {

    @Test

    public void test() {

        Transaction trans = Cat.newTransaction("logTransaction", "logTransaction");

        Cat.newEvent("logEvent", "logEvent");

        Cat.newTrace("logTrace", "logTrace");

        Cat.newHeartbeat("logHeartbeat", "logHeartbeat");

        Throwable cause = new Throwable();

        Cat.logError(cause);

        Cat.logError("message", cause);

        Cat.logTrace("logTrace", "<trace>");

        Cat.logTrace("logTrace", "<trace>", Trace.SUCCESS, "data");

        Cat.logMetric("logMetric", "test", "test");

        Cat.logMetricForCount("logMetricForCount");

        Cat.logMetricForCount("logMetricForCount", 4);

        Cat.logMetricForDuration("logMetricForDuration", 100);

        Cat.logMetricForSum("logMetricForSum", 100);

        Cat.logMetricForSum("logMetricForSum", 100, 100);

        Cat.logEvent("RemoteLink", "Call", Message.SUCCESS, "Cat-0a010680-384736-2061");

        Cat.logEvent("EventType", "EventName");

        Cat.logHeartbeat("logHeartbeat", "logHeartbeat", Message.SUCCESS, null);

        trans.setStatus(Transaction.SUCCESS);

//        trans.setStatus(cause);

        trans.complete();

        Assert.assertEquals(true, Cat.isInitialized());

    }

}
看得出来,cat把其主要功能都列举在了这个单元测试里。大概功能就是,记录event,trace,error,metrics.
不过,咱们只讨论下其中个别类型的处理就O了。
先来看第一个创建事务的方法:
    Cat.newTransaction("logTransaction", "logTransaction");

// 进入方法查看,1. 先获取生产者; 2. 创建一个事务

    public static Transaction newTransaction(String type, String name) {

        return Cat.getProducer().newTransaction(type, name);

    }

// 查看获取生产者的方法,检查是否已初始化,如果没有初始化则进行初始化,深度咱们就先到这里

    public static MessageProducer getProducer() {

        checkAndInitialize();

        return s_instance.m_producer;

    }

// 2. 创建一个事务,1.先获取上下文如果没有则新建; 2. 如果可以记录消息,则立马创建一个默认事务DefaultTransaction; 3. 开启执行,返回事务实例,供下文调用;

    @Override

    public Transaction newTransaction(String type, String name) {

        // this enable CAT client logging cat message without explicit setup

        if (!m_manager.hasContext()) {

            m_manager.setup();

        }

        if (m_manager.isMessageEnabled()) {

            DefaultTransaction transaction = new DefaultTransaction(type, name, m_manager);

            m_manager.start(transaction, false);

            return transaction;

        } else {

            return NullMessage.TRANSACTION;

        }

    }

// 2.1. 如何获取当前上下文,

    @Override

    public void setup() {

        Context ctx;

        if (m_domain != null) {

            ctx = new Context(m_domain.getId(), m_hostName, m_domain.getIp());

        } else {

            ctx = new Context("Unknown", m_hostName, "");

        }

        m_context.set(ctx);

    }

// 2.2. 检查是否已初始化上下文

    @Override

    public boolean hasContext() {

        return m_context.get() != null;

    }

// 2.3. 上下文怎么保证线程安全,使用 ThreadLocal 线程变量

    private ThreadLocal<Context> m_context = new ThreadLocal<Context>();

// 2.4. 开启一个事务,1. 获取上下文; 2. 开启上下文事务; 3. 如果是tag类型的事务,则将其放入 m_taggedTransactions; 配置有误,只提示一次警告

    @Override

    public void start(Transaction transaction, boolean forked) {

        Context ctx = getContext();

        if (ctx != null) {

            ctx.start(transaction, forked);

            if (transaction instanceof TaggedTransaction) {

                TaggedTransaction tt = (TaggedTransaction) transaction;

                m_taggedTransactions.put(tt.getTag(), tt);

            }

        } else if (m_firstMessage) {

            m_firstMessage = false;

            m_logger.warn("CAT client is not enabled because it's not initialized yet");

        }

    }

// 2.4.1. 获取上下文

    private Context getContext() {

        if (Cat.isInitialized()) {

            Context ctx = m_context.get();

            if (ctx != null) {

                return ctx;

            } else {

                if (m_domain != null) {

                    ctx = new Context(m_domain.getId(), m_hostName, m_domain.getIp());

                } else {

                    ctx = new Context("Unknown", m_hostName, "");

                }

                m_context.set(ctx);

                return ctx;

            }

        }

        return null;

    }

// 2.4.2. 开启事务,1. 如果stack为空就把事务设置到m_tree上,否则处理子节点; 2. 把事务压入栈中;

        public void start(Transaction transaction, boolean forked) {

            if (!m_stack.isEmpty()) {

                // Do NOT make strong reference from parent transaction to forked transaction.

                // Instead, we create a "soft" reference to forked transaction later, via linkAsRunAway()

                // By doing so, there is no need for synchronization between parent and child threads.

                // Both threads can complete() anytime despite the other thread.

                if (!(transaction instanceof ForkedTransaction)) {

                    Transaction parent = m_stack.peek();

                    addTransactionChild(transaction, parent);

                }

            } else {

                m_tree.setMessage(transaction);

            }

            if (!forked) {

                m_stack.push(transaction);

            }

        }

// 2.4.3. 上下文结构

        public Context(String domain, String hostName, String ipAddress) {

            m_tree = new DefaultMessageTree();        // 创建一个消息树

            m_stack = new Stack<Transaction>();        // 存放栈信息

            Thread thread = Thread.currentThread();

            String groupName = thread.getThreadGroup().getName();

            m_tree.setThreadGroupName(groupName);

            m_tree.setThreadId(String.valueOf(thread.getId()));

            m_tree.setThreadName(thread.getName());

            m_tree.setDomain(domain);

            m_tree.setHostName(hostName);

            m_tree.setIpAddress(ipAddress);

            m_length = 1;

            m_knownExceptions = new HashSet<Throwable>();

        }

// DefaultModuleInitializer

   @Override

   public void execute(ModuleContext ctx, Module... modules) {

      Set<Module> all = new LinkedHashSet<Module>();

      info(ctx, "Initializing top level modules:");

      for (Module module : modules) {

         info(ctx, "   " + module.getClass().getName());

      }

      try {

         expandAll(ctx, modules, all);

         for (Module module : all) {

            if (!module.isInitialized()) {

               executeModule(ctx, module, m_index++);

            }

         }

      } catch (Exception e) {

         throw new RuntimeException("Error when initializing modules! Exception: " + e, e);

      }

   }

// 调用executeModule方法,初始化数据

   private synchronized void executeModule(ModuleContext ctx, Module module, int index) throws Exception {

      long start = System.currentTimeMillis();

      // set flat to avoid re-entrance

      module.setInitialized(true);

      info(ctx, index + " ------ " + module.getClass().getName());

      // execute itself after its dependencies

      module.initialize(ctx);

      long end = System.currentTimeMillis();

      info(ctx, index + " ------ " + module.getClass().getName() + " DONE in " + (end - start) + " ms.");

   }

 // cat初始化

    // this should be called during application initialization time

    public static void initialize(File configFile) {

        PlexusContainer container = ContainerLoader.getDefaultContainer();

        initialize(container, configFile);

    }

    public static void initialize(PlexusContainer container, File configFile) {

        ModuleContext ctx = new DefaultModuleContext(container);

        // 该方法会去 components.xml中查找 org.unidal.initialization.Module 的实现类,

        Module module = ctx.lookup(Module.class, CatClientModule.ID);

        if (!module.isInitialized()) {

            ModuleInitializer initializer = ctx.lookup(ModuleInitializer.class);

            ctx.setAttribute("cat-client-config-file", configFile);

            initializer.execute(ctx, module);

        }

    }
// components.xml 中配置的 Module, 加载入 CatClientModule
        <component>

            <role>org.unidal.initialization.Module</role>

            <role-hint>cat-client</role-hint>

            <implementation>com.dianping.cat.CatClientModule</implementation>

        </component>
// plexus.xml 中 配置日志输出
<plexus>

    <components>

        <component>

            <role>org.codehaus.plexus.logging.LoggerManager</role>

            <implementation>org.unidal.lookup.logger.TimedConsoleLoggerManager</implementation>

            <configuration>

                <dateFormat>MM-dd HH:mm:ss.SSS</dateFormat>

                <showClass>true</showClass>

                <logFilePattern>cat_{0,date,yyyyMMdd}.log</logFilePattern>

                <baseDirRef>CAT_HOME</baseDirRef>

                <defaultBaseDir>/data/applogs/cat</defaultBaseDir>

            </configuration>

        </component>

    </components>

</plexus>
// logEvent 举个例子,event处理过程
Cat.logEvent("RemoteLink", "Call", Message.SUCCESS, "Cat-0a010680-384736-2061");

// 进入方法

    public static void logEvent(String type, String name, String status, String nameValuePairs) {

        Cat.getProducer().logEvent(type, name, status, nameValuePairs);

    }

    // DefaultMessageProducer, logEvent

    @Override

    public void logEvent(String type, String name, String status, String nameValuePairs) {

        Event event = newEvent(type, name);

        if (nameValuePairs != null && nameValuePairs.length() > 0) {

            event.addData(nameValuePairs);

        }

        event.setStatus(status);

        event.complete();

    }

    // DefaultEvent, complete 方法

    @Override

    public void complete() {

        setCompleted(true);

        if (m_manager != null) {

            m_manager.add(this);

        }

    }

    // DefaultMessageManager, add方法,添加到上下文中

    @Override

    public void add(Message message) {

        Context ctx = getContext();

        if (ctx != null) {

            ctx.add(message);

        }

    }

    // DefaultMessageManager, 最终添加方法

    public void add(Message message) {

        if (m_stack.isEmpty()) {

            MessageTree tree = m_tree.copy();

            tree.setMessage(message);

            flush(tree);

        } else {

            Transaction parent = m_stack.peek();

            addTransactionChild(message, parent);

        }

    }

// DefaultMessageManager, 发送刷写数据

    public void flush(MessageTree tree) {

        if (tree.getMessageId() == null) {

            tree.setMessageId(nextMessageId());

        }

        MessageSender sender = m_transportManager.getSender();

        if (sender != null && isMessageEnabled()) {

            sender.send(tree);

            reset();

        } else {

            m_throttleTimes++;

            if (m_throttleTimes % 10000 == 0 || m_throttleTimes == 1) {

                m_logger.info("Cat Message is throttled! Times:" + m_throttleTimes);

            }

        }

    }

// TcpSocketSender, 发送数据

    // 先插入 BlockingQueue<MessageTree> m_queue 阻塞队列中,如果插入失败,则进行日志队列检查

    @Override

    public void send(MessageTree tree) {

        if (isAtomicMessage(tree)) {

            boolean result = m_atomicTrees.offer(tree, m_manager.getSample());

            if (!result) {

                logQueueFullInfo(tree);

            }

        } else {

            boolean result = m_queue.offer(tree, m_manager.getSample());

            if (!result) {

                logQueueFullInfo(tree);

            }

        }

    }

    // 日志队列检查

    private void logQueueFullInfo(MessageTree tree) {

        if (m_statistics != null) {

            m_statistics.onOverflowed(tree);

        }

        int count = m_errors.incrementAndGet();

        if (count % 1000 == 0 || count == 1) {

            m_logger.error("Message queue is full in tcp socket sender! Count: " + count);

        }

        tree = null;

    }

    // 如果队列不为空,则插入到上一节点之后

    private void addTransactionChild(Message message, Transaction transaction) {

        long treePeriod = trimToHour(m_tree.getMessage().getTimestamp());

        long messagePeriod = trimToHour(message.getTimestamp() - 10 * 1000L); // 10 seconds extra time allowed

        if (treePeriod < messagePeriod || m_length >= m_configManager.getMaxMessageLength()) {

            m_validator.truncateAndFlush(this, message.getTimestamp());

        }

        transaction.addChild(message);

        m_length++;

    }

    // DefaultTransaction, addChild, 添加子节点,完成添加操作

    @Override

    public DefaultTransaction addChild(Message message) {

        if (m_children == null) {

            m_children = new ArrayList<Message>();

        }

        if (message != null) {

            m_children.add(message);

        } else {

            Cat.logError(new Exception("null child message"));

        }

        return this;

    }
// Transaction 的 complete 实现,最终的提交
trans.complete();

// 进入方法,如果已经结束,则认为是异常情况

    @Override

    public void complete() {

        try {

            if (isCompleted()) {

                // complete() was called more than once

                DefaultEvent event = new DefaultEvent("cat", "BadInstrument");

                event.setStatus("TransactionAlreadyCompleted");

                event.complete();

                addChild(event);

            } else {

                m_durationInMicro = (System.nanoTime() - m_durationStart) / 1000L;

                setCompleted(true);        // 防止下次再进入

                if (m_manager != null) {

                    m_manager.end(this);

                }

            }

        } catch (Exception e) {

            // ignore

        }

    }

    // DefaultMessageManager, end 方法

    @Override

    public void end(Transaction transaction) {

        Context ctx = getContext();

        if (ctx != null && transaction.isStandalone()) {

            if (ctx.end(this, transaction)) {

                m_context.remove();

            }

        }

    }

    // DefaultMessageManager, end transaction 进行校验

    public boolean end(DefaultMessageManager manager, Transaction transaction) {

        if (!m_stack.isEmpty()) {

            Transaction current = m_stack.pop();

            if (transaction == current) {

                m_validator.validate(m_stack.isEmpty() ? null : m_stack.peek(), current);

            } else {

                while (transaction != current && !m_stack.empty()) {

                    m_validator.validate(m_stack.peek(), current);

                    current = m_stack.pop();

                }

            }

            if (m_stack.isEmpty()) {

                MessageTree tree = m_tree.copy();

                m_tree.setMessageId(null);

                m_tree.setMessage(null);

                if (m_totalDurationInMicros > 0) {

                    adjustForTruncatedTransaction((Transaction) tree.getMessage());

                }

                manager.flush(tree);

                return true;

            }

        }

        return false;

    }

    // 验证事务的正确性,对嵌套的 transaction 进行验证

    public void validate(Transaction parent, Transaction transaction) {

        if (transaction.isStandalone()) {

            List<Message> children = transaction.getChildren();

            int len = children.size();

            for (int i = 0; i < len; i++) {

                Message message = children.get(i);

                if (message instanceof Transaction) {

                    validate(transaction, (Transaction) message);

                }

            }

            if (!transaction.isCompleted() && transaction instanceof DefaultTransaction) {

                // missing transaction end, log a BadInstrument event so that

                // developer can fix the code

                markAsNotCompleted((DefaultTransaction) transaction);

            }

        } else if (!transaction.isCompleted()) {

            if (transaction instanceof DefaultForkedTransaction) {

                // link it as run away message since the forked transaction is not completed yet

                linkAsRunAway((DefaultForkedTransaction) transaction);

            } else if (transaction instanceof DefaultTaggedTransaction) {

                // link it as run away message since the forked transaction is not completed yet

                markAsRunAway(parent, (DefaultTaggedTransaction) transaction);

            }

        }

    }

    // 适应事务时间段

    private void adjustForTruncatedTransaction(Transaction root) {

        DefaultEvent next = new DefaultEvent("TruncatedTransaction", "TotalDuration");

        long actualDurationInMicros = m_totalDurationInMicros + root.getDurationInMicros();

        next.addData(String.valueOf(actualDurationInMicros));

        next.setStatus(Message.SUCCESS);

        root.addChild(next);

        m_totalDurationInMicros = 0;

    }

// 发送最后的数据

    public void flush(MessageTree tree) {

        if (tree.getMessageId() == null) {

            tree.setMessageId(nextMessageId());

        }

        MessageSender sender = m_transportManager.getSender();

        if (sender != null && isMessageEnabled()) {

            sender.send(tree);

            reset();

        } else {

            m_throttleTimes++;

            if (m_throttleTimes % 10000 == 0 || m_throttleTimes == 1) {

                m_logger.info("Cat Message is throttled! Times:" + m_throttleTimes);

            }

        }

    }

    // 可以记录的前提是,所有条件均满足

    @Override

    public boolean isMessageEnabled() {

        return m_domain != null && m_domain.isEnabled() && m_context.get() != null && m_configManager.isCatEnabled();

    }

// 发送messageTree到 LinkedBlockingQueue<MessageTree> m_tree

    @Override

    public void send(MessageTree tree) {

        if (isAtomicMessage(tree)) {

            boolean result = m_atomicTrees.offer(tree, m_manager.getSample());

            if (!result) {

                logQueueFullInfo(tree);

            }

        } else {

            boolean result = m_queue.offer(tree, m_manager.getSample());

            if (!result) {

                logQueueFullInfo(tree);

            }

        }

    }

// 发送数据完成后,需要将原来的数据清空还原,以便下次可用

    @Override

    public void reset() {

        // destroy current thread local data

        Context ctx = m_context.get();

        if (ctx != null) {

            if (ctx.m_totalDurationInMicros == 0) {

                ctx.m_stack.clear();

                ctx.m_knownExceptions.clear();

                m_context.remove();

            } else {

                ctx.m_knownExceptions.clear();

            }

        }

    }

    // 上下文的移除,其他链表结构各自移除

     public void remove() {

         ThreadLocalMap m = getMap(Thread.currentThread());

         if (m != null)

             m.remove(this);

     }

    // 为保证上下文绝对移除,再次操作

    @Override

    public void end(Transaction transaction) {

        Context ctx = getContext();

        if (ctx != null && transaction.isStandalone()) {

            if (ctx.end(this, transaction)) {

                m_context.remove();

            }

        }

    }
// 写入队列后,由 TcpSocketSender 线程进行轮询发送到cat后台
    @Override

    public void run() {

        m_active = true;

        while (m_active) {

            ChannelFuture channel = m_manager.channel();

            if (channel != null && checkWritable(channel)) {

                try {

                    MessageTree tree = m_queue.poll();

                    if (tree != null) {

                        sendInternal(tree);

                        tree.setMessage(null);

                    }

                } catch (Throwable t) {

                    m_logger.error("Error when sending message over TCP socket!", t);

                }

            } else {

                long current = System.currentTimeMillis();

                long oldTimestamp = current - HOUR;

                while (true) {

                    try {

                        MessageTree tree = m_queue.peek();

                        if (tree != null && tree.getMessage().getTimestamp() < oldTimestamp) {

                            MessageTree discradTree = m_queue.poll();

                            if (discradTree != null) {

                                m_statistics.onOverflowed(discradTree);

                            }

                        } else {

                            break;

                        }

                    } catch (Exception e) {

                        m_logger.error(e.getMessage(), e);

                        break;

                    }

                }

                try {

                    Thread.sleep(5);

                } catch (Exception e) {

                    // ignore it

                    m_active = false;

                }

            }

        }

    }
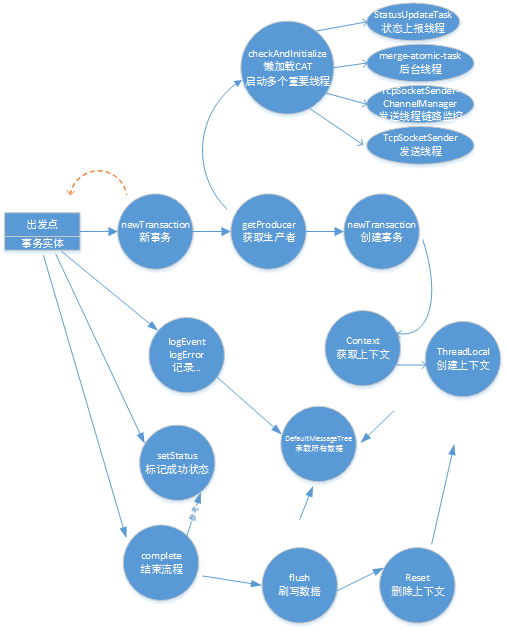
如此,整个cat埋点的过程就搞定了。关键技术就是:
1. ThreadLocal 用于保存上下文埋点,保证线程安全。
2. LinkedBlockingQueue 用于保存消息树,作为生产线程与消费线的沟通桥梁!
3. AtomicInteger 用于计数,保证准确性。
4. 心跳线和用于发送本机的状态到cat后台。
5. 懒加载,单例模式的使用。
等等,来个图:
应用监控CAT之cat-client源码阅读(一)的更多相关文章
- 【原】Spark中Client源码分析(二)
继续前一篇的内容.前一篇内容为: Spark中Client源码分析(一)http://www.cnblogs.com/yourarebest/p/5313006.html DriverClient中的 ...
- ZooKeeper源码阅读——client(二)
原创技术文章,转载请注明:转自http://newliferen.github.io/ 如何连接ZooKeeper集群 要想了解ZooKeeper客户端实现原理,首先需要关注一下客户端的使用方式, ...
- Rpc框架dubbo-client(v2.6.3) 源码阅读(二)
接上一篇 dubbo-server 之后,再来看一下 dubbo-client 是如何工作的. dubbo提供者服务示例, 其结构是这样的!dubbo://192.168.11.6:20880/com ...
- InfluxDB源码阅读之httpd服务
操作系统 : CentOS7.3.1611_x64 go语言版本:1.8.3 linux/amd64 InfluxDB版本:1.1.0 服务模块介绍 源码路径: github.com/influxda ...
- Pytorch版本yolov3源码阅读
目录 Pytorch版本yolov3源码阅读 1. 阅读test.py 1.1 参数解读 1.2 data文件解析 1.3 cfg文件解析 1.4 根据cfg文件创建模块 1.5 YOLOLayer ...
- Redis源码阅读(一)事件机制
Redis源码阅读(一)事件机制 Redis作为一款NoSQL非关系内存数据库,具有很高的读写性能,且原生支持的数据类型丰富,被广泛的作为缓存.分布式数据库.消息队列等应用.此外Redis还有许多高可 ...
- Kubernetes 学习(九)Kubernetes 源码阅读之正式篇------核心组件之 Scheduler
0. 前言 继续上一篇博客阅读 Kubernetes 源码,参照<k8s 源码阅读>首先学习 Kubernetes 的一些核心组件,首先是 kube-scheduler 本文严重参考原文: ...
- Spring源码阅读 之 配置的读取,解析
在上文中我们已经知道了Spring如何从我们给定的位置加载到配置文件,并将文件包装成一个Resource对象.这篇文章我们将要探讨的就是,如何从这个Resouce对象中加载到我们的容器?加载到容器后又 ...
- 【原】AFNetworking源码阅读(一)
[原]AFNetworking源码阅读(一) 本文转载请注明出处 —— polobymulberry-博客园 1. 前言 AFNetworking版本:3.0.4 由于我平常并没有经常使用AFNetw ...
随机推荐
- 记一次Struts2 内核问题分析解决
问题场景描述 生产环境某个处理耗时比较长的接口,吞吐能力极差.客服反馈此功能长期处于毫无响应状态. 具体表现 系统启动后第一次调用耗时极慢,长时间不响应.紧随之后发起的请求也同时没有响应. 等待第一次 ...
- Linux sleep 语句以及循环 测试负载
sleep 命令 sleep 1 睡眠1秒sleep 1s 睡眠1秒sleep 1m 睡眠1分sleep 1h 睡眠1小时 总代码 #!/bin/bash for i in {1. ...
- skyline开发——读取Shapefile要素属性
double len; IFeatures66 features = featureLayer.FeatureGroups.Polyline.GetCurrentFeatures(); foreach ...
- perl 读取Excel写入txt 乱码
用perl读出excel的内容(中文),然后输出在txt中乱码,但是打印在控制台正常. 解决办法: use Encode qw/from_to/; from_to($value, 'gb2312', ...
- Django路由分配及渲染
一.url路由分配 1.url配置的本质是将浏览器传递过来的路径和参数与服务器中的视图向匹配,并返回浏览器相应的视图函数. 2.url路径path规则 path(route, view, kwargs ...
- appium 1.6.x版本去除安装Unlock、Setting
(appium目录不知道可以查看appium运行日志) 修改目录/usr/local/lib/node_modules/appium/node_modules/appium-android-drive ...
- 学以致用三十二-----python中函数的括号使用
一直以来对python中函数括号的使用,有点分不清楚,到底什么时候用括号,什么时候不用括号,造成了很大看困惑. 今天来总结下. class aaa(): y = 'you' def __init__( ...
- ABAP 图形练习(GFW_PRES_SHOW and GRAPH_2D)
创建屏幕0100(元素清单中含定制控制CONTAINER和OK_CODE) 创建GUI状态100(功能键含BACK和EXIT用于返回和退出 ) 代码 *&------------------- ...
- (三)Javascript面向对象编程:非构造函数的继承
Javascript面向对象编程:非构造函数的继承 这个系列的第一部分介绍了"封装",第二部分介绍了使用构造函数实现"继承". 今天是最后一个部分,介绍不使 ...
- sqoop错误集锦1
1.当时初学Sqoop的时候,mysql导入到hdfs导入命令执行以后,在hdfs上面没有找到对应的数据,今天根据这个bug,顺便解决这个问题吧,之前写的http://www.cnblogs.com/ ...