Django(出版社功能)
day62
day62 2018-05-02
1. 内容回顾
Django
1. 安装
1. Django版本 1.11.xx
2. 安装方式
1. 命令行 --> Python环境(双版本,pip的使用)
2. PyCharm安装
2. 创建Django项目
1. 创建方式
1. 命令行创建方式
1. cd到你要保存Django项目的目录
2. Django-admin startproject 项目名 --> 会在当前目录创建Django项目
2. PyCharm创建方式
1. File --> new project --> ...
2. 创建完之后一定要选在新窗口打开!!!
3. 配置Django项目
1. settings.py文件
1. templates文件夹的位置
2. 静态文件
1. STATIC_URL --> 静态文件夹的别名(在HTML文件中用的)
2. STATICFILES_DIRS --> 静态文件夹的真正路径
3. 注释掉 csrf 相关的中间件
4. Django项目连接的数据库信息
4. Django WEB请求流程(简版)
1. 启动Django项目,等待用户连接
2. 浏览器在地址栏输入URL,来连接我的Django项目
3. 在urls.py中 找 路径和函数的 对应关系
4. 执行对应的函数
5. 返回响应
5. views.py
1. 专门用来定义处理请求的函数
1. 基本必备三件套
from django.shortcuts import HttpResponse, render, redirect
1. HttpResponse("要返回的内容") --> 通常用于直接返回数据
2. render(request, "html文件", {"k1": v1}) --> 返回一个HTML文件或者打开文件进行字符串替换
3. redirect("URL") --> 告诉用户的浏览器去访问其他的URL
2. request相关
1. request.method --> 查看请求的方法
2. request.POST --> 获取POST请求的数据
6. ORM使用
1. 什么是ORM?
是一种编程的方法论(模型), 和语言无关.(其他的语言也有类似的实现.)
2. ORM的本质:
类 ---> 数据表
对象 ---> 数据行
属性 ---> 字段
按照规定的语法写,自动翻译成对应的SQL语句.
3. ORM的功能:
ORM操作数据表
ORM操作数据行
4. Django里ORM的使用:
1. 手动创建数据库
2. 在settings.py里面,配置数据库的连接信息
DATABASES = {
'default': {
'ENGINE': 'django.db.backends.mysql',
'NAME': 'day62',
'HOST': '127.0.0.1',
'PORT': 3306,
'USER': 'root',
'PASSWORD': '123456',
}
}
3. 在项目/__init__.py告诉Django用pymysql模块代替MySQLdb来连接MySQL数据库
import pymysql
pymysql.install_as_MySQLdb()
4. 在app/models.py里面定义类
# 出版社
class Publisher(models.Model):
id = models.AutoField(primary_key=True) # 自增的ID主键
# 创建一个varchar(64)的唯一的不为空的字段
name = models.CharField(max_length=64, null=False, unique=True)
5. 执行两个命令
1. python3 manage.py makemigrations --> 把models.py里面的更改记录到小本本上
2. python3 manage.py migrate --> 把更改翻译成SQL语句,去数据库执行
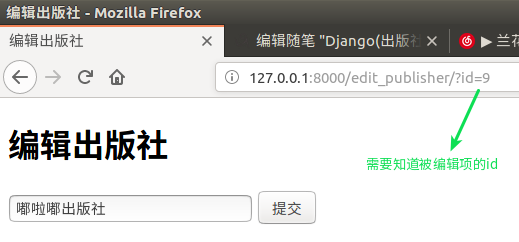
路径参数,可知删除和编辑的是哪一个ID项。

登陆、删除和添加过程

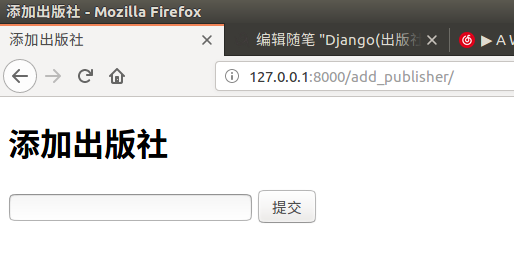
添加页面
编辑过程

编辑页面:
以上内容详细程序
add_publisher.html
 <!DOCTYPE html>

 <html lang="zh-CN">

 <head>

     <meta charset="UTF-8">

     <title>添加出版社</title>

     <!--支持移动端适配-->

     <meta name="viewport" content="width=device-width, initial-scale=1">

 </head>

 <body>

 <h1>添加出版社</h1>

 <form action="/add_publisher/" method="post">

 {#    输入放入publisher_name中#}

     <input type="text" name="publisher_name">

     <input type="submit" value="提交">

     <p style="color: red">{{ error }}</p>

 </form>

 </body>

 </html>
edit_publisher.html
 <!DOCTYPE html>

 <html lang="zh-CN">

 <head>

     <meta charset="UTF-8">

     <title>编辑出版社</title>

     <!--支持移动端适配-->

     <meta name="viewport" content="width=device-width, initial-scale=1">

 </head>

 <body>

 <h1>编辑出版社</h1>

 <form action="/edit_publisher/" method="post">

     <input type="text" name="id" value="{{ publisher.id }}" style="display: none">

 {#    输入放入publisher_name中#}

     <input type="text" name="edit_name", value="{{ publisher.name }}">

     <input type="submit" value="提交">

     <p style="color: red">{{ error }}</p>

 </form>

 </body>

 </html>
publisher_list.html
 <!DOCTYPE html>

 <html lang="zh-CN">

 <head>

     <meta charset="UTF-8">

     <title>出版社列表</title>

     <!--支持移动端适配-->

     <meta name="viewport" content="width=device-width, initial-scale=1">

 </head>

 <body>

 <a href="/add_publisher/">添加新出版社</a>

 <table border="1">

     <thead>

     <tr>

         <th>序号</th>

         <th>ID</th>

         <th>出版社名字</th>

         <th>操作</th>

     </tr>

     </thead>

     <tbody>

     {% for publisher in publisher_list %}

         <tr>

         <td>{{ forloop.counter }}</td>

         <td>{{ publisher.id }}</td>

         <td>{{ publisher.name }}</td>

 {#        <td>#}

 {#            <a class="btn btn-danger" href="/delete_publisher/?id={{ publisher.id }}">删除</a>#}

 {#            <a class="btn btn-info" href="/edit_publisher/?id={{ publisher.id }}">编辑</a>#}

 {#        </td>#}

         <td>

 {#            url携带参数的固定写法#}

             <a href="/delete_publisher/?id={{ publisher.id }}">删除</a>

 {#            /  /   表示在当前网站不同地址间跳转#}

             <a href="/edit_publisher/?id={{ publisher.id }}">编辑</a>

         </td>

         </tr>

     {% endfor %}

     </tbody>

 </table>

 </body>

 </html>
views.py
 from django.shortcuts import render, redirect, HttpResponse

 from app01 import models

 # Create your views here.

 def publisher_list(request):

     ret = models.Publisher.objects.all().order_by("id")# 按ID排序

     return render(request, "publisher_list.html", {"publisher_list": ret})

 def add_publisher(request):

     error_msg = ""

     if request.method == "POST":

         new_name = request.POST.get("publisher_name")

         if new_name:

             # 去数据库新建记录、

             models.Publisher.objects.create(name=new_name)

             # 引导用户回到出版社列表页

             return redirect("/publisher_list")

         else:

             error_msg="名字不能为空"

     # error_msg -> error

     return render(request, "add_publisher.html", {"error": error_msg})

 def delete_publisher(request):

     # 从get中取出将要删除的ID值

           #GET得到一个字典  get根据id取值

     del_id = request.GET.get("id", None)

     # 如果能取到id值

     if del_id:

         del_obj = models.Publisher.objects.get(id=del_id)

         #删除

         del_obj.delete()

         return redirect("/publisher_list/")

     else:

         return HttpResponse("fucking error")

 def edit_publisher(request):

     #如果是post   t提交

     if request.method == "POST":

         edit_id = request.POST.get("id")

         new_name = request.POST.get("edit_name")

         # 根据id确定编辑哪一个出版社

         edit_publisher = models.Publisher.objects.get(id=edit_id)

         edit_publisher.name = new_name

         edit_publisher.save()#把修改后的保存

         return redirect("/publisher_list/")

     #如果是get  显示页面时 需需显示待编辑的内容

     # 获取到当前编辑的出版社对象   GET

     edit_id = request.GET.get("id", None)# None可以默认取不到

     if edit_id:

         publisher_obj = models.Publisher.objects.get(id=edit_id)

         return render(request, "edit_publisher.html", {"publisher": publisher_obj}) #取出来的值传到页面显示

     else:

         HttpResponse("编辑的出版社不存在!")

 def test(request):

     print(request.GET)

     print(request.GET.get("id"))

     return HttpResponse("ok")
bootstrap美化
<!DOCTYPE html>
<!-- saved from url=(0042)https://v3.bootcss.com/examples/dashboard/ -->
<html lang="zh-CN">
<head>
<meta http-equiv="Content-Type" content="text/html; charset=UTF-8"> <meta http-equiv="X-UA-Compatible" content="IE=edge">
<meta name="viewport" content="width=device-width, initial-scale=1">
<!-- 上述3个meta标签*必须*放在最前面,任何其他内容都*必须*跟随其后! -->
<meta name="description" content="">
<meta name="author" content="">
{# <link rel="icon" href="https://v3.bootcss.com/favicon.ico">#} <title>Dashboard</title>
<!-- Bootstrap core CSS -->
<link href="/static/bootstrap/css/bootstrap.css" rel="stylesheet">
<!-- Custom styles for this template -->
<link href="/static/dashboard.css" rel="stylesheet">
<link rel="stylesheet" href="/static/fontAwesome/css/font-awesome.css">
</head> <body>
<nav class="navbar navbar-inverse navbar-fixed-top">
<div class="container-fluid">
<div class="navbar-header">
<button type="button" class="navbar-toggle collapsed" data-toggle="collapse" data-target="#navbar"
aria-expanded="false" aria-controls="navbar">
<span class="sr-only">Toggle navigation</span>
<span class="icon-bar"></span>
<span class="icon-bar"></span>
<span class="icon-bar"></span>
</button>
<a class="navbar-brand" href="https://v3.bootcss.com/examples/dashboard/#">Project name</a>
</div>
<div id="navbar" class="navbar-collapse collapse">
<ul class="nav navbar-nav navbar-right">
<li><a href="https://v3.bootcss.com/examples/dashboard/#">Dashboard</a></li>
<li><a href="https://v3.bootcss.com/examples/dashboard/#">Settings</a></li>
<li><a href="https://v3.bootcss.com/examples/dashboard/#">Profile</a></li>
<li><a href="https://v3.bootcss.com/examples/dashboard/#">Help</a></li>
</ul>
<form class="navbar-form navbar-right">
<input type="text" class="form-control" placeholder="Search...">
</form>
</div>
</div>
</nav> <div class="container-fluid">
<div class="row">
<div class="col-sm-3 col-md-2 sidebar">
<ul class="nav nav-sidebar">
<li class="active"><a href="/publisher_list/">出版社列表页<span class="sr-only">(current)</span></a>
</li>
<li><a href="#"></a></li>
<li><a href="#">Analytics</a></li>
<li><a href="#">Export</a></li>
</ul> </div>
<div class="col-sm-9 col-sm-offset-3 col-md-10 col-md-offset-2 main">
<h1 class="page-header">Dashboard</h1> <div class="panel panel-primary">
<!-- Default panel contents -->
<div class="panel-heading">出版社列表<i class="fa fa-thumb-tack" aria-hidden="true"></i></div>
<div class="panel-body">
<div class="row" style="margin-bottom: 15px">
<div class="col-md-4">
<div class="input-group">
<input type="text" class="form-control" placeholder="Search for...">
<span class="input-group-btn">
<button class="btn btn-default" type="button">搜索</button>
</span>
</div><!-- /input-group -->
</div><!-- /.col-md-4 -->
<div class="col-md-1 pull-right">
<button class="btn btn-success" data-toggle="modal" data-target="#myModal">新增</button>
</div> </div><!-- /.row --> <table class="table table-bordered">
<thead>
<tr>
<th>#</th>
<th>id</th>
<th>出版社名称</th>
<th>操作</th>
</tr>
</thead>
<tbody>
{% for publisher in publisher_list %}
<tr>
<td>{{ forloop.counter }}</td>
<td>{{ publisher.id }}</td>
<td>{{ publisher.name }}</td>
<td>
<a class="btn btn-danger" href="/delete_publisher/?id={{ publisher.id }}">删除</a>
<a class="btn btn-info" href="/edit_publisher/?id={{ publisher.id }}">编辑</a>
</td>
</tr>
{% endfor %}
</tbody>
</table> <nav aria-label="Page navigation" class="text-right">
<ul class="pagination">
<li>
<a href="#" aria-label="Previous">
<span aria-hidden="true">«</span>
</a>
</li>
<li><a href="#">1</a></li>
<li><a href="#">2</a></li>
<li><a href="#">3</a></li>
<li><a href="#">4</a></li>
<li><a href="#">5</a></li>
<li>
<a href="#" aria-label="Next">
<span aria-hidden="true">»</span>
</a>
</li>
</ul>
</nav>
</div> </div>
</div>
</div>
</div> <div class="modal fade" tabindex="-1" role="dialog" id="myModal">
<div class="modal-dialog" role="document">
<div class="modal-content">
<div class="modal-header">
<button type="button" class="close" data-dismiss="modal" aria-label="Close"><span aria-hidden="true">×</span>
</button>
<h4 class="modal-title">用户信息</h4>
</div>
<div class="modal-body">
<form class="form-horizontal">
<div class="form-group">
<label for="inputEmail3" class="col-sm-2 control-label">邮箱</label>
<div class="col-sm-10">
<input type="email" class="form-control" id="inputEmail3" placeholder="Email">
</div>
</div>
<div class="form-group">
<label for="inputPassword3" class="col-sm-2 control-label">密码</label>
<div class="col-sm-10">
<input type="password" class="form-control" id="inputPassword3" placeholder="Password">
</div>
</div>
</form>
</div>
<div class="modal-footer">
<button type="button" class="btn btn-default" data-dismiss="modal">取消</button>
<button type="button" class="btn btn-primary">保存</button>
</div>
</div><!-- /.modal-content -->
</div><!-- /.modal-dialog -->
</div><!-- /.modal --> <!-- Bootstrap core JavaScript
================================================== -->
<!-- Placed at the end of the document so the pages load faster -->
<script src="/static/jquery-3.2.1.min.js"></script>
<script src="/static/bootstrap/js/bootstrap.js"></script> </body>
</html>
结果:

今日内容
1. GET请求和POST请求
都属于HTTP协议规定的请求方法
2. 什么时候用GET请求?
1. 浏览器想要得到一个HTML页面的时候
2. 搜索引擎查询关键字的时候 www.sogo.com/web/?query=迪丽热巴 (问号前是路径,问号后是路径参数)
3. 什么时候用POST?
1. 向后端提交数据
1. 大段的数据
2. 包含隐私的数据 用GET方法会在页面上显示,对隐私不安全

3. 上传文件
4. 实际中GET和POST的应用场景
1. GET:
1. 直接在浏览器地址栏输入URL访问网站
2. a标签
2. POST:
1. 登录注册
2. 修改(新增)大段的数据
3. 上传文件
Django(出版社功能)的更多相关文章
- Django 分页功能
Django 分页功能比较强大,这边是结合官网的内容写的可以参考 https://docs.djangoproject.com/en/1.9/topics/pagination/ 分页命令行练习案列 ...
- Django——分页功能Paginator
Django分页功能----Paginator Paginator所需参数: Paginator(object_list,per_page) Paginator常用属性: per_page: 每页显示 ...
- 大致掌握django的功能
目录 静态文件配置 request对象方法初识 pycharm链接数据库(mysql) django链接数据库(mysql) django orm 字段的增删查改 数据的增删查改 数据的查,改,删 d ...
- Django—常用功能
索引 一.静态文件 二.中间件 三.Admin站点 3.1 列表页选项 3.2 编辑页选项 3.3 重写模板 四.上传图片 4.1 在管理页面admin中上传图片 4.2 自定义form表单中上传图片 ...
- django分页功能实现
django内置的分页功能需要引入内置模块from django.core.paginator import Paginator, EmptyPage, PageNotAnInteger Pagina ...
- django分页功能
采用django自带的Paginator功能 from django.core.paginator import Paginator food = foodInfo.objects.filter(fo ...
- django 用户注册功能实现
增加views的类 class RegisterView(View): def get(self, request): return render(request, 'register.html', ...
- django验证码功能
1.目的 现在我们一般访问网页都需要输入验证码,比如博客园,有的甚至是通过手机验证码实时登录.这样做的目的主要还是为了防止其他人的恶意访问,比如爬虫,下面就来看看验证码是如何实现的 2.StringI ...
- Django 文件下载功能
def file_download(request): con= MySQLdb.connect(host='192.168.xxx.xxx',user='root',passwd='xxxx',db ...
随机推荐
- requestFullscreen()事件全屏不好使怎么解决
标明:我在360和火狐中全屏requestFullscreen()事件不好使: 解释:我后来发现我的页面是在iframe框架中使用的并且没有设置allowfullscreen="true&q ...
- makeuque
http://blog.csdn.net/10km/article/details/49867479
- 6. Manage the driver for browser and the script for Hub
- Java数据结构和算法(一)散列表
Java数据结构和算法(一)散列表 数据结构与算法目录(https://www.cnblogs.com/binarylei/p/10115867.html) 散列表(Hash table) 也叫哈希表 ...
- db2学习笔记
a.服务端安装 v11.1_win64_expc.zip 官网下载 b.客户端安装 Toad for DB2 Freeware 6.1 百度找找 .建数据库 create database HRA_G ...
- failed creating java jvm.dll
启动tomcat服务时出现错误failed creating java jvm.dll的解决办法 把jdk\bin目录下的msvcr71.dll 或msvcr100.dll 复制到tomcat安装目录 ...
- window.load 和$(document).ready() 、window.load和body onload区别
1.执行时间 window.onload必须等到页面内包括图片的所有元素加载完毕后才能执行. $(document).ready()是DOM结构绘制完毕后就执行,不必等到加载完毕.2.编写个数不同 w ...
- 2018.07.31 POJ1741Tree(点分治)
传送门 只是来贴一个点分治的板子(年轻时候写的丑别介意). 代码: #include<cstdio> #include<cstring> #include<algorit ...
- Part 2 - Fundamentals(4-10)
https://simpleisbetterthancomplex.com/series/2017/09/11/a-complete-beginners-guide-to-django-part-2. ...
- FuelPHP 简体中文手册
FuelPHP中文手册 FuelPHP是一个简单的.灵活的.社区驱动的PHP 5.3 web框架,它基于其他框架的最佳思想,是一个全新的开始. 他的诞生源自于很多开发社区对于现有开发框架的不满,Fue ...