基于 Vue BootStrap的迷你Chrome插件
安装
- 安装 Visual Studio Code 和Chrome, 自行翻墙
详细安装这里略过
- 安装包管理工具
用管理员身份运行cmd,输入:
npm install -g bower (全局安装)
创建
- 新建目录brochure 进入目录运行
bower install bootstrap@3 vue axios
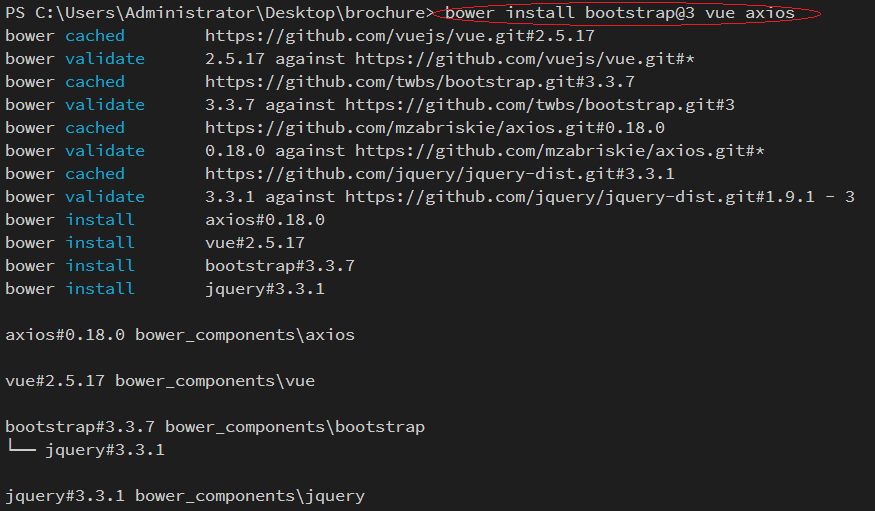
成功!
新建 css, js 目录,并在对应的目录下面新建 index.css 和 index.js文件
新建 img 目录,导入图标
新建 manifest.json 写入插件配置
  {

      "manifest_version": 2,

      "name": "发现小册",

      "version": "1.0.0",

      "description": "掘金已发布小册查看插件",

      "icons": {

          "48": "img/48/book.png"

      },

      "browser_action": {

          "default_icon": "img/48/book.png",

          "default_title": "掘金小册查看插件",

          "default_popup": "popup.html" (要与外部的入口的html文件名相同)

      },

      "permissions": [

          "contextMenus",  (在Chrome的右键菜单中增加自己的菜单项)

          "tabs",

          "notifications",

          "webRequest",

          "webRequestBlocking",

          "storage"

      ],

      "content_security_policy": "script-src 'self' 'unsafe-eval'; object-src 'self'",

      "content_scripts": [

          {

              "matches": [

                  "<all_urls>"

              ],

              "js": [

                  "js/index.js"

              ]

          }

      ]

  }
注意 : content_security_policy 简称CSP, 是Chrome扩展引入为了减少XSS的发生, 这里我们要设置 "content_security_policy": "script-src 'self' 'unsafe-eval'; object-src 'self'" ,
不然插件引入的vue没法识别,插件会报错。
新建 popup.html 的项目入口文件
项目基本构建完成
项目目录

代码
index.css 代码
body {

    width: 350px;

    height: 400px;

    overflow-y: scroll;

}

.row {

    border-bottom: .5px solid #e6e8e8;

    padding-bottom: 10px;

    padding-top: 10px;

}

.desc {

    line-height: 20px;

    height: 20px;

    font-size: 12px;

}

.title {

    font-size: 16px;

    font-weight: 600;

    color: #ed7b11;

    margin-top: 0px;

}

.info {

    margin-top: 18px;

}

.author {

    font-weight: blod;

}

.author-desc,

.message,

.buy-number {

    color: #ccc;

}

.price-text {

    color: #ed7b11;

}

span {

    padding: 2px;

}
popup.html 代码
<link rel="stylesheet" href="./bower_components/bootstrap/dist/css/bootstrap.css">

<link rel="stylesheet" href="css/index.css">

<div class="container" id="app"></div>

<script src="./bower_components/vue/dist/vue.js"></script>

<script src="./bower_components/axios/dist/axios.js"></script>

<script src="js/index.js"></script>
数据请求与数据绑定
index.js 添加数据请求
获取数据的地址为第三方的数据地址,第一页数据:https://xiaoce-timeline-api-ms.juejin.im/v1/getListByLastTime?uid=&client_id=&token=&src=web&alias=&pageNum=1
var vm = new Vue({

    el: '#app',

    data: {

        infoList: []

    },

    created() {

        const _this = this;

        const total = 3;

        const base_url = 'https://xiaoce-timeline-api-ms.juejin.im/v1/getListByLastTime?uid=&client_id=&token=&src=web&alias=&pageNum=';

        for (let number = 1; number < total; number++) {

            axios.get(base_url + number)

                .then(function (res) {

                    const data = res.data.d;

                    if (data != null && res.data.m === 'ok') {

                        _this.infoList.push(...data);

                    }

                })

                .catch(function (err) {

                    console.log(err);

                });

        }

    }

});
- 在popup.html的 .container的div下添加数据绑定
    <div class="row" v-for="item in infoList">

        <div class="box">

            <div class="col-xs-4">

                <img v-bind:src="item.img" alt="..." width=100 height=150>

            </div>

            <div class="col-xs-8">

                <h4 class="title"> {{item.title}}</h4>

                <p class="desc">{{item.desc}}</p>

                <br>

                <div class="info">

                    <span class="author">{{item.userData.username}}</span><span class="author-desc">{{item.userData.jobTitle}}</span>

                    <br>

                    <span class="price-text">¥{{item.price}}</span>

                    <span class="message">{{item.lastSectionCount}}小节</span>

                    <span class="buy-number">{{item.buyCount}} 人</span>

                </div>

            </div>

        </div>

    </div>
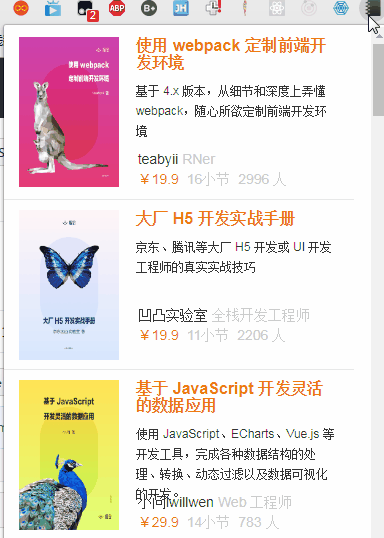
项目启动
项目完成后,打开chrome 浏览器 找到更多工具下面的扩展程序,选择记载已压缩的扩展程序,
然后选择项目brochure
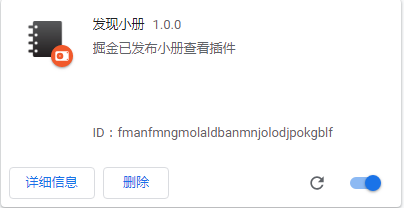
出现这个表示安装成功,点击导航行
运行效果
谢谢!基于 Vue BootStrap的迷你Chrome插件
注:本文著作权归作者,由demo大师代发,拒绝转载,转载需要作者授权
基于 Vue BootStrap的迷你Chrome插件的更多相关文章
- 基于Vue的省市区三级联动插件
官网地址:https://distpicker.uine.org/ 安装: npm install v-distpicker --save 局部注册: import VDistpicker from ...
- 谷歌浏览器中安装.crx扩展名的离线Chrome插件
一.本地拖放安装 1.下载扩展程序/脚本程序至本地计算机: 2.将其直接拖拽到浏览器的“扩展程序”(chrome://chrome/extensions/)页面. 二.解决“只能通过Chrome网上应 ...
- 离线Chrome插件安装文件(crx)的安装方法
离线Chrome插件安装文件(crx)的安装方法 一.正常安装方法 1.开发谷歌浏览器,设置->扩展程序 在打开的谷歌浏览器的扩展管理器中用户可以看到一些已经安装程序的Chrome插件,或者一个 ...
- Chrome 插件安装技巧
参考http://blog.csdn.net/shiyaru1314/article/details/49303317 最近在学习WEBAPI 由于没有界面可以调试,需要安装Chrome中的插件 P ...
- 基于jquery的bootstrap在线文本编辑器插件Summernote
Summernote是一个基于jquery的bootstrap超级简单WYSIWYG在线编辑器.Summernote非常的轻量级,大小只有30KB,支持Safari,Chrome,Firefox.Op ...
- 一款基于Bootstrap的js分页插件bootstrap-paginator使用实例
Bootstrap Paginator是一款基于Bootstrap的js分页插件,功能很丰富.它提供了一系列的参数用来支持用户的定制,提供了公共的方法可随时获得插件状态的改变,以及事件来监听用户的动作 ...
- 基于Metronic的Bootstrap开发框架经验总结(5)--Bootstrap文件上传插件File Input的使用
Bootstrap文件上传插件File Input是一个不错的文件上传控件,但是搜索使用到的案例不多,使用的时候,也是一步一个脚印一样摸着石头过河,这个控件在界面呈现上,叫我之前使用过的Uploadi ...
- 超级好用的前端开发测试Chrome插件-基于REST的Web服务客户端
基于REST的Web服务客户端是一款功能强大的谷歌浏览器插件,使用基于REST的Web服务客户端(模拟REST客户端)可以让用户使用谷歌浏览器模拟REST请求来测试REST风格. 基于REST的Web ...
- 基于bootstrap的上传插件fileinput实现ajax异步上传功能(支持多文件上传预览拖拽)
首先需要导入一些js和css文件 ? 1 2 3 4 5 6 <link href="__PUBLIC__/CSS/bootstrap.css" rel="exte ...
随机推荐
- C#编程(十一)----------C#编程规范
C#编程规范 1.要使一个代码块内的代码都同意缩进一个tab键长度 2.有下列情况下建议有换行 方法之间: 局部变量和它后边的语句之间: 方法内的功能逻辑部分之间: 3.{和}要单起一行 4.每行建议 ...
- pytest文档22-fixture详细介绍-作为参数传入,error和failed区别
前言 fixture是pytest的核心功能,也是亮点功能,熟练掌握fixture的使用方法,pytest用起来才会得心应手! fixture简介 fixture的目的是提供一个固定基线,在该基线上测 ...
- IOS tableview 横向滚动
1. UITableView 设置 CGRect tableViewRect = CGRectMake(0.0, 0.0, 50.0, 320.0);self.tableView = [[UITabl ...
- 莫比乌斯函数&莫比乌斯反演
莫比乌斯函数:http://wenku.baidu.com/view/fbec9c63ba1aa8114431d9ac.html Orz PoPoQQQ
- spark调优经验(待续)
spark调优是须要依据业务须要调整的,并非说某个设置是一成不变的,就比方机器学习一样,是在不断的调试中找出当前业务下更优的调优配置.以下零碎的总结了一些我的调优笔记. spark 存储的时候存在严重 ...
- require.js 最佳实践
require.js是一个js库,相关的基础知识,前面转载了两篇博文:Javascript模块化编程(require.js), Javascript模块化工具require.js教程,RequireJ ...
- Tomcat gzip果然强大,js文件压缩率50%以上
Tomcat配置使用gzip,在server.xml中 <Connector port="9098" protocol="HTTP/1.1" connec ...
- Typescript declaration: Merge a class and an interface
参考: https://stackoverflow.com/questions/47670959/typescript-declaration-merge-a-class-and-an-interfa ...
- matlab中,怎样把矩阵中所有的0改为2
一句话搞定:>> a(find(a==0))=[2]:把矩阵中所有的0改为2
- Angular路由与Nodejs路由的区别
转自:http://www.imooc.com/qadetail/114683?t=148182 觉得angualr.js的路由是针对于单页面的路由,每次路由发生变化,只是页面的状态发生变化,页面本身 ...