CentOS7系列--1.2CentOS7基本设置
CentOS7基本设置
1. 查看相关信息
1.1. 查看系统信息
1.1.1. 查看系统位数
方法1:
[root@centos7 ~]# uname -a
Linux centos7.smartmap 3.10.0-514.el7.x86_64 #1 SMP Tue Nov 22 16:42:41 UTC 2016 x86_64 x86_64 x86_64 GNU/Linux
方法2:显示系统程序信息
[root@centos7 ~]# file /bin/ls
/bin/ls: ELF 64-bit LSB executable, x86-64, version 1 (SYSV), dynamically linked (uses shared libs), for GNU/Linux 2.6.32, BuildID[sha1]=3d705971a4c4544545cb78fd890d27bf792af6d4, stripped
方法3:
[root@centos7 ~]# cat /proc/version
Linux version 3.10.0-514.el7.x86_64 (builder@kbuilder.dev.centos.org) (gcc version 4.8.5 20150623 (Red Hat 4.8.5-11) (GCC) ) #1 SMP Tue Nov 22 16:42:41 UTC 2016
方法4:
(32位的系统中int类型和long类型一般都是4字节,64位的系统中int类型还是4字节的,但是long已变成了8字节inux系统中可用"getconf WORD_BIT"和"getconf LONG_BIT"获得word和long的位数。64位系统中应该分别得到32和64。)
[root@centos7 ~]# getconf LONG_BIT
64
1.1.2. 查看系统版本
方法1:
[root@centos7 ~]# lsb_release -a
方法2:
[root@centos7 ~]# cat /etc/os-release
NAME="CentOS Linux"
VERSION="7 (Core)"
ID="centos"
ID_LIKE="rhel fedora"
VERSION_ID="7"
PRETTY_NAME="CentOS Linux 7 (Core)"
ANSI_COLOR="0;31"
CPE_NAME="cpe:/o:centos:centos:7"
HOME_URL="https://www.centos.org/"
BUG_REPORT_URL="https://bugs.centos.org/"
CENTOS_MANTISBT_PROJECT="CentOS-7"
CENTOS_MANTISBT_PROJECT_VERSION="7"
REDHAT_SUPPORT_PRODUCT="centos"
REDHAT_SUPPORT_PRODUCT_VERSION="7"
方法3:
[root@centos7 ~]# cat /etc/redhat-release
CentOS Linux release 7.3.1611 (Core)
方法4:
[root@centos7 ~]# rpm -q centos-release
centos-release-7-3.1611.el7.centos.x86_64
1.1.3. 查看内核版本
方法1:
[root@centos7 ~]# cat /proc/version
Linux version 3.10.0-514.el7.x86_64 (builder@kbuilder.dev.centos.org) (gcc version 4.8.5 20150623 (Red Hat 4.8.5-11) (GCC) ) #1 SMP Tue Nov 22 16:42:41 UTC 2016
方法2:
[root@centos7 ~]# uname -a
Linux centos7.smartmap 3.10.0-514.el7.x86_64 #1 SMP Tue Nov 22 16:42:41 UTC 2016 x86_64 x86_64 x86_64 GNU/Linux
1.1.4. 查看默认语言
方法1:
[root@centos7 ~]# echo $LANG $LANGUAGE
en_US.UTF-8
1.2. 查看主机名
方法1:
[root@centos7 ~]# hostname
centos7.smartmap
方法2:
[root@centos7 ~]# cat /etc/hostname
centos7.smartmap
方法3:
[root@centos7 ~]# hostnamectl
Static hostname: centos7.smartmap
Icon name: computer-vm
Chassis: vm
Machine ID: 7f288507ab404a89bfcfc3030e334c3b
Boot ID: f8a46efd003c4e83bead7cb635cbc21a
Virtualization: vmware
Operating System: CentOS Linux 7 (Core)
CPE OS Name: cpe:/o:centos:centos:7
Kernel: Linux 3.10.0-514.el7.x86_64
Architecture: x86-64
方法4:
[root@centos7 ~]# nmcli general hostname
centos7.smartmap
1.3. 查看IP
/etc/sysconfig/network 说是全局设置,默认里面啥也没有,可以添加全局默认网关
/etc/hostname 用nmtui修改hostname后,主机名保存在这里
/etc/resolv.conf 保存DNS设置,不需要手工改,nmtui里面设置的DNS会出现在这里
/etc/sysconfig/network-scripts/ 连接配置信息 ifcfg 文件
/etc/NetworkManager/system-connections/ VPN、移动宽带、PPPoE连接
方法1:
[root@centos7 ~]# ip addr
1: lo: <LOOPBACK,UP,LOWER_UP> mtu 65536 qdisc noqueue state UNKNOWN qlen 1
link/loopback 00:00:00:00:00:00 brd 00:00:00:00:00:00
inet 127.0.0.1/8 scope host lo
valid_lft forever preferred_lft forever
inet6 ::1/128 scope host
valid_lft forever preferred_lft forever
2: ens33: <BROADCAST,MULTICAST,UP,LOWER_UP> mtu 1500 qdisc pfifo_fast state UP qlen 1000
link/ether 00:0c:29:56:e1:f1 brd ff:ff:ff:ff:ff:ff
inet 192.168.1.101/24 brd 192.168.1.255 scope global dynamic ens33
valid_lft 4765sec preferred_lft 4765sec
inet6 fe80::2eef:6152:a121:4867/64 scope link
valid_lft forever preferred_lft forever
方法2:
[root@centos7 ~]# nmcli
ens33: connected to ens33
"Intel 82545EM Gigabit Ethernet Controller (Copper) (PRO/1000 MT Single Port Adapter)"
ethernet (e1000), 00:0C:29:56:E1:F1, hw, mtu 1500
ip4 default
inet4 192.168.1.101/24
inet6 fe80::2eef:6152:a121:4867/64
lo: unmanaged
loopback (unknown), 00:00:00:00:00:00, sw, mtu 65536
Use "nmcli device show" to get complete information about known devices and
"nmcli connection show" to get an overview on active connection profiles.
Consult nmcli(1) and nmcli-examples(5) manual pages for complete usage details.
1.4. 查看网关
方法1:
[root@centos7 ~]# cat /etc/sysconfig/network
# Created by anaconda
NETWORKING=yes
HOSTNAME=appserver.smartmap.com
方法2:
1.5. 查看路由
方法1:
[root@centos7 ~]# ip route
default via 192.168.1.1 dev ens33 proto static metric 100
192.168.1.0/24 dev ens33 proto kernel scope link src 192.168.1.101 metric 100
方法2:
[root@centos7 ~]# ip route show
default via 192.168.1.1 dev ens33 proto static metric 100
192.168.1.0/24 dev ens33 proto kernel scope link src 192.168.1.101 metric 100
192.168.1.101 dev ens33 proto kernel scope link src 192.168.1.101 metric 100
1.6. 查看DNS
方法1:
[root@centos7 ~]# cat /etc/resolv.conf
# Generated by NetworkManager
search smartmap
nameserver 218.30.19.50
nameserver 61.134.1.5
2. 修改主机名
方法1:
[root@centos7 ~]# hostnamectl set-hostname appserver.smartmap
[root@centos7 ~]# hostname
appserver.smartmap
[root@centos7 ~]# cat /etc/hostname
192.168.1.110 appserver appserver.smartmap.com
方法2:
[root@centos7 ~]# nmcli general hostname centos7.smartmap
[root@centos7 ~]# hostname
centos7.smartmap
3. 修改IP
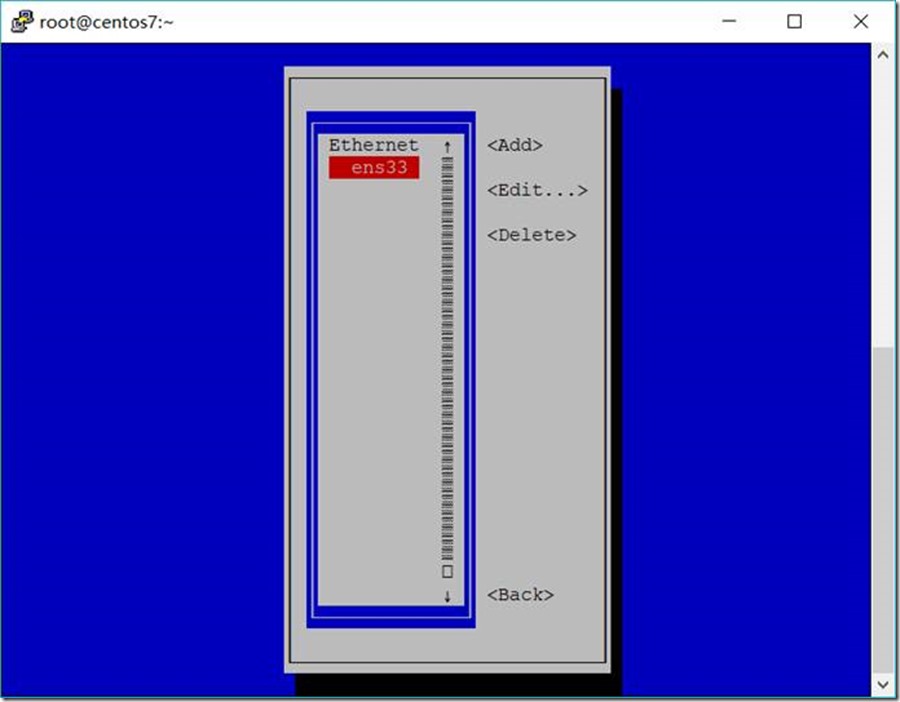
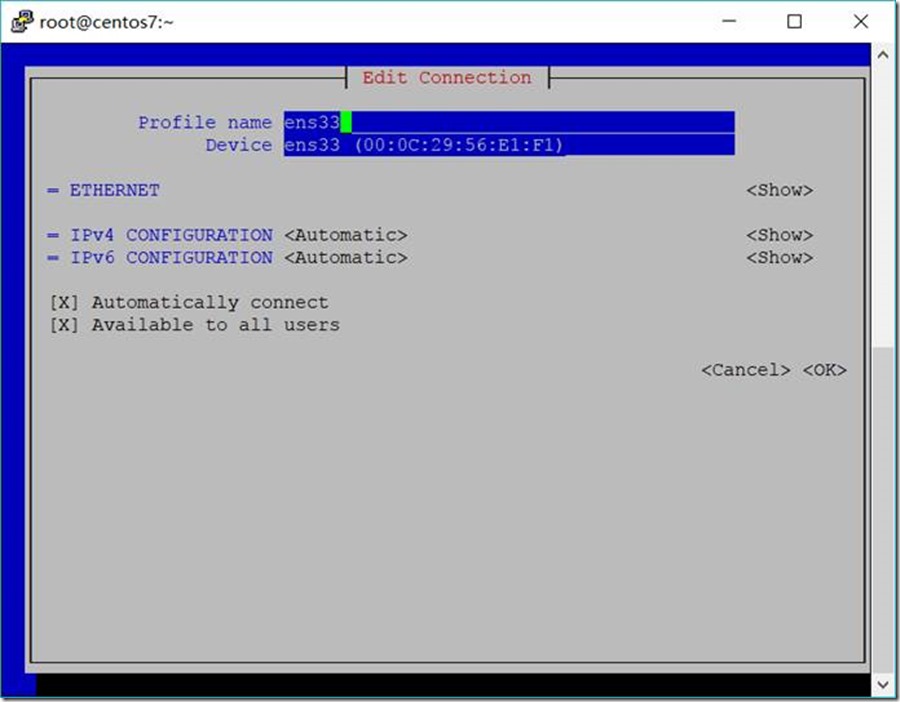
3.1. 应用nmtui的字符界面修改IP:
[root@centos7 ~]# nmtui


3.2. 应用nmcli的命令修改IP:
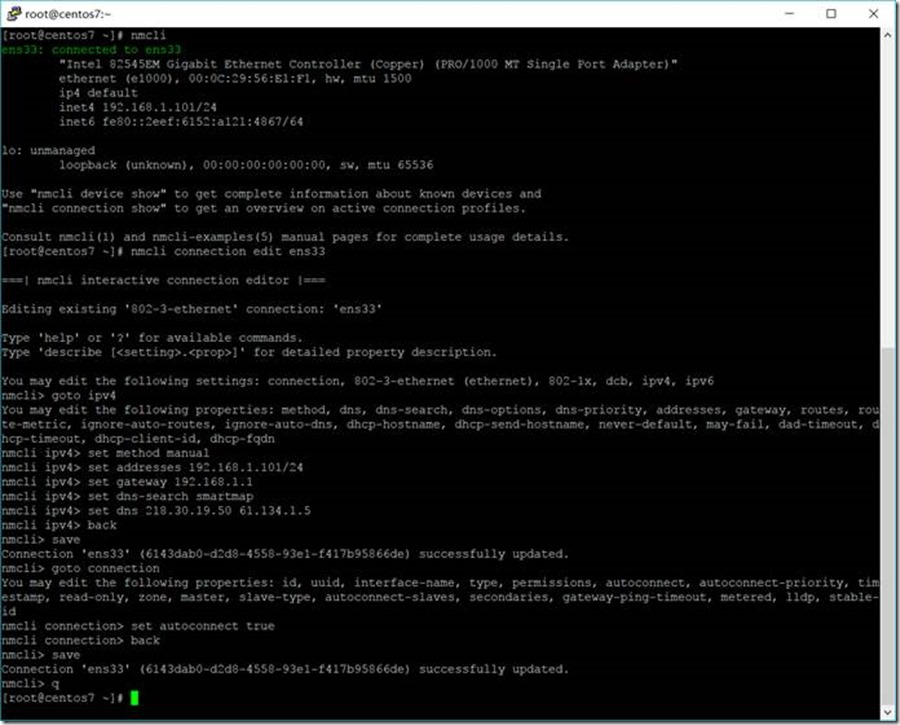
[root@centos7 ~]# nmcli
ens33: connected to ens33
"Intel 82545EM Gigabit Ethernet Controller (Copper) (PRO/1000 MT Single Port Adapter)"
ethernet (e1000), 00:0C:29:56:E1:F1, hw, mtu 1500
ip4 default
inet4 192.168.1.101/24
inet6 fe80::2eef:6152:a121:4867/64
lo: unmanaged
loopback (unknown), 00:00:00:00:00:00, sw, mtu 65536
Use "nmcli device show" to get complete information about known devices and
"nmcli connection show" to get an overview on active connection profiles.
Consult nmcli(1) and nmcli-examples(5) manual pages for complete usage details.
[root@centos7 ~]# nmcli connection edit ens33
===| nmcli interactive connection editor |===
Editing existing '802-3-ethernet' connection: 'ens33'
Type 'help' or '?' for available commands.
Type 'describe [<setting>.<prop>]' for detailed property description.
You may edit the following settings: connection, 802-3-ethernet (ethernet), 802-1x, dcb, ipv4, ipv6
nmcli> goto ipv4
You may edit the following properties: method, dns, dns-search, dns-options, dns-priority, addresses, gateway, routes, route-metric, ignore-auto-routes, ignore-auto-dns, dhcp-hostname, dhcp-send-hostname, never-default, may-fail, dad-timeout, dhcp-timeout, dhcp-client-id, dhcp-fqdn
nmcli ipv4> set method manual
nmcli ipv4> set addresses 192.168.1.101/24
nmcli ipv4> set gateway 192.168.1.1
nmcli ipv4> set dns-search smartmap
nmcli ipv4> set dns 218.30.19.50 61.134.1.5
nmcli ipv4> back
nmcli> save
Connection 'ens33' (6143dab0-d2d8-4558-93e1-f417b95866de) successfully updated.
nmcli> goto connection
You may edit the following properties: id, uuid, interface-name, type, permissions, autoconnect, autoconnect-priority, timestamp, read-only, zone, master, slave-type, autoconnect-slaves, secondaries, gateway-ping-timeout, metered, lldp, stable-id
nmcli connection> set autoconnect true
nmcli connection> back
nmcli> save
Connection 'ens33' (6143dab0-d2d8-4558-93e1-f417b95866de) successfully updated.
nmcli> q
查看修改结果
[root@centos7 ~]# cat /etc/sysconfig/network-scripts/ifcfg-ens33
TYPE=Ethernet
BOOTPROTO=none
DEFROUTE=yes
IPV4_FAILURE_FATAL=no
IPV6INIT=yes
IPV6_AUTOCONF=yes
IPV6_DEFROUTE=yes
IPV6_FAILURE_FATAL=no
IPV6_ADDR_GEN_MODE=stable-privacy
NAME=ens33
UUID=6143dab0-d2d8-4558-93e1-f417b95866de
DEVICE=ens33
ONBOOT=yes
DNS1=218.30.19.50
DNS2=61.134.1.5
DOMAIN=smartmap
IPADDR1=192.168.1.101
PREFIX1=32
IPADDR=192.168.1.101
PREFIX=24
GATEWAY=192.168.1.1
IPV6_PEERDNS=yes
IPV6_PEERROUTES=yes
IPV6_PRIVACY=no
4. 重启网卡
[root@centos7 ~]# systemctl restart network.service
5. 关闭selinux
[root@centos7 ~]# getenforce
Disabled
[root@centos7 ~]# vi /etc/sysconfig/selinux
修改SELINUX=enforcing为SELINUX=disabled
# This file controls the state of SELinux on the system.
# SELINUX= can take one of these three values:
# enforcing - SELinux security policy is enforced.
# permissive - SELinux prints warnings instead of enforcing.
# disabled - No SELinux policy is loaded.
SELINUX=disabled
# SELINUXTYPE= can take one of three two values:
# targeted - Targeted processes are protected,
# minimum - Modification of targeted policy. Only selected processes are protected.
# mls - Multi Level Security protection.
SELINUXTYPE=targeted
6. 关闭firewall
[root@centos7 ~]# systemctl status firewalld
● firewalld.service - firewalld - dynamic firewall daemon
Loaded: loaded (/usr/lib/systemd/system/firewalld.service; disabled; vendor preset: enabled)
Active: inactive (dead)
Docs: man:firewalld(1)
[root@centos7 ~]# systemctl stop firewalld.service
[root@centos7 ~]# systemctl disable firewalld.service
Removed symlink /etc/systemd/system/dbus-org.fedoraproject.FirewallD1.service.
Removed symlink /etc/systemd/system/basic.target.wants/firewalld.service.
[root@centos7 ~]# reboot
7. 系统更新
[root@centos7 ~]# yum -y update
参考: http://www.cnblogs.com/panblack/p/Centos7-WhatsNew-02-networking.html
CentOS7系列--1.2CentOS7基本设置的更多相关文章
- CentOS7系列--5.2CentOS7中配置和管理Docker
CentOS7配置和管理Docker Docker是操作系统级别的虚拟化工具,它能自动化布署在容器中的应用 1. 安装Docker 1.1. 安装Docker相关软件 [root@server1 ~] ...
- CentOS7系列--3.2CentOS7中配置iSCSI服务
CentOS7配置iSCSI服务 在网络上的存贮服务为iSCSI Target,而连接到iSCSI Target服务的叫iSCSI Initiator 1. 直接配置iSCSI Target服务 1. ...
- CentOS7系列--2.2CentOS7中配置SSH服务
CentOS7配置SSH服务 1. SSH配置 1.1. 使用SSH服务更加安全 [root@centos7 ~]# vi /etc/ssh/sshd_config 设置如下 PermitRootLo ...
- Android Studio系列教程二--基本设置与运行
Android Studio系列教程二--基本设置与运行 2014 年 11 月 28 日 DevTools 本文为个人原创,欢迎转载,但请务必在明显位置注明出处! 上面一篇博客,介绍了Studio的 ...
- CentOS7系列--安装Chrome浏览器
CentOS7系列--安装Chrome浏览器 1. 创建yum源文件 [root@server20 ~]# cd /etc/yum.repos.d/ [root@server20 yum.repos. ...
- cobbler部署centos6与centos7系列
cobbler部署centos6与centos7系列 转载自:http://www.jianshu.com/p/a4bed77bf40d 版权声明:完全抄自 http://www.jianshu.co ...
- 阿里云CentOS7系列三 -- 配置防火墙
前面讲到了安装JDK以及Tomcat.但是大家会发现,当我们访问 http:// XXX.XXX.XXX.XXX:8080/80 时候,tomcat 猫并没有出现.原因就是没有设置防火墙. 再次介绍下 ...
- 阿里云CentOS7系列二 -- 安装Tomcat7的方法
前面讲到了JDK在CentOS7 环境下的安装步骤.这次来分享安装Tomcat7的安装步骤: Tomcat7 安装包: 链接: http://pan.baidu.com/s/1geKwASN 密码: ...
- centos7系列Cobbler+kickstart全自动装机实战
配置yum源,以及epel源 [root@crobbler-90111 ~]# cat /etc/yum.repos.d/aliyun.repo [epel] name=ailiyun baseurl ...
随机推荐
- Ubuntu软件更新时出错问题解决
apt-get instal update 提示:错误,无法解析域名等等之类的 网上解决办法一大堆,先别急着用网上的方法,来检查检查系统是否有网络连接 网络图标显示网络连接,等等,别被表面迷惑了,命令 ...
- [WiX]Component Rules 101
原文:http://robmensching.com/blog/posts/2003/10/18/component-rules-101 I've been debating with myself ...
- (转)Python中集合(set)的基本操作以及一些常见的用法
原文:http://blog.51cto.com/10616534/1944841 Python除了List.Tuple.Dict等常用数据类型外,还有一种数据类型叫做集合(set),集合的最大特点是 ...
- sublime text3在交互时解决input()函数无法使用的问题
1,打开sublime text3工具栏,依次点击View->Show Console菜单打开命令行, 2,在命令行里 输入代码 import urllib.request,o ...
- 运维甩锅神器---Jumpserver
简介jumpserver 也就是跳板机,堡垒机,主要用于免密钥登陆web终端,可以对所有操作进行记录,录像!对所有服务器进行资产管理, 给开发人员分配登陆主机的权限和sudo权限,为运维人员省了很多手 ...
- springboot-23-aspectj日志记录及threadlocal内存泄漏
对于请求参数的处理和响应, 如果在代码中体现日志会显得很繁琐, 普遍的解决方案是使用spring的切面方案去解决. 这儿使用的是springboot的切面: http://www.cnblogs.co ...
- Ceph 存储集群 - 搭建存储集群
目录 一.准备机器 二.ceph节点安装 三.搭建集群 四.扩展集群(扩容) 一.准备机器 本文描述如何在 CentOS 7 下搭建 Ceph 存储集群(STORAGE CLUSTER). 一共4 ...
- nodeJs的npm报错问题
1. Failed at the phantomjs-prebuilt@2.1.14 install script 'node install.js'. 解决办法: npm install phant ...
- 任务三十七:UI组件之浮出层
任务三十七:UI组件之浮出层 面向人群: 有一定JavaScript基础 难度: 低 重要说明 百度前端技术学院的课程任务是由百度前端工程师专为对前端不同掌握程度的同学设计.我们尽力保证课程内容的质量 ...
- C/C++ 类型内存占用详解
最近做一些面试题目碰到了很多次考察C/C++类型内存占用的题目,主要考察队C/C++的指针.类型等的熟悉程度. 本blog为了方面大家参考,总结了常见的类型内存占用的情况,能力所限,若有问题,请指出! ...