DIV+CSS实战(三)
一、说明
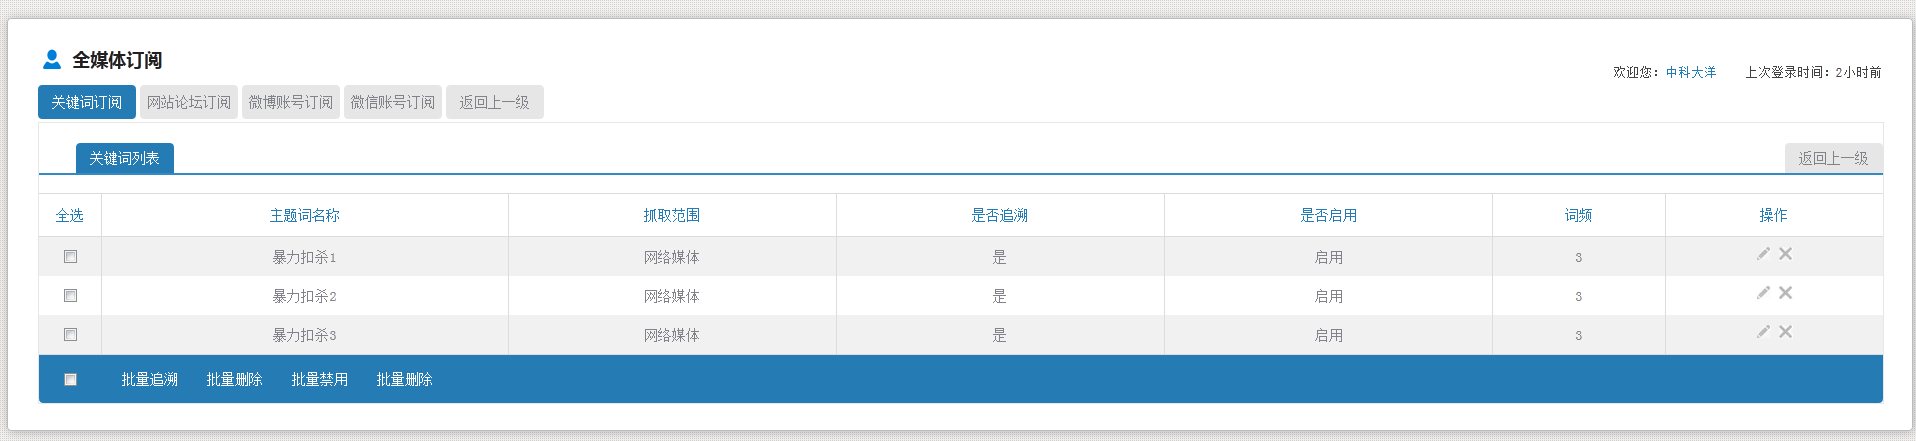
在上篇博客《DIV+CSS实战(二)》中,实现了头部以及Tab标签卡,下面开始实现内容区域,要实现的效果如下:

二、内容最外层的设计(边框)
给最外层加边框,并且设置高度随着里面的内容自动增加
CSS样式
 .divContent{

     width: 100%;

     float: left;

     margin-top: 3px;

     border: 1px solid #e8e7e7;

     padding-top: 20px;

     height: auto;

 }
三、内容里面的Tab标签
jsp设计
 <div id="keyadd" class="keyaddClass ">

     <a href="关键词列表" class="tab">关键词列表</a>

     <a href="返回上一级">返回上一级</a>

 </div>
CSS设计
 .keyaddClass{

     border-bottom: 2px solid #348bc4;

     margin-bottom: 15px;

     width: 98%;

         float: left;

     padding-left: 2%;

 }

 .keyaddClass a{

     color: #818389;

     text-decoration: none;

     height: 30px;

     line-height: 30px;

     font-size: 14px;

     float: left;

     border-radius:4px 4px 0px 0px;

     width: 98px;

     text-align: center;

     background-color: #257CB5;

     color: white;

 }

 .keyaddClass a:last-child{

     float: right;

     background-color:#E6E6E6;

     color:#818389;

 }
效果图:

四、内容里表格的设计
由刚开始的图片可以看出,表格需要实现各行换色功能,该功能后期会在JS中实现。还有,这里先虚拟几个数据,真正的项目中,都是用循环动态生成的,例如<c:foreach>等标签
JSP设计
 <div class="divContent1">

    <table>

      <tr>

         <th>全选</th>

         <th>主题词名称</th>

         <th>抓取范围</th>

         <th>是否追溯</th>

         <th>是否启用</th>

         <th>词频</th>

         <th>操作</th>

     </tr>

     <tr>

       <td><input type="checkbox"></td>

       <td>暴力扣杀1</td>

       <td>网络媒体</td>

       <td>是</td>

       <td>启用</td>

       <td>3</td>

       <td>

           <a  href=""><img src="data:images/yq/key/paint.png" alt="修改" title="修改" ></a>

           <a ><img src="data:images/yq/key/cancle.png" alt="删除" title="删除"></a>

       </td>

     </tr>

     <tr>

       <td><input type="checkbox"></td>

       <td>暴力扣杀2</td>

       <td>网络媒体</td>

       <td>是</td>

       <td>启用</td>

       <td>3</td>

       <td>

          <a  href=""><img src="data:images/yq/key/paint.png" alt="修改" title="修改" ></a>

          <a ><img src="data:images/yq/key/cancle.png" alt="删除" title="删除"></a>

       </td>

    </tr>

    <tr>

       <td><input type="checkbox"></td>

       <td>暴力扣杀3</td>

       <td>网络媒体</td>

       <td>是</td>

       <td>启用</td>

       <td>3</td>

       <td>

         <a  href=""><img src="data:images/yq/key/paint.png" alt="修改" title="修改" ></a>

         <a ><img src="data:images/yq/key/cancle.png" alt="删除" title="删除"></a>

       </td>

    </tr>

  </table>

</div>
CSS设计
         .divContent1{

             width: 100%;

             float: left;

             overflow: hidden;

             margin-top: 3px;

         }

         .divContent1 table{

             float: left;

             width: 100%;

             /*如果不设置的话,设置td的边框的时候,会用间隔*/

             border-collapse: collapse;

             border-spacing:;

             text-align: center;

         }

         .divContent1 table th{

             height:40px;

             line-height:40px;

             font-size:14px;

             color:#257bb4;

             font-weight:normal;

             border-top:1px solid #dcdcdc;

             border-right: 1px solid #dcdcdc;

             border-bottom: 1px solid #dcdcdc;

         }

         /*最后一个和最外层的边框重复了,所以去掉*/

         .divContent1 table th:last-child{

             border-right: 0px solid #dcdcdc;

         }

         .divContent1 table td{

             height:37px;

             line-height:37px;

             font-size:14px;

             border-right: 1px solid #dcdcdc;

         }

         /*最后一个和最外层的边框重复了,所以去掉*/

         .divContent1 table td:last-child{

             border-right: 0px solid #dcdcdc;

         }

         /*最后一行底部添加边框*/

         .divContent1 table tr:last-child td{

             border-bottom:1px solid #dcdcdc;

         }

         /*隔行换色*/

         .journalBg {

             background: none repeat scroll 0 0 #f1f1f1;

         }
效果图:

五、内容里批量操作的设计
JSP设计
 <div class="footOperation">

      <table>

          <tr>

             <td><input type="checkbox"></td>

             <td>

                 <a href="">批量追溯</a>

                 <a href="">批量删除</a>

                 <a href="">批量禁用</a>

                 <a href="">批量删除</a>

             </td>

          </tr>

      </table>

 </div>
CSS设计
         .footOperation{

             background: none repeat scroll 0 0 #257cb5;

             height: 48px;

             overflow: hidden;

             width: 100%;

             float: left;

             border-radius:0px 0px 4px 4px;

         }

         .footOperation table {

             width: 100%;

             float: left;

             text-align: left;

             border-collapse: collapse;

             border-spacing:;

         }

         /*为了使批量操作里的复选框和表格里的复选框对其,所以设置他们所在的td的宽度一样*/

         .divContent1 table td:first-child{

             width: 60px;

         }

         /*上面的设置了边框,这个没有设置,所以减一*/

         .footOperation table  td:first-child{

             text-align: center;

             width: 59px;

             height:48px;

             line-height: 48px;

         }

         .footOperation table  td:last-child{

             padding-left: 10px;

         }

         .footOperation table a{

             font-size:14px;

             width:80px;

             height:30px;

             line-height:30px;

             color:white;

             text-decoration: none;

             margin-right: 5px;

             float: left;

             text-align: center;

         }

         /*鼠标经过时变色*/

         .footOperation table a:HOVER{

              background-color:#EAF3E2;

              /*背景椭圆色*/

              border-radius:10px 10px 10px 10px;

              color: #257bb4;

         }
效果图:

六、整体设计
JSP代码
<body>
<form action="" >
<div class="jc-demo-box">
<div class="divHeader">
<h1 class="headerH1">全媒体订阅</h1>
<div class="f_r">
<p>
欢迎您:<span class="color2">中科大洋</span> 上次登录时间:2小时前
</p>
</div>
</div>
<div class="divTab">
<a href="" class="tabin">关键词订阅</a>
<a href="" class="">网站论坛订阅</a>
<a href="" class="">微博账号订阅</a>
<a href="" class="">微信账号订阅</a>
<a href="" class="">返回上一级</a>
</div>
<div class="divContent">
<div id="keyadd" class="keyaddClass ">
<a href="关键词列表" class="tab">关键词列表</a>
<a href="返回上一级">返回上一级</a>
</div>
<div class="divContent1">
<table>
<tr>
<th>全选</th>
<th>主题词名称</th>
<th>抓取范围</th>
<th>是否追溯</th>
<th>是否启用</th>
<th>词频</th>
<th>操作</th>
</tr>
<tr>
<td><input type="checkbox"></td>
<td>暴力扣杀1</td>
<td>网络媒体</td>
<td>是</td>
<td>启用</td>
<td>3</td>
<td>
<a href=""><img src="data:images/yq/key/paint.png" alt="修改" title="修改" ></a>
<a ><img src="data:images/yq/key/cancle.png" alt="删除" title="删除"></a>
</td>
</tr>
<tr>
<td><input type="checkbox"></td>
<td>暴力扣杀2</td>
<td>网络媒体</td>
<td>是</td>
<td>启用</td>
<td>3</td>
<td>
<a href=""><img src="data:images/yq/key/paint.png" alt="修改" title="修改" ></a>
<a ><img src="data:images/yq/key/cancle.png" alt="删除" title="删除"></a>
</td>
</tr>
<tr>
<td><input type="checkbox"></td>
<td>暴力扣杀3</td>
<td>网络媒体</td>
<td>是</td>
<td>启用</td>
<td>3</td>
<td>
<a href=""><img src="data:images/yq/key/paint.png" alt="修改" title="修改" ></a>
<a ><img src="data:images/yq/key/cancle.png" alt="删除" title="删除"></a>
</td>
</tr>
</table>
</div> <div class="footOperation">
<table>
<tr>
<td><input type="checkbox"></td>
<td>
<a href="">批量追溯</a>
<a href="">批量删除</a>
<a href="">批量禁用</a>
<a href="">批量删除</a>
</td>
</tr>
</table>
</div>
</div>
<div style="clear:both;height:1px;width:100%; overflow:hidden; margin-top:-1px;"></div>
</div> </form>
</body>
CSS设计
     <style type="text/css">

         /*给body添加特效,背景色,padding margin等以及body内的字体样式,*/

         body{

             background:url(images/yq/key/body_bj.gif) repeat 0 0;

             margin: 0px;

             padding: 0px;

             color: #818389;

             font: 13px "宋体",Arial,Helvetica,sans-serif;

         }

         .jc-demo-box{

              width:96%;

              text-align: left;

                margin: 2em auto;

                background: white;

                border: 1px #bbb solid;

                /*DIV设置圆角特效,IE下不支持*/

              -webkit-border-radius: 4px;

              -moz-border-radius: 4px;

              border-radius: 4px;

              /*DIV设置发光特效*/

              -webkit-box-shadow: 1px 1px 10px rgba(0, 0, 0, 0.25);

              -moz-box-shadow: 1px 1px 10px rgba(0, 0, 0, 0.25);

              box-shadow: 1px 1px 10px rgba(0, 0, 0, 0.25);

              padding: 25px 30px;

              /*设置高度自动适应*/

              height: auto;

              min-width: 846px;

         }

         .divHeader{

             height: 28px;

             margin-bottom: 13px;

             width:100%;

         }

         .divHeader h1{

             color: #212121;

             float: left;

             font-family: "微软雅黑";

             font-size: 18px;

             height: 28px;

             line-height: 28px;

             padding-left: 34px;

         }

         .divHeader .headerH1{

             background: url("images/yq/key/blue_user.png") no-repeat 5px 5px;

         }

         .divHeader .f_r{

             color: #434343;

             height:30px;

             line-height: 30px;

             float: right;

         }

         .divHeader .f_r .color2{

             color: #257bb4;

         }

         .divTab{

             height: 34px;

             width:100%;

             float: left;

         }

         .divTab a{

             background-color:#E6E6E6;

             height:34px;

             /*设置行高,以使文字垂直居中*/

             line-height:34px;

             width:98px;

             float:left;

             margin-right:4px;

             border-radius:4px;

             color: #818389;

             font-size:14px;

             text-align:center;

             text-decoration: none;

         }

         /*选中的时候*/

         .divTab .tabin{

             background-color: #257CB5;

             color: white;

         }

         .divContent{

             width: 100%;

             float: left;

             margin-top: 3px;

             border: 1px solid #e8e7e7;

             padding-top: 20px;

             height: auto;

         }

         .keyaddClass{

             border-bottom: 2px solid #348bc4;

             margin-bottom: 15px;

             width: 98%;

             float: left;

             padding-left: 2%;

         }

         .keyaddClass a{

             color: #818389;

             text-decoration: none;

             height: 30px;

             line-height: 30px;

                font-size: 14px;

                float: left;

                border-radius:4px 4px 0px 0px;

                width: 98px;

                text-align: center;

                background-color: #257CB5;

             color: white;

         }

         .keyaddClass a:last-child{

                float: right;

                background-color:#E6E6E6;

                color:#818389;

         }

         .divContent1{

             width: 100%;

             float: left;

             overflow: hidden;

             margin-top: 3px;

         }

         .divContent1 table{

             float: left;

             width: 100%;

             /*如果不设置的话,设置td的边框的时候,会用间隔*/

             border-collapse: collapse;

             border-spacing:;

             text-align: center;

         }

         .divContent1 table th{

             height:40px;

             line-height:40px;

             font-size:14px;

             color:#257bb4;

             font-weight:normal;

             border-top:1px solid #dcdcdc;

             border-right: 1px solid #dcdcdc;

             border-bottom: 1px solid #dcdcdc;

         }

         /*最后一个和最外层的边框重复了,所以去掉*/

         .divContent1 table th:last-child{

             border-right: 0px solid #dcdcdc;

         }

         .divContent1 table td{

             height:37px;

             line-height:37px;

             font-size:14px;

             border-right: 1px solid #dcdcdc;

         }

         /*最后一个和最外层的边框重复了,所以去掉*/

         .divContent1 table td:last-child{

             border-right: 0px solid #dcdcdc;

         }

         /*最后一行底部添加边框*/

         .divContent1 table tr:last-child td{

             border-bottom:1px solid #dcdcdc;

         }

         /*隔行换色*/

         .journalBg {

             background: none repeat scroll 0 0 #f1f1f1;

         }

         .footOperation{

             background: none repeat scroll 0 0 #257cb5;

             height: 48px;

             overflow: hidden;

             width: 100%;

             float: left;

             border-radius:0px 0px 4px 4px;

         }

         .footOperation table {

             width: 100%;

             float: left;

             text-align: left;

             border-collapse: collapse;

             border-spacing:;

         }

         /*为了使批量操作里的复选框和表格里的复选框对其,所以设置他们所在的td的宽度一样*/

         .divContent1 table td:first-child{

             width: 60px;

         }

         /*上面的设置了边框,这个没有设置,所以减一*/

         .footOperation table  td:first-child{

             text-align: center;

             width: 59px;

             height:48px;

             line-height: 48px;

         }

         .footOperation table  td:last-child{

             padding-left: 10px;

         }

         .footOperation table a{

             font-size:14px;

             width:80px;

             height:30px;

             line-height:30px;

             color:white;

             text-decoration: none;

             margin-right: 5px;

             float: left;

             text-align: center;

         }

         /*鼠标经过时变色*/

         .footOperation table a:HOVER{

              background-color:#EAF3E2;

              /*背景椭圆色*/

              border-radius:10px 10px 10px 10px;

              color: #257bb4;

         }

     </style>
效果图:
DIV+CSS实战(三)的更多相关文章
- DIV+CSS实战(二)
一.说明 在DIV+CSS实战(一)中,已经把框架搭建起来了,现在就需要往框架里面添加内容了.需要实现的内容如下图: 二.头部的设计(全媒体订阅) 左侧是一张图片+标题 ,右侧是登录名 和上次登录的时 ...
- DIV+CSS实战(四)
一.说明 在上篇博文<DIV+CSS(三)>中,一个页面基本上展示出来了!下面实现以下页面上的一些功能,比方批量删除等功能.这里以批量删除为例,批量禁止,批量启用和批量删除差不多,只不过一 ...
- DIV+CSS实战(一)
一.说明 作为一个后台的程序员,我也是很少写前端,最近有一个项目,前端主要是由我来负责,就把我在项目中所学到的东西,记录下来!我的页面要嵌入到另一个系统中,所以,并不是按照传统的top,left,co ...
- DIV+CSS实战(五)
一.说明 前面实现了关键词订阅模块,现在实现站点订阅模块,主要实现的是站点添加界面.站点添加界面里面实现一个提示框不在提示的功能(保存到cookie中),还有就是实现一个站点的选择框,包括输入文字自动 ...
- 2天驾驭DIV+CSS (实战篇)(转)
这是去年看到的一片文章,感觉在我的学习中,有不少的影响.于是把它分享给想很快了解css的兄弟们.本文是实战篇. 基础篇[知识一] “DIV+CSS” 的叫法是不准确的[知识二] “DIV+CSS” ...
- DIV+CSS布局问题:一个宽度不确定的DIV里面放三个水平对齐的DIV,左右两个DIV宽度固定为150px,中间那个DIV充满剩余的宽度
一个入门的DIV+CSS布局问题:一个宽度不确定的DIV里面放三个水平对齐的DIV,左右两个DIV宽度固定为150px,中间那个DIV充满剩余的宽度. 说明:代码非真实情况下使用,所以直接简单. 没耐 ...
- HTML的三种布局:DIV+CSS、FLEX、GRID
Div+css布局 也就是盒子模型,有W3C盒子模型,IE盒子模型.盒子模型由四部分组成margin.border.padding.content. 怎么区别这两种模型呢,区别在于w3c中的width ...
- 【学习DIV+CSS】1. 你必须知道的三个知识
1. DIV+CSS的叫法不够严谨 我们以前做页面布局的时候大多是用Table,很多人称之为“Table+CSS”,而现在比较流行的是DIV布局,所以称之为“DIV+CSS”.听起来是挺合理的,岂不知 ...
- 第6天:DIV+CSS页面布局实战
今天我从早上9:00写代码一直写到下午18:00,写的我差点抑郁了,还好最后终于写出了一个完整页面,没有做动画效果,就是练习了一下DIV+CSS布局,做的是福务达(www.zzfwd.cn)的主页,真 ...
随机推荐
- Java对字符串使用MD5进行加密(亲测有效)
转自:https://blog.csdn.net/jay314159/article/details/4918358 前言: MD5即Message-Digest Algorithm 5(信息-摘要算 ...
- git创建仓库,并提交代码(第一次创建并提交)(转)
一直想学GIT,一直不曾学会.主要是GUI界面的很少,命令行大多记不住.今天尝试提交代码,按GIT上给的方法,没料到既然提交成功了. 于是把它记下来,方便以后学习. 代码是学习用的,没多大意义: 下图 ...
- cobbler之ks文件编辑
kickstart文件的组成部分: 命令段:用于配置系统 软件包:指定要安装的程序包及程序包组 %packages 标识 @Base:使用@指定包组 lftp:直接写程序包名 注 ...
- unity Object-c交互
一.unity 调用 Object-c C/C++可以直接与Object-c交互,只要把文件后缀.m直接改成.mm,成为C/C++与Object-c混编文件.C#又可以调用C/C++方法,所以C#就是 ...
- unity 返回子对象组件
Component[] GetComponentsInChildren(Type t, bool includeInactive = false); //includeInactive: 是否查找非激 ...
- 趣味编程:FizzBuzz(Kotlin版)
fun toFizzBuzzIf(n: Int) = if (n % 3 == 0 && n % 5 == 0) "FizzBuzz" else if (n % 3 ...
- 检测到有潜在危险的 Request.Form 值——ValidateRequest的使用
1.aspx中 在 Web 应用程序中,要阻止依赖于恶意输入字符串的黑客攻击,约束和验证用户输入是必不可少的.跨站点脚本攻击就是此类攻击的一个示例. 当请求验证检测到潜在的恶意客户端输入时,会引发此异 ...
- python之信号量【Semaphore】
# 互斥锁同时只允许一个线程更改数据,而Semaphore是同时允许一定数量的线程更改数据,比如 # 一个厕所有3个坑,那么最多只允许3个人上厕所,后面的人只能等里面有人出来了才能再进去 import ...
- 把System.Drawing.Image对象img,在页面的Image控件上显示出来
1.保存到本地,然后调用. //定义文件名 string iname = DateTime.Now.ToString("yyMMddhhmmss"); //保存到服务器,b是 ...
- 【Spring】Spring boot多数据源历险记
一.问题描述 笔者根据需求在开发过程中,需要在原项目的基础上(单数据源),新增一个数据源C,根据C数据源来实现业务.至于为什么不新建一个项目,大概是因为这只是个小功能,访问量不大,不需要单独申请个服务 ...