AQS底层原理分析
J.U.C 简介
Lock
Lock 简介
Lock 的实现
Lock 的类关系图
Lock 有很多的锁的实现,但是直观的实现是 ReentrantLock 重入锁
 |
 void lock() // 如果锁可用就获得锁,如果锁不可用就阻塞直到锁释放
void lockInterruptibly() // 和lock()方法相似, 但阻塞的线程 可 中 断 , 抛 出java.lang.InterruptedException 异常
boolean tryLock() // 非阻塞获取锁;尝试获取锁,如果成功返回 true
boolean tryLock(longtimeout, TimeUnit timeUnit)//带有超时时间的获
取锁方法
void unlock() // 释放锁
|
ReentrantLock 重入锁
重入锁的设计目的
public class ReentrantDemo{

  public synchronized void demo(){

    System.out.println("begin:demo");

    demo2();

  }

  public void demo2(){

    System.out.println("begin:demo1");

    synchronized (this){

    }

  }

  public static void main(String[] args) {

    ReentrantDemo rd=new ReentrantDemo();

    new Thread(rd::demo).start();

}

}
public class AtomicDemo {

  private static int count=0;

  static Lock lock=new ReentrantLock();

  public static void inc(){

    lock.lock();

    try {

      Thread.sleep(1);

    } catch (InterruptedException e) {

      e.printStackTrace();

    }

    count++;

    lock.unlock();

  }

  public static void main(String[] args) throws InterruptedException {

    for(int i=0;i<1000;i++){

      new Thread(()->{AtomicDemo.inc();}).start();;

    }

    Thread.sleep(3000);System.out.println("result:"+count);

  }

}
ReentrantReadWriteLock
public class LockDemo {

  static Map<String,Object> cacheMap=new HashMap<>();

  static ReentrantReadWriteLock rwl=new ReentrantReadWriteLock();

  static Lock read=rwl.readLock();

  static Lock write=rwl.writeLock();

  public static final Object get(String key) {

    System.out.println("开始读取数据");

    read.lock(); //读锁

    try {

      return cacheMap.get(key);
    }finally {

      read.unlock();

    }

  }

  public static final Object put(String key,Object value){

    write.lock();

    System.out.println("开始写数据");

    try{

      return cacheMap.put(key,value);

    }finally {

      write.unlock();

    }

  }

}
ReentrantLock 的实现原理
AQS 是什么
AQS 的内部实现
 static final class Node {

      static final Node SHARED = new Node();

      static final Node EXCLUSIVE = null;

      static final int CANCELLED =  1;

      static final int SIGNAL    = -1;

      static final int CONDITION = -2;

      static final int PROPAGATE = -3;

    volatile int waitStatus;

      volatile Node prev;//前驱节点

      volatile Node next;//后驱节点

      volatile Thread thread;//当前线程

      Node nextWaiter;//存储在condition 队列中的后继节点

      final boolean isShared() {//是否为共享锁

            return nextWaiter == SHARED;

      }

      final Node predecessor() throws NullPointerException {

            Node p = prev;

            if (p == null)

                throw new NullPointerException();

            else

                return p;

      }

      Node() {    // Used to establish initial head or SHARED marker

      }

      Node(Thread thread, Node mode) {     // Used by addWaiter 将线程构造一个节点,添加队列

            this.nextWaiter = mode;

            this.thread = thread;

      }

      Node(Thread thread, int waitStatus) { // Used by Condition

            this.waitStatus = waitStatus;

            this.thread = thread;

      }

    }
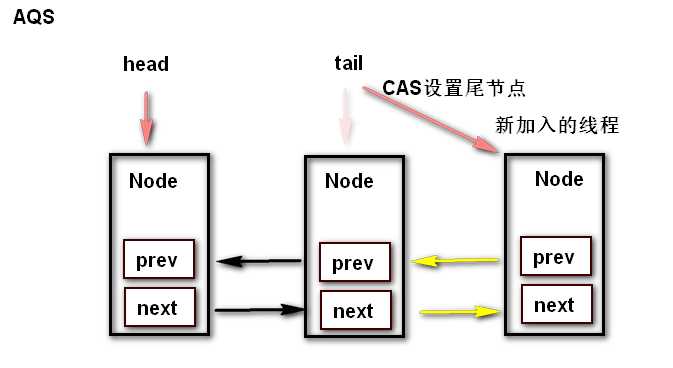
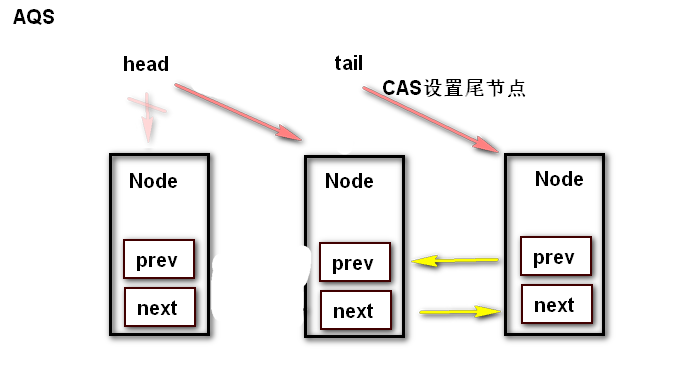
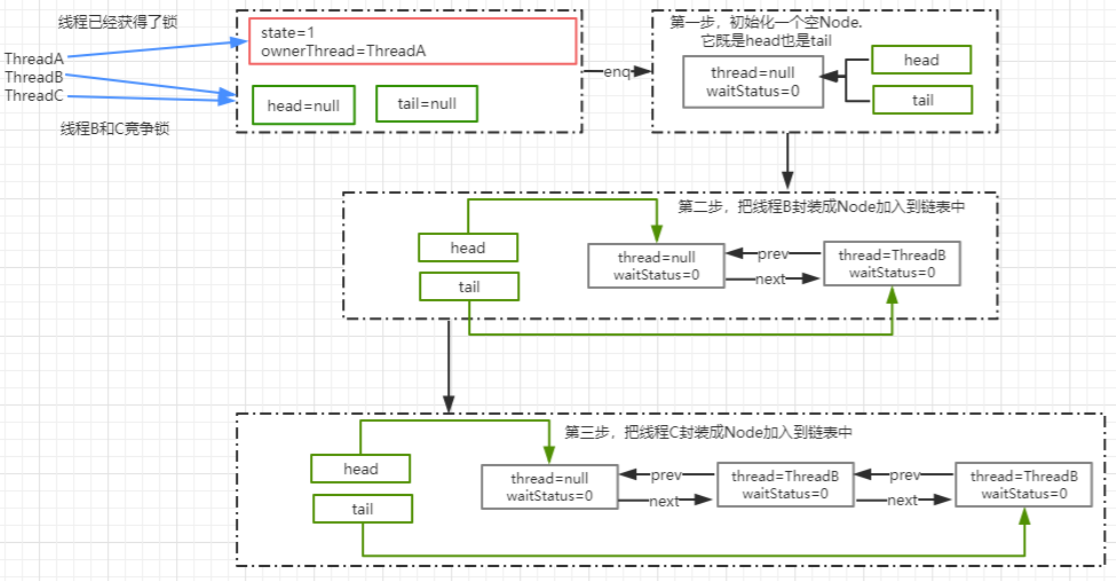
释放锁以及添加线程对于队列的变化
ReentrantLock 的源码分析
ReentrantLock 的时序图
调用 ReentrantLock 中的 lock()方法,源码的调用过程我使用了时序图来展现。
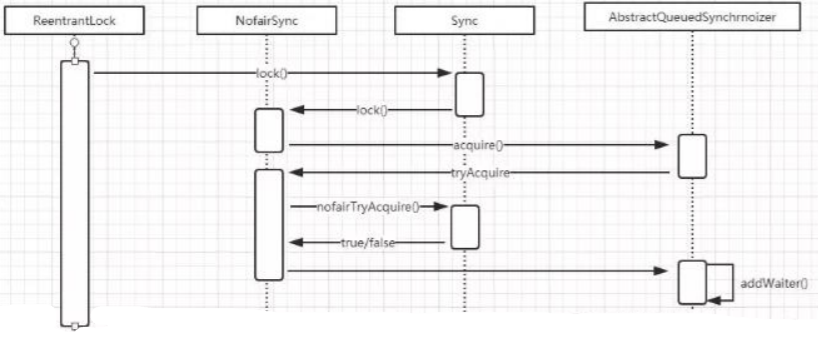
ReentrantLock.lock()
public void lock() {

  sync.lock();

}
NofairSync.lock
final void lock() {

  if (compareAndSetState(0, 1))

    setExclusiveOwnerThread(Thread.currentThread());

  else

    acquire(1);

}
CAS 的实现原理
protected final boolean compareAndSetState(int expect, int update) {
// See below for intrinsics setup to support this
return unsafe.compareAndSwapInt(this,stateOffset, expect, update);
}
Unsafe 类
stateOffset
compareAndSwapInt
UNSAFE_ENTRY(jboolean, Unsafe_CompareAndSwapInt(JNIEnv *env, jobject unsafe, jobject obj, jlong offset, jint e, jint x))

  UnsafeWrapper("Unsafe_CompareAndSwapInt");

  oop p = JNIHandles::resolve(obj); //将 Java 对象解析成 JVM 的 oop(普通对象指针),

  jint* addr = (jint *) index_oop_from_field_offset_long(p, offset); //根据对象 p和地址偏移量找到地址

  return (jint)(Atomic::cmpxchg(x, addr, e)) == e; //基于 cas 比较并替换, x 表示需要更新的值,addr 表示 state 在内存中的地址,e 表示预期值

UNSAFE_END
AQS.accquire
public final void acquire(int arg) {

  if (!tryAcquire(arg) && acquireQueued(addWaiter(Node.EXCLUSIVE), arg))selfInterrupt();

}
NonfairSync.tryAcquire
protected final boolean tryAcquire(int acquires) {

  return nonfairTryAcquire(acquires);

}
ReentrantLock.nofairTryAcquire
final boolean nonfairTryAcquire(int acquires) {

  final Thread current = Thread.currentThread();//获取当前执行的线程

  int c = getState();//获得 state 的值

  if (c == ) {//表示无锁状态

    if (compareAndSetState(, acquires)) {//cas 替换 state 的值,cas 成功表示获取锁成功
      setExclusiveOwnerThread(current);//保存当前获得锁的线程,下次再来的时候不要再尝试竞争锁

      return true;

    }

  }

  else if (current == getExclusiveOwnerThread()) {//如果同一个线程来获得锁,直接增加重入次数

    int nextc = c + acquires;

    if (nextc < ) // overflow

      throw new Error("Maximum lock count exceeded");

    setState(nextc);

    return true;

  }

  return false;

}
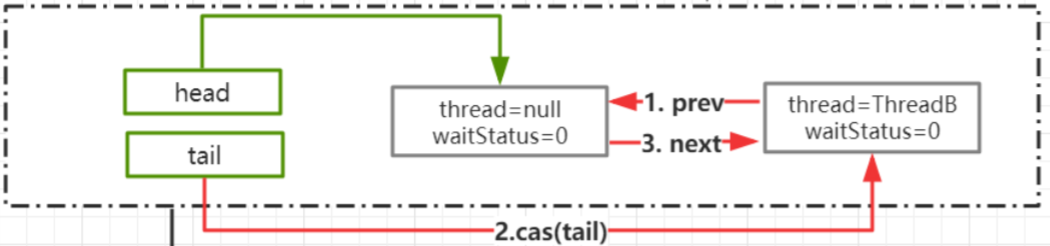
AQS.addWaiter
private Node addWaiter(Node mode) {
  Node node = new Node(Thread.currentThread(), mode);//把当前线程封装为 Node

  Node pred = tail; //tail 是 AQS 中表示同比队列队尾的属性,默认是 null

  if (pred != null) {//tail 不为空的情况下,说明队列中存在节点

    node.prev = pred;//把当前线程的 Node 的 prev 指向 tail

    if (compareAndSetTail(pred, node)) {//通过 cas 把 node加入到 AQS 队列,也就是设置为 tail

      pred.next = node;//设置成功以后,把原 tail 节点的 next指向当前 node

      return node;

    }

  }

  enq(node);//tail=null或者compareAndSetTail(pred, node)=false,把 node 添加到同步队列
  return node;
}
enq
private Node enq(final Node node) {

  for (;;) {

    Node t = tail;

    if (t == null) { // Must initialize

    if (compareAndSetHead(new Node()))

      tail = head;

    } else {

      node.prev = t;

      if (compareAndSetTail(t, node)) {

        t.next = node;

        return t;

      }

    }

  }

}
AQS.acquireQueued
final boolean acquireQueued(final Node node, int arg) {

  boolean failed = true;

  try {

    boolean interrupted = false;

    for (;;) {

      final Node p = node.predecessor();//获取当前节点的 prev 节点

      if (p == head && tryAcquire(arg)) {//如果是 head 节点,说明有资格去争抢锁

        setHead(node);//获取锁成功,也就是ThreadA 已经释放了锁,然后设置 head 为 ThreadB 获得执行权限

        p.next = null; //把原 head 节点从链表中移除

        failed = false;

        return interrupted;

      }

      //ThreadA 可能还没释放锁,使得 ThreadB 在执行 tryAcquire 时会返回 false

      if (shouldParkAfterFailedAcquire(p,node) && parkAndCheckInterrupt())
        interrupted = true; //并且返回当前线程在等待过程中有没有中断过。

    }

  } finally {

    if (failed)

      cancelAcquire(node);

  }

}
NofairSync.tryAcquire
shouldParkAfterFailedAcquire
private static boolean shouldParkAfterFailedAcquire(Node pred, Node node) {

  int ws = pred.waitStatus;//前置节点的waitStatus

  if (ws == Node.SIGNAL)//如果前置节点为 SIGNAL,意味着只需要等待其他前置节点的线程被释放,

    return true;//返回 true,意味着可以直接放心的挂起了

  if (ws > 0) {//ws 大于 0,意味着 prev 节点取消了排队,直接移除这个节点就行

  do {

    node.prev = pred = pred.prev;//相当于: pred=pred.prev;

    node.prev=pred;

  } while (pred.waitStatus > 0); //这里采用循环,从双向列表中移除 CANCELLED 的节点

    pred.next = node;

  } else {//利用 cas 设置 prev 节点的状态为 SIGNAL(-1)

    compareAndSetWaitStatus(pred, ws,Node.SIGNAL);

  }

  return false;

}
parkAndCheckInterrupt
private final boolean parkAndCheckInterrupt() {

  LockSupport.park(this);

  return Thread.interrupted();

}
static void selfInterrupt() {

  Thread.currentThread().interrupt();

}

LockSupport
锁的释放流程
ReentrantLock.unlock
public final boolean release(int arg) {

  if (tryRelease(arg)) { //释放锁成功

    Node h = head; //得到 aqs 中 head 节点

    if (h != null && h.waitStatus != 0)//如果 head 节点不为空并且状态!=0.调用 unparkSuccessor(h)唤醒后续节点

       unparkSuccessor(h);

    return true;

  }

  return false;

}
protected final boolean tryRelease(int releases){

  int c = getState() - releases;

  if (Thread.currentThread() !=getExclusiveOwnerThread())

    throw new IllegalMonitorStateException();

  boolean free = false;

  if (c == 0) {

    free = true;

    setExclusiveOwnerThread(null);

  }

  setState(c);

  return free;

}
unparkSuccessor
 private void unparkSuccessor(Node node) {

  int ws = node.waitStatus;//获得 head 节点的状态

  if (ws < 0)

    compareAndSetWaitStatus(node, ws, 0);// 设置 head 节点状态为 0

  Node s = node.next;//得到 head 节点的下一个节点

  if (s == null || s.waitStatus > 0) {

    //如果下一个节点为 null 或者 status>0 表示 cancelled 状态.

    //通过从尾部节点开始扫描,找到距离 head 最近的一个waitStatus<=0 的节点

    s = null;

    for (Node t = tail; t != null && t != node; t =t.prev)

      if (t.waitStatus <= 0)

        s = t;

  }

   if (s != null) //next 节点不为空,直接唤醒这个线程即可

      LockSupport.unpark(s.thread);

}
为什么在释放锁的时候是从 tail 进行扫描
private Node enq(final Node node) {

  for (;;) {

    Node t = tail;

    if (t == null) { // Must initialize

      if (compareAndSetHead(new Node()))

        tail = head;

    } else {

      node.prev = t;

      if (compareAndSetTail(t, node)) {

        t.next = node;

        return t;

      }

    }

  }

}

原本挂起的线程继续执行
AQS.acquireQueued
final boolean acquireQueued(final Node node, int arg) {

  boolean failed = true;

  try {

    boolean interrupted = false;

    for (;;) {

      final Node p = node.predecessor();

      if (p == head && tryAcquire(arg)) {

        setHead(node);

        p.next = null; // help GC

        failed = false;

        return interrupted;

      }

    if (shouldParkAfterFailedAcquire(p,node) && parkAndCheckInterrupt())

      interrupted = true;

    }

  } finally {

    if (failed)

    cancelAcquire(node);
  }

}

公平锁和非公平锁的区别
FairSync.tryAcquire
final void lock() {

  acquire(1);

}
FairSync.tryAcquire
protected final boolean tryAcquire(int acquires) {

  final Thread current = Thread.currentThread();

  int c = getState();

  if (c == 0) {

    if (!hasQueuedPredecessors() && compareAndSetState(0, acquires)) {

      setExclusiveOwnerThread(current);

      return true;

    }

  }

  else if (current == getExclusiveOwnerThread()) {

    int nextc = c + acquires;

    if (nextc < 0)

      throw new Error("Maximum lock count exceeded");

    setState(nextc);

    return true;

  }

  return false;

}
Condition
Condition 的基本使用
ConditionWait
public class ConditionDemoWait implements Runnable{

  private Lock lock;

  private Condition condition;

  public ConditionDemoWait(Lock lock, Condition condition){

    this.lock=lock;

    this.condition=condition;

  }
  @Override

  public void run() {

    System.out.println("begin -ConditionDemoWait");

    try {

      lock.lock();

      condition.await();

      System.out.println("end - ConditionDemoWait");

    } catch (InterruptedException e) {

      e.printStackTrace();

    }finally {

      lock.unlock();

    }

  }

}
ConditionSignal
public class ConditionDemoSignal implements Runnable{

  private Lock lock;

  private Condition condition;

  public ConditionDemoSignal(Lock lock, Condition condition){

    this.lock=lock;
    this.condition=condition;

  }

  @Override

  public void run() {

    System.out.println("begin -ConditionDemoSignal");

    try {

      lock.lock();

      condition.signal();

      System.out.println("end - ConditionDemoSignal");

    }finally {

      lock.unlock();

    }

  }

}
Condition 源码分析
condition.await
public final void await() throws InterruptedException {

    if (Thread.interrupted())

      throw new InterruptedException();

    Node node = addConditionWaiter(); //创建一个新的节点,节点状态为 condition,采用的数据结构仍然是链表

    int savedState = fullyRelease(node); //释放当前的锁,得到锁的状态,并唤醒 AQS 队列中的一个线程

    int interruptMode = 0;

    //如果当前节点没有在同步队列上,即还没有被 signal,则将当前线程阻塞

    while (!isOnSyncQueue(node)) {//判断这个节点是否在 AQS 队列上,第一次判断的是 false,因为前面已经释放锁了

      LockSupport.park(this); // 第一次总是 park 自己,开始阻塞等待

      // 线程判断自己在等待过程中是否被中断了,如果没有中断,则再次循环,会在 isOnSyncQueue 中判断自己是否在队列上.

      // isOnSyncQueue 判断当前 node 状态,如果是 CONDITION 状态,或者不在队列上了,就继续阻塞.
      // isOnSyncQueue 判断当前 node 还在队列上且不是 CONDITION 状态了,就结束循环和阻塞.

      if ((interruptMode = checkInterruptWhileWaiting(node)) != 0)

        break;

    }

    // 当这个线程醒来,会尝试拿锁, 当 acquireQueued 返回 false 就是拿到锁了.

    // interruptMode != THROW_IE -> 表示这个线程没有成功将 node 入队,但 signal 执行了 enq 方法让其入队了.

    // 将这个变量设置成 REINTERRUPT.

    if (acquireQueued(node, savedState) && interruptMode != THROW_IE)

      interruptMode = REINTERRUPT;

    // 如果 node 的下一个等待者不是 null, 则进行清理,清理 Condition 队列上的节点.

    // 如果是 null ,就没有什么好清理的了.

    if (node.nextWaiter != null) // clean up if cancelled

      unlinkCancelledWaiters();

    // 如果线程被中断了,需要抛出异常.或者什么都不做

    if (interruptMode != 0)

      reportInterruptAfterWait(interruptMode);

}
public final void signal() {

  if (!isHeldExclusively()) //先判断当前线程是否获得了锁

    throw new IllegalMonitorStateException();

  Node first = firstWaiter; // 拿到 Condition 队列上第一个节点

  if (first != null)

    doSignal(first);

}
Condition.doSignal
private void doSignal(Node first) {

  do {

    if ( (firstWaiter = first.nextWaiter) == null)// 如果第一个节点的下一个节点是 null, 那么, 最后一个节点也是 null.

      lastWaiter = null; // 将 next 节点设置成 null

      first.nextWaiter = null;

  } while (!transferForSignal(first) && (first = firstWaiter) != null);

  }
final boolean transferForSignal(Node node) {

  /*

  * If cannot change waitStatus, the node has been cancelled.

  */

  if (!compareAndSetWaitStatus(node, Node.CONDITION, 0))

    return false;

  Node p = enq(node);

  int ws = p.waitStatus;

  // 如果上一个节点的状态被取消了, 或者尝试设置上一个节点的状态为 SIGNAL失败了(SIGNAL 表示: 他的 next 节点需要停止阻塞),

  if (ws > 0 || !compareAndSetWaitStatus(p, ws,Node.SIGNAL))

    LockSupport.unpark(node.thread); // 唤醒输入节点上的线程.

  return true;

}
AQS.transferForSignal
final boolean transferForSignal(Node node) {

  /*

  * If cannot change waitStatus, the node has been cancelled.*/

  if (!compareAndSetWaitStatus(node, Node.CONDITION, 0))

    return false;

  Node p = enq(node);

  int ws = p.waitStatus;

  // 如果上一个节点的状态被取消了, 或者尝试设置上一个节点的状态为 SIGNAL失败了(SIGNAL 表示: 他的 next 节点需要停止阻塞),

  if (ws > 0 || !compareAndSetWaitStatus(p, ws,Node.SIGNAL))

    LockSupport.unpark(node.thread); // 唤醒输入节点上的线程.

  return true;

}
Condition 总结
AQS底层原理分析的更多相关文章
- 多线程(四) AQS底层原理分析
J.U.C 简介 Java.util.concurrent 是在并发编程中比较常用的工具类,里面包含很多用来在并发 场景中使用的组件.比如线程池.阻塞队列.计时器.同步器.并发集合等等.并 发包的作者 ...
- HashMap底层原理分析(put、get方法)
1.HashMap底层原理分析(put.get方法) HashMap底层是通过数组加链表的结构来实现的.HashMap通过计算key的hashCode来计算hash值,只要hashCode一样,那ha ...
- AQS工作原理分析
AQS工作原理分析 一.大致介绍1.前面章节讲解了一下CAS,简单讲就是cmpxchg+lock的原子操作:2.而在谈到并发操作里面,我们不得不谈到AQS,JDK的源码里面好多并发的类都是通过Sy ...
- JMM和Volatile底层原理分析
JMM和volatile分析 1.JMM:Java Memory Model,java线程内存模型 JMM:它是一个抽象的概念,描述的是线程和内存间的通信,java线程内存模型和CPU缓存模型类似,它 ...
- springAop:Aop(Xml)配置,Aop注解配置,spring_Aop综合案例,Aop底层原理分析
知识点梳理 课堂讲义 0)回顾Spring体系结构 Spring的两个核心:IoC和AOP 1)AOP简介 1.1)OOP开发思路 OOP规定程序开发以类为模型,一切围绕对象进行,OOP中完成某个任务 ...
- Activiti工作流学习笔记(三)——自动生成28张数据库表的底层原理分析
原创/朱季谦 我接触工作流引擎Activiti已有两年之久,但一直都只限于熟悉其各类API的使用,对底层的实现,则存在较大的盲区. Activiti这个开源框架在设计上,其实存在不少值得学习和思考的地 ...
- AQS实现原理分析——ReentrantLock
在Java并发包java.util.concurrent中可以看到,不少源码是基于AbstractQueuedSynchronizer(以下简写AQS)这个抽象类,因为它是Java并发包的基础工具类, ...
- 基于JAVA Socket的底层原理分析及工具实现
前言 在工作开始之前,我们先来了解一下Socket 所谓Socket,又被称作套接字,它是一个抽象层,简单来说就是存在于不同平台(os)的公共接口.学过网络的同学可以把它理解为基于传输TCP/IP协议 ...
- 从Redis分布式缓存实战入手到底层原理分析、面面俱到覆盖大厂面试考点
概述 官方说明 Redis官网 https://redis.io/ 最新版本6.2.6 Redis中文官网 http://www.redis.cn/ 不过中文官网的同步更新维护相对要滞后不少时间,但对 ...
随机推荐
- [Shell]MySql慢查询日志GetShell
通过开启慢查询日志,配置可解析日志文件GETSHELL. MySQL的慢查询日志是MySQL提供的一种日志记录,它用来记录在MySQL中响应时间超过阀值的语句. long_query_time的默认值 ...
- 怎么样在vue-cli的项目里面引入element ui
第一步:先进入到项目里面 npm i element-ui -S 第二步: import Vue from 'vue'; import ElementUI from 'element-ui'; //这 ...
- vue的ref试用
<!DOCTYPE html> <html lang="en"> <head> <meta charset="utf-8&quo ...
- css去除图片间隙
问题如下图 把图片转换成块状元素即可 .img{ display: block; } 解决后:
- SQL语句简单增删改查
常用数据类型 Int:整数,长度没有作用 Varchar:字符串,varchar(3)表示最多存放3个字符,1个中文或英文或符合都占1个字符 Decimal:小数,decimal(5,2)表示共存5位 ...
- NPAPI插件开发详细记录:用VS2010开发NPAPI插件步骤<转>
原帖地址:https://blog.csdn.net/z6482/article/details/7660748 ------------------------------------------- ...
- HttpWebrequest使用的注意点
HttpWebrequest使用的注意点 1.HttpWebrequest相关属性的设置以及默认连接数量限制 System.Net.ServicePointManager.DefaultConnect ...
- elementUI 列表里面含有多选框,当翻页的时候依然保持之前页多选不变
el-table的type="selection"的使用 场景:el-table,type="selection"时,重新请求后,设置列表更新前的已勾选项 踩坑 ...
- 如何贡献补丁到uboot社区?
答: 首次贡献分为两步: 1. 首先需要订阅一下,地址在此https://lists.denx.de/listinfo/u-boot,使邮箱地址对应有一个成员名称,才能向uboot社区发送补丁,否则会 ...
- 如何禁用Chrome浏览器的Flash
使用Chrome浏览器时,经常会因为Flash而导致CPU占用过多,系统变慢.如果你常访问的网站很少用到的Flash或者页面上的Flash不是网站的核心功能,那么建议禁用Flash.禁用Flash的步 ...