shell 学习笔记3-shell变量扩展
一、特殊位置参数变量
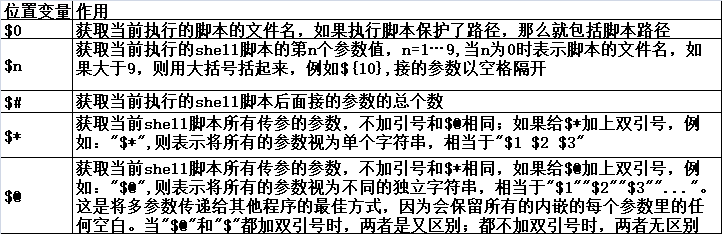
1、特殊位置参数变量
在shell中比如:$0、$1、$#,等被称为特殊位置参数变量,当命令行、函数、脚本执行等处传递参数时,就需要使用位置参数变量
参数说明如下:
2、示例$1$2...$9${10}${11}...
1)测试$n(n为1..15)
[root@web1 scripts]# vim test1.sh       #<---创建test1.sh脚本

#!/bin/bash

echo $1                     #<---打印脚本传递的第一个参数的值

[root@web1 scripts]# chmod +x test1.sh   #<---授权

[root@web1 scripts]# ./test1.sh       #<---不加参数输出空白

[root@web1 scripts]# ./test1.sh zxg    #<---加一个参数

zxg

[root@web1 scripts]# ./test1.sh zxg shell  #<---加两个参数,只输出第一个参数

zxg

[root@web1 scripts]# ./test1.sh "zxg shell"  #<---添加双括号,两个都输出因为加双括号会作为一个字符串参数

zxg shell

[root@web1 scripts]#
2)同时加入$1和$2,并进行测试
[root@web1 scripts]# cat test2.sh               #<---创建test2.sh脚本

#!/bin/bash

echo $ $

[root@web1 scripts]# chmod +x test2.sh          #<---加权限

[root@web1 scripts]# ./test2.sh zxg shell        #<---运行

zxg shell

[root@web1 scripts]# ./test2.sh "zxg shell" 2019    #<---对又空格的字符串需要双引号才能正常使用

zxg shell

[root@web1 scripts]#
3)设置15个位置参数($1~$15),用于接收命令行传递的15个参数
[root@web1 scripts]# echo \${..}                       #<---利用大括号输出15个位置参数,10大技巧

$ $ $ $ $ $ $ $ $ $ $ $ $ $ $

[root@web1 scripts]# echo \${..} >test3.sh

[root@web1 scripts]# cat test3.sh

$ $ $ $ $ $ $ $ $ $ $ $ $ $ $

[root@web1 scripts]# echo {a..z}

a b c d e f g h i j k l m n o p q r s t u v w x y z

[root@web1 scripts]# chmod +x test3.sh

[root@web1 scripts]# cat test3.sh

echo $ $ $ $ $ $ $ $ $ $ $ $ $ $ $

[root@web1 scripts]# ./test3.sh {a..z}            #<---运行发现就到9 超过9必须用大括号

a b c d e f g h i a0 a1 a2 a3 a4 a5

[root@web1 scripts]#
[root@web1 scripts]# cat test3.sh
echo $1 $2 $3 $4 $5 $6 $7 $8 $9 ${10} ${11} ${12} ${13} ${14} ${15} #这样就可以正常了
[root@web1 scripts]# ./test3.sh {a..z}
a b c d e f g h i j k l m n o
[root@web1 scripts]#
3、$0特殊变量的作用示例
取出执行脚本的名称(包括路径)
1)、获得脚本名称及路径
[root@web1 scripts]# cat test4.sh

#!/bin/bash

echo $

[root@web1 scripts]# chmod +x test4.sh

[root@web1 scripts]# ./test4.sh

./test4.sh

[root@web1 scripts]#
[root@web1 scripts]# sh /scripts/test4.sh #<---带路径的话,就会输出路径加名字
/scripts/test4.sh
[root@web1 scripts]#
2)单独获取名称或路径的方法
[root@web1 scripts]# dirname /scripts/test4.sh   #<---dirname命令作用时获取脚本路径

/scripts

[root@web1 scripts]# basename /scripts/test4.sh  #<---basename命令则时获取脚本名称

test4.sh

[root@web1 scripts]#
3)利用$0 和(dirname、basename)分别读取脚本名称和脚本路径
[root@web1 scripts]# cat test5.sh

#!/bin/bash

dirname $

basename $

[root@web1 scripts]# chmod +x test5.sh

[root@web1 scripts]# sh /scripts/test5.sh

/scripts

test5.sh

[root@web1 scripts]#
4、$#特殊变量获取脚本传参个数的示例
1)通过$#获取脚本传参的个数
[root@web1 scripts]# cat test6.sh

#!/bin/bash

echo $ $ $ $ $ $ $ $ $

echo $#

[root@web1 scripts]# chmod +x test6.sh

[root@web1 scripts]# ./test6.sh {a..z}   #<---传入26个参数

a b c d e f g h i               #<---只打印了9个

26                        #<---代表26个参数

[root@web1 scripts]#
2)根据用户在命令行的传参个数判断用户的输入,不合要求的给予提示并退出
这是针对$0、$1、$#等多位置参数的综合示例
[root@web1 scripts]# cat test7.sh

#!/bin/bash

[ $# -ne  ] && {                #<---如果执行脚本传参的个数不等于2

        echo "muse two args"          #<---则给用户提示正确的用法

        exit                   #<---由于不满足要求,因此退出脚本,返回值为1

}

echo abc                      #<---满足了参数个数的传参要求,就执行判断后的程序脚本,打印abc

[root@web1 scripts]# chmod +x test7.sh

[root@web1 scripts]# ./test7.sh

muse two args

[root@web1 scripts]# ./test7.sh

abc

[root@web1 scripts]#
if语句的写法
[root@web1 scripts]# cat test8.sh

#!/bin/bash

if [ $# -ne  ]

        then

                echo "USAGE:/bin/bash $0  arg1 arg2"

        exit

fi

echo $ $

[root@web1 scripts]# chmod +x test8.sh

[root@web1 scripts]# ./test8.sh

USAGE:/bin/bash ./test8.sh  arg1 arg2

[root@web1 scripts]# ./test8.sh

[root@web1 scripts]#
5、$*和$@特殊变量功能及区别示例
1)利用set设置位置参数(同命令行脚本的传参)
[root@web1 scripts]# set -- "i am" zxg shell

[root@web1 scripts]# echo $#

[root@web1 scripts]# echo $

i am

[root@web1 scripts]# echo $

zxg

[root@web1 scripts]# echo $

shell

[root@web1 scripts]#
测试$*和$@,注意,此时带双引号
[root@web1 scripts]# echo "$*"

i am zxg shell

[root@web1 scripts]# echo "$@"

i am zxg shell

[root@web1 scripts]# for i in "$*";do echo $i;done    #<---在又双引号的情况下,"$*",引号里面当作一个参数输出

i am zxg shell

[root@web1 scripts]# for i in "$@";do echo $i;done     #<---在又双引号的情况下,"$#",每个参数独立输出,

i am                                #<---算一个参数

zxg

shell

[root@web1 scripts]# for i ;do echo $i;done        #<---去掉in 变量列表,相当于又引号的in "$@"

i am

zxg

shell

[root@web1 scripts]# for i in $*;do echo $i;done      #<---$*不加双引号,因此会输出所有参数,然后第一个参数"i am"也拆开输出了

i

am

zxg

shell

[root@web1 scripts]# shift                  #<---用shift将位置参数移位(左移)

[root@web1 scripts]# echo $#

[root@web1 scripts]# echo $1                 #<---这里就打印原来$2的值

zxg

[root@web1 scripts]# echo $2                 #<---这里就打印原来$3的值

shell

[root@web1 scripts]#
二、shell进程中的特殊状态变量

1、$?示例
1)执行命令
[root@web1 scripts]# pwd

/scripts

[root@web1 scripts]# echo $?          #<---返回0表示上一个命令成功

[root@web1 scripts]# ls /root

anaconda-ks.cfg  Desktop    google-chrome-stable_current_x86_64.rpm  original-ks.cfg

bash-test        Downloads  initial-setup-ks.cfg

[root@web1 scripts]# lss /root

bash: lss: command not found...

Similar command is: 'ls'

[root@web1 scripts]# echo $?          #<---非零表示上一个命令失败

[root@web1 scripts]#
可以利用$?判断安装、打包、备份等执行是否正确成功
tar zcf /zxg/zxg.tar.gz /zxg/zxg
echo $?
2)通过脚本控制命令及脚本执行后的返回值
[root@web1 scripts]# cat test9.sh

#!/bin/bash

[ $# -ne  ] && {                    #<---参数格式不等于2

        echo "must be two args"            #<---输出提示

exit 119                          #<---终止程序运行并以制定的119状态值退出程序赋值给$?

}

echo zxg

[root@web1 scripts]# chmod +x test9.sh

[root@web1 scripts]# ./test9.sh

zxg

[root@web1 scripts]# echo $?

[root@web1 scripts]# ./test9.sh

must be two args

[root@web1 scripts]# echo $?

[root@web1 scripts]#
3)小结
判断命令、脚本或函数程序是否执行成功
若在脚本中调用执行exit 数字 把这个数字以函数返回值的形式传给$?变量
如果是在函数里,则通过return数字把这个数字以函数返回值的形式传给$?
2、$$特殊变量功能及实践
1)获取脚本执行的进程号
[root@web1 scripts]# cat test10.sh

#!/bin/bash

echo $$ >/tmpa.pid                                #<---获取$$的值,并重定向

sleep                                       #<---休息300s,模拟守护进程不退出

[root@web1 scripts]# chmod +x test10.sh

[root@web1 scripts]# ps -ef|grep test10|grep -v grep

[root@web1 scripts]# ./test10.sh &                       #<---后台运行

[]

[root@web1 scripts]# ps -ef|grep test10|grep -v grep            #<---查找进程号

root           : pts/    :: /bin/bash ./test10.sh

[root@web1 scripts]# cat /tmpa.pid                       #<---对应$$的值

[root@web1 scripts]#
2)实现系统中多次执行某个脚本后的进程只有一个-企业级应用,用于执行启动或定时任务
[root@web1 scripts]# cat test11.sh

#!/bin/bash

pidpath=/tmp/a.pid                              #<---定义pid文件

if [ -f "$pidpath" ]                             #<---如果pid文件存在,值=则执行then后面的命令

        then

                kill `cat $pidpath` >/dev/null >&1          #<---杀掉与前一个金朝赌赢的进程

                rm -f $pidpath                       #<---删除pid文件

fi

echo $$ >$pidpath                               #<---将当前$$值记录到pid文件里

sleep

[root@web1 scripts]# chmod +x test11.sh

[root@web1 scripts]# ./test11.sh

^C

[root@web1 scripts]# ./test11.sh &

[]

[root@web1 scripts]# ps -ef |grep test11.sh|grep -v grep

root           : pts/    :: /bin/bash ./test11.sh

[root@web1 scripts]# ./test11.sh &

[]

[root@web1 scripts]# ps -ef |grep test11.sh|grep -v grep

root           : pts/    :: /bin/bash ./test11.sh

[]-  Terminated              ./test11.sh

[root@web1 scripts]# ./test11.sh &                                  #<---无论执行多少次脚本每次都会将上一次运行的杀掉,都只有一个进程

[]

[root@web1 scripts]# ps -ef |grep test11.sh|grep -v grep

root           : pts/    :: /bin/bash ./test11.sh

[]-  Terminated              ./test11.sh

[root@web1 scripts]#
3、$_特殊变量功能说明及实践
获得上一条命令的最后一个参数,用的不多
[root@web1 scripts]# systemctl restart httpd zxg

Failed to restart zxg.service: Unit not found.

Job for httpd.service failed because the control process exited with error code. See "systemctl status httpd.service" and "journalctl -xe" for details.

[root@web1 scripts]# echo $_

zxg

[root@web1 scripts]#
4、$!特殊变量功能说明及实践
$!的功能类似$$,只不过作用是获取上次执行脚本的pid,了解就可以了
[root@web1 scripts]# ps -ef |grep test11.sh|grep -v grep

[root@web1 scripts]# echo $!

[root@web1 scripts]#
转载请注明出处:https://www.cnblogs.com/zhangxingeng/p/11128349.html
shell 学习笔记3-shell变量扩展的更多相关文章
- Shell学习笔记之shell脚本和python脚本实现批量ping IP测试
0x00 将IP列表放到txt文件内 先建一个存放ip列表的txt文件: [root@yysslopenvpn01 ~]# cat hostip.txt 192.168.130.1 192.168.1 ...
- shell学习笔记1: shell 中的变量与常见符号使用方法
变量 声明即用 a=2 b="123" 调用 ${varName}或者 $varName echo $b echo ${a} 常见变量 $?:判断上一个语句是否成功 $0:执行脚本 ...
- 鸟书shell 学习笔记(一) shell专注于概念和命令
变量 variableName=value 等号左右不能有空格 变量内容有空格须要用"或者'括起来,可是 v="hello $name" $保持原有功能,单引號则不行 ...
- shell学习笔记2: shell中的四则运算符
shell中的四则运算符 n1,n2 :常量数字 char:运算符号 加,减,乘,除,取余(+,-,*,/,%) $a,$b:变量a,变量b 方法1 数字与符号之间需要有空格 不支持小数 expr n ...
- 鸟书shell 学习笔记(二) shell中正則表達式相关
通配符与正則表達式的差别 通配符是bash原生支持的语法,正則表達式是处理字符串的一种表示方式, 正則表達式须要支持的工具支持才干够 语系设置 : export LANG=C grep alias 设 ...
- shell学习笔记汇总
1.shell脚本中函数使用 函数定义在前,调用在后,顺序反了就没有效果了.函数调用为:函数名 参数列表 函数内部通过以下变量访问函数的参数:shell脚本函数中: $0: 这个脚本的名字 $n: 这 ...
- SHELL学习笔记三
SHELL学习笔记一 SHELL学习笔记二 SHELL学习笔记三 for 命令 读取列表中的复杂值 从变量读取列表 从命令读取值 更改字段分隔符 用通配符读取目录 which 使用多个测试命令 unt ...
- shell学习笔记
shell学习笔记 .查看/etc/shells,看看有几个可用的Shell . 曾经用过的命令存在.bash_history中,但是~/.bash_history记录的是前一次登录前记录的所有指令, ...
- [转帖][Bash Shell] Shell学习笔记
[Bash Shell] Shell学习笔记 http://www.cnblogs.com/maybe2030/p/5022595.html 阅读目录 编译型语言 解释型语言 5.1 作为可执行程序 ...
- shell 学习笔记2-shell-test
一.字符串测试表达式 前面一篇介绍:什么是shell,shell变量请参考: shell 学习笔记1-什么是shell,shell变量 1.字符串测试表达式参数 字符串需要用""引 ...
随机推荐
- (转)golang获取当前时间、时间戳和时间字符串及它们之间的相互转换
原文连接: https://blog.csdn.net/skh2015java/article/details/70051512 1.获取当前时间 currentTime:=time.Now() // ...
- shop++上传图片失败
如题上传shop++商城商品图片失败. 其主要原因是图片过大.本人使用测试需要在500KB以下才能成功 1.点击编辑缩小尺寸.这个缩小有限 2.用QQ截图另存为png
- centos的6.9版本安装mysql
用yum安装后,执行service命令启动: [root@centos ~]# yum install mysql-server Loaded plugins: fastestmirror, secu ...
- Spring cloud微服务安全实战-_5-10实现基于session的SSO(Token有效期)
refresh_token过期了怎么办,虽然可以设置一个比较长的有效期,但是终归还是要过期的. 只能从认证服务器重新走认证授权的流程. 两种情况 1,session还没过期的,跳过去之后,直接就知道你 ...
- lombok 插件安装使用
Lombok是一个Java库,它自动插入编辑器并构建工具,为Java添加香料.永远不要再编写另一个getter或Eques方法,您的类有一个功能齐全的构建器,可以自动化您的日志变量以及更多的注释. 官 ...
- LinkedHashMap和hashMap和TreeMap的区别
推荐博客:https://www.jianshu.com/p/8f4f58b4b8ab 区别: LinkedHashMap是继承于HashMap,是基于HashMap和双向链表来实现的. HashMa ...
- 最基础的Python的socket编程入门教程
最基础的Python的socket编程入门教程 本文介绍使用Python进行Socket网络编程,假设读者已经具备了基本的网络编程知识和Python的基本语法知识,本文中的代码如果没有说明则都是运行在 ...
- Bmp格式图片与16进制的互相转换简解 Python
BMP TO HEX 首先介绍Github上一个简单的Bmp转成16进制的py: https://github.com/robertgallup/bmp2hex 网上这种例子很多.思路也简单:将bmp ...
- Sublime Text 3能用支持的插件推荐
从二月份用测试版本build 3012开始用sublime text 3,虽然很多插件在sublime text 3不工作了,因为sublime text 3修复了2的一些bug.提升了性能并集成了不 ...
- Ubuntu18使用netplan设置多网口绑定
Ubuntu18使用netplan设置网络参考:https://www.cnblogs.com/minseo/p/11325384.html 修改配置文件 /etc/netplan/50-cloud- ...