
Caffe FCN:可视化featureMaps和Weights(C++)、获取FCN结果
为何不使用C++版本FCN获取最后的分割掩模,何必要使用python呢!因此需要获取网络最后层的featureMaps,featureMaps的结果直接对应了segmentation的最终结果,可以直接用于掩模分析。
caffe源码给出了提取中间层featureMap的源代码,位置在tools/extract_features.cpp。
参考文章链接: caffe模型可视化featureMaps和Weights(C++) ,文章有大量修改,如有不适,请移步原文。
1. 可视化最后一层featureMap的代码段(稍作修改):
int Classifier::visualize_featuremap( const cv::Mat& img, string layer_name, std::vector<cv::Mat> &Maps )

{

	Maps.resize(0);

	Blob<float>* input_layer = net_->input_blobs()[0];

	input_layer->Reshape(1, num_channels_, input_geometry_.height, input_geometry_.width);

	net_->Reshape();

	std::vector<cv::Mat> input_channels;

	WrapInputLayer(&input_channels);

	Preprocess(img, &input_channels);

	net_->Forward();

	std::cout << "网络中的Blobs名称为:\n";

	vector<shared_ptr<Blob<float> > > blobs = net_->blobs();

	vector<string> blob_names = net_->blob_names();

	std::cout << blobs.size() << " " << blob_names.size() << std::endl;

	for (int i = 0; i < blobs.size(); i++){

		std::cout << blob_names[i] << " " << blobs[i]->shape_string() << std::endl;

	}

	std::cout << std::endl;

	assert(net_->has_blob(layer_name));

	shared_ptr<Blob<float> >  conv1Blob = net_->blob_by_name(layer_name);

	std::cout << "测试图片的特征响应图的形状信息为:" << conv1Blob->shape_string() << std::endl;

	float maxValue = -10000000, minValue = 10000000;

	const float* tmpValue = conv1Blob->cpu_data();

	for (int i = 0; i < conv1Blob->count(); i++){

		maxValue = std::max(maxValue, tmpValue[i]);

		minValue = std::min(minValue, tmpValue[i]);

	}

	int width = conv1Blob->shape(3);  //响应图的高度

	int height = conv1Blob->shape(2);  //响应图的宽度

	int channel = conv1Blob->shape(1);  //通道数

	int num = conv1Blob->shape(0);      //个数

	int imgHeight = (int)(1 + sqrt(channel))*height;

	int imgWidth = (int)(1 + sqrt(channel))*width;

	cv::Mat img(imgHeight, imgWidth, CV_8UC1, cv::Scalar(0));

	int kk = 0;

	for (int x = 0; x < imgHeight; x += height){

		for (int y = 0; y < imgWidth; y += width){

			if (kk >= channel)

				continue;

			cv::Mat roi(height, width, CV_8UC1);

			//cv::Mat roi = img(cv::Rect(y, x, width, height));

			for (int i = 0; i < height; i++){

				for (int j = 0; j < width; j++){

					float value = conv1Blob->data_at(0, kk, i, j);//速度稍慢,应该有快速复制方法

					//roi.at<uchar>(i, j) = (value - minValue) / (maxValue - minValue) * 255;

					value = (value - minValue) / (maxValue - minValue);

					roi.at<uchar>(i, j) = 255* floor(value / 0.5) ;

				}

			}

			Maps.push_back(roi);

			kk++;

		}

	}

	return Maps.size();

}
2. 获取FCN的最终输出
	vector<Blob<float>* >  outBlob = net_->Forward();//得到的结果仍为151个//输出结果为151个模板

	int channel = outBlob[0]->shape(1);

	int hi = outBlob[0]->shape(2);

	int wi = outBlob[0]->shape(3);

	int area = wi*hi;

	vector<shared_ptr<Blob<float> > > blobs = net_->blobs();

	vector<string> blob_names = net_->blob_names();
获取最大标记
int Classifier::GetMaxMask( const cv::Mat& img, int layerIdx, double thres,cv::Mat &maskMax )

{

	vector<boost::shared_ptr<Blob<float> > > blobs = net_->blobs();

	vector<string> blob_names = net_->blob_names();

	int num_features = net_->output_blobs()[0]->shape(1);

	int channel = net_->output_blobs()[0]->shape(1);

	int hi = net_->output_blobs()[0]->shape(2);

	int wi = net_->output_blobs()[0]->shape(3);

	int area = wi*hi;

	std::vector<int> image_indices(num_features, 0);

	int i = layerIdx;

	const boost::shared_ptr<Blob<float> > feature_blob

		= net_->blob_by_name(blob_names[i]);

	int batch_size = feature_blob->num();

	int dim_features = feature_blob->count() / batch_size;

	float maxValue = -10000000, minValue = 10000000;

	const float* tmpValue = feature_blob->cpu_data();

	for (int i = 0; i < feature_blob->count(); i++){

		maxValue = std::max(maxValue, tmpValue[i]);

		minValue = std::min(minValue, tmpValue[i]);

	}

	std::vector<int> areal(channel);

	for (int i = 0; i < channel;++i){

		areal[i] = i*area;

	}

	const float* feature_blob_data;

	const float minv = 10000000;

	const float maxv = -10000000;

	int classI = 0;

	for ( int n = 0; n < batch_size; ++n){

		feature_blob_data =

			feature_blob->cpu_data() + feature_blob->offset(n);

		int img_index = 0;

		for (int h = 0; h < hi; ++h)

		{

			uchar* ptr = (unsigned char*)(maskMax.data + h * maskMax.step);

			int idxH = h*wi;

			img_index = idxH;

			for ( int w = 0; w < wi; ++w)

			{

				float valueG = maxv;

				for ( int c = 0; c < channel; ++c){

					int datum_index = areal[c] + img_index;// area*c;

					float value = static_cast<float>(feature_blob_data[datum_index]);

					if ( valueG < value ){

						valueG = value;

						classI = c;

					}

				}

				*ptr = (uchar)classI;

				++ptr;

				++img_index;

			}

		}

	}

	return 1;

}
获取所有标记
//获取特定的元,使用点数限制

int Classifier::getAllSeg(cv::Mat &im_inp, cv::Mat  &maskMax,

	std::vector<cv::Mat > &segs,std::vector<std::pair<int,float> > &labels,

	const int nPointMin)

{

	std::vector<int> numsc(m_nClass);

	int h = maskMax.rows;

	int w = maskMax.cols;

	for (int i = 0; i < maskMax.rows; ++i)

	{

		uchar *ptrm = maskMax.ptr<uchar>(i);

		for (int j = 0; j < maskMax.cols; ++j)

		{

			int c = *ptrm;

			numsc[c]++;

			++ptrm;

		}

	}

	//添加限制,获取分割图

	std::map<int, int> maps;

	int k = 0;

	for (int i = 0; i < numsc.size();++i){

		if (numsc[i]>nPointMin){

			auto idx =make_pair(i,1.0f);

			labels.push_back(idx);

			auto idxm = make_pair(i, k);

			maps.insert(idxm);

			++k;

		}

	}

	//获取图像

	for (int i = 0; i < labels.size(); ++i){

		cv::Mat seg(h, w, CV_8UC3);

		segs.push_back(seg);

	}

	std::vector<uchar *>  ptres(labels.size());

	for (int idx = 0; idx < labels.size(); ++idx){

		ptres[idx] = (uchar *)segs[idx].data;

	}

	for ( int i = 0; i < maskMax.rows; ++i )

	{

		uchar *ptr = im_inp.ptr<uchar>(i);

		uchar *ptrm = maskMax.ptr<uchar>(i);

		for (int n = 0; n < labels.size(); ++n)

			ptres[n] = (uchar *)segs[n].ptr<uchar>(i);

		for ( int j = 0; j < maskMax.cols; ++j )

		{

			int c = *ptrm;

			int pos;// = maps[c];

			auto l_it = maps.find(c);

			if ( l_it == maps.end() )

				pos = -1;

			else

				pos = l_it->second;

			if ( pos>-1) *(ptres[pos]) = *ptr;

			++ptr;

			for (int n = 0; n < labels.size();++n) ++ptres[n];

			if (pos>-1) *(ptres[pos]) = *ptr;

			++ptr;

			for (int n = 0; n < labels.size(); ++n) ++ptres[n];

			if (pos>-1) *(ptres[pos]) = *ptr;

			++ptr;

			for (int n = 0; n < labels.size(); ++n) ++ptres[n];

			++ptrm;

		}

	}

	int nseg = segs.size();

	return nseg;

}
3.此外,可视化权值的代码段,直接摘抄
    cv::Mat visualize_weights(string prototxt, string caffemodel, int weights_layer_num)

    {

        ::google::InitGoogleLogging("0");

    #ifdef CPU_ONLY

        Caffe::set_mode(Caffe::CPU);

    #else

        Caffe::set_mode(Caffe::GPU);

    #endif

        Net<float> net(prototxt, TEST);

        net.CopyTrainedLayersFrom(caffemodel);

        vector<shared_ptr<Blob<float> > > params = net.params();

        std::cout << "各层参数的维度信息为:\n";

        for (int i = 0; i<params.size(); ++i)

            std::cout << params[i]->shape_string() << std::endl;

        int width = params[weights_layer_num]->shape(3);     //宽度

        int height = params[weights_layer_num]->shape(2);    //高度

        int channel = params[weights_layer_num]->shape(1);       //通道数

        int num = params[weights_layer_num]->shape(0);       //个数

        int imgHeight = (int)(1 + sqrt(num))*height;

        int imgWidth = (int)(1 + sqrt(num))*width;

        Mat img(imgHeight, imgWidth, CV_8UC3, Scalar(0, 0, 0));

        float maxValue = -1000, minValue = 10000;

        const float* tmpValue = params[weights_layer_num]->cpu_data();

        for (int i = 0; i<params[weights_layer_num]->count(); i++){

            maxValue = std::max(maxValue, tmpValue[i]);

            minValue = std::min(minValue, tmpValue[i]);

        }

        int kk = 0;

        for (int y = 0; y<imgHeight; y += height){

            for (int x = 0; x<imgWidth; x += width){

                if (kk >= num)

                    continue;

                Mat roi = img(Rect(x, y, width, height));

                for (int i = 0; i<height; i++){

                    for (int j = 0; j<width; j++){

                        for (int k = 0; k<channel; k++){

                            float value = params[weights_layer_num]->data_at(kk, k, i, j);

                            roi.at<Vec3b>(i, j)[k] = (value - minValue) / (maxValue - minValue) * 255;                    }

                    }

                }

                ++kk;

            }

        }

        return img;

    }
3.FeatureMap获取结果
原图:

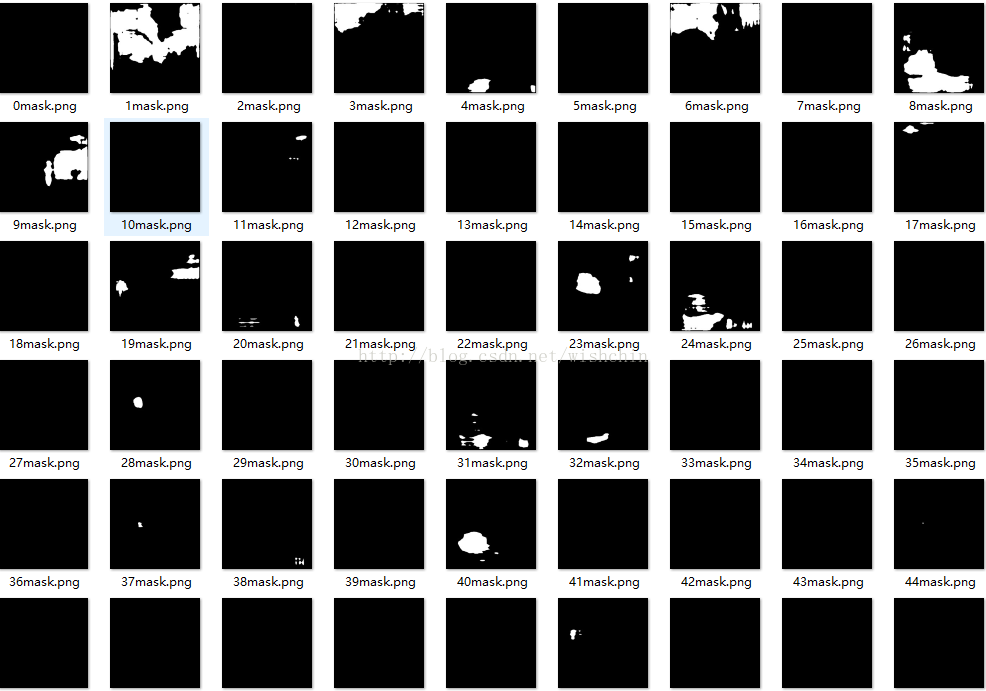
分割结果显示:
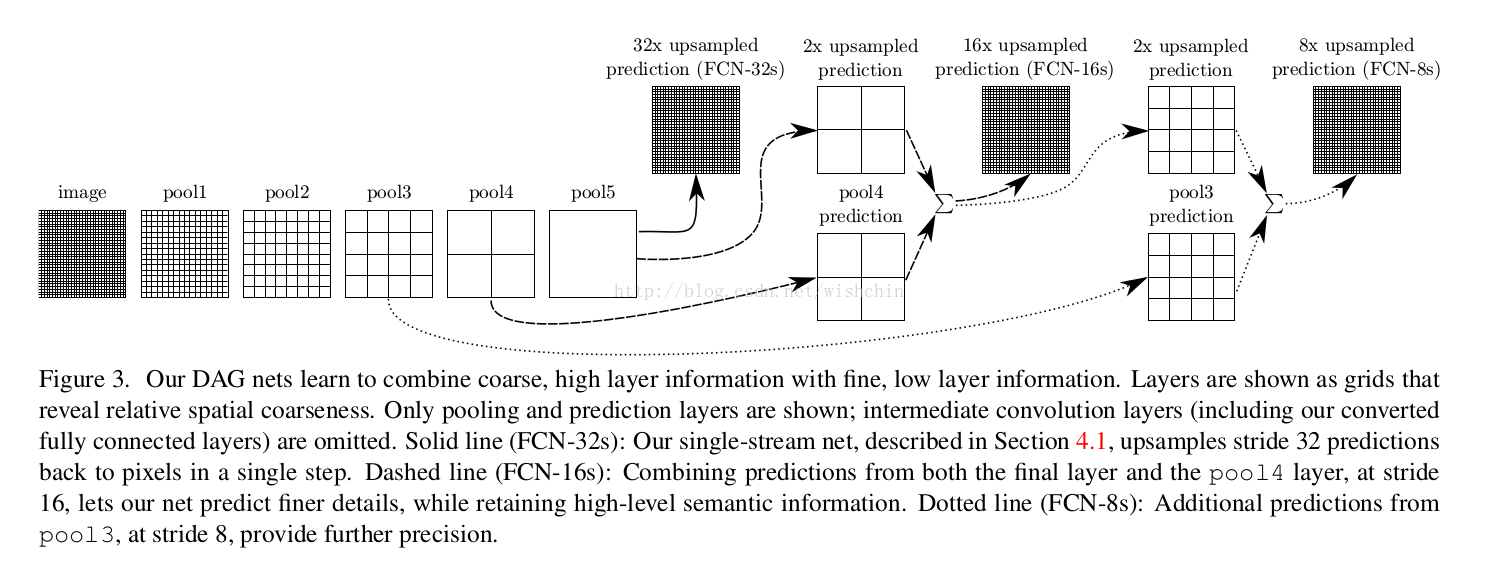
参考:经典论文Fully Convolutional Networks for semantic Segmentation
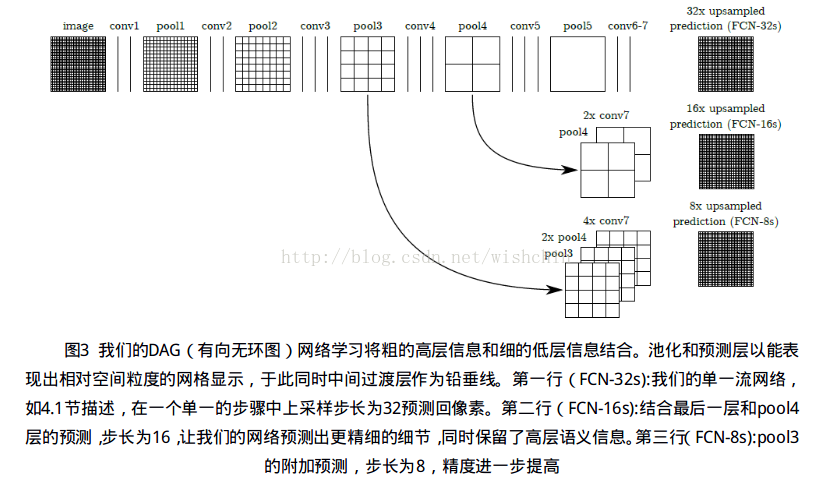
作者又翻译了一遍
总结:
pooling层的多层分布,最终用于预测每个点的类别信息,pooling层的粒度与最终分割的精度产生关联。
Caffe FCN:可视化featureMaps和Weights(C++)、获取FCN结果的更多相关文章
- 神经网络:caffe特征可视化的代码例子
caffe特征可视化的代码例子 不少读者看了我前面两篇文章 总结一下用caffe跑图片数据的研究流程 deep learning实践经验总结2--准确率再次提升,到达0.8.再来总结一下 之后.想知道 ...
- caffe net 可视化工具,,层特征可视化
1.只用网络在线结构绘制可视化网络模型 http://ethereon.github.io/netscope/#/editor 将对应的网络输入到里面,然后按shift+enter即可查看对应的网络结 ...
- caffe model 可视化
1. 打开网址 http://ethereon.github.io/netscope/#/editor 2.将自己的train_test.prototxt里的复制粘贴到左边 3.然后同时shift+e ...
- caffe net 可视化工具
http://ethereon.github.io/netscope/#/editor 将对应的网络输入到里面,然后按shift+enter即可查看对应的网络结构
- caffe网络结构可视化在线工具
http://ethereon.github.io/netscope/#/editor shift+enter
- Caffe使用step by step:r-cnn目标检测代码
深度学习算法火起来之后,基于深度学习各种模型都如雨后春笋一般在各个领域广泛应用. 由于想把深度学习算法应用在在视频目标检测方向,得到一个较好的结果.由于视频数据的复杂性,因此使用深度学习算法在视频中的 ...
- Caffe入门随笔
Caffe入门随笔 分享一下自己入门机器学习的一些资料:(1)课程,最推荐Coursera上的Andrew NG的Machine Learning,最好注册课程,然后跟下来.其次是华盛顿大学的Ma ...
- Tensorflow可视化MNIST手写数字训练
简述] 我们在学习编程语言时,往往第一个程序就是打印“Hello World”,那么对于人工智能学习系统平台来说,他的“Hello World”小程序就是MNIST手写数字训练了.MNIST是一个手写 ...
- 【caffe Net】使用举例和代码中文注释
首先是Net使用的小例子: #include <vector> #include <iostream> #include <caffe/net.hpp> using ...
随机推荐
- F - Experienced Endeavour 矩阵快速幂
Alice is given a list of integers by Bob and is asked to generate a new list where each element in t ...
- [bzoj3781]小B的询问_莫队
小B的询问 bzoj-3781 题目大意:给定一个n个数的序列,m次询问.每次询问一段区间内数的种类的平方和. 注释:$1\le n\,m\le 5\cdot 10^4$. 想法:莫队练习题. 我们考 ...
- 用xtrabackup+binlog恢复误删除的数据库
关键技术,数据库产生的二进制文件,在主库就是binlog在从库就是relay-log,用最新的物理备份可以新启动个新实例,可以模拟个从库,把主库的binlog复制到新的数据库实例上,利用主从复制和物理 ...
- 27、Java并发性和多线程-CAS(比较和替换)
以下内容转自http://ifeve.com/compare-and-swap/: CAS(Compare and swap)比较和替换是设计并发算法时用到的一种技术.简单来说,比较和替换是使用一个期 ...
- MVC中动作方法三个特性以及解决同名方法冲突
一.Http请求谓词特性(解决方法同名冲突问题的一个方案) 关于Http谓词特点:经常使用,如果不加上该特性,默认动作方法接收所有谓词的请求一般开发中都会加上谓词,限定请求谓词类型 二.NonActi ...
- webservice Connection timed out
webservice Connection timed out,当发生webservice的链接超时错误时.我想原因无非就是webclient到webservice之间的链接通路发生了异常,那么该怎样 ...
- LeetCode 941. Valid Mountain Array (有效的山脉数组)
题目标签:Array 题目给了一组int array A,让我们判断它是否是 一个山脉数组. 山脉数组一定要有一个最高值,然后要同时有 山坡和下坡. 想法是,从左边开始依次比较两个数字,int[0] ...
- error: 'Can't connect to local MySQL server through socket '/var/lib/mysql/mysql.sock' (2)'
[root@luozhonghua ~]# /usr/bin/mysqladmin -u root password 'aaaaaa' /usr/bin/mysqladmin: connect t ...
- linux替换目录下所有文件中的某字符串
linux替换目录下所有文件中的某字符串 比如,要将目录/modules下面所有文件中的zhangsan都修改成lisi,这样做: sed -i "s/zhangsan/lisi/g&quo ...
- oc68--NSString
// // main.m // 字符串截取 #import <Foundation/Foundation.h> int main(int argc, const char * argv[] ...