
Android TextView使用HTML处理字体样式、显示图片等
一般情况下,TextView中的文本都是一个样式。那么如何对于TextView中各个部分的文本来设置字体,大小,颜色,样式,以及超级链接等属性呢?下面我们通过SpannableString的具体实例操作来演示一下。

//创建一个 SpannableString对象

SpannableString msp = new SpannableString("字体测试字体大小一半两倍前景色背景色正常粗体斜体粗斜体下划线删除线x1x2电话邮件网站短信彩信地图X轴综合");

      //设置字体(default,default-bold,monospace,serif,sans-serif)

      msp.setSpan(new TypefaceSpan("monospace"), 0, 2, Spanned.SPAN_EXCLUSIVE_EXCLUSIVE);

      msp.setSpan(new TypefaceSpan("serif"), 2, 4, Spanned.SPAN_EXCLUSIVE_EXCLUSIVE);

      //设置字体大小(绝对值,单位:像素)

      msp.setSpan(new AbsoluteSizeSpan(20), 4, 6, Spanned.SPAN_EXCLUSIVE_EXCLUSIVE);

      msp.setSpan(new AbsoluteSizeSpan(20,true), 6, 8, Spanned.SPAN_EXCLUSIVE_EXCLUSIVE);  //第二个参数boolean dip,如果为true,表示前面的字体大小单位为dip,否则为像素,同上。

      //设置字体大小(相对值,单位:像素) 参数表示为默认字体大小的多少倍

      msp.setSpan(new RelativeSizeSpan(0.5f), 8, 10, Spanned.SPAN_EXCLUSIVE_EXCLUSIVE);  //0.5f表示默认字体大小的一半

      msp.setSpan(new RelativeSizeSpan(2.0f), 10, 12, Spanned.SPAN_EXCLUSIVE_EXCLUSIVE);  //2.0f表示默认字体大小的两倍

      //设置字体前景色

      msp.setSpan(new ForegroundColorSpan(Color.MAGENTA), 12, 15, Spanned.SPAN_EXCLUSIVE_EXCLUSIVE);  //设置前景色为洋红色

      //设置字体背景色

      msp.setSpan(new BackgroundColorSpan(Color.CYAN), 15, 18, Spanned.SPAN_EXCLUSIVE_EXCLUSIVE);  //设置背景色为青色

      //设置字体样式正常,粗体,斜体,粗斜体

      msp.setSpan(new StyleSpan(android.graphics.Typeface.NORMAL), 18, 20, Spanned.SPAN_EXCLUSIVE_EXCLUSIVE);  //正常

      msp.setSpan(new StyleSpan(android.graphics.Typeface.BOLD), 20, 22, Spanned.SPAN_EXCLUSIVE_EXCLUSIVE);  //粗体

      msp.setSpan(new StyleSpan(android.graphics.Typeface.ITALIC), 22, 24, Spanned.SPAN_EXCLUSIVE_EXCLUSIVE);  //斜体

      msp.setSpan(new StyleSpan(android.graphics.Typeface.BOLD_ITALIC), 24, 27, Spanned.SPAN_EXCLUSIVE_EXCLUSIVE);  //粗斜体

      //设置下划线

      msp.setSpan(new UnderlineSpan(), 27, 30, Spanned.SPAN_EXCLUSIVE_EXCLUSIVE);

      //设置删除线

      msp.setSpan(new StrikethroughSpan(), 30, 33, Spanned.SPAN_EXCLUSIVE_EXCLUSIVE);

      //设置上下标

      msp.setSpan(new SubscriptSpan(), 34, 35, Spanned.SPAN_EXCLUSIVE_EXCLUSIVE);     //下标

      msp.setSpan(new SuperscriptSpan(), 36, 37, Spanned.SPAN_EXCLUSIVE_EXCLUSIVE);   //上标

      //超级链接(需要添加setMovementMethod方法附加响应)

      msp.setSpan(new URLSpan("tel:4155551212"), 37, 39, Spanned.SPAN_EXCLUSIVE_EXCLUSIVE);     //电话

      msp.setSpan(new URLSpan("mailto:webmaster@google.com"), 39, 41, Spanned.SPAN_EXCLUSIVE_EXCLUSIVE);     //邮件

      msp.setSpan(new URLSpan("http://www.baidu.com"), 41, 43, Spanned.SPAN_EXCLUSIVE_EXCLUSIVE);     //网络

      msp.setSpan(new URLSpan("sms:4155551212"), 43, 45, Spanned.SPAN_EXCLUSIVE_EXCLUSIVE);     //短信   使用sms:或者smsto:

      msp.setSpan(new URLSpan("mms:4155551212"), 45, 47, Spanned.SPAN_EXCLUSIVE_EXCLUSIVE);     //彩信   使用mms:或者mmsto:

      msp.setSpan(new URLSpan("geo:38.899533,-77.036476"), 47, 49, Spanned.SPAN_EXCLUSIVE_EXCLUSIVE);     //地图

      //设置字体大小(相对值,单位:像素) 参数表示为默认字体宽度的多少倍

      msp.setSpan(new ScaleXSpan(2.0f), 49, 51, Spanned.SPAN_EXCLUSIVE_EXCLUSIVE); //2.0f表示默认字体宽度的两倍,即X轴方向放大为默认字体的两倍,而高度不变

      //设置项目符号

      msp.setSpan(new BulletSpan(android.text.style.BulletSpan.STANDARD_GAP_WIDTH,Color.GREEN), 0 ,53, Spanned.SPAN_EXCLUSIVE_EXCLUSIVE); //第一个参数表示项目符号占用的宽度,第二个参数为项目符号的颜色

      tv_textView.setText(msp);

      tv_textView.setMovementMethod(LinkMovementMethod.getInstance());
from:http://blog.csdn.net/johnsonblog/article/details/7741972
String类是CharSequence的子类,在CharSequence子类中有一个接口Spanned,即类似html的带标记的文本,我们可以用它来在TextView中显示html。但在上面Android源码注释中有提及TextView does not accept HTML-like formatting。
android.text.Html类共提供了三个方法,可以到Android帮助文档查看。
public static Spanned fromHtml (String source)

public static Spanned fromHtml (String source, Html.ImageGetter imageGetter, Html.TagHandler tagHandler)

public static String toHtml (Spanned text)
通过使用第一个方法,可以将Html显示在TextView中:
public void onCreate(Bundle savedInstanceState) {

        super.onCreate(savedInstanceState);

        setContentView(R.layout.main);

        TextView tv=(TextView)findViewById(R.id.textView1);

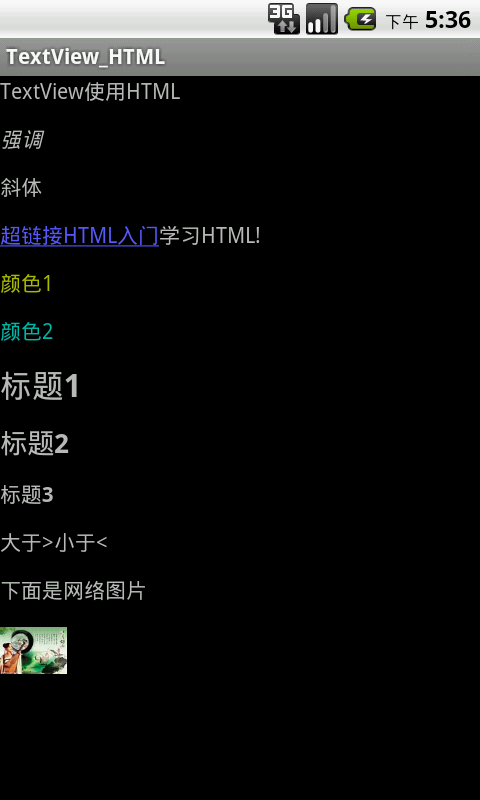
        String html="<html><head><title>TextView使用HTML</title></head><body><p><strong>强调</strong></p><p><em>斜体</em></p>"

                +"<p><a href=\"http://www.dreamdu.com/xhtml/\">超链接HTML入门</a>学习HTML!</p><p><font color=\"#aabb00\">颜色1"

                +"</p><p><font color=\"#00bbaa\">颜色2</p><h1>标题1</h1><h3>标题2</h3><h6>标题3</h6><p>大于>小于<</p><p>" +

                "下面是网络图片</p><img src=\"http://avatar.csdn.net/0/3/8/2_zhang957411207.jpg\"/></body></html>";

        tv.setMovementMethod(ScrollingMovementMethod.getInstance());//滚动

        tv.setText(Html.fromHtml(html));

    }
效果:
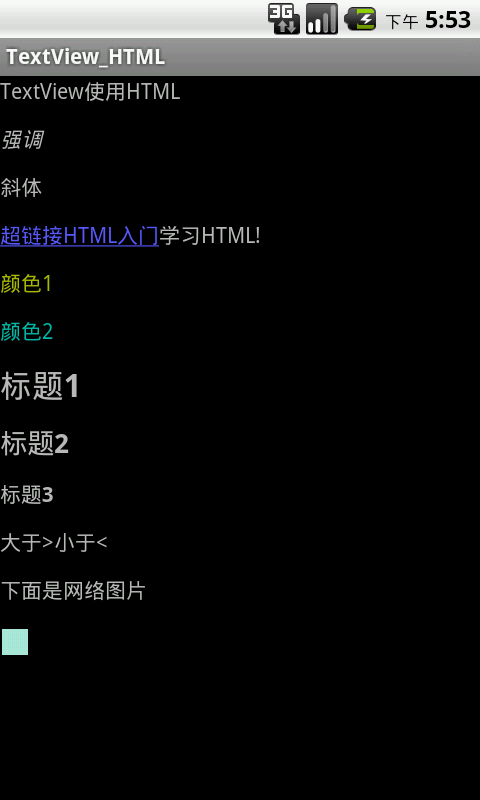
可以看出,字体效果是显示出来了,但是图片却没有显示。要实现图片的显示需要使用Html.fromHtml的另外一个重构方法:public static Spanned fromHtml (String source, Html.ImageGetterimageGetter, Html.TagHandler tagHandler)其中Html.ImageGetter是一个接口,我们要实现此接口,在它的getDrawable(String source)方法中返回图片的Drawable对象才可以。
修改后的代码:
ImageGetter imgGetter = new Html.ImageGetter() {

        public Drawable getDrawable(String source) {

              Drawable drawable = null;

              URL url;

              try {

                  url = new URL(source);

                  drawable = Drawable.createFromStream(url.openStream(), "");  //获取网路图片

              } catch (Exception e) {

                  return null;

              }

              drawable.setBounds(0, 0, drawable.getIntrinsicWidth(), drawable

                            .getIntrinsicHeight());

              return drawable;

        }

};
这里主要是实现了Html.ImageGetter接口,通过图片的URL地址获取相应的Drawable实例。
不要忘了在Mainifest文件中加入网络访问的权限:
<uses-permission android:name="android.permission.INTERNET" />
友情提示:通过网络获取图片是一个耗时的操作,最好不要放在主线程中,否则容易引起阻塞。
上面介绍的是显示网络上的图片,但如何显示本地的图片呢:
   ImageGetter imgGetter = new Html.ImageGetter() {

        public Drawable getDrawable(String source) {

              Drawable drawable = null;

              drawable = Drawable.createFromPath(source); //显示本地图片

              drawable.setBounds(0, 0, drawable.getIntrinsicWidth(), drawable

                            .getIntrinsicHeight());

              return drawable;

        }

};
Android实战技巧:用TextView实现Rich Text---在同一个TextView中设置不同的字体风格
From:http://blog.csdn.net/hitlion2008/article/details/6856780
背景介绍
在开发应用过程中经常会遇到显示一些不同的字体风格的信息犹如默认的LockScreen上面的时间和充电信息。对于类似的情况,可能第一反应就是用不同的多个TextView来实现,对于每个TextView设置不同的字体风格以满足需求。
这里推荐的做法是使用android.text.*;和android.text.style.*;下面的组件来实现RichText:也即在同一个TextView中设置不同的字体风格。对于某些应用,比如文本编辑,记事本,彩信,短信等地方,还必须使用这些组件才能达到想到的显示效果。
主要的基本工具类有android.text.Spanned; android.text.SpannableString; android.text.SpannableStringBuilder;使用这些类来代替常规String。SpannableString和SpannableStringBuilder可以用来设置不同的Span,这些Span便是用于实现Rich Text,比如粗体,斜体,前景色,背景色,字体大小,字体风格等等,android.text.style.*中定义了很多的Span类型可供使用。
这是相关的API的Class General Hierarchy: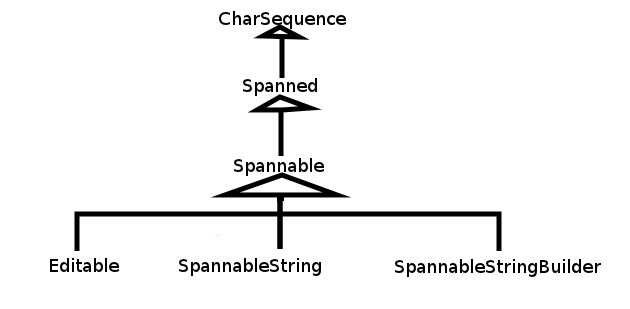
因为Spannable等最终都实现了CharSequence接口,所以可以直接把SpannableString和SpannableStringBuilder通过TextView.setText()设置给TextView。
使用方法
当要显示Rich Text信息的时候,可以使用创建一个SpannableString或SpannableStringBuilder,它们的区别在于SpannableString像一个String一样,构造对象的时候传入一个String,之后再无法更改String的内容,也无法拼接多个SpannableString;而SpannableStringBuilder则更像是StringBuilder,它可以通过其append()方法来拼接多个String:
SpannableString word = new SpannableString("The quick fox jumps over the lazy dog");

SpannableStringBuilder multiWord = new SpannableStringBuilder();

multiWord.append("The Quick Fox");

multiWord.append("jumps over");

multiWord.append("the lazy dog");
创建完Spannable对象后,就可以为它们设置Span来实现想要的Rich Text了,常见的Span有:
- AbsoluteSizeSpan(int size) ---- 设置字体大小,参数是绝对数值,相当于Word中的字体大小
- RelativeSizeSpan(float proportion) ---- 设置字体大小,参数是相对于默认字体大小的倍数,比如默认字体大小是x, 那么设置后的字体大小就是x*proportion,这个用起来比较灵活,proportion>1就是放大(zoom in), proportion<1就是缩小(zoom out)
- ScaleXSpan(float proportion) ---- 缩放字体,与上面的类似,默认为1,设置后就是原来的乘以proportion,大于1时放大(zoon in),小于时缩小(zoom out)
- BackgroundColorSpan(int color) ----背景着色,参数是颜色数值,可以直接使用android.graphics.Color里面定义的常量,或是用Color.rgb(int, int, int)
- ForegroundColorSpan(int color) ----前景着色,也就是字的着色,参数与背景着色一致
- TypefaceSpan(String family) ----字体,参数是字体的名字比如“sans", "sans-serif"等
- StyleSpan(Typeface style) -----字体风格,比如粗体,斜体,参数是android.graphics.Typeface里面定义的常量,如Typeface.BOLD,Typeface.ITALIC等等。
- StrikethroughSpan----如果设置了此风格,会有一条线从中间穿过所有的字,就像被划掉一样
对于这些Sytle span在使用的时候通常只传上面所说明的构造参数即可,不需要设置其他的属性,如果需要的话,也可以对它们设置其他的属性,详情可以参见文档。
SpannableString和SpannableStringBuilder都有一个设置上述Span的方法:
- /**
- * Set the style span to Spannable, such as SpannableString or SpannableStringBuilder
- * @param what --- the style span, such as StyleSpan
- * @param start --- the starting index of characters to which the style span to apply
- * @param end --- the ending index of characters to which the style span to apply
- * @param flags --- the flag specified to control
- */
- setSpan(Object what, int start, int end, int flags);
其中参数what是要设置的Style span,start和end则是标识String中Span的起始位置,而 flags是用于控制行为的,通常设置为0或Spanned中定义的常量,常用的有:
- Spanned.SPAN_EXCLUSIVE_EXCLUSIVE --- 不包含两端start和end所在的端点
- Spanned.SPAN_EXCLUSIVE_INCLUSIVE --- 不包含端start,但包含end所在的端点
- Spanned.SPAN_INCLUSIVE_EXCLUSIVE --- 包含两端start,但不包含end所在的端点
- Spanned.SPAN_INCLUSIVE_INCLUSIVE--- 包含两端start和end所在的端点
这里理解起来就好像数学中定义区间,开区间还是闭区间一样的。还有许多其他的Flag,可以参考这里。这里要重点说明下关于参数0,有很多时候,如果设置了上述的参数,那么Span会从start应用到Text结尾,而不是在start和end二者之间,这个时候就需要使用Flag 0。
Linkify
另外,也可以对通过TextView.setAutoLink(int)设置其Linkify属性,其用处在于,TextView会自动检查其内容,会识别出phone number, web address or email address,并标识为超链接,可点击,点击后便跳转到相应的应用,如Dialer,Browser或Email。Linkify有几个常用选项,更多的请参考文档:
- Linkify.EMAIL_ADDRESS -- 仅识别出TextView中的Email在址,标识为超链接,点击后会跳到Email,发送邮件给此地址
- Linkify.PHONE_NUMBERS -- 仅识别出TextView中的电话号码,标识为超链接,点击后会跳到Dialer,Call这个号码
- Linkify.WEB_URLS-- 仅识别出TextView中的网址,标识为超链接,点击后会跳到Browser打开此URL
- Linkify.ALL -- 这个选项是识别出所有系统所支持的特殊Uri,然后做相应的操作
权衡选择
个人认为软件开发中最常见的问题不是某个技巧怎么使用的问题,而是何时该使用何技巧的问题,因为实现同一个目标可能有N种不同的方法,就要权衡利弊,选择最合适的一个,正如常言所云,没有最好的,只有最适合的。如前面所讨论的,要想用不同的字体展现不同的信息可能的解法,除了用Style Span外还可以用多个TextView。那么就需要总结下什么时候该使用StyleSpan,什么时候该使用多个TextView:
- 如果显示的是多个不同类别的信息,就应该使用多个TextView,这样也方便控制和改变各自的信息,例子就是默认LockScreen上面的日期和充电信息,因为它们所承载不同的信息,所以应该使用多个TextView来分别呈现。
- 如果显示的是同一类信息,或者同一个信息,那么应该使用StyleSpan。比如,短信息中,要把联系人的相关信息突出显示;或是想要Highlight某些信息等。
- 如果要实现Rich text,没办法,只能使用Style span。
- 如果要实现某些特效,也可以考虑使用StyleSpan。设置不同的字体风格只是Style span的初级应用,如果深入研究,可以发现很多奇妙的功效。
实例
<?xml version="1.0" encoding="utf-8"?>

<LinearLayout

  xmlns:android="http://schemas.android.com/apk/res/android"

  android:layout_width="wrap_content"

  android:layout_height="wrap_content"

  android:orientation="vertical">

  <ScrollView

    android:layout_width="fill_parent"

    android:layout_height="wrap_content">

        <LinearLayout

            android:layout_width="fill_parent"

            android:layout_height="wrap_content"

            android:orientation="vertical">

              <TextView

                android:id="@+id/text_view_font_1"

                android:layout_width="fill_parent"

                android:layout_height="wrap_content"

                />

              <TextView

                android:id="@+id/text_view_font_2"

                android:layout_width="fill_parent"

                android:layout_height="wrap_content"

                />

              <TextView

                android:id="@+id/text_view_font_3"

                android:layout_width="fill_parent"

                android:layout_height="wrap_content"

                />

              <TextView

                android:id="@+id/text_view_font_4"

                android:layout_width="fill_parent"

                android:layout_height="wrap_content"

                />

              <TextView

                android:id="@+id/text_view_font_5"

                android:layout_width="fill_parent"

                android:layout_height="wrap_content"

                />

       </LinearLayout>

    </ScrollView>

</LinearLayout>
Source code:
package com.android.effective;

import java.util.regex.Matcher;

import java.util.regex.Pattern;

import android.app.Activity;

import android.graphics.Color;

import android.graphics.Typeface;

import android.os.Bundle;

import android.text.Spannable;

import android.text.SpannableString;

import android.text.SpannableStringBuilder;

import android.text.style.AbsoluteSizeSpan;

import android.text.style.BackgroundColorSpan;

import android.text.style.ForegroundColorSpan;

import android.text.style.QuoteSpan;

import android.text.style.RelativeSizeSpan;

import android.text.style.ScaleXSpan;

import android.text.style.StrikethroughSpan;

import android.text.style.StyleSpan;

import android.text.style.TypefaceSpan;

import android.text.style.URLSpan;

import android.text.util.Linkify;

import android.widget.TextView;

public class TextViewFontActivity extends Activity {

    @Override

    public void onCreate(Bundle bundle) {

        super.onCreate(bundle);

        setContentView(R.layout.textview_font_1);

        // Demonstration of basic SpannableString and spans usage

        final TextView textWithString = (TextView) findViewById(R.id.text_view_font_1);

        String w = "The quick fox jumps over the lazy dog";

        int start = w.indexOf('q');

        int end = w.indexOf('k') + 1;

        Spannable word = new SpannableString(w);

        word.setSpan(new AbsoluteSizeSpan(22), start, end,

                Spannable.SPAN_INCLUSIVE_INCLUSIVE);

        word.setSpan(new StyleSpan(Typeface.BOLD), start, end,

                Spannable.SPAN_INCLUSIVE_INCLUSIVE);

        word.setSpan(new BackgroundColorSpan(Color.RED), start, end,

                Spannable.SPAN_INCLUSIVE_INCLUSIVE);

        textWithString.setText(word);

        // Demonstration of basic SpannableStringBuilder and spans usage

        final TextView textWithBuilder = (TextView) findViewById(R.id.text_view_font_2);

        SpannableStringBuilder word2 = new SpannableStringBuilder();

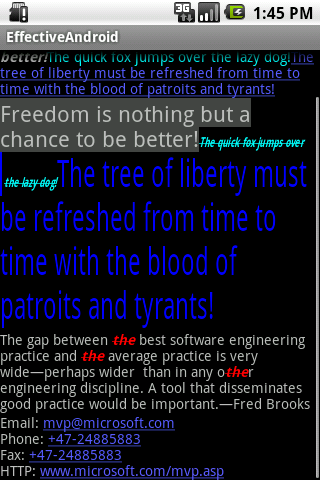
        final String one = "Freedom is nothing but a chance to be better!";

        final String two = "The quick fox jumps over the lazy dog!";

        final String three = "The tree of liberty must be refreshed from time to time with " +

                "the blood of patroits and tyrants!";

        word2.append(one);

        start = 0;

        end = one.length();

        word2.setSpan(new StyleSpan(Typeface.BOLD_ITALIC), start, end, Spannable.SPAN_EXCLUSIVE_EXCLUSIVE);

        word2.append(two);

        start = end;

        end += two.length();

        word2.setSpan(new ForegroundColorSpan(Color.CYAN), start, end,

                Spannable.SPAN_EXCLUSIVE_EXCLUSIVE);

        word2.append(three);

        start = end;

        end += three.length();

        word2.setSpan(new URLSpan(three), start, end, Spannable.SPAN_EXCLUSIVE_EXCLUSIVE);

        textWithBuilder.setText(word2);

        // Troubleshooting when using SpannableStringBuilder

        final TextView textTroubles = (TextView) findViewById(R.id.text_view_font_3);

        SpannableStringBuilder word3 = new SpannableStringBuilder();

        start = 0;

        end = one.length();

        // Caution: must first append or set text to SpannableStringBuilder or SpannableString

        // then set the spans to them, otherwise, IndexOutOfBoundException is thrown when setting spans

        word3.append(one);

        // For AbsoluteSizeSpan, the flag must be set to 0, otherwise, it will apply this span to until end of text

        word3.setSpan(new AbsoluteSizeSpan(22), start, end, 0);//Spannable.SPAN_INCLUSIVE_INCLUSIVE);

        // For BackgroundColorSpanSpan, the flag must be set to 0, otherwise, it will apply this span to end of text

        word3.setSpan(new BackgroundColorSpan(Color.DKGRAY), start, end, 0); //Spannable.SPAN_INCLUSIVE_INCLUSIVE);

        word3.append(two);

        start = end;

        end += two.length();

        word3.setSpan(new TypefaceSpan("sans-serif"), start, end,

                Spannable.SPAN_INCLUSIVE_INCLUSIVE);

        // TODO: sometimes, flag must be set to 0, otherwise it will apply the span to until end of text

        // which MIGHT has nothing to do with specific span type.

        word3.setSpan(new StyleSpan(Typeface.BOLD_ITALIC), start, end, 0);//Spannable.SPAN_INCLUSIVE_INCLUSIVE);

        word3.setSpan(new ScaleXSpan(0.618f), start, end, Spannable.SPAN_INCLUSIVE_INCLUSIVE);

        word3.setSpan(new StrikethroughSpan(), start, end, 0);//Spannable.SPAN_INCLUSIVE_INCLUSIVE);

        word3.setSpan(new ForegroundColorSpan(Color.CYAN), start, end, Spannable.SPAN_INCLUSIVE_INCLUSIVE);

        word3.setSpan(new QuoteSpan(), start, end, 0); //Spannable.SPAN_INCLUSIVE_INCLUSIVE);

        word3.append(three);

        start = end;

        end += three.length();

        word3.setSpan(new RelativeSizeSpan((float) Math.E), start, end, Spannable.SPAN_INCLUSIVE_INCLUSIVE);

        word3.setSpan(new ForegroundColorSpan(Color.BLUE), start, end, Spannable.SPAN_INCLUSIVE_INCLUSIVE);

        textTroubles.setText(word3);

        // Highlight some patterns

        final String four = "The gap between the best software engineering " +

                "practice and the average practice is very wide¡ªperhaps wider " +

                " than in any other engineering discipline. A tool that disseminates " +

                "good practice would be important.¡ªFred Brooks";

        final Pattern highlight = Pattern.compile("the");

        final TextView textHighlight = (TextView) findViewById(R.id.text_view_font_4);

        SpannableString word4 = new SpannableString(four);

        Matcher m = highlight.matcher(word4.toString());

        while (m.find()) {

            word4.setSpan(new StyleSpan(Typeface.BOLD_ITALIC), m.start(), m.end(),

                    Spannable.SPAN_INCLUSIVE_INCLUSIVE);

            word4.setSpan(new ForegroundColorSpan(Color.RED), m.start(), m.end(),

                    Spannable.SPAN_INCLUSIVE_INCLUSIVE);

            word4.setSpan(new StrikethroughSpan(), m.start(), m.end(),

                    Spannable.SPAN_INCLUSIVE_INCLUSIVE);

        }

        textHighlight.setText(word4);

        // Set numbers, URLs and E-mail address to be clickable with TextView#setAutoLinkMask

        final TextView textClickable = (TextView) findViewById(R.id.text_view_font_5);

        final String contact = "Email: mvp@microsoft.com\n" +

                "Phone: +47-24885883\n" +

                "Fax: +47-24885883\n" +

                "HTTP: www.microsoft.com/mvp.asp";

        // Set the attribute first, then set the text. Otherwise, it won't work

        textClickable.setAutoLinkMask(Linkify.ALL); // or set 'android:autoLink' in layout xml

        textClickable.setText(contact);

    }

}
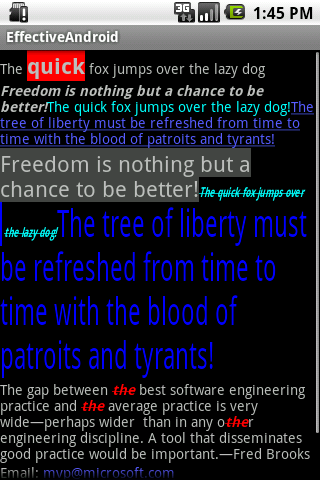
The results:
Android TextView使用HTML处理字体样式、显示图片等的更多相关文章
- Android Toolbar 标题居中及字体样式自定义
首先找到 toolbar 所在xml布局文件,将toolbar控件放置在一个相对布局(RelativeLayout)中,然后设置toolbar的title为空(随便打几个空格即可): 然后在 tool ...
- Android开发——获得Json数据,并显示图片
流程介绍 使用okhttp网络框架进行get请求,获得json数据 //一个封装好的工具类的静态方法 public static void sendOkHttpRequest(final String ...
- (转)使用OpenGL显示图像(七)Android OpenGLES2.0——纹理贴图之显示图片
转:http://blog.csdn.net/junzia/article/details/52842816 前面几篇博客,我们将了Android中利用OpenGL ES 2.0绘制各种形体,并在上一 ...
- Android textview 设置不同的字体大小和颜色
在实际应用中,需要将一个字符串已不同的颜色,字体显示出来.当然完全可以通过不同textview拼接出来.也可以通过一个textview来展示. 步骤如下: 1.定义不同style . 不妨如下定义2个 ...
- Android TextView文字过多时通过滚动条显示多余内容
方法一: TextView文字过多,显示不全,怎么办?我们可以为Textview添加滚动条. <TextView android:id="@+id/bus_detail_content ...
- Android TextView文字超出一屏不能显示其它的文字 解决方案
在android上面让TextView 过多的文字实现有滚动条,之前想简单了以为设置TextView的属性就可以实现,结果还是需要ScrollView配合使用,才能达到滚动条的效果有两种方式实现, 一 ...
- linux中终端字体样式显示不正常
问题:Centos终端中,字体显示不正常,中间感觉有空格,空格和单词傻傻分不清. 解决办法: yum groupinstall "Chinese Support" yum grou ...
- Android实例-操作sqlite数据库之Grid显示图片(XE8+小米2)
结果: 1.数据库文件,记得打包到程序中(assets\internal\). 操作方法: 1.新建firemonkey mobile application①菜单->File->New- ...
- Android的TextView使用Html来处理图片显示、字体样式、超链接等
一.[Android实例]实现TextView里的文字有不同颜色 转eoe:http://www.eoeandroid.com/thread-4496-1-1.html import android. ...
随机推荐
- 细说websocket - php篇(未完)
下面我画了一个图演示 client 和 server 之间建立 websocket 连接时握手部分,这个部分在 node 中可以十分轻松的完成,因为 node 提供的 net 模块已经对 socket ...
- eclipse中maven插件,改变默认仓库位置
一.eclipse中maven默认仓库是当前用户下.m2/repository,需改变默认路径按照下面步骤. 步骤一:安装maven 下载:http://maven.apache.org/ 配置mav ...
- 改动app的默认设置(包含改动默认launcher)
1.改为自己的launcher ComponentName component = new ComponentName( context.getPackageName(), MainActivity. ...
- 思科ACL不连续通配符掩码的计算
access-list 120 permit ip 10.0.0.0 0.0.0.191 any 这条ACL看似简单,却又复杂,因为正常我们见到的通配符掩码都是诸如0.0.0.255(255. ...
- 2017年网站安全狗绕过WebShell上传拦截的新姿势
本文来源:https://www.webshell.ren/post-308.html 今天有一位朋友发一个上传点给我 我一看是南方cms 有双文件上传漏洞 本来可以秒的 但是看到了 安全狗 从图片可 ...
- PS中进程状态
PROCESS STATE CODES Here are the different values that the s, stat and state output spec ...
- JavaScript中的闭包详解
闭包是JavaScript的重要特性,非常强大,可用于执行复杂的计算,可并不容易理解,尤其是对之前从事面向对象编程的人来说,对 JavaScript 认识和编程显得更难.特别是在看一些开源的JavaS ...
- [android] AndroidManifest.xml - 【 manifest -> application】
语法: <application android:allowTaskReparenting=["true" | "false"] android:back ...
- C++ 类中的静态成员变量,静态成员函数
//类中的静态成员变量,静态成员函数 #define _CRT_SECURE_NO_WARNINGS #include<iostream> using namespace std; /* ...
- trim() 是什么意思?
这是一个很常见的函数,他的所用是去掉字符序列左边和右边的空格,如字符串str = " ai lafu yo ";str = trim(str); cout << str ...