基于tomcat集群做session共享
前端代理服务器nginx:192.168.223.136
tomcat服务器:采用的一台多实例192.168.223.146:8081,192.168.223.146:8082(如何构建多实例tomcat,请参考前面的文章)
首先查看下tomcat的webapps目录架构:
[root@wadeson tomcat-instance]# pwd
/usr/local/tomcat-instance
[root@wadeson tomcat-instance]# ll
总用量 24
-rwxr-xr-x. 1 root root 165 8月 9 15:31 start-tomcat1.sh
-rwxr-xr-x. 1 root root 165 8月 9 16:18 start-tomcat2.sh
-rwxr-xr-x. 1 root root 165 8月 9 15:38 stop-tomcat1.sh
-rwxr-xr-x. 1 root root 165 8月 9 16:18 stop-tomcat2.sh
drwxr-xr-x. 7 root root 4096 8月 9 15:45 tomcat1
drwxr-xr-x. 7 root root 4096 8月 9 16:12 tomcat2
[root@wadeson tomcat-instance]# cd tomcat1/webapps/
[root@wadeson webapps]# tree .
.
├── myapp
│ └── test.jsp
└── ROOT
├── classes
├── index.jsp
├── lib
├── META-INF
└── WEB-INF
由于安装的tomcat是8.5版本的,所以查看下官方文档:https://tomcat.apache.org/tomcat-8.5-doc/cluster-howto.html
构建tomcat集群只需要如下几步:
1、添加集群组件信息(在host或者engine组件下添加进去就行)
  <Cluster className="org.apache.catalina.ha.tcp.SimpleTcpCluster"

                 channelSendOptions="8">

          <Manager className="org.apache.catalina.ha.session.DeltaManager"

                   expireSessionsOnShutdown="false"

                   notifyListenersOnReplication="true"/>

          <Channel className="org.apache.catalina.tribes.group.GroupChannel">

            <Membership className="org.apache.catalina.tribes.membership.McastService"

                        address="228.0.0.4"

                        port="45564"

                        frequency="500"

                        dropTime="3000"/>

            <Receiver className="org.apache.catalina.tribes.transport.nio.NioReceiver"

                      address="auto"

                      port="4000"

                      autoBind="100"

                      selectorTimeout="5000"

                      maxThreads="6"/>

            <Sender className="org.apache.catalina.tribes.transport.ReplicationTransmitter">

              <Transport className="org.apache.catalina.tribes.transport.nio.PooledParallelSender"/>

            </Sender>

            <Interceptor className="org.apache.catalina.tribes.group.interceptors.TcpFailureDetector"/>

            <Interceptor className="org.apache.catalina.tribes.group.interceptors.MessageDispatchInterceptor"/>

          </Channel>

          <Valve className="org.apache.catalina.ha.tcp.ReplicationValve"

                 filter=""/>

          <Valve className="org.apache.catalina.ha.session.JvmRouteBinderValve"/>

          <Deployer className="org.apache.catalina.ha.deploy.FarmWarDeployer"

                    tempDir="/tmp/war-temp/"

                    deployDir="/tmp/war-deploy/"

                    watchDir="/tmp/war-listen/"

                    watchEnabled="false"/>

          <ClusterListener className="org.apache.catalina.ha.session.ClusterSessionListener"/>

        </Cluster>
以上是直接摘自官网,需要稍微做下修改address="auto",address="228.0.0.4"
2、需要在各自的应用程序目录下面为web.xml添加一行<distributable/>元素
- Make sure your
web.xmlhas the<distributable/>element
现在直接贴自己的配置tomcat1:
<Host name="localhost" appBase="/usr/local/tomcat-instance/tomcat1/webapps" unpackWARs="true" autoDeploy="true">
<Context path="" docBase="ROOT" reloadable="true"/>
<Valve className="org.apache.catalina.valves.AccessLogValve" directory="/usr/local/tomcat-instance/tomcat1/logs"
prefix="localhost_access_log" suffix=".txt"
pattern="%h %l %u %t "%r" %s %b" />
<Cluster className="org.apache.catalina.ha.tcp.SimpleTcpCluster" channelSendOptions="8">
<Manager className="org.apache.catalina.ha.session.DeltaManager"
expireSessionsOnShutdown="false"
notifyListenersOnReplication="true"/>
<Channel className="org.apache.catalina.tribes.group.GroupChannel">
<Membership className="org.apache.catalina.tribes.membership.McastService"
address="228.0.0.4"
port="45564"
frequency="500"
dropTime="3000"/>
<Receiver className="org.apache.catalina.tribes.transport.nio.NioReceiver"
address="192.168.223.146" 由于是一台主机上的两个tomcat实例,所以这里的cluster添加的内容都一样
port="4000"
autoBind="100"
selectorTimeout="5000"
maxThreads="6"/>
<Sender className="org.apache.catalina.tribes.transport.ReplicationTransmitter">
<Transport className="org.apache.catalina.tribes.transport.nio.PooledParallelSender"/>
</Sender>
<Interceptor className="org.apache.catalina.tribes.group.interceptors.TcpFailureDetector"/>
<Interceptor className="org.apache.catalina.tribes.group.interceptors.MessageDispatchInterceptor"/>
</Channel>
<Valve className="org.apache.catalina.ha.tcp.ReplicationValve"
filter=""/>
<Valve className="org.apache.catalina.ha.session.JvmRouteBinderValve"/>
<Deployer className="org.apache.catalina.ha.deploy.FarmWarDeployer"
tempDir="/tmp/war-temp/"
deployDir="/tmp/war-deploy/"
watchDir="/tmp/war-listen/"
watchEnabled="false"/>
<ClusterListener className="org.apache.catalina.ha.session.ClusterSessionListener"/>
</Cluster>
</Host>
然后在应用程序ROOT下面的WEB-INF的下面添加自己的web.xml:
[root@wadeson tomcat-instance]# ll tomcat1/webapps/ROOT/WEB-INF/web.xml
-rw-------. 1 root root 168271 8月 10 16:50 tomcat1/webapps/ROOT/WEB-INF/web.xml
<distributable/> 这就是需要添加的一行内容
</web-app>
于是配置tomcat1实例完成,tomcat2的配置和tomcat1一致(由于是同一主机的不同实例)
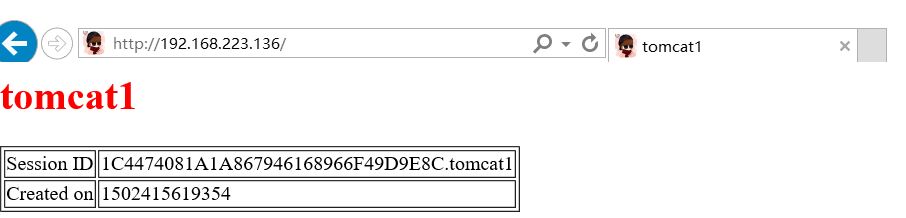
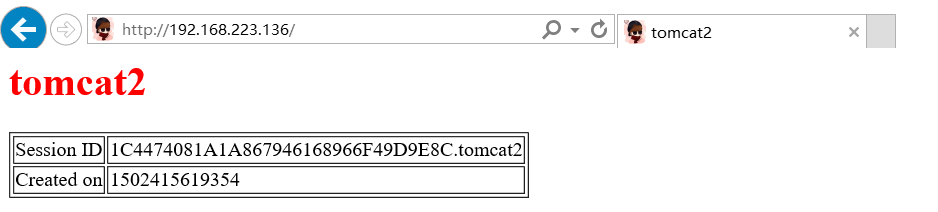
于是进行访问:

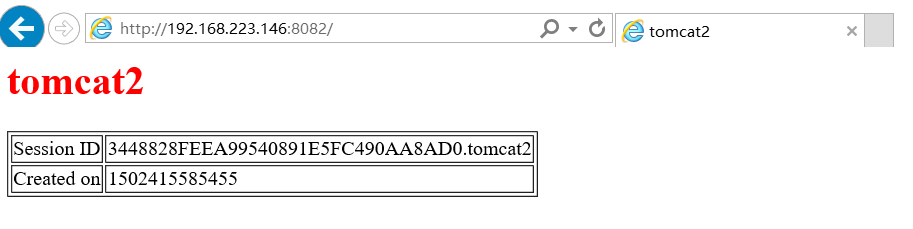
可以看见session的id值两者相同,只是后面的tomcat不一致,于是session共享的功能就达成了,然后配置nginx进行代理转发:
upstream backserver {
server 192.168.223.146:8081 weight=1;
server 192.168.223.146:8082 weight=1;
}
server {
listen 80;
server_name 192.168.223.136;
location / {
root html;
index index.html index.htm;
proxy_pass http://backserver/;
}
测试效果:
基于tomcat集群做session共享的更多相关文章
- Dubbo入门到精通学习笔记(十八):使用Redis3.0集群实现Tomcat集群的Session共享
文章目录 1.单节点访问http://192.168.1.61:8082/pay-web-boss/: 2.增加多一个消费者节点:192.168.1.62,以同样的方式部署pay-web-boss工程 ...
- Tomcat集群的session共享
配置Tomcat的session共享可以有三种解决方案: 第一种是以负载均衡服务器本身提供的session共享策略,每种服务器的配置是不一样的并且nginx本身是没有的. 第二种是利用web容器本身的 ...
- Tomcat 集群 + Redis Session 共享出现 Session 瞬间失效问题
写在前面的话 写这篇博客出于公司最近要迁移到新的云上面且对之前的资源,架构做一个升级. 本来是一个不大的项目,旧环境旧一个 TOMCAT 跑起来,不过出于高可用考虑,新环境决定使用 TOMCAT 集群 ...
- Nginx+Tomcat+Memcached实现tomcat集群和session共享
一.Nginx安装 详见前文:http://www.cnblogs.com/yixiwenwen/p/3574097.html 二.memcached安装和启动 详见前文:http://www.cnb ...
- 关于 tomcat 集群中 session 共享的三种方法
前两种均需要使用 memcached 或redis 存储 session ,最后一种使用 terracotta 服务器共享. 建议使用 redis,不仅仅因为它可以将缓存的内容持久化,还因为它支持的单 ...
- tomcat集群及session共享
一般来说,java web app主要用作两个领域: 1.api.api一般是无状态的,所以无需考虑session共享的问题 2.传统web应用和网站,如crm,oa,erp,b2c,bbs等.尤其b ...
- 通过memcached来实现对tomcat集群中Session的共享策略
近期在做一套集群的实现,实现的方案是在Linux下完成对Apache + Tomcat 负载均衡的功能. 上述功能已经实现,有需要了解的朋友可以看我另外一篇博文. Linux下Apache与Tomca ...
- Redis+Tomcat+Nginx集群实现Session共享,Tomcat Session共享
Redis+Tomcat+Nginx集群实现Session共享,Tomcat Session共享 ============================= 蕃薯耀 2017年11月27日 http: ...
- Redis存储Tomcat集群的Session
Redis存储Tomcat集群的Session 如何 做到把新开发的代码推送到到生产系统中部署,生产系统要能够零宕机.对使用用户零影响. 设想 是使用集群来搞定,通过通知负载均衡Nginx,取下集群中 ...
随机推荐
- Excel表导出
前言 分别介绍两种导出Exce表格的方法和读取Excel表格数据方法. 1.在MVC下的表格导出. 2.基于NPOI的表格导出. 3.读取Excel表格数据. 第一种方法:在MVC下的表格导出. 首 ...
- 【BZOJ2699】更新 动态规划
[BZOJ2699]更新 Description 对于一个数列A[1..N],一种寻找最大值的方法是:依次枚举A[2]到A[N],如果A[i]比当前的A[1]值要大,那么就令A[1]=A ...
- 【BZOJ4146】[AMPPZ2014]Divisors
[BZOJ4146][AMPPZ2014]Divisors Description 给定一个序列a[1],a[2],...,a[n].求满足i!=j且a[i]|a[j]的二元组(i,j)的个数. In ...
- 运用JS设置cookie、读取cookie、删除cookiev
JS设置cookie: 假设在A页面中要保存变量username的值("jack")到cookie中,key值为name,则相应的JS代码为: document.cookie=&q ...
- ArcGIS Server管理工具之批量发布动态地图服务工具.md
友好阅读链接:(http://swj.me/2015/08/26/batchPublishtools/) update0918: 修复了创建链接文件时而出错的bug 修复了在24011的警告已处理的情 ...
- 如何获取Input标签自定义属性的值?
HTML代码: <input type="hidden" value="${Name?if_exists}" id='ID' busCode = &quo ...
- 一个误区(关于javascript的字符串拼接)
前段时间听说了一个问题,说是,javascript中使用+=来拼接字符串会比使用Array的join方法慢几十倍以上,今天在工作间歇,就写了个例 子验证了一下,结果确完全相反,使用+=比join要快( ...
- Linux下的内核抢占
2017-03-03 很遗憾之前在介绍进程调度的文章中,虽然涉及到了内核抢占,但是却没有对其进行深入介绍,今天就稍微总结下内核抢占. 内核抢占在一定程度上减少了对某种事件的响应延迟,这也是内核抢占被引 ...
- Python3.6编译安装以及python开发之virtualenv与virtualenvwrapper
Python3.6编译安装 下载python源码包 先到安装目录 cd /opt 下载源码包 wget https://www.python.org/ftp/python/3.6.2/Python-3 ...
- 深入了解跟踪(trace)
深入了解跟踪(trace) 转自:https://www.cnblogs.com/zhijianliutang/p/4113911.html 前言 一提到跟踪俩字,很多人想到警匪片中的场景,同样在我们 ...