springboot-shiro chapter03 login
简介:这一节主要是集成shiro进行鉴权, 用户登录/退出
环境:
IDEA15+
JDK1.8+
Maven3+
代码:
https://git.oschina.net/xinshu/springboot-shiro
一、shiro 基本功能

Authentication:身份认证,验证用户身份;
Authorization:授权,验证某个已认证的用户是否拥有某个权限;如:验证某个用户是否拥有某个角色。或者验证某个用户对某资源是否具有某个权限;
Session Manager:会话管理,即用户登录后就是一次会话,在没有退出之前,它的所有信息都在会话中;会话可以是普通JavaSE环境的,也可以是如Web环境的;
Cryptography:加密,保护数据的安全性,如密码加密存储到数据库,而不是明文存储;
Web Support:Web支持,可以非常容易的集成到Web环境;
Caching:缓存,比如用户登录后,其用户信息、拥有的角色/权限不必每次去查,这样可以提高效率;
Concurrency:shiro支持多线程应用的并发验证,即如在一个线程中开启另一个线程,能把权限自动传播过去;
Testing:提供测试支持;
Run As:允许一个用户假装为另一个用户(如果他们允许)的身份进行访问;
Remember Me:记住我,这个是非常常见的功能,即一次登录后,下次再来的话不用登录了。
二、shiro 流程及基本概念

Shiro的对外API核心就是Subject;
Subject:主体,代表了当前“用户”,这个用户不一定是一个具体的人,与当前应用交互的任何东西都是Subject;即一个抽象概念;所有Subject都绑定到SecurityManager,与Subject的所有交互都会委托给SecurityManager;SecurityManager才是实际的执行者;
SecurityManager:安全管理器;即所有与安全有关的操作都会与SecurityManager交互;且它管理着所有Subject;可以看出它是Shiro的核心,它负责与后边介绍的其他组件进行交互,如果学习过SpringMVC,你可以把它看成DispatcherServlet前端控制器;
Realm:Shiro从从Realm获取安全数据(如用户、角色、权限),就是说SecurityManager要验证用户身份,那么它需要从Realm获取相应的用户进行比较以确定用户身份是否合法;也需要从Realm得到用户相应的角色/权限进行验证用户是否能进行操作;可以把Realm看成DataSource,即安全数据源。
一个简单的Shiro应用:
1、应用代码通过Subject来进行认证和授权,而Subject又委托给SecurityManager;
2、需要给Shiro的SecurityManager注入Realm,从而让SecurityManager能得到合法的用户及其权限进行判断。
三、shiro Authentication认证特点
Authentication is the process of identity verification– you are trying to verify a user is who they say they are. To do so, a user needs to provide some sort of proof of identity that your system understands and trusts.
The Shiro framework is designed to make authentication as clean and intuitive as possible while providing a rich set of features. Below is a highlight of the Shiro authentication features.
Subject Based - Almost everything you do in Shiro is based on the currently executing user, called a Subject. And you can easily retrieve the Subject anywhere in your code. This makes it easier for you to understand and work with Shiro in your applications.
Single Method call - The authentication process is a single method call. Needing only one method call keeps the API simple and your application code clean, saving you time and effort.
Rich Exception Hierarchy - Shiro offers a rich exception hierarchy to offered detailed explanations for why a login failed. The hierarchy can help you more easily diagnose code bugs or customer services issues related to authentication. In addition, the richness can help you create more complex authentication functionality if needed.
‘Remember Me’ built in - Standard in the Shiro API is the ability to remember your users if they return to your application. You can offer a better user experience to your them with minimal development effort.
Pluggable data sources - Shiro uses pluggable data access objects (DAOs), called Realms, to connect to security data sources like LDAP and Active Directory. To help you avoid building and maintaining integrations yourself, Shiro provides out-of-the-box realms for popular data sources like LDAP, Active Directory, and JDBC. If needed, you can also create your own realms to support specific functionality not included in the basic realms.
Login with one or more realms - Using Shiro, you can easily authenticate a user against one or more realms and return one unified view of their identity. In addition, you can customize the authentication process with Shiro’s notion of an authentication strategy. The strategies can be setup in configuration files so changes don’t require source code modifications– reducing complexity and maintenance effort.
四、依赖资源
与上一节相比,这里主要依赖shiro-spring构建,由于shiro-spring构建又依赖于shiro-core及shiro-web控件,所以pom.xml文件只需依赖shiro-spring即可

<dependency>

      <groupId>org.apache.shiro</groupId>

      <artifactId>shiro-spring</artifactId>

      <version>${shiro.version}</version>

</dependency>
五、配置及实现
从Shiro工作流程中,我们需要配置SecurityManager(负责接收Subject校验请求、与其他组件交互)及Reaml(获取安全数据信息)。由于是用spring-boot, 这里推荐由配置传统的xml文件改为java 注解@Configuration方式配置,主要配置如下:
@Configuration

public class ShiroConfiguration {

    private static Map<String, String> filterChainDefinitionMap = new LinkedHashMap<>();

    @Bean(name = "ShiroRealmImpl")

    public ShiroRealmImpl getShiroRealm() {

        return new ShiroRealmImpl();

    }

    @Bean(name = "securityManager")

    public DefaultWebSecurityManager getDefaultWebSecurityManager() {

        DefaultWebSecurityManager defaultWebSecurityManager = new DefaultWebSecurityManager();

        defaultWebSecurityManager.setRealm(getShiroRealm());

        return defaultWebSecurityManager;

    }

    @Bean(name = "lifecycleBeanPostProcessor")

    public LifecycleBeanPostProcessor getLifecycleBeanPostProcessor() {

        return new LifecycleBeanPostProcessor();

    }

    @Bean(name = "shiroFilter")

    public ShiroFilterFactoryBean getShiroFilterFactoryBean() {

        ShiroFilterFactoryBean shiroFilterFactoryBean = new ShiroFilterFactoryBean();

        shiroFilterFactoryBean.setSecurityManager(getDefaultWebSecurityManager());

        shiroFilterFactoryBean.setLoginUrl("/login");

        shiroFilterFactoryBean.setSuccessUrl("/welcome");

        filterChainDefinitionMap.put("/welcome", "authc");

        filterChainDefinitionMap.put("/**", "anon");

        shiroFilterFactoryBean.setFilterChainDefinitionMap(filterChainDefinitionMap);

        return shiroFilterFactoryBean;

    }

}
其中:
Spring中使用shiro时, Spring容器会根据bean名称查找shiroFilter的bean,同时将所有Filter操作委托给它,shiroFilter作为入口定义了需要控制的URL规则类型,然后根据URL规则进行相应的安全控制,具体shiroFilter定义过程如下:
1.Spring中定义了一类特殊的Bean——FactoryBean,当需要“shiroFilter”的bean时, 会调用ShiroFilterFactoryBean的getObject()方法来实现
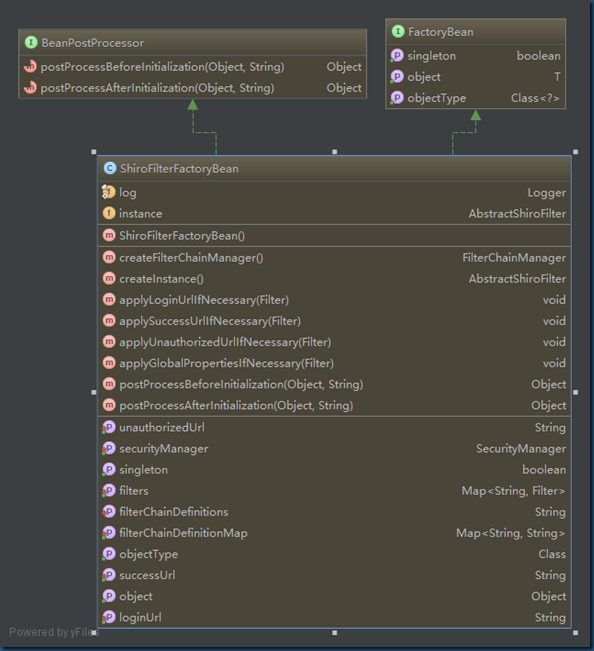
很显然ShiroFilterFactoryBean定义过程中需要指定Securitymanager, successUrl, loginUrl以及filterChainDefinitionMap等。
2.定义securityManager bean, 指定securitymanager类型,同时设置安全数据的获取方式setRealm(Realm realm)
3.定义Realm的bean,ShiroRealmImpl类具体实现如下:
public class ShiroRealmImpl extends AuthenticatingRealm {

    private static Logger logger = LoggerFactory.getLogger(ShiroRealmImpl.class);

    @Override

    protected AuthenticationInfo doGetAuthenticationInfo(AuthenticationToken token) throws AuthenticationException {

        UsernamePasswordToken usernamePasswordToken = (UsernamePasswordToken) token;

        String username = usernamePasswordToken.getUsername();

        String encodedPassword = new Sha256Hash(usernamePasswordToken.getPassword()).toBase64();

        logger.info("------------------------authentication--------------------------");

        if (false) {

            // TODO 用户名不存在

            throw new UnknownAccountException();

        } else if (false) {

            // TODO 密码错误

            throw new IncorrectCredentialsException();

        }

        return new SimpleAuthenticationInfo(new ShiroUser(username, "用户编码", "用户名称"),

                String.valueOf(usernamePasswordToken.getPassword()),

                ByteSource.Util.bytes("用户id"), getName());

    }

}
主要是实现了doGetAuthenticationInfo(AuthenticationToken token)方法,来验证当前用户身份信息
4.另外值得说明的是这里定义了,lifecycleBeanPostProcessor Bean这里主要的目的是管理shiro的生命周期
5.Spring mvc 登录/退出Controller,
请求/login时, http谓语为GET类型则加载login.jsp页面,POST类型作为验证用户身份的请求,调用subject.login(usernamePasswordToken)成功重定向到welcome.jsp, 否则重定向到login.jsp页面
@Controller

public class LoginController {

    private static Logger logger = LoggerFactory.getLogger(LoginController.class);

    @Value(value = "${application.message}")

    private String message;

    @RequestMapping(value = "/login", method = RequestMethod.GET)

    public String loginInit(Map<String, Object> model) {

        return "login";

    }

    @RequestMapping(value = "/login", method = RequestMethod.POST)

    public String login(Map<String, Object> model, @RequestParam("userid") String userId,

                        @RequestParam("password") String password) {

        UsernamePasswordToken usernamePasswordToken = new UsernamePasswordToken(userId, password);

        Subject subject = SecurityUtils.getSubject();

        try {

            subject.login(usernamePasswordToken);

        } catch (UnknownAccountException uae) {

            logger.info("未知账户");

        } catch (IncorrectCredentialsException ice) {

            logger.info("密码不正确");

        } catch (LockedAccountException lae) {

            logger.info("账户已锁定");

        } catch (ExcessiveAttemptsException eae) {

            logger.info("用户名密码次数过多");

        } catch (AuthenticationException ae) {

            logger.info("用户名密码不正确");

        }

        if (subject.isAuthenticated()) {

            logger.info("登录认证通过");

            model.put("time", new Date());

            model.put("message", this.message);

            return "redirect:/welcome";

        } else {

            usernamePasswordToken.clear();

            return "redirct:/login";

        }

    }

    @RequestMapping(value="/logout", method=RequestMethod.POST)

    public String logout(){

        SecurityUtils.getSubject().logout();

        return "redirect:/login";

    }

}
springboot-shiro chapter03 login的更多相关文章
- springboot + shiro + cas4.2.7 实战
1. 下载地址 https://github.com/apereo/cas/archive/v4.2.7.zip 2. 解压后, 用intellj idea 打开 3. 执行 gradle build ...
- springboot+shiro
作者:纯洁的微笑 出处:http://www.ityouknow.com/ 这篇文章我们来学习如何使用Spring Boot集成Apache Shiro.安全应该是互联网公司的一道生命线,几乎任何的公 ...
- SpringBoot+Shiro+Redis共享Session入门小栗子
在单机版的Springboot+Shiro的基础上,这次实现共享Session. 这里没有自己写RedisManager.SessionDAO.用的 crazycake 写的开源插件 pom.xml ...
- SpringBoot+Shiro入门小栗子
写一个不花里胡哨的纯粹的Springboot+Shiro的入门小栗子 效果如图: 首页:有登录注册 先注册一个,然后登陆 登录,成功自动跳转到home页 home页:通过认证之后才可以进 代码部分: ...
- springboot+shiro+redis(单机redis版)整合教程-续(添加动态角色权限控制)
相关教程: 1. springboot+shiro整合教程 2. springboot+shiro+redis(单机redis版)整合教程 3. springboot+shiro+redis(集群re ...
- Spring Cloud之路:(七)SpringBoot+Shiro实现登录认证和权限管理
版权声明:本文为博主原创文章,未经博主允许不得转载. https://blog.csdn.net/sage_wang/article/details/79592269一.Shiro介绍1.Shiro是 ...
- springboot+shiro+redis(集群redis版)整合教程
相关教程: 1. springboot+shiro整合教程 2. springboot+shiro+redis(单机redis版)整合教程 3.springboot+shiro+redis(单机red ...
- springboot+shiro+redis(单机redis版)整合教程
相关教程: 1. springboot+shiro整合教程 2. springboot+shiro+redis(集群redis版)整合教程 3.springboot+shiro+redis(单机red ...
- springboot+shiro整合教程
进阶教程: 1. springboot+shiro+redis(单机redis版)整合教程 2. springboot+shiro+redis(集群redis版)整合教程 3.springboot+s ...
- springboot + shiro + mysql + mybatis 工程快速搭建
1. 新建 springboot 工程 2. 随便起个名字 3. 初始化工程 4. 导入 shiro 和 thymeleaf 依赖 <!-- thymeleaf依赖 --> <dep ...
随机推荐
- NOI2001 食物链【扩展域并查集】*
NOI2001 食物链 动物王国中有三类动物 A,B,C,这三类动物的食物链构成了有趣的环形.A 吃 B,B吃 C,C 吃 A. 现有 N 个动物,以 1 - N 编号.每个动物都是 A,B,C 中的 ...
- python selenium 开发环境配置
selenium是一个web测试应用框架也可以拿来做爬虫. 1.安装selenium模块 pip install -U selenium 2.安装selenium模块后需要有相应的浏览器驱动 A.使用 ...
- bat命令1
echo 命令 打开回显或关闭请求回显功能,或显示消息.如果没有任何参数,echo命令将显示当前回显设置. 语法 echo [{on|off}] [message] Sample:@echo off ...
- Sprint第一个冲刺(第一天)
一.Sprint介绍 我们这次的团队项目是做<餐厅到店点餐系统>APP版,暂时不是基于用户需求来做的,但后期会进行用户需求调查,完善我们的软件.现在正在做一些前期准备,在团队合作上还缺乏一 ...
- nginx unit 安装试用
1. yum 源 nano /etc/yum.repos.d/unit.repo 内容 [unit] name=unit repo baseurl=https://packages.nginx.org ...
- 一款直接时空处理分析的开源数据库---geomesa
一款直接时空处理分析的开源数据库---geomesa,可用于交通轨迹数据存储分析等相关领域, 在分布式列数据库的基础上进行扩展,目前支持Accumulo, HBase, Cassandra, and ...
- node 升级
npm install -g n npm update –g
- 笔记:服务器压缩方案 来源于 Accept-Encoding: gzip, deflate 问题
笔记:服务器压缩方案 来源于 Accept-Encoding: gzip, deflate 问题 事情起因:odoo demo 没有启动web 压缩 目前流行的 web 压缩技术 gzip br 支持 ...
- textArea中的maxlength是无效的 解决办法
-------------------------------------------------------------------------------------- <s:texta ...
- 机器学习之代价函数(cost function)
代价函数(有的地方也叫损失函数,Loss Function)在机器学习中的每一种算法中都很重要,因为训练模型的过程就是优化代价函数的过程,代价函数对每个参数的偏导数就是梯度下降中提到的梯度,防止过拟合 ...