NodeJS路径的小问题
In this post we will explore the concept of refresh tokens as defined by OAuth2. We will learn why they came to be and how they compare to other types of tokens. We will also learn how to use them with a simple example. Read on!
Update: at the moment this article was written Auth0 had not gone through OpenID Connect certification. Some of the terms used in this article such as access token do not conform to this spec but do conform to the OAuth2 specification. OpenID Connect establishes a clear distinction between access tokens (used to access the API of the authorization server) and the id token(used for client authentication against a resource server).
Introduction
Modern authentication and/or authorization solutions have introduced the concept of tokens into their protocols. Tokens are specially crafted pieces of data that carry just enough information to either authorize the user to perform an action, or allow a client to get additional information about the authorization process (to then complete it). In other words, tokens are pieces of information that allow the authorization process to be performed. Whether this information is readable or parsable by the client (or any party other than the authorization server) is defined by the implementation. The important thing is: the client gets this information, and then uses it to get access to a resource. The JSON Web Token (JWT) spec defines a way in which common token information may be represented by an implementation.
A short JWT recap
JWT defines a way in which certain common information pertaining to the process of authentication/authorization may be represented. As the name implies, the data format is JSON. JWTs carry certain common fields such as subject, issuer, expiration time, etc. JWTs become really useful when combined with other specs such as JSON Web Signature (JWS) and JSON Web Encryption (JWE). Together these specs provide not only all the information usually needed for an authorization token, but also a means to validate the content of the token so that it cannot be tampered with (JWS) and a way to encrypt information so that it remains opaque to the client (JWE). The simplicity of the data format (and its other virtues) have helped JWTs become one of the most common types of tokens. If you are interested in learning how to implement JWTs in your web apps, check this excellent post by Ryan Chenkie.
Token types
For the purposes of this post, we will focus on the two most common types of tokens: access tokens and refresh tokens.
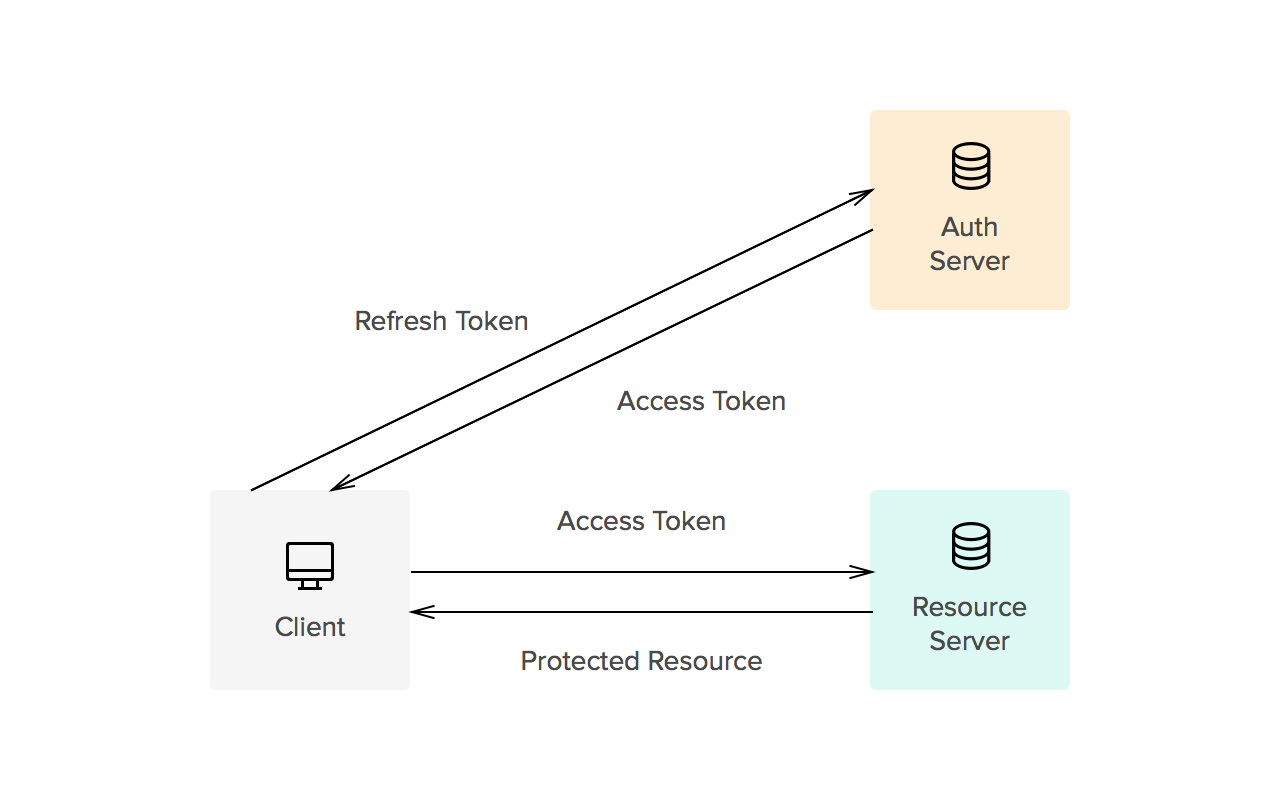
- Access tokens carry the necessary information to access a resource directly. In other words, when a client passes an access token to a server managing a resource, that server can use the information contained in the token to decide whether the client is authorized or not. Access tokens usually have an expiration date and are short-lived.

- Refresh tokens carry the information necessary to get a new access token. In other words, whenever an access token is required to access a specific resource, a client may use a refresh token to get a new access token issued by the authentication server. Common use cases include getting new access tokens after old ones have expired, or getting access to a new resource for the first time. Refresh tokens can also expire but are rather long-lived. Refresh tokens are usually subject to strict storage requirements to ensure they are not leaked. They can also be blacklisted by the authorization server.
Whether tokens are opaque or not is usually defined by the implementation. Common implementations allow for direct authorization checks against an access token. That is, when an access token is passed to a server managing a resource, the server can read the information contained in the token and decide itself whether the user is authorized or not (no checks against an authorization server are needed). This is one of the reasons tokens must be signed (using JWS, for instance). On the other hand, refresh tokens usually require a check against the authorization server. This split way of handling authorization checks allows for three things:
- Improved access patterns against the authorization server (lower load, faster checks)
- Shorter windows of access for leaked access tokens (these expire quickly, reducing the chance of a leaked token allowing access to a protected resource)
- Sliding-sessions (see below)
Sliding-sessions
Sliding-sessions are sessions that expire after a period of inactivity. As you can imagine, this is easily implemented using access tokens and refresh tokens. When a user performs an action, a new access token is issued. If the user uses an expired access token, the session is considered inactive and a new access token is required. Whether this token can be obtained with a refresh token or a new authentication round is required is defined by the requirements of the development team.
Security considerations
Refresh tokens are long-lived. This means when a client gets a refresh token from a server, this token must be stored securely to keep it from being used by potential attackers. If a refresh token is leaked, it may be used to obtain new access tokens (and access protected resources) until it is either blacklisted or it expires (which may take a long time). Refresh tokens must be issued to a single authenticated client to prevent use of leaked tokens by other parties. Access tokens must be kept secret, but as you may imagine, security considerations are less strict due to their shorter life.
"Access tokens must be kept secret, security considerations are less strict due to their shorter life."
TWEET THIS

Example: a refresh-token issuing server
For the purposes of this example we will use a simple server based on node-oauth2-server that will issue access and refresh tokens. Access tokens will be required to access a protected resource. The client will be a simple CURL command. The code from this example is based on the examples from node-oauth2-server. We have modified the base examples to use JWT for access tokens.
Node-oauth2-server uses a predefined API for the model. You can find the docs here. The following code shows how to implement the model for JWT access tokens.
DISCLAIMER: Please note the code in the following example is not production ready.
model.generateToken = function(type, req, callback) {

  //Use the default implementation for refresh tokens

  console.log('generateToken: ' + type);

  if(type === 'refreshToken') {

    callback(null, null);

    return;

  }

  //Use JWT for access tokens

  var token = jwt.sign({

    user: req.user.id

  }, secretKey, {

    expiresIn: model.accessTokenLifetime,

    subject: req.client.clientId

  });

  callback(null, token);

}

model.getAccessToken = function (bearerToken, callback) {

  console.log('in getAccessToken (bearerToken: ' + bearerToken + ')');

  try {

    var decoded = jwt.verify(bearerToken, secretKey, {

        ignoreExpiration: true //handled by OAuth2 server implementation

    });

    callback(null, {

      accessToken: bearerToken,

      clientId: decoded.sub,

      userId: decoded.user,

      expires: new Date(decoded.exp * 1000)

    });

  } catch(e) {

    callback(e);

  }

};

model.saveAccessToken = function (token, clientId, expires, userId, callback) {

  console.log('in saveAccessToken (token: ' + token +

              ', clientId: ' + clientId + ', userId: ' + userId.id +

              ', expires: ' + expires + ')');

  //No need to store JWT tokens.

  console.log(jwt.decode(token, secretKey));

  callback(null);

};
The OAuth2 token endpoint (/oauth/token) handles issuing of all types of grants (password and refresh tokens). All other endpoints are protected by the OAuth2 middleware that checks for the access token.
// Handle token grant requests

app.all('/oauth/token', app.oauth.grant());

app.get('/secret', app.oauth.authorise(), function (req, res) {

  // Will require a valid access_token

  res.send('Secret area');

});
So, for instance, assuming there is a user 'test' with password 'test' and a client 'testclient' with a client secret 'secret', one could request a new access token/refresh token pair as follows:
$ curl -X POST -H 'Authorization: Basic dGVzdGNsaWVudDpzZWNyZXQ=' -d 'grant_type=password&username=test&password=test' localhost:3000/oauth/token

{

    "token_type":"bearer",

    "access_token":"eyJ0eXAiOiJKV1QiLCJhbGciOiJIUzI1NiJ9.eyJ1c2VyIjoiVlx1MDAxNcKbwoNUwoonbFPCu8KhwrYiLCJpYXQiOjE0NDQyNjI1NDMsImV4cCI6MTQ0NDI2MjU2M30.MldruS1PvZaRZIJR4legQaauQ3_DYKxxP2rFnD37Ip4",

    "expires_in":20,

    "refresh_token":"fdb8fdbecf1d03ce5e6125c067733c0d51de209c"

}
The authorization header contains the client id and secret encoded as BASE64 (testclient:secret).
To access a protected resource with that access token:
$ curl 'localhost:3000/secret?access_token=eyJ0eXAiOiJKV1QiLCJhbGciOiJIUzI1NiJ9.eyJ1c2VyIjoiVlx1MDAxNcKbwoNUwoonbFPCu8KhwrYiLCJpYXQiOjE0NDQyNjI1NDMsImV4cCI6MTQ0NDI2MjU2M30.MldruS1PvZaRZIJR4legQaauQ3_DYKxxP2rFnD37Ip4'

Secret area
Access to the "secret area" will not cause a database lookup to validate the access token thanks to JWT.
Once the token has expired:
$ curl 'localhost:3000/secret?access_token=eyJ0eXAiOiJKV1QiLCJhbGciOiJIUzI1NiJ9.eyJ1c2VyIjoiVlx1MDAxNcKbwoNUwoonbFPCu8KhwrYiLCJpYXQiOjE0NDQyNjI2MTEsImV4cCI6MTQ0NDI2MjYzMX0.KkHI8KkF4nmi9z6rAQu9uffJjiJuNnsMg1DC3CnmEV0'

{

    "code":401,

    "error":"invalid_token",

    "error_description":"The access token provided has expired."

}
Now we can use the refresh token to get a new access token by hitting the token endpoint like so:
curl -X POST -H 'Authorization: Basic dGVzdGNsaWVudDpzZWNyZXQ=' -d 'refresh_token=fdb8fdbecf1d03ce5e6125c067733c0d51de209c&grant_type=refresh_token' localhost:3000/oauth/token

{

    "token_type":"bearer",

    "access_token":"eyJ0eXAiOiJKV1QiLCJhbGciOiJIUzI1NiJ9.eyJ1c2VyIjoiVlx1MDAxNcKbwoNUwoonbFPCu8KhwrYiLCJpYXQiOjE0NDQyNjI4NjYsImV4cCI6MTQ0NDI2Mjg4Nn0.Dww7TC-d0teDAgsmKHw7bhF2THNichsE6rVJq9xu_2s",

    "expires_in":20,

    "refresh_token":"7fd15938c823cf58e78019bea2af142f9449696a"

}
DISCLAIMER: Please note the code in the previous example is not production ready.
See the full code here.
Aside: use refresh tokens in your Auth0 apps
At Auth0 we do the hard part of authentication for you. Refresh tokens are not an exception. Once you have setup your app with us, follow the docs here to learn how to get a refresh token.
Conclusion
Refresh tokens improve security and allow for reduced latency and better access patterns to authorization servers. Implementations can be simple using tools such as JWT + JWS. If you are interested in learning more about tokens (and cookies), check our article here.
You can also check the Refresh Tokens landing page for more information.
可以参考:http://www.haomou.net/2014/08/13/2014_web_token/ 对于使用json web token
NodeJS路径的小问题的更多相关文章
- inux关于readlink函数获取运行路径的小程序
inux关于readlink函数获取运行路径的小程序 相关函数: stat, lstat, symlink 表头文件: #include <unistd.h> 定义函数:int re ...
- nodeJs实现微信小程序的图片上传
今天我来介绍一下nodejs如何实现保存微信小程序传过来的图片及其返回 首先wx.uploadFile绝大部分时候是配合wx.chooseImage一起出现的,毕竟选择好了图片,再统一上传是实现用户图 ...
- 写给小前端er的nodejs,mongodb后端小攻略~ (windows系统~)
一.写在前面 迫于学校的压力,研二上准备回学校做实验发论文了,感觉真的没意思,这几天学着搞搞后端,踩了很多坑,整理一下这几天的坑以免以后再犯! 二.本文主要内容(由于是面向前端同学的,所以前端的内容就 ...
- nodejs和ionic小助手
nodejs已经安装完成的情况下,安装ionic小助手 win+r打开cmd. 命令: 1.node -v(查看版本信息) 2.npm -v(查看版本信息) 3.npm install -g cnpm ...
- js中获取项目路径的小插件
//立即执行的js (function() { //获取contextPath var contextPath = getContextPath(); //获取basePath var basePat ...
- 分享一个nodejs写的小论坛
引言:作为一个前端小菜鸟,最近迷上了node,于是乎空闲时间,为了练练手写了一个node的小社区,关于微信小程序的,欢迎大家批评指导. 项目架构部分 一.前端架构 作为一个写样式也得无聊的前端狮,我偷 ...
- linux关于readlink函数获取运行路径的小程序
http://blog.csdn.net/djzhao/article/details/8178375 相关函数: stat, lstat, symlink表头文件: #include <u ...
- nodejs 路径
在学习的时候遇到了 一些路劲方面的疑惑 便查询了一些 module.filename:开发期间,该行代码所在的文件.__filename:始终等于 module.filename.__dirname: ...
- nodejs路径处理方法和绝对路径
1. 路径处理方法 __dirname 表示当前文件所在的目录的绝对路径__filename 表示当前文件的绝对路径module.filename ==== __filename 等价process. ...
随机推荐
- ios中怎么样点击背景退出键盘
//退出键盘 只需一句,药到病除 - (void)touchesBegan:(NSSet *)touches withEvent:(UIEvent *)event{ [self.view endEdi ...
- Java之HttpURLConnection的变态事: Keep-Alive
HttpURLConnection的变态事: Keep-Alive JDK自带的HttpURLConnection默认启动Keep-Alive, 使用后的HttpURLConnection会放入池里重 ...
- [iPhone高级] 基于XMPP的IOS聊天客户端程序(IOS端一)
介绍完了服务器,这篇我们就要介绍重点了,写我们自己的IOS客户端程序 先看一下我们完成的效果图 首先下载xmppframework这个框架,下载 点ZIP下载 接下来,用Xcode新建一个工程 将以下 ...
- IOS内存管理「2」- 点语法的内存管理
- 转:CentOS 7 安装Nginx
一.准备工作: 1.安装必备工具: ? 1 2 3 $ yum -y install gcc gcc-c++ autoconf automake $ yum -y install zlib zli ...
- 13.首次安装CY7C68013A驱动失败记(结果竟然是这样)
原文地址:首次安装CY7C68013A驱动失败记(结果竟然是这样)作者:孙茂多 今天把68013A-56焊接在CCD2的CPLD PCB上,配套的EEPROM存储器还没有焊接上,所以想用它试验一下Cy ...
- STL学习系列四:Stack容器
Stack简介 stack是堆栈容器,是一种“先进后出”的容器. stack是简单地装饰deque容器而成为另外的一种容器. #include <stack> 1.stack对象的默认构造 ...
- RHEL6.4找回root密码的方法
1.先在系统启动的时候提示:press any key to enter menu 时按下e键(其实其他键也可以,只不过我习惯e键而已) 2.进入如下界面: 3.按上下箭头方向键选中第二项,按e键,进 ...
- 项目结队开发---NABC分析(成员)
一.简介 项目名称:校园导航 特点:手机app,简便易用,适合对铁大地形不了解.路痴者使用. 二.NABC分析 N(need):对于新生报到,学生家长参观校园等想要了解校园路线者,本app软件将带给你 ...
- 玩耍Hibernate系列(一)补充--基础知识
基本概述: Hibernate是一个开放源代码的对象关系映射框架,它对JDBC进行了非常轻量级的对象封装,使得java程序员可以随心所欲的使用对象编程思维来操纵数据库,Hibernate可以应用在任何 ...