Spring温故而知新 – Spring AOP
AOP的相关专业术语
通知(Advice):定义在连接点做什么
Spring中通知类型:前置通知,后置通知,返回通知,异常通知,环绕通知
连接点(JoinPoint):程序执行过程中拦截的点,Sping中一般是方法
切点(PointCut): 决定advice通知应该作用域哪个连接点
切面(Aspect):切面就是对横切关注点的抽象
引入(Introduction):无需修改现有类的代码,向现有类添加新的方法或属性
织入(Weaving):把切面应用到目标对象并创建新的代理对象的过程。
先理解两个概念:
静态织入:通过特定的编译器在编译期间将需要增加的代码织入,即编译生成.class文件后,字节码已经被织入。
动态织入:运行时动态将要增强的代码织入到目标类中,一般通过动态代理的技术实现,如JDK动态代理或者CGLIB动态代理
Spring借鉴了AspectJ的切面,可以使用AspectJ来做切点解析和匹配,但是在运行时仍然是基于动态代理的AOP,并不依赖于AspectJ的编译器和织入器weaver (这点上区别于AspectJ:采用静态织入),但是编程模型几乎与编写成熟的AspectJ注解切面完全一致,这种AOP风格的好处在与能够不使用XML配置来完成。
AspectJ切点表达式
Spring借助AspectJ的切点表达式语言完成切面的定义,常见AspectJ指示器如下:
execution : 匹配方法执行的连接点,这是你将会用到的Spring的最主要的切入点指示符。
within : 限定匹配特定类型的连接点(在使用Spring AOP的时候,在匹配的类型中定义的方法的执行)。
this : 限定匹配特定的连接点(使用Spring AOP的时候方法的执行),其中bean reference(Spring AOP 代理)是指定类型的实例。
target : 限定匹配特定的连接点(使用Spring AOP的时候方法的执行),其中目标对象(被代理的应用对象)是指定类型的实例。
args: 限定匹配特定的连接点(使用Spring AOP的时候方法的执行),其中参数是指定类型的实例。
@target: 限定匹配特定的连接点(使用Spring AOP的时候方法的执行),其中正执行对象的类持有指定类型的注解。
@args:限定匹配特定的连接点(使用Spring AOP的时候方法的执行),其中实际传入参数的运行时类型持有指定类型的注解。
@within: 限定匹配特定的连接点,其中连接点所在类型(类)已指定注解(在使用Spring AOP的时候,所执行的方法所在类型已指定注解)。
@annotation: 限定匹配特定的连接点(使用Spring AOP的时候方法的执行),其中连接点(方法)的主题持有指定的注解。(在使用Spring AOP的时候,所执行的方法已指定注解)
其中只有execution指示器是执行匹配的,其他的指示器都是用来限制匹配的,具体指示器使用方式如下:
execution指示器:
execution(<修饰符> <返回类型> <类路径> <方法名>(<参数列表>) <异常模式> )
<修饰符>:类型修饰符,可选,如public、protected,*表示任意修饰符
<返回类型>:必填,如void,String等,*表示任意类型
<类路径>:类型表达式匹配(包名.类名),可选 “包名.*”表示包下所有类,“包名..*”表示包以及子包下所有的类
<方法名>:方法名匹配,必填,*表示可以匹配任意方法
(参数列表):参数匹配,必填,()表示没有参数,(..)表示匹配任意个数参数,(..,String)表示匹配最后一个参数是String类型方法,前面可以是任意参数
<异常模式>:异常列表,可选
使用示例:
1:匹配com.sl.aop包下所有公共类型方法
execution(public * com.sl.aop.*.*(..))
2:匹配com.sl.aop包下所有以Order结尾的方法
execution(* com.sl.aop.*.*Order(..))
3:匹配com.sl.aop包下OrderService接口下所有无参方法
execution(* com.sl.aop.OrderService.*())
within 指示器:
within(<类路径>)
使用示例:
1: com.sl.aop包以及子包下任意连接点
within(com.sl.aop.OrderService.*)
2: com.sl.aop包以及子包下OrderService类型及子类型的任意连接点
within(com.sl.aop.OrderService+)
其他指示器:
//实现OrderService接口的代理对象的任意连接点(这里是AOP代理对象类型匹配)

this(com.sl.aop.OrderSerivce)

可以与excution组合使用

@Before("execution(* com.sl.aop.*.*(..)) && this(com.sl.aop.OrderService)")

//实现OrderService接口的目标对象的任意连接点(区别于this的代理对象)

target(com.sl.aop.OrderSerivce)

具体this和target的区别可参考CSDN这篇文章https://blog.csdn.net/yangshangwei/article/details/77861658

//匹配使用了@Service注解的类(类上加注解,接口上加注解不起作用)

@within(org.springframework.stereotype.Service)

@Before("execution(* com.sl.aop.*.*(..)) && @within(org.springframework.stereotype.Service)")

//匹配使用了@ Secure注解的方法(方法上加注解)

@annotation(cn.javass.spring.chapter6.Secure )
使用注解配置AOP
示例代码:
xml配置如下:
<?xml version="1.0" encoding="UTF-8"?>

<beans xmlns="http://www.springframework.org/schema/beans"

    xmlns:xsi="http://www.w3.org/2001/XMLSchema-instance"

    xmlns:aop="http://www.springframework.org/schema/aop"

    xmlns:context="http://www.springframework.org/schema/context"

    xsi:schemaLocation="http://www.springframework.org/schema/beans

           http://www.springframework.org/schema/beans/spring-beans.xsd

           http://www.springframework.org/schema/aop

           http://www.springframework.org/schema/aop/spring-aop.xsd

           http://www.springframework.org/schema/context

           http://www.springframework.org/schema/context/spring-context.xsd" >

    <!-- 组件扫描,扫描含有注解的类 -->

    <context:component-scan base-package="com.sl.aop"></context:component-scan>

    <!—启用aspectj注解 -->

    <aop:aspectj-autoproxy></aop:aspectj-autoproxy>

</beans>
java代码:
@Component

@Aspect // 定义切面

public class OrderLogger {

    //定义切点函数

    // 前置通知 :在目标方法被调用之前调用该通知

    //@Before("execution(* com.sl.aop.*.*(..))")

    //@Before("execution(public * com.sl.aop.*.*(..))")

    //@Before("execution(* com.sl.aop.OrderService.*())")

    //@Before("execution(* com.sl.aop.*.*(..)) && this(com.sl.aop.OrderService)")

    @Before("execution(* com.sl.aop.*.*(..)) && @within(org.springframework.stereotype.Service)")

    public void beforeCreateOrder() {

        System.out.println("before create order");

    }

//使用args处理通知中的参数

    @Before("execution(public * com.sl.aop.*.*(..)) && args(orderNumber,..)")

    public void beforeCreateOrder(String orderNumber) {

        System.out.println("before create order:"+orderNumber);

    }

    // 后置通知:在目标方法返回或抛异常后调用该通知

    @After("execution(* com.sl.aop.OrderServiceImpl.createOrder(..))")

    public void afterCreateOrder() {

        System.out.println("after create order");

    }

    // 返回通知:在目标方法正常返回后调用

    @AfterReturning("execution(* com.sl.aop.OrderServiceImpl.createOrder(..))")

    public void createOrderSuccess() {

        System.out.println("create order success");

    }

    // 异常通知:在目标方法抛出异常后调用

    @AfterThrowing("execution(* com.sl.aop.OrderServiceImpl.createOrder(..))")

    public void createOrderError() {

        System.out.println("create order error");

    }

    // 异常通知:在目标方法抛出异常后调用

    @Around("execution(* com.sl.aop.OrderServiceImpl.createOrder(..))")

    public void createOrderError(ProceedingJoinPoint jp) throws Throwable {

        System.out.println("around before create order");

        jp.proceed();

        System.out.println("around after create order");

    }

}
public interface OrderService {

    public void createOrder();

    public void createOrder(String orderNumber);

}

//@Service

@Component("orderServiceImpl")

public class OrderServiceImpl implements OrderService {

    @Override

    public void createOrder() {

        System.out.println("creating order");

    }

    @Override

    public void createOrder(String orderNumber) {

        System.out.println("creating order:"+orderNumber);

    }

}
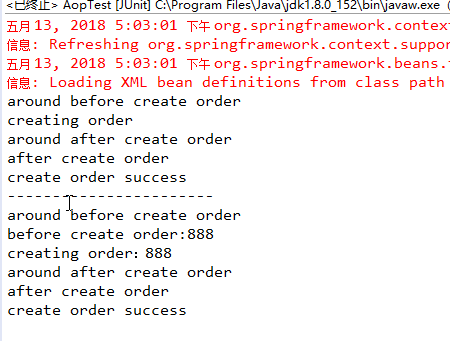
测试代码:
@Test

 public void TestAspectAop() {

        ApplicationContext context =

                new ClassPathXmlApplicationContext("aoptextbean.xml");

        OrderService orderService =    (OrderService)context.getBean("orderServiceImpl");


       orderService.createOrder();


        System.out.println("-----------------------");


        orderService.createOrder("888");

    }
结果:
使用XML配置AOP
使用上面的代码,切面类中删除所以aop相关注解,通过xml配置来实现前置、后置等通知,示例代码:
<?xml version="1.0" encoding="UTF-8"?>

<beans xmlns="http://www.springframework.org/schema/beans"

    xmlns:xsi="http://www.w3.org/2001/XMLSchema-instance"

    xmlns:aop="http://www.springframework.org/schema/aop"

    xmlns:context="http://www.springframework.org/schema/context"

    xsi:schemaLocation="http://www.springframework.org/schema/beans

           http://www.springframework.org/schema/beans/spring-beans.xsd

           http://www.springframework.org/schema/aop

           http://www.springframework.org/schema/aop/spring-aop.xsd

           http://www.springframework.org/schema/context

           http://www.springframework.org/schema/context/spring-context.xsd" >

    <!-- 组件扫描,扫描含有注解的类 -->

    <context:component-scan base-package="com.sl.aop"></context:component-scan>

    <!-- 使用aspectj注解 -->

    <!-- <aop:aspectj-autoproxy></aop:aspectj-autoproxy> -->

    <bean id="orderLogger" class="com.sl.aop.OrderLogger"></bean>

    <aop:config>

        <!--1: 申明一个切面   多个切面时order指定优先级-->

        <aop:aspect ref="orderLogger" order="0">

            <!-- 2:定义通知  method:指定通知名  pointcut:指定切点-->

            <aop:before method="beforeCreateOrder" pointcut="execution(* com.sl.aop.OrderService.*())" />

            <!-- <aop:before method="beforeCreateOrder" pointcut="execution(public * com.sl.aop.*.*(String)) and args(orderNumber)" /> -->

            <aop:after method="afterCreateOrder" pointcut="execution(* com.sl.aop.OrderServiceImpl.createOrder(..))" />

            <aop:after-returning method="createOrderSuccess" pointcut="execution(* com.sl.aop.OrderServiceImpl.createOrder(..))" />

            <aop:after-throwing method="createOrderError" pointcut="execution(* com.sl.aop.OrderServiceImpl.createOrder(..))" />

            <aop:around method="createOrderAround" pointcut="execution(* com.sl.aop.OrderServiceImpl.createOrder(..))" />

        </aop:aspect>

    </aop:config>

</beans>
@Component

public class OrderLogger {

    //定义切点函数

    // 前置通知 :在目标方法被调用之前调用该通知

    public void beforeCreateOrder() {

        System.out.println("before create order");

    }

    //使用args处理通知中的参数

    public void beforeCreateOrder(String orderNumber) {

        System.out.println("before create order:"+orderNumber);

    }

    // 后置通知:在目标方法返回或抛异常后调用该通知

    public void afterCreateOrder() {

        System.out.println("after create order");

    }

    // 返回通知:在目标方法正常返回后调用

    public void createOrderSuccess() {

        System.out.println("create order success");

    }

    // 异常通知:在目标方法抛出异常后调用

    public void createOrderError() {

        System.out.println("create order error");

    }

    // 异常通知:在目标方法抛出异常后调用

    public void createOrderAround(ProceedingJoinPoint jp) throws Throwable {

        System.out.println("around before create order");

        jp.proceed();

        System.out.println("around after create order");

    }

}
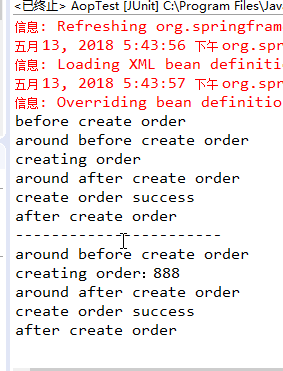
测试代码:
@Test

    public void TestAspectAop() {

        ApplicationContext context =

                new ClassPathXmlApplicationContext("aoptextbean.xml");

        OrderService orderService =    (OrderService)context.getBean("orderServiceImpl");

        orderService.createOrder();

        System.out.println("-----------------------");

        orderService.createOrder("888");

    }
运行结果:
最后解释一下Spring中使用xml配置AOP的标签及其属性使用方式:
<aop:config>                                              <!--AOP配置根节点  -->

     <aop:pointcut expression="" id=""/>                   <!--定义切点   expression切点表达式,比如 expression="execution(* com.sl.aop.*.*(..))", id:定义切点id="tempId"-->

     <aop:advisor advice-ref=""/>                          <!--定义通知器  -->

     <aop:aspect  ref="" order="">                                <!--定义切面  ref:切面引用(切面beanID) order:执行顺序,多个切面可以指定优先级-->

        <aop:before method="" pointcut="" pointcut-ref="" />      <!--前置通知  method:通知方法名,poincut:切点表达式,pointcut-ref:切点引用(切点id),如pointcut-ref="tempId",可以如其他通知引用相同切点-->

        <aop:after method="" pointcut="" pointcut-ref=""/>                    <!--后置通知 -->

        <aop:after-returning method="" pointcut="" pointcut-ref=""/>         <!--返回通知 -->

        <aop:after-throwing method="" pointcut="" pointcut-ref=""/>           <!--异常通知 -->

        <aop:around method="" pointcut="" pointcut-ref=""/>                   <!--环绕通知 -->

        <aop:declare-parents types-matching="" implement-interface=""/>       <!--引入额外接口 -->

        <aop:pointcut expression="" id=""/>                                   <!--定义切点  -->

     </aop:aspect>

</aop:config>
Spring温故而知新 – Spring AOP的更多相关文章
- Spring 3.0 AOP (一)AOP 术语
关于AOP.之前我已写过一个系列的随笔: <自己实现简单的AOP>,它的关注点在于实现.实现语言是C#,实现方式为 自定义实现 RealProxy 抽象类.重写Invoke方法,以便进行方 ...
- Spring系列之AOP实现的两种方式
AOP常用的实现方式有两种,一种是采用声明的方式来实现(基于XML),一种是采用注解的方式来实现(基于AspectJ). 首先复习下AOP中一些比较重要的概念: Joinpoint(连接点):程序执行 ...
- [Spring框架]Spring AOP基础入门总结二:Spring基于AspectJ的AOP的开发.
前言: 在上一篇中: [Spring框架]Spring AOP基础入门总结一. 中 我们已经知道了一个Spring AOP程序是如何开发的, 在这里呢我们将基于AspectJ来进行AOP 的总结和学习 ...
- springMVC+MyBatis+Spring 整合(4) ---解决Spring MVC 对AOP不起作用的问题
解决Spring MVC 对AOP不起作用的问题 分类: SpringMVC3x+Spring3x+MyBatis3x myibaits spring J2EE2013-11-21 11:22 640 ...
- 【转】spring - ioc和aop
[转]spring - ioc和aop 1.程序中为什么会用到spring的ioc和aop 2.什么是IOC,AOP,以及使用它们的好处,即详细回答了第一个问题 3.原理 关于1: a:我们平常使用对 ...
- Spring核心框架 - AOP的原理及源码解析
一.AOP的体系结构 如下图所示:(引自AOP联盟) 层次3语言和开发环境:基础是指待增加对象或者目标对象:切面通常包括对于基础的增加应用:配置是指AOP体系中提供的配置环境或者编织配置,通过该配置A ...
- Spring中的AOP
什么是AOP? (以下内容来自百度百科) 面向切面编程(也叫面向方面编程):Aspect Oriented Programming(AOP),通过预编译方式和运行期动态代理实现程序功能的统一维护的一种 ...
- Spring IOC及AOP学习总结
一.Spring IOC体系学习总结: Spring中有两个容器体系,一类是BeanFactory.还有一类是ApplicationContext.BeanFactory提供了基础的容器功能.Appl ...
- Spring自学教程-AOP学习(五)
Spring中的AOP 一.概述 (一)基本概念 1.什么是AOP? 面向方面编程.所谓方面即是指日志.权限.异常处理.事务处理等. 2.AOP的3个关键概念 (1)切入点(Pointc ...
随机推荐
- 【翻译】了解Ext JS 5的小部件
原文:Understanding Widgets in Ext JS 5 在Ext JS 5,引入了新的"widgetcolumn",支持在网格的单元格中放置组件.同时,还在Ext ...
- STL字符串常用方法扩展
前言 STL作为一个标准模版库,很多容器和算法都是很实用的,接口也相对比较友好,而且在实现上也比较轻量级.相对boost来说,要轻量得多,相对loki来说,使用的模版语法不会那么晦涩难懂,基本还是能看 ...
- IntelliJ Idea + Maven + Junit
Caculate.java package com.yxj.TestJunit; /** * Created by ubd on 15-4-17. */ public class Caculate { ...
- StarUML添加自定义approach和profile
来源:fasiondog 添加Approch StarUML中的Approch也就是创建项目时的模板,其中预定义了所使用方法的模型和视图.StarUML默认Approach如下: StarUML的Ap ...
- 《java入门第一季》之面向对象(方法重写问题)
方法重载的引入:根据一个案例: /* 继承中成员方法的关系: A:子类中的方法和父类中的方法声明不一样,这个太简单. B:子类中的方法和父类中的方法声明一样,这个该怎么玩呢? 通过子类对象调用方法: ...
- Android实训案例(七)——四大组件之一Service初步了解,实现通话录音功能,抽调接口
Service Service的神奇之处,在于他不需要界面,一切的操作都在后台操作,所以很多全局性(手机助手,语音助手)之类的应用很长需要这个,我们今天也来玩玩 我们新建一个工程--ServiceDe ...
- LeetCode之“树”:Path Sum && Path Sum II
Path Sum 题目链接 题目要求: Given a binary tree and a sum, determine if the tree has a root-to-leaf path suc ...
- Linux自动安装JDK的shell脚本
Linux自动安装JDK的shell脚本 A:本脚本运行的机器,Linux B:待安装JDK的机器, Linux 首先在脚本运行的机器A上确定可以ssh无密码登录到待安装jdk的机器B上,然后就可以在 ...
- C/C++语言中NULL、'\0’和0的区别
注:本文参考了http://blog.csdn.net/mylinx/article/details/6873253及书籍<征服C指针>([日]前桥和弥著). NULL.'\0'和0的值是 ...
- django-debug-tools 使用
用django开发很快也很容易,但是很多时候我们的经验并不是很足,就会给自己挖下很多坑,不管是性能问题,还是开发语言使用技巧问题都会给应用的稳定带来危害, 开发之后的调试和调优就显得很重要,今天就尝试 ...