
spring+struts1
概括及介绍:
集成原理:在Action 中获得BeanFactory,通过BeanFactory取得业务逻辑对象
本例采用:JDK1.8,tomcat7.0.9
技术点:spring与strut1集成方案例子介绍
集成原理:在Action 中获得BeanFactory,通过BeanFactory取得业务逻辑对象

1、spring和struts1的依赖包管理

   * struts1

   -- 拷贝struts1和jstl的依赖包

   -- 在web.xml文件中配置 ActionServlet

   -- 提供 struts-config.xml 文件

   -- 提供国际化支持,提供缺省国际化资源文件

   * spring

   -- 拷贝spring相关依赖包

   -- 提供spring的配置文件

 2、在web.xml文件中配置ContextLoaderListener,让web server	在启动的时候

   BeanFactory 放到serverletContext中提高效率。

	  <!-- 在web.xml中通过contextConfigLocation配置spring,

	  contextConfigLocation参数定义了要装入的 Spring 配置文件。  -->

	    <param-name>contextConfigLocation</param-name>

	    <param-value>classpath:applicationContext1.xml</param-value>

	  </context-param>

	  <listener>

	    <listener-class>org.springframework.web.context.ContextLoaderListener</listener-class>

	  </listener>

3、 在action中采用 	 WebApplicationContextUtils.getRequiredWebApplicationContext() 从

  ServletContext 中取得BeanFactory。

4. BeanFactory从业务逻辑中取得对象

	存在缺点:

	  (主动查找存在问题,存在对象依赖。)Action中存在了依赖查找,所以action 依赖 spring 的 API。

	     进一步了解依赖查找和依赖注入
一、项目架构截图
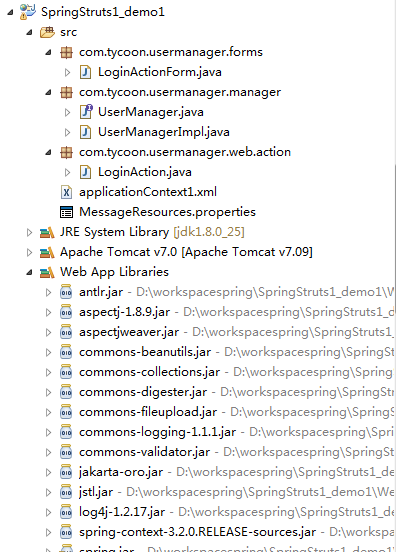
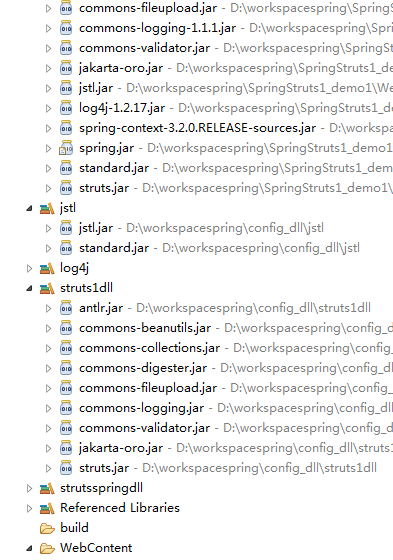
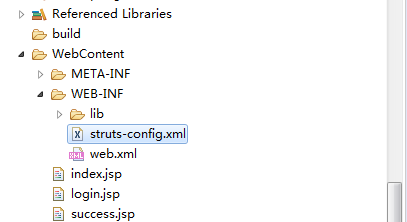
二、代码接口介绍
1、strut1中LoginActionForm 获得前台提交数据
2、定义模拟验证登录接口:UserManager
3、实现登录接口实现类:UserManagerImpl
4、strut1的Action:LoginAction
5、spring的配置文件:applicationContext1.xml
6、strut1配置文件:struts-config.xml
7、strut1中web.xml文件
8、欢迎页:index.jsp
9、登录页:login.jsp
10、登录成功页:success.jsp
三、代码
1、strut1中LoginActionForm 获得前台提交数据
package com.tycoon.usermanager.forms;

import org.apache.struts.action.ActionForm;

/**

 *

 * LoginActionForm

 * @author northEastTycoon

 */

public class LoginActionForm extends ActionForm {

	private static final long serialVersionUID = 1L;

	// 用户名称

	private String username="northEastTycoon";

	// 用户密码

	private String password="northEastTycoon";

	public String getUsername() {

		return username;

	}

	public void setUsername(String username) {

		this.username = username;

	}

	public String getPassword() {

		return password;

	}

	public void setPassword(String password) {

		this.password = password;

	}

}
2、定义模拟验证登录接口:UserManager
package com.tycoon.usermanager.manager;

/**

 *

 * UserManager :模拟登陆接口

 * @author northEastTycoon

 */

public interface UserManager {

	public void login(String username,String password);

}
3、实现登录接口实现类:UserManagerImpl
package com.tycoon.usermanager.manager;

/**

 *

 * UserManager :实现模拟登陆接口类

 * @author northEastTycoon

 */

public class UserManagerImpl implements UserManager {

	@Override

	public void login(String username, String password) {

		System.out.println(this.getClass()+",username:"+username);

	}

}
4、 strut1的Action:LoginAction
package com.tycoon.usermanager.web.action;

import javax.servlet.http.HttpServletRequest;

import javax.servlet.http.HttpServletResponse;

import org.apache.struts.action.Action;

import org.apache.struts.action.ActionForm;

import org.apache.struts.action.ActionForward;

import org.apache.struts.action.ActionMapping;

import org.springframework.beans.factory.BeanFactory;

import org.springframework.web.context.support.WebApplicationContextUtils;

import com.tycoon.usermanager.forms.LoginActionForm;

import com.tycoon.usermanager.manager.UserManager;

/**

 *

 * Action类 :控制类

 * @author northEastTycoon

 */

public class LoginAction extends Action {

	@Override

	public ActionForward execute(ActionMapping mapping, ActionForm form, HttpServletRequest request,

			HttpServletResponse response) throws Exception {

		LoginActionForm laf = (LoginActionForm) form;

		String username = laf.getUsername();

		String password = laf.getPassword();

		// 由于耗时,还可以从ServletContext获得BeanFactory对象

		BeanFactory factory = WebApplicationContextUtils.getRequiredWebApplicationContext(request.getSession().getServletContext());

		UserManager userManager = (UserManager)factory.getBean("userManager");

		userManager.login(username, password);

		return mapping.findForward("success");

	}

}
5、 spring的配置文件:applicationContext1.xml
<?xml version="1.0" encoding="UTF-8"?>

<beans xmlns="http://www.springframework.org/schema/beans"

	xmlns:xsi="http://www.w3.org/2001/XMLSchema-instance"

	xmlns:p="http://www.springframework.org/schema/p"

	xmlns:aop="http://www.springframework.org/schema/aop"

	xsi:schemaLocation="http://www.springframework.org/schema/beans

		http://www.springframework.org/schema/beans/spring-beans-3.0.xsd

		http://www.springframework.org/schema/aop

		http://www.springframework.org/schema/aop/spring-aop-3.0.xsd">

	<bean id="userManager" class="com.tycoon.usermanager.manager.UserManagerImpl"/>

</beans>
6、strut1配置文件:struts-config.xml
<?xml version="1.0" encoding="UTF-8"?>

<!DOCTYPE struts-config PUBLIC

"-//Apache Software Foundation//DTD Struts Configuration 1.2//EN"

 "http://struts.apache.org/dtds/struts-config_1_2.dtd">

<struts-config>

	<form-beans>

		<form-bean name="loginForm"

			type="com.tycoon.usermanager.forms.LoginActionForm"></form-bean>

	</form-beans>

	<action-mappings>

		<action path="/login" type="com.tycoon.usermanager.web.action.LoginAction"

			name="loginForm" scope="request">

			<forward name="success" path="/success.jsp"></forward>

		</action>

	</action-mappings>

	<message-resources parameter="MessageResources" />

</struts-config>
7、strut1中web.xml文件
<?xml version="1.0" encoding="UTF-8"?>

<web-app xmlns:xsi="http://www.w3.org/2001/XMLSchema-instance" xmlns="http://java.sun.com/xml/ns/j2ee" xmlns:web="http://xmlns.jcp.org/xml/ns/javaee" xsi:schemaLocation="http://java.sun.com/xml/ns/j2ee http://java.sun.com/xml/ns/j2ee/web-app_2_4.xsd http://xmlns.jcp.org/xml/ns/javaee http://java.sun.com/xml/ns/javaee/web-app_2_5.xsd" version="2.4">

  <welcome-file-list>

    <welcome-file>/index.jsp</welcome-file>

  </welcome-file-list>

  <servlet>

    <servlet-name>action</servlet-name>

    <servlet-class>org.apache.struts.action.ActionServlet</servlet-class>

    <init-param>

      <param-name>config</param-name>

      <param-value>/WEB-INF/struts-config.xml</param-value>

    </init-param>

    <init-param>

      <param-name>debug</param-name>

      <param-value>3</param-value>

    </init-param>

    <init-param>

      <param-name>detail</param-name>

      <param-value>3</param-value>

    </init-param>

    <load-on-startup>0</load-on-startup>

  </servlet>

  <servlet-mapping>

    <servlet-name>action</servlet-name>

    <url-pattern>*.do</url-pattern>

  </servlet-mapping>

  <context-param>

  <!-- 在web.xml中通过contextConfigLocation配置spring,

  contextConfigLocation参数定义了要装入的 Spring 配置文件。  -->

    <param-name>contextConfigLocation</param-name>

    <param-value>classpath:applicationContext1.xml</param-value>

  </context-param>

  <listener>

    <listener-class>org.springframework.web.context.ContextLoaderListener</listener-class>

  </listener>

</web-app>
8、欢迎页:index.jsp
<%@ page language="java" contentType="text/html; charset=GB18030"

    pageEncoding="GB18030"%>

<!DOCTYPE html PUBLIC "-//W3C//DTD HTML 4.01 Transitional//EN" "http://www.w3.org/TR/html4/loose.dtd">

<html>

<head>

<meta http-equiv="Content-Type" content="text/html; charset=GB18030">

<title>Insert title here</title>

</head>

<body>

	<h1>Spring+struts1(东北大亨实例)</h1>

	<hr>

	<hr>

	<a href="login.jsp">登录</a>

</body>

</html>
9、登录页:login.jsp
<%@ page language="java" contentType="text/html; charset=GB18030"

	pageEncoding="GB18030"%>

<!DOCTYPE html PUBLIC "-//W3C//DTD HTML 4.01 Transitional//EN" "http://www.w3.org/TR/html4/loose.dtd">

<html>

<head>

<meta http-equiv="Content-Type" content="text/html; charset=GB18030">

<title>Insert title here</title>

</head>

<body>

	<form action="login.do" method="post">

		用户:<input type="text" name="username"><br> 密码:<input

			type="password" name="password"><br> <input

			type="submit" value="登录">

	</form>

</body>

</html>
10、 登录成功页:success.jsp
<%@ page language="java" contentType="text/html; charset=GB18030"

    pageEncoding="GB18030"%>

<!DOCTYPE html PUBLIC "-//W3C//DTD HTML 4.01 Transitional//EN" "http://www.w3.org/TR/html4/loose.dtd">

<html>

<head>

<meta http-equiv="Content-Type" content="text/html; charset=GB18030">

<title>Insert title here</title>

</head>

<body>

	${loginForm.username},用户登录成功!

</body>

</html>
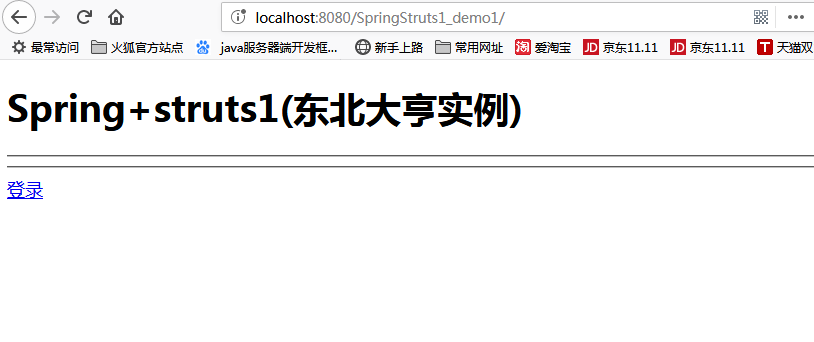
运行截图:
1、请求欢迎页面
2、点击登录,跳转到登录页面
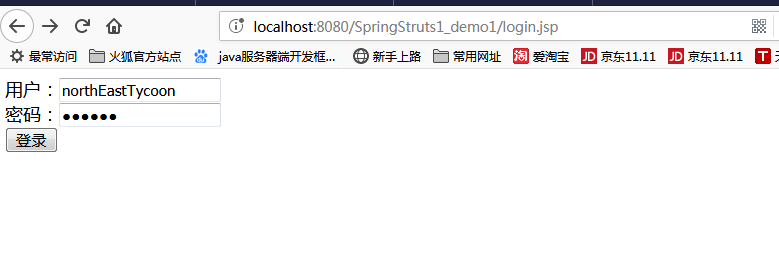
3、显示成功后页面
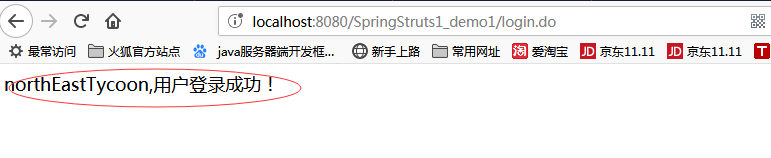
spring+struts1的更多相关文章
- Spring一套全通—工厂
百知教育 - Spring系列课程 - 工厂 第一章 引言 1. EJB存在的问题 2. 什么是Spring Spring是一个轻量级的JavaEE解决方案,整合众多优秀的设计模式 轻量级 1. 对于 ...
- java面试题之ssh
1.写出你熟悉的开源框架以及各自的作用(项目中为什么使用SSH) 答:框架:hibernate,spring,struts1/struts2. Hibernate主要用于数据持久化:封装了JDBC操作 ...
- 【HPP开发】让所有中小企业拥有自己的APP
HPP hybirdApp或者hbuilderApp, 指通过html,css,js语言开发出ios和android两个版本的APP, 开发效率成倍上升,开发时间大幅缩减,开发成本同样也大大缩减. 移 ...
- 我的Java自学之路
其实在转正之后我就想抽个时间好好的梳理一下我的 Java 上车之路 ,但是一直拖到现在 ,因为有学弟问到 ,所以也就给了我动力 .毕竟答应了人家的事要做到 . 首先要有相应的背景介绍 ,不然说个毛线啊 ...
- 【转载】Hybrid APP了解
原文:http://uikoo9.com/blog/detail/hpp 不错的hybrid app框架:http://www.dcloud.io/case/#group-1 HPP hybirdAp ...
- struts1+spring+myeclipse +cxf 开发webservice以及普通java应用调用webservice的实例
Cxf + Spring+ myeclipse+ cxf 进行 Webservice服务端开发 使用Cxf开发webservice的服务端项目结构 Spring配置文件applicationCont ...
- struts1,struts2,hibernate,spring的运行原理结构图
一.struts1运行原理 1.初始化:struts框架的总控制器ActionServlet是一个Servlet,它在web.xml中配置成自动启动的Servlet,在启动时总控制器会读取配置文件(s ...
- struts1.3整合spring2.5(将spring委托给struts方式)
前提是配置完struts1.3 导包 spring-2.5.6.jar //spring核心包 spring-webmvc-struts-2.5.5.jar //struts整合spring使用 lo ...
- spring 整合 Struts1.X [转]
这篇博客摘自[http://blog.csdn.net/chendc201/article/details/8464008], 其中也有一些是自己增加的部分 . 第一步, 需要为 Struts 装载 ...
随机推荐
- 【Linux】CentOS7上rpm命令批量卸载删除模糊rpm包名
例如,我要删除如下文件名匹配上wine的所有文件
- 配置php扩展memcache
配置php扩展memcache 环境说明: 系统版本 CentOS 6.9 x86_64 软件版本 nginx-1.12.2 php-5.5.38 ...
- 使用Kinect2作为Oculus游戏应用的输入设备
注: 文章写于2015年8月, 眼下VR游戏Demo已经完结, 所以把上一次预研的一些经验分享出来, 希望对大家有所帮助 背景 初接触Oculus时, 从网上下载了一大堆的Demo来体验, 可是, 操 ...
- Android NDK生成共享库和静态库
Date: 2014-03-14 Title: Compile Android Native Binary And Library Published: true Type: post Tags: A ...
- AngularJS, Ember.js, Backbone这类新框架与 jQuery的重要区别在哪里?
jQuery主要是用来操作DOM的,如果单单说jQuery的话就是这样一个功能,它的插件也比较多,大家也都各自专注一个功能,可以说jQuery体系是跟着前端页面从静态到动态崛起的一个产物,他的作用就是 ...
- Vue笔记五
十二.过滤器(filter) 示例代码: <template> <div id="app"> {{ msg | capitalize }} </div ...
- Hadoop eclipse插件使用过程中出现的问题
http://download.csdn.net/detail/java2000_wl/4326323 转自http://www.ithao123.cn/content-945210.html 由于h ...
- 使Gallery时设置居左显示
Gallery中的图片默认是居中显示的.可是在非常多情况下我们须要它居左显示,这样做有一个简单方法.就是把Gallery的left设置为负多少,如以下的方法: Drawable drawable=ca ...
- window 效率神器:Wox
官方网站 http://www.getwox.com/ 下载后以管理员身份运行,右下角可以看到Wox的图标.点击setting可以进入主界面 如果看不懂可以将语言设置为中文 默认快捷键是Alt + s ...
- Ubuntu安装sublime test 3 (Build 3126)
Ubuntu下 Sublime Text 3 (Build 3143) 存在一些bug........ 满心欢喜地更新后, 又默默换回Build 3126 1. 安装 sudo apt-get upd ...