Spring MVC Flash Attribute 的讲解与使用示例
转自:https://www.oschina.net/translate/spring-mvc-flash-attribute-example
Spring MVC 3.1版本加了一个很有用的特性,Flash属性,它能解决一个长久以来缺少解决的问题,一个POST/Redirect/GET模式问题。
正常的MVC Web应用程序在每次提交都会POST数据到服务器。一个正常的Controller (被注解 @Controller标记)从请求获取数据和处理它 (保存或更新数据库)。一旦操作成功,用户就会被带到(forward)一个操作成功的页面。传统上来说,这样的POST/Forward/GET模式,有时候会导致多次提交问题. 例如用户按F5刷新页面,这时同样的数据会再提交一次。
为了解决这问题, POST/Redirect/GET 模式被用在MVC应用程序上. 一旦用户表单被提交成功, 我们重定向(Redirect)请求到另一个成功页面。这样能够令浏览器创建新的GET请求和加载新页面。这样用户按下F5,是直接GET请求而不是再提交一次表单。

Image credit: Wikipedia

Idiot_s_Sky
|
|
虽然这一方法看起来很完美,并且解决了表单多次提交的问题,但是它又引入了一个获取请求参数和属性的难题. 通常当我们生成一次http重定向请求的时候,被存储到请求数据会丢失,使得下一次GET请求不可能访问到这次请求中的一些有用的信息. Flash attributes
为了这样做, Flash 特性使用了两个集合. FlashMap 被用来管理 flash attributes 而 FlashMapManager 则被用来存储,获取和管理 FlashMap 实体. 对于每一次请求一个 “input” flash map 会被创建,来存储来自任何之前请求的 flash attribute 还有一个 “output” flash map 会被创建,来存储任何我们存储在这个请求中的,之后的请求参数. |

leoxu
|

使用要想在你的 Spring MVC 应用中使用 Flash attribute,要用 3.1 版本或以上。并且要在 spring-servlet.xml 文件中加入 mvc:annotation-driven。
这些都完成之后,Flash attribute 就会自动设为“开启”,以供使用了。只需在你的 Spring controller 方法中加入RedirectAttributes redirectAttributes。
addFlashAttribute 方法会自动向 output flash map 中添加给定的参数,并将它传递给后续的请求。 我们来看看一个使用 Flash attribute 来完成 POST/Redirect/GET 并传递一些信息的完整实例吧。 Flash Attribute 实例下面的应用向用户显示一个表单。当用户填完数据,并提交表单之后,页面会重定向到另一个显示成功信息的页面。在这个重定向的新页面中,会显示用户刚才输入的信息。 |

戴仓薯
|
第1步: 需要的 JAR 和项目结构如果你用 Maven 来做依赖管理,用下面的 dependencies 来添加 Spring 3.1 MVC 的支持。
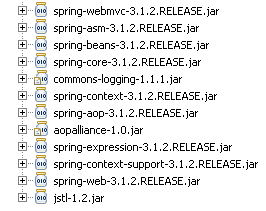
或者,你可以下载以下 JAR 文件,然后把它们放在 /WEB-INF/lib 文件夹下。
第2步: Spring 配置要为 web 项目添加 Spring 支持,需要在 web.xml 中添加 DispatcherServlet 。
然后,spring-servlet 使用 mvc:annotation-driven 来支持 mvc ,并且会扫描项目中的 context:component-scan 标签。 spring-servlet.xml
第3步: Spring Controller – RedirectAttributesController 的代码使用 Customer.java 对象作为 bean 来保存客户信息。 Customer.java
CustomerController 类有3个方法。showForm 方法对应 URL /form ,用来显示 Add New Customer 表单。addCustomer 方法对应 URL /addcustomer ,用来处理 POST 请求。 CustomerController.java
注意我们在 addCustomer 方法中是如何使用 redirectAttributes 参数来添加 flash attribute 的。并且,我们是用 addFlashAttribute 方法来设置新的参数为 flash attribute。 |
戴仓薯
|
第4步: View 层
add customer.JSP 文件显示一个 Add New Customer(添加新客户)表单。
add_customer.jsp
|
1
2
3
4
5
6
7
8
9
10
11
12
13
14
15
16
17
18
19
20
21
22
23
24
25
26
27
28
29
30
|
<%@taglib uri="http://www.springframework.org/tags/form" prefix="form"%><html><body> <h1>Add New Customer</h1> <form:form action="addcustomer.html" method="post" commandName="customer"> <table> <tr> <td><form:label path="firstname">Firstname</form:label></td> <td><form:input path="firstname" /> </td> </tr> <tr> <td><form:label path="lastname">Lastname</form:label></td> <td><form:input path="lastname" /> </td> </tr> <tr> <td><form:label path="age">Age</form:label></td> <td><form:input path="age" /> </td> </tr> <tr> <td><form:label path="email">Email</form:label> <td><form:input path="email" /> </td> </tr> <tr> <td colspan="2"><input type="submit" value="Add Customer" /> </td> </tr> </table> </form:form></body></html> |
show_customer.jsp 简单地显示客户的名和姓,以及用 flash attributes 设置的成功信息。
show_customer.jsp
|
1
2
3
4
5
6
7
|
<%@taglib uri="http://www.springframework.org/tags/form" prefix="form"%><html><body><h1>${message}</h1> ${customer.lastname}, ${customer.firstname} added successfully..</body></html> |
Demo:
执行这个 web 项目即可。
URL: http://localhost:8080/SpringMVC_Flash_Attribute_Maven_example/form.html


下载源代码
Spring MVC Flash Attribute 的讲解与使用示例的更多相关文章
- Spring MVC Flash Attribute
转自:Spring MVC Flash Attribute 的讲解与使用示例 Spring MVC 3.1版本加了一个很有用的特性,Flash属性,它能解决一个长久以来缺少解决的问题,一个POST/R ...
- 理解Spring MVC Model Attribute和Session Attribute
作为一名 Java Web 应用开发者,你已经快速学习了 request(HttpServletRequest)和 session(HttpSession)作用域.在设计和构建 Java Web 应用 ...
- 【译】理解Spring MVC Model Attribute 和 Session Attribute
作为一名 Java Web 应用开发者,你已经快速学习了 request(HttpServletRequest)和 session(HttpSession)作用域.在设计和构建 Java Web 应用 ...
- 0052 Spring MVC入门--环境搭建--第一个入门示例
Spring MVC是什么 Spring是一个框架,包括了MVC.IoC.AOP等等组件 MVC是一种思想,并非Spring框架独有,全称是Model.View.Controller,即模型.视图.控 ...
- Spring MVC中自定义拦截器的简单示例
1. 引言 拦截器(Interceptor)实现对每一个请求处理前后进行相关的业务处理,类似于Servlet的Filter. 我们可以让普通的Bean实现HandlerIntercpetor接口或继承 ...
- Spring MVC Cookie example
In this post we will see how to access and modify http cookies of a webpage in Spring MVC framework. ...
- [Spring MVC]学习笔记--form表单标签的使用
github例子地址: https://github.com/lemonbar/spring-mvc-jsp 效果图 关于spring mvc的标签的讲解, 有一篇blog已经讲的很细了. http: ...
- 从一个简单案例上手Spring MVC,同时分析Spring MVC面试问题
很多公司都会用Spring MVC,而且初级程序员在面试时,一定会被问到这方面的问题,所以这里我们来通过一个简单的案例来分析Spring MVC,事实上,我们在培训中就用这个举例,很多零基础的程序员能 ...
- Spring MVC全局异常处理与拦截器校检
在使用Spring MVC进行开发时,总是要对系统异常和用户的异常行为进行处理,以提供给用户友好的提示,也可以提高系统的安全性. 拦截系统响应错误 首先是拦截系统响应错误,这个可以在web.xml中配 ...
随机推荐
- android 多语言(在APP里面内切换语言)
创建SharedPreferences的管理类 public class PreferenceUtil { private static SharedPreferences mSharedPrefer ...
- tomcat调试页面的时候,不刷新
1.调试一个页面的时候,js文件不刷新,也就是相当于没有改(cache) 2.解决:在Server中将当前tomcat的模式改为debug即可
- Broadcast Intent & Broadcast Receiver
当Android系统发生某种状况,必须通知所有程序进行处理时,例如电量不足等,可利用Broadcast Intent对象的功能来进行信息广播. 运行机制包括两部:送出Intent对象的程序:监听广播信 ...
- STM32 HAL库 UART使用printf
// 添加这个函数 int fputc(int ch,FILE *f) { uint8_t temp[]={ch}; HAL_UART_Transmit(&UartHandle,temp,,) ...
- Yii2 如何更好的在页面注入CSS
首先 先添加一个widgets,代码如下(提示:使用时注意修改命名空间) <?php /** * User: yiqing * Date: 2014/12/15 * Time: 0:21 */ ...
- Python OOP(2)-static method,class method and instance method
静态方法(Static Method): 一种简单函数,符合以下要求: 1.嵌套在类中. 2.没有self参数. 特点: 1.类调用.实例调用,静态方法都不会接受自动的self参数. 2.会记录所有实 ...
- HDR(High Dynamic Range) - 高动态范围
1. Dynamic Range 动态范围是指一个场景的最亮和最暗部分之间的相对比值 2. Tone-mapping 现实真正存在的亮度差,即最亮的物体亮度和最暗的物体亮度之比为 , 而人类的眼睛 ...
- c的详细学习(2)数据类型,运算符与表达式
本节用来介绍c语言中的数据类型和运算符. (1)c语言的基本符号: 任何一种基本语言都有自己的基本词汇表.c语言的基本词汇表有一下几部分: *数字10个: *英文字母:大小 ...
- python链表的实现
根据Problem Solving with Algorithms and Data Structures using Python 一书用python实现链表 书籍在线网址http://intera ...
- Redis的管理
一.redis持久化 redis是内存数据库,一切的数据都是存储到内存中的,我们知道,当服务器意外关机,那么在内存中的数据都将丢失,但是redis为我们提供持久化功能,这样就能把数据保存到硬盘上.re ...