Mesos源码分析(4) Mesos Master的启动之三
3. ModuleManager::load(flags.modules.get())如果有参数--modules或者--modules_dir=dirpath,则会将路径中的so文件load进来
代码中加载模块的代码如下

对应的命令行参数如下:

都可以写什么Module呢?
首先是Allocator
默认是内置的Hierarchical Dominant Resource Fairness allocator
要写一个自己的Allocator:
- 通过--modules加载so
- 通过--allocator参数指定
当然很少有人会重写这个Allocator,因为这是Mesos的精髓所在,但是可以对默认的Alllocator进行加强的。
参考文档http://mesos.apache.org/documentation/latest/allocation-module/
Mesos Allocation Modules
The logic that the Mesos master uses to determine which frameworks to make resource offers to is encapsulated in the master's allocator module. The allocator is a pluggable component that organizations can use to implement their own sharing policy, e.g. fair-sharing, priority, etc., or tune the default hierarchical Dominant Resource Fairness algorithm (see the DRF paper).
To use a custom allocator in Mesos, one must:
- Implement the Allocator interface as defined in mesos/allocator/allocator.hpp,
- Wrap the allocator implementation in a module and load it in the Mesos master.
Writing a custom allocator
Allocator modules are implemented in C++, the same language in which Mesos is written. They must subclass the Allocator interface defined in mesos/allocator/allocator.hpp. However, your implementation can be a C++ proxy, which delegates calls to an actual allocator written in a language of your choice.
The default allocator is HierarchicalDRFAllocatorProcess, which lives in$MESOS_HOME/src/master/allocator/mesos/hierarchical.hpp. Like most Mesos components, it is actor-based, which means all interface methods are non-blocking and return immediately after putting the corresponding action into the actor's queue. If you would like to design your custom allocator in a similar manner, subclass MesosAllocatorProcess from$MESOS_HOME/src/master/allocator/mesos/allocator.hpp and wrap your actor-based allocator inMesosAllocator. This dispatches calls to the underlying actor and controls its lifetime. You can refer to HierarchicalDRFAllocatorProcess as a starting place if you choose to write your own actor-based allocation module.
Additionally, the built-in hierarchical allocator can be extended without the need to reimplement the entirety of the allocation logic. This is possible through the use of the Sorter abstraction. Sorters define the order in which hierarchy layers (e.g. roles or frameworks) should be offered resources by taking "client" objects and some information about those clients and returning an ordered list of clients.
Sorters are implemented in C++ and inherit the Sorter class defined in$MESOS_HOME/src/master/allocator/sorter/sorter.hpp. The default sorter is DRFSorter, which implements fair sharing and can be found in$MESOS_HOME/src/master/allocator/sorter/drf/sorter.hpp. This sorter is capable of expressing priorities by specifying weights in Sorter::add(). Each client's share is divided by its weight. For example, a role that has a weight of 2 will be offered twice as many resources as a role with weight 1.
Wiring up a custom allocator
Once a custom allocator has been written, the next step is to override the built-in implementation with your own. This process consists of several steps:
- Wrap your allocator in a Mesos allocator module,
- Load this module in Mesos master.
An allocator module is a factory function and a module description, as defined inmesos/module/allocator.hpp. Assuming the allocation logic is implemented by theExternalAllocator class declared in external_allocator.hpp, the following snippet describes the implementation of an allocator module named ExternalAllocatorModule:
#include <mesos/allocator/allocator.hpp>
#include <mesos/module/allocator.hpp>
#include <stout/try.hpp>
#include "external_allocator.hpp"
using namespace mesos;
using mesos::allocator::Allocator;
using mesos::internal::master::allocator::HierarchicalDRFAllocator;
static Allocator* createExternalAllocator(const Parameters& parameters)
{
Try<Allocator*> allocator = ExternalAllocator::create();
if (allocator.isError()) {
return nullptr;
}
return allocator.get();
}
// Declares an ExternalAllocator module named 'ExternalAllocatorModule'.
mesos::modules::Module<Allocator> ExternalAllocatorModule(
MESOS_MODULE_API_VERSION,
MESOS_VERSION,
"Mesos Contributor",
"engineer@example.com",
"External Allocator module.",
nullptr,
createExternalAllocator);
Refer to the Mesos Modules documentation for instructions on how to compile and load a module in Mesos master.
Hook
你可以写hook模块,讲代码插在很多关键的步骤,从而改写整个Executor或者Docker或者Task的启动的整个过程。
可以干预的hook的地方定义在mesos/hook.hpp中。
Class hook定义如下:
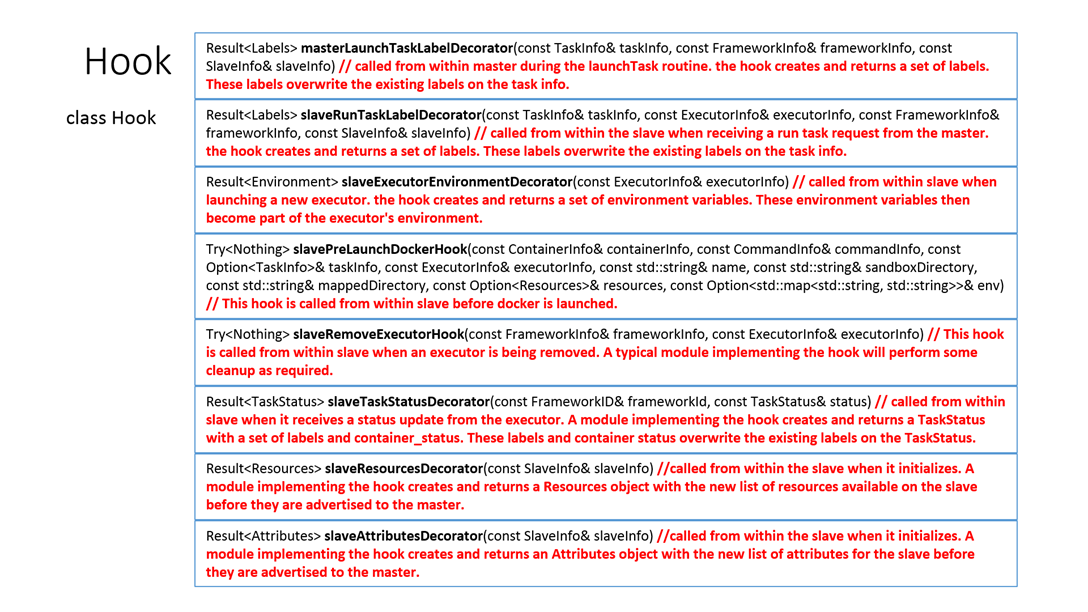
其中比较常用的是slavePrelaunchDockerHook,可以在Docker启动之前做一些事情,比如准备工作。
还有slaveRemoveExecutorHook,这个可以在executor结束的时候,做一些事情,比如清理工作。
要加载一个hook需要:
- 通过--modules加载so
- 通过--hooks加载hook
./bin/mesos-agent.sh --master=<IP>:<PORT> --modules="file://<path-to-modules-config>.json" --hooks=TestTaskHook
Isolator
可通过--isolation=VALUE指定,仅仅用于Mesos Containerizer。
在src/slave/containerizer/mesos/container.cpp里面

默认只会有cpu和memory
|
然后是创建Mesos Containerizer的Launcher
|
然后就是创建Isolator
|
所有的isolator会放在一个vector里面
|
最终创建MesosContainerizer
|
那isolator是如何起作用的呢?
当一个MesosContainerizer启动一个进程的时候,会调用如下的函数。
在src/slave/containerizer/mesos/containerizer.cpp中有

里面最重要的一步是fork一个进程
|
最后还会调用isolate不断的检验这个进程是否使用适当的资源。
|
Isolator定义了以下函数
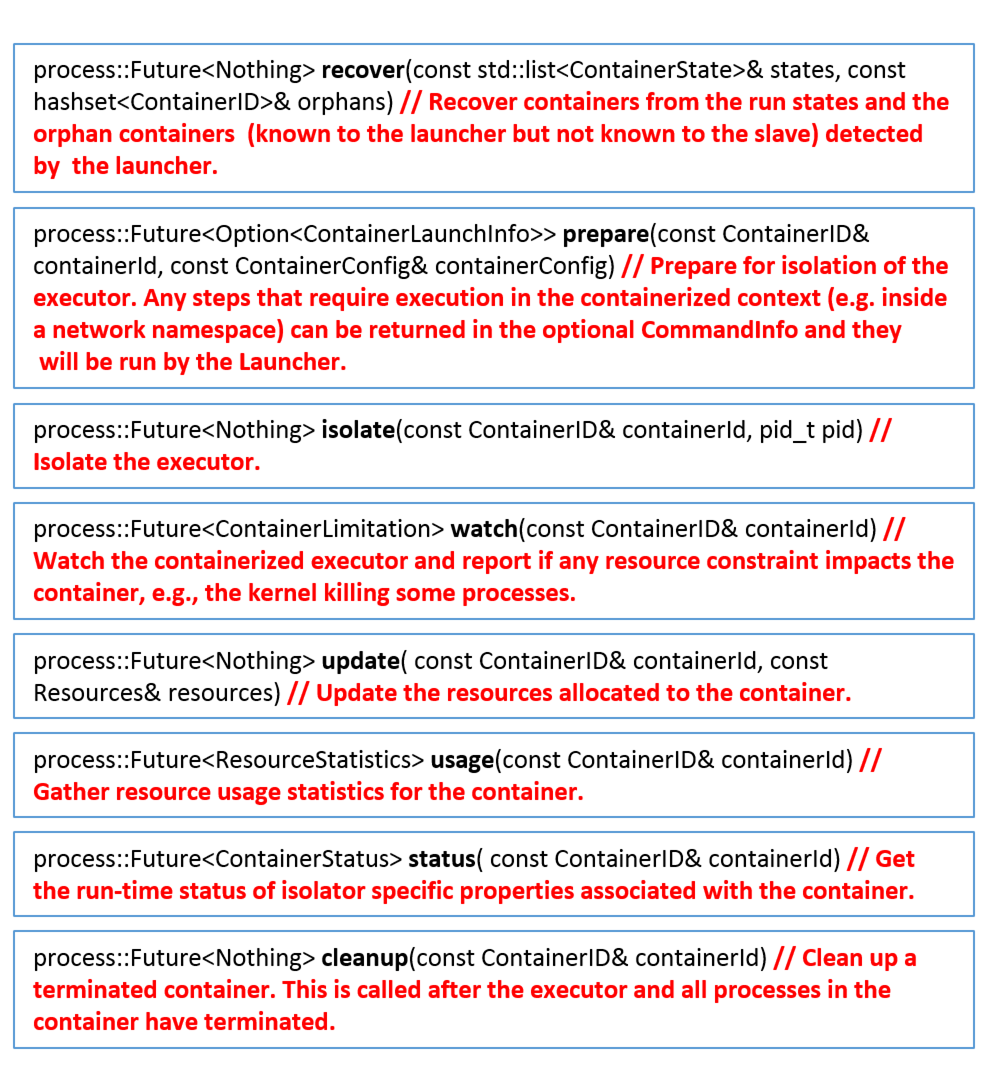

中会调用

Master Contender and Detector
Detector是检测哪个是Mesos-Master的Leader,Contender是自己竞争成为Mesos-Master的leader。默认使用zookeeper。
4. Mesos-Master启动的第四步是加载Hook, HookManager::initialize(flags.hooks.get())

Mesos源码分析(4) Mesos Master的启动之三的更多相关文章
- Mesos源码分析(5): Mesos Master的启动之四
5. Create an instance of allocator. 代码如下 Mesos源码中默认的Allocator,即HierarchicalDRFAllocator的位置在$ME ...
- Mesos源码分析(2): Mesos Master的启动之一
Mesos Master的启动参数如下: /usr/sbin/mesos-master --zk=zk://127.0.0.1:2181/mesos --port=5050 --log_dir=/va ...
- Mesos源码分析(6): Mesos Master的初始化
Mesos Master的初始化在src/master/master.cpp中 在Mesos Master的log中,是能看到这一行的. 1.初始化role,并设置weight权重 ...
- Mesos源码分析(3): Mesos Master的启动之二
2. process::firewall::install(move(rules));如果有参数--firewall_rules则会添加规则 对应的代码如下: // Initialize fire ...
- Mesos源码分析(1): Mesos的启动过程总论
- Mesos源码分析(9): Test Framework的启动
我们以Test Framework为例子解释Framework的启动方式. Test Framework的代码在src/examples/test_framework.cpp中的main函数 首先要指 ...
- Mesos源码分析
Mesos源码分析(1): Mesos的启动过程总论 Mesos源码分析(2): Mesos Master的启动之一 Mesos源码分析(3): Mesos Master的启动之二 Mesos源码分析 ...
- Mesos源码分析(11): Mesos-Master接收到launchTasks消息
根据Mesos源码分析(6): Mesos Master的初始化中的代码分析,当Mesos-Master接收到launchTask消息的时候,会调用Master::launchTasks函数. v ...
- Mesos源码分析(10): MesosSchedulerDriver的启动及运行一个Task
MesosSchedulerDriver的代码在src/sched/sched.cpp里面实现. Driver->run()调用start() 首先检测Mesos-Maste ...
随机推荐
- swoole异步群发模板消息
1.用的是TP5.1的框架,swoole分成一个客户端发送接收消息,一个服务器负责处理信息 服务端代码,服务器要先安装swoole拓展,用 php server.php 启动进程监听 <?php ...
- caffe服务器搭建血泪记录
装过很多次caffe了,但这个还是遇到了很多奇葩问题,不过以前都是在ubuntu上,这次是在centos上. 1.import error _caffe.so: undefined symbol: ...
- Java软件工程的弹幕调试原则
日期:2019.4.25 博客期:054 星期四 今天是把很久之前的那个相关程序——一维数组的最大和的子数组的求取信息,我们今天的任务就是把每一步的信息都要进行输出查看! 如下图: package p ...
- 学习笔记_J2EE_Mybatis_01_mybatis入门
mybatis入门 1.概述 因为觉得自己写的概念信息未必比别人好,而且这些理论知识了解就好,内核信息还是要看源码.所以从相对权威的百度百科转载了基本信息,也因此它的真实性是经过检验的. 1.1 什么 ...
- 洛谷 P1111 修复公路
题目链接 https://www.luogu.org/problemnew/show/P1111 以后只发题目链接!!! 题目大意 给出A地区的村庄数N,和公路数M,公路是双向的.并告诉你每条公路的连 ...
- MySQL 远程连接问题
使用Workbench 无法远程连接Mysql服务器提示如下错误: 查找原因: 显示只能localhost 访问. 解决方法:修改授权远程访问 create user 'root'@'%' ident ...
- CentOS7没有eth0网卡
本人刚刚进去运维圈,写写博客,记录一下自己日常工作学习中的各种问题,方便自己,方便他人. CentOS7系统安装完毕之后,输入ifconfig命令发现没有eth0,不符合我们的习惯.而且也无法远程ss ...
- SEH exception with code 0xc0000005 thrown in the test body
在用Visual Studio时遇到这个报错.原因:访问了非法的内存地址. 这个问题不应该被忽略,通常是代码有bug. 解决办法: VS2013: 菜单->Debug->Exception ...
- php curl Problem with the SSL CA cert (path? access rights?)
公司有台老服务器,搭的php的环境,有个负载均横的服务 调用 curl_init 的时候报了 Problem with the SSL CA cert (path? access rights?) 网 ...
- 在SOUI中使用动态多语言切换
动态语言切换是很多国际化产品的需求,SOUI之前的版本支持静态多语言翻译,通过在程序启动时设置好语言翻译模块,在程序中打开的UI都会自动调用该翻译模块进行文字翻译,但是不支持运行进语言切换. 最近几个 ...