使用Nightwatch.js做基于浏览器的web应用自动测试
1 安装
1.1 安装Node.js
在http://nodejs.org/ 上下载适合本机系统的安装包运行安装,注意安装选项中选择npm tool以用于后续依赖包的安装。

1.2 通过npm工具安装Nightwatch
命令行运行“npm install nightwatch”,如下的提示表明安装成功。

1.3 Npm相关目录结构
所有npm安装的模块都会基于当前cmd窗口的目录,也就是说如果cmd的工作目录是在c:\根目录,则会在该目录下创建node_modules文件夹,并将安装的模块都放到该目录下,如果通过windows附件程序或者win+R启动的,则工作目录在“%USERPROFILE%\”下。
Npm安装所下载的临时文件保存在“%appdata%\npm-cache”下。
1.4 下载Selenium WebDriver server
http://selenium-release.storage.googleapis.com/index.html上下载最新版本的jar包,并将其放到NightWatch的bin目录下。
2 实例使用
2.1 nightwatch.js中增加引用
在”\node_modules\nightwatch\examples\tests\nightwatch.js”中增加引用“require('../../bin/runner.js');”
2.2 运行Selenium WebDriver server(进入jar所在目录, 我的目录是D:\nodejs\node_modules\nightwatch\bin,运行命令“java -jar 2.53.1-server.jar”
2.3 运行nightwatch.js
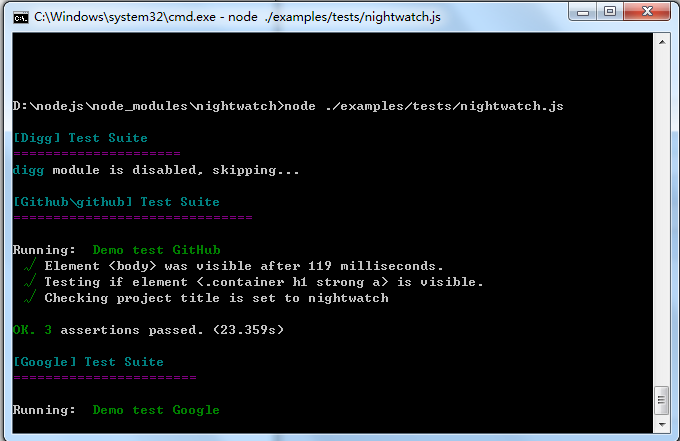
命令行下,cd到nightwatch所在的目录(我的目录是D:\nodejs\node_modules\nightwatch),然后运行“node ./examples/tests/nightwatch.js”
我用的chrome浏览器,我将chromedriver.exe放置在目录D:\nodejs\node_modules\nightwatch\bin下, nightwatch.json配置文件如下:
{

  "src_folders" : ["./examples/tests"],

  "output_folder" : "./examples/reports",

  "custom_commands_path" : "./examples/custom-commands",

  "page_objects_path" : "./examples/pages",

  "custom_assertions_path" : "",

  "globals_path" : "",

  "live_output" : false,

  "parallel_process_delay" : 10,

  "disable_colors": false,

  "test_workers" : false,

  "selenium" : {

    "start_process" : false,

    "server_path" : "",

    "log_path" : "",

    "host" : "127.0.0.1",

    "port" : 4444,

    "cli_args" : {

      "webdriver.chrome.driver" : "./",

      "webdriver.ie.driver" : "",

      "webdriver.firefox.profile" : ""

    }

  },

  "test_settings" : {

    "default" : {

      "launch_url" : "http://localhost",

      "selenium_host" : "127.0.0.1",

      "selenium_port" : 4444,

      "silent" : true,

      "disable_colors": false,

      "screenshots" : {

        "enabled" : false,

        "path" : ""

      },

      "desiredCapabilities" : {

        "browserName" : "chrome",

        "javascriptEnabled" : true,

        "acceptSslCerts" : true

      }

    },

	"chrome" : {

      "desiredCapabilities": {

        "browserName": "chrome"

      }

    },

    "saucelabs" : {

      "selenium_host" : "ondemand.saucelabs.com",

      "selenium_port" : 80,

      "username" : "${SAUCE_USERNAME}",

      "access_key" : "${SAUCE_ACCESS_KEY}",

      "use_ssl" : false,

      "silent" : true,

      "output" : true,

      "screenshots" : {

        "enabled" : false,

        "on_failure" : true,

        "path" : ""

      },

      "desiredCapabilities": {

        "name" : "test-example",

        "browserName": "firefox"

      },

      "globals" : {

        "myGlobal" : "some_sauce_global"

      },

      "selenium" : {

        "start_process" : false

      }

    },

    "phantomjs" : {

      "desiredCapabilities" : {

        "browserName" : "phantomjs",

        "javascriptEnabled" : true,

        "acceptSslCerts" : true,

        "phantomjs.binary.path" : "/path/to/phantomjs"

      }

    },

    "browserstack" : {

      "selenium" : {

        "start_process" : false

      },

      "selenium_host" : "hub.browserstack.com",

      "selenium_port" : 80,

      "silent" : true,

      "desiredCapabilities": {

        "name" : "test-example",

        "browserName": "firefox",

        "browserstack.user" : "...",

        "browserstack.key" : "..."

      }

    },

    "testingbot" : {

      "selenium_host" : "hub.testingbot.com",

      "selenium_port" : 80,

      "apiKey" : "${TB_KEY}",

      "apiSecret" : "${TB_SECRET}",

      "silent" : true,

      "output" : true,

      "screenshots" : {

        "enabled" : false,

        "on_failure" : true,

        "path" : ""

      },

      "desiredCapabilities": {

        "name" : "test-example",

        "browserName": "firefox"

      },

      "selenium" : {

        "start_process" : false

      }

    }

  }

}
2.3 异常处理
如果没意外,执行上述js的时候会抛类似下面的异常,不要慌张,根据异常提示,安装所需要的module即可,安装方法“npm install xxx”。

3 基本原理

4 测试套件
Nightwatch.js makes it possible to organizedyour test scripts into groups and run them as needed. To group tests togetherjust place them in the same sub-folder. The folder name is the name of thegroup.例如下面的目录结构。

5 自己的脚本
在nightwatch根目录下建一个名为test.js的文件:
require('./bin/runner.js');
var nightwatch = require('./index.js');
module.exports = {
"step one" : function (browser) {
browser
.url("http://www.google.com.hk")
.waitForElementVisible('body', 1000)
.setValue('input[type=text]', 'nightwatch')
.waitForElementVisible('button[name=btnG]', 1000)
},
"step two" : function (browser) {
browser
.click('button[name=btnG]')
.pause(1000)
.assert.containsText('#main', 'The Night Watch')
.end();
}
};
然后”node ./test.js”运行:

更多的使用参见其api文档:http://nightwatchjs.org/api
6 产品特征
Ø Simple but powerful syntax which enables you to write tests veryquickly, using only JavaScript and CSS selectors. No need to initialize otherobjects and classes, you only need to write the test specs.
Ø Built-in command-line test runner which enables you to run the testseither altogether, by group or single.
Ø Manages the Selenium server automatically; can be disabled ifSelenium runs on another machine.
Ø Continous Integration support: JUnit XML reporting is built-in soyou can integrate your tests in your build process with systems suchs as Hudsonor Teamcity.
Ø Use CSS selectors or Xpath to locate and verify elements on the pageor execute commands.
Ø Easy to extend if you need to implement your own commands specificto your application.
使用Nightwatch.js做基于浏览器的web应用自动测试的更多相关文章
- Nightwatch.js – 轻松实现浏览器的自动测试
Nightwatch.js 是一个易于使用的,基于 Node.js 平台的浏览器自动化测试解决方案.它使用强大的 Selenium WebDriver API 来在 DOM 元素上执行命令和断言. 语 ...
- 在Autodesk应用程序商店发布基于浏览器的Web应用程序
你一定已经听说过Autodesk应用程序商店了,通过Autodesk应用程序商店,你可以免费下载或购买来自全球的优秀开发者发布的应用程序,来帮助你更快更方便的完成你的工作.而且作为开发者,您也可以在A ...
- Android IOS WebRTC 音视频开发总结(七)-- 基于浏览器的开发
前面写的一系列总结都是讲webrtc如何下载,编译,开发的,有些人可能有点云里雾里了,WEBRTC不是用来搞跨浏览器开发的吗,怎么我讲的这些跟浏览器扯不上任何关系,其实看看下面这个架构图,你就明白了, ...
- SlimerJS – Web开发人员可编写 JS 控制的浏览器
SlimerJS 是一个提供给 Web 开发人员,可通过脚本编程控制的浏览器.它可以让你使用 Javascript 脚本操纵一个网页:打开一个网页,点击链接,修改的内容等,这对于做功能测试,页面自动机 ...
- Vis.js – 基于浏览器的动态 JavaScript 可视化库
Vis.js 是一个动态的,基于浏览器的可视化库.该库被设计为易于使用,能处理大量的动态数据.该库由以下几部分组成:一是数据集和数据视图,基于灵活的键/值数据集,可以添加,更新和删除项目,订阅数据集变 ...
- Breach - HTML5 时代,基于 JS 编写的浏览器
Breach 是一款属于 HTML5 时代的开源浏览器项目,,完全用 Javascript 编写的.免费.模块化.易于扩展.这个浏览器中的一切都是模块,Web 应用程序在其自己的进程运行.通过选择合适 ...
- 基于浏览器的开源“管理+开发”工具,Pivotal MySQL*Web正式上线!
基于浏览器的开源“管理+开发”工具,Pivotal MySQL*Web正式上线! https://www.sohu.com/a/168292858_747818 https://github.com/ ...
- 10款基于jquery的web前端特效及源码下载
1.jQuery时间轴插件:jQuery Timelinr 这是一款可用于展示历史和计划的时间轴插件,尤其比较适合一些网站展示发展历程.大事件等场景.该插件基于jQuery,可以滑动切换.水平和垂直滚 ...
- 通过Web Api 和 Angular.js 构建单页面的web 程序
通过Web Api 和 Angular.js 构建单页面的web 程序 在传统的web 应用程序中,浏览器端通过向服务器端发送请求,然后服务器端根据这个请求发送HTML到浏览器,这个响应将会影响整个的 ...
随机推荐
- AtCoder Grand Contest 021
A - Digit Sum 2 Time limit : 2sec / Memory limit : 256MB Score : 300 points Problem Statement Find t ...
- IDE介绍以及Eclipse的简单使用
一.IDE介绍 ① 什么是IDE? 1. IDE全称是”Integrated Development Environment”,中文称为“集成开发环境”; 2.是用于提供程序开发环境的应用程序, ...
- 5款工具助你写出更好的Java代码
1.FindBugs 顾名思义,FindBugs是一款帮助开发者发现bug的工具,它是一个开源项目,遵循GNU公共许可协议,运行的是Java字节码而不是源码. 它是一款静态分析工具,它检查类或者JAR ...
- 通过FEDERATED存储引擎同步两实例间的表数据
需求情景:实例1中A库中的三个视图是实例2中的B库所依赖的,B需要A库中三个视图的实时数据. 方案:通过FEDERATED来完成跨势力的查询FEDERATED存储引擎表只会创建表结构,不会存储表数据, ...
- HDU——2602Bone Collector(01背包)
Bone Collector Time Limit: 2000/1000 MS (Java/Others) Memory Limit: 32768/32768 K (Java/Others) T ...
- IBM QMF下载
官网下载页面: http://www-01.ibm.com/support/docview.wss?uid=swg27009383 官方BBS: https://w3-connections.ibm. ...
- iOS-BMK标注&覆盖物
在iOS开发中,地图算是一个比较重要的模块.我们常用的地图有高德地图,百度地图,谷歌地图,对于中国而言,苹果公司已经不再使用谷歌地图,官方使用的是高德地图.下面将讲述一下百度地图开发过程中的一些小的知 ...
- 【NOIP2016练习】T2 forest (树形DP,数论)
题意:有一棵N个点的树,每个点上有点权 定义路径长度为所经过的所有点的点权之和,树的直径为一棵树中最大的路径长度 有N次询问,每次询问要求回答所有树的直径之积 每次询问后会删一条边,树的数量会+1 要 ...
- xml文档绑定某个属性值到treeview算法
原文发布时间为:2008-08-10 -- 来源于本人的百度文章 [由搬家工具导入] using System.Xml; protected void Button2_Click(object sen ...
- Opus 和 AAC 声音编码格式
Opus编码器 是一个有损声音编码的格式,由互联网工程任务组(IETF)近来开发,适用于网络上的实时声音传输,标准格式为RFC 6716.Opus 格式是一个开放格式,使用上没有任何专利或限制. Op ...