wait/notify模拟线程池
线程创建和销毁会消耗很多的资源,当我们创建线程时,会发现cpu利用率很高,为了节省资源的使用,使用线程池是一个比较好的选择,当有任务需要执行时,随机分配给一条线程去执行,也可以删除任务,获取任务数量等。下面使用springboot构建一个简单的线程池。
自定义线程池
package com.demo.bootdemo.threadpool;

import java.util.LinkedList;

import java.util.List;

public class MyThreadPool {

    // 线程用于执行任务,所以要具有执行任务,添加线程,减少线程,获取任务数量,释放线程,定时执行任务等操作

    private LinkedList<Thread> threadPool = new LinkedList<Thread>();

    // 存放需要执行的任务

    private LinkedList<Job> jobs = new LinkedList<Job>();

    // 线程池容量

    private int capacity;

    public MyThreadPool() {

        capacity = 10;

        init();

    }

    public MyThreadPool(int capacity) {

        this.capacity = capacity;

        init();

    }

    /**

     * 初始化

     */

    private void init() {

        for (int i = 0; i < capacity; i++) {

            Thread th = new Thread(new MyRunnable(), "th_" + i);

            threadPool.add(th);

            th.start();

        }

    }

    /**

     * 执行单个任务

     *

     * @param job

     */

    public void executeJob(Job job) {

        addJob(job);

    }

    /**

     * 批量执行任务

     *

     * @param jobList

     */

    public void executeJobs(List<Job> jobList) {

        addJobs(jobList);

    }

    public void deleteJob(String jobKey) {

        synchronized (jobs) {

            Job delJob = null;

            for (Job j : jobs) {

                if (jobKey.equals(j.getJobKey())) {

                    delJob = j;

                    break;

                }

            }

            // 删除

            jobs.remove(delJob);

        }

    }

    private void addJobs(List<Job> jobList) {

        synchronized (jobs) {

            if (jobList != null && jobList.size() > 0) {

                jobs.addAll(jobList);

                jobs.notifyAll();

            }

        }

    }

    private void addJob(Job job) {

        synchronized (jobs) {

            jobs.add(job);

            jobs.notify();

        }

    }

    /**

     * 获取任务数量

     *

     * @return

     */

    public int getJobSize() {

        return jobs.size();

    }

    private class MyRunnable implements Runnable {

        public void run() {

            // 任务列表中没有任务,则等待,否则取出任务执行

            while (true) {

                Job job = null;

                synchronized (jobs) {

                    if (jobs.isEmpty()) {

                        try {

                            jobs.wait();

                        } catch (InterruptedException e) {

                            e.printStackTrace();

                        }

                    } else {

                        job = jobs.removeFirst();

                    }

                }

                if (job != null) {

                    job.execute();

                }

            }

        }

    }

}
Job接口
package com.demo.bootdemo.threadpool;

public abstract class Job {

    String jobKey;

    public String getJobKey() {

        return jobKey;

    }

    public void setJobKey(String jobKey) {

        this.jobKey = jobKey;

    }

    public abstract void execute();

}
Job实现类,这里模仿了三种不同类型的Job, PrintJob,SayHelloJob和WriteFileJob
PrintJob
package com.demo.bootdemo.threadpool.myjob;

import java.util.LinkedList;

import org.slf4j.Logger;

import org.slf4j.LoggerFactory;

import com.demo.bootdemo.threadpool.Job;

public class PrintJob extends Job {

    private Logger logger = LoggerFactory.getLogger(PrintJob.class);

    private LinkedList<String> ls = new LinkedList<String>();

    public PrintJob(String jobKey, LinkedList<String> ls) {

        this.setJobKey(jobKey);

        this.ls = ls;

    }

    @Override

    public void execute() {

        try {

            Thread.sleep(1000);

        } catch (InterruptedException e) {

            e.printStackTrace();

        }

        logger.info(ls.toString() +", " + getJobKey());

    }

}
SayHelloJob
package com.demo.bootdemo.threadpool.myjob;

import org.slf4j.Logger;

import org.slf4j.LoggerFactory;

import com.demo.bootdemo.threadpool.Job;

public class SayHelloJob extends Job {

    private Logger logger = LoggerFactory.getLogger(SayHelloJob.class);

    public SayHelloJob(String jobKey) {

        this.setJobKey(jobKey);

    }

    @Override

    public void execute() {

        logger.info("Just say hello. " + getJobKey());

    }

}
WriteFileJob
package com.demo.bootdemo.threadpool.myjob;

import java.io.File;

import java.io.FileOutputStream;

import java.io.IOException;

import org.slf4j.Logger;

import org.slf4j.LoggerFactory;

import com.demo.bootdemo.threadpool.Job;

public class WriteFileJob extends Job {

    private Logger logger = LoggerFactory.getLogger(WriteFileJob.class);

    public WriteFileJob(String jobKey) {

        this.setJobKey(jobKey);

    }

    @Override

    public void execute() {

        String fileName = "./" + System.currentTimeMillis();

        File f = new File(fileName);

        FileOutputStream fos = null;

        try {

            fos = new FileOutputStream(f);

            fos.write(String.valueOf(System.currentTimeMillis()).getBytes());

            Thread.sleep(1000);

        } catch (Exception e) {

            e.printStackTrace();

        } finally {

            if (fos != null) {

                try {

                    fos.close();

                } catch (IOException e) {

                    e.printStackTrace();

                }

            }

            logger.info(String.format("write file. fileName: %s", fileName) + ", " + getJobKey());

        }

    }

}
配置类
package com.demo.bootdemo.threadpool.properties;

import org.springframework.boot.context.properties.ConfigurationProperties;

import org.springframework.context.annotation.Configuration;

@Configuration

@ConfigurationProperties(prefix = "pool.thread")

public class ThreadPoolProperties {

    private int count;

    public int getCount() {

        return count;

    }

    public void setCount(int count) {

        this.count = count;

    }

}
配置文件applicaiton.properties
pool.thread.count=5
测试类入口
package com.demo.bootdemo.threadpool.listeners;

import java.util.ArrayList;

import java.util.LinkedList;

import java.util.List;

import org.springframework.context.ApplicationListener;

import org.springframework.context.event.ContextRefreshedEvent;

import com.demo.bootdemo.threadpool.Job;

import com.demo.bootdemo.threadpool.MyThreadPool;

import com.demo.bootdemo.threadpool.myjob.PrintJob;

import com.demo.bootdemo.threadpool.myjob.SayHelloJob;

import com.demo.bootdemo.threadpool.myjob.WriteFileJob;

import com.demo.bootdemo.threadpool.properties.ThreadPoolProperties;

public class ThreadPoolListeners implements ApplicationListener<ContextRefreshedEvent> {

    @Override

    public void onApplicationEvent(ContextRefreshedEvent event) {

        ThreadPoolProperties bean = event.getApplicationContext().getBean(ThreadPoolProperties.class);

        // 初始化线程池

        MyThreadPool pool = new MyThreadPool(bean.getCount());

        // 新建PrintJob任务

        LinkedList<String> ls = new LinkedList<String>();

        ls.add("a");

        ls.add("b");

        PrintJob printJob = new PrintJob("PrintJobKey000", ls);

        // 新建sayhellojob

        SayHelloJob sayHelloJob = new SayHelloJob("SayHelloJobKey000");

        // 新建writeFileJob

        WriteFileJob writeFileJob = new WriteFileJob("WriteFileJobKey000");

        List<Job> jobList = new ArrayList<>();

        jobList.add(printJob);

        jobList.add(sayHelloJob);

        jobList.add(writeFileJob);

        // 执行以上三个任务

        pool.executeJobs(jobList);

        jobList.clear();

        for (int i = 0; i < 10; i++) {

            sayHelloJob = new SayHelloJob("sayhellojobkey" + i);

            jobList.add(sayHelloJob);

        }

        pool.executeJobs(jobList);

        // 删除任务

        pool.deleteJob("sayhellojobkey7");

        pool.deleteJob("sayhellojobkey8");

        // 单独执行一个任务

        writeFileJob = new WriteFileJob("writeJobkey_alone");

        pool.executeJob(writeFileJob);

    }

}
springboot启动类
package com.demo.bootdemo;

import org.springframework.boot.SpringApplication;

import org.springframework.boot.autoconfigure.SpringBootApplication;

import com.demo.bootdemo.threadpool.listeners.ThreadPoolListeners;

@SpringBootApplication

public class MythreadpoolApplication {

    public static void main(String[] args) {

        SpringApplication springApplication = new SpringApplication(MythreadpoolApplication.class);

        springApplication.addListeners(new ThreadPoolListeners());

        springApplication.run(args);

    }

}
输出结果
  .   ____          _            __ _ _

 /\\ / ___'_ __ _ _(_)_ __  __ _ \ \ \ \

( ( )\___ | '_ | '_| | '_ \/ _` | \ \ \ \

 \\/  ___)| |_)| | | | | || (_| |  ) ) ) )

  '  |____| .__|_| |_|_| |_\__, | / / / /

 =========|_|==============|___/=/_/_/_/

 :: Spring Boot ::        (v2.1.1.RELEASE)

20:39:18.382 [main] Starting MythreadpoolApplication on admin-PC with PID 27632 (D:\Programs\eclipseworkplace\springboot\mythreadpool\target\classes started by admin in D:\Programs\eclipseworkplace\springboot\mythreadpool)

20:39:18.385 [main] No active profile set, falling back to default profiles: default

20:39:18.855 [th_3] Just say hello. SayHelloJobKey000

20:39:18.855 [th_3] Just say hello. sayhellojobkey1

20:39:18.855 [th_3] Just say hello. sayhellojobkey2

20:39:18.855 [th_0] Just say hello. sayhellojobkey0

20:39:18.855 [th_3] Just say hello. sayhellojobkey3

20:39:18.855 [th_0] Just say hello. sayhellojobkey5

20:39:18.855 [th_0] Just say hello. sayhellojobkey6

20:39:18.855 [th_0] Just say hello. sayhellojobkey9

20:39:18.855 [th_1] Just say hello. sayhellojobkey4

20:39:18.858 [main] Started MythreadpoolApplication in 0.722 seconds (JVM running for 1.432)

20:39:19.854 [th_4] [a, b], PrintJobKey000

20:39:19.857 [th_2] write file. fileName: ./1558355958854, WriteFileJobKey000

20:39:19.858 [th_0] write file. fileName: ./1558355958855, writeJobkey_alone
从述打印日志看,sayhellojobkey7和sayhellojobkey8对应jobkey未打印出来,删除任务生效,所有任务都正常执行,两个WriteFileJob分别生成名称为1558355958854和1558355958855的文件,查看当前路径,也确实可以找到这样的文件。
将本案例打包,放入linux执行,使用jstack查看所有线程状态
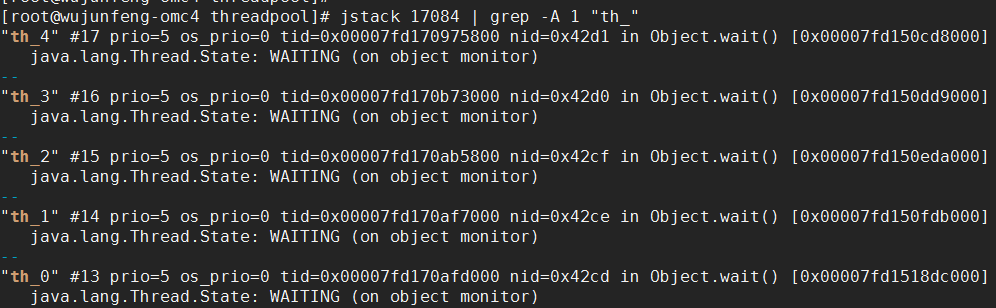
这些线程基本上都处于WAITING状态,不具有锁,待Job任务被添加到集合中时,将唤醒这些线程,处理Job
wait/notify模拟线程池的更多相关文章
- 使用ThreadGroup模拟线程池
参考文章: [1]创建线程池 http://sunnylocus.iteye.com/blog/223327?page=2#comments [2]线程组ThreadGroup http://hub ...
- wait/notify模拟连接池
连接池中的连接可重复使用,减少每次新建和烧毁连接对资源的消耗,但连接池的容量大小也要设置合理,否则也会占用多余的资源.连接池的基本功能是获取连接和释放连接 连接在java中也是一个类,连接对象是一个普 ...
- 二 Java利用等待/通知机制实现一个线程池
接着上一篇博客的 一Java线程的等待/通知模型 ,没有看过的建议先看一下.下面我们用等待通知机制来实现一个线程池 线程的任务就以打印一行文本来模拟耗时的任务.主要代码如下: 1 定义一个任务的接口 ...
- java中线程池的几种实现方式
1.线程池简介: 多线程技术主要解决处理器单元内多个线程执行的问题,它可以显著减少处理器单元的闲置时间,增加处理器单元的吞吐能力. 假设一个服务器完成一项任务所需时间为:T1 创建 ...
- [.NET] 自己实现任务池(模仿线程池)
线程池虽然好用,但限制也不少: (1)总觉得默认的 MaxThread 小了一点,每次使用都要手工调大= = (2)任务不能等待完成 (3)任务一旦加入不能取消,甚至不知道是正在排队/正在执行/执行完 ...
- Java线程池的实现
线程池的作用: 一个线程的周期分为:创建.运行.销毁三个阶段. 处理一个任务时,首先创建一个任务线程,然后执行任务,完了还要销毁线程.而线程只有处于运行状态的时候,才是真的在处理我们交给它的任务,这个 ...
- 线程池的原理及实现 (zhuan)
http://blog.csdn.net/hsuxu/article/details/8985931 ************************************************* ...
- Android(java)学习笔记267:Android线程池形态
1. 线程池简介 多线程技术主要解决处理器单元内多个线程执行的问题,它可以显著减少处理器单元的闲置时间,增加处理器单元的吞吐能力. 假设一个服务器完成一项任务所需时间为:T1 创建线程时间, ...
- java多线程总结五:线程池的原理及实现
1.线程池简介: 多线程技术主要解决处理器单元内多个线程执行的问题,它可以显著减少处理器单元的闲置时间,增加处理器单元的吞吐能力. 假设一个服务器完成一项任务所需时间为:T1 创 ...
随机推荐
- (๑•̀ㅂ•́)و✧QQ用户信息管理系统
这是第二篇文章,就直接切主题 这次剖析的也是自己的作业之一:QQ信息管理系统 一:(此处省略了建Proarams类,其实目的只是想强调把连接语句单独放一个类里更容易调用,命名规范如图) 二:(导入SQ ...
- python连接oracle导出数据文件
python连接oracle,感觉table_list文件内的表名,来卸载数据文件 主脚本: import os import logging import sys import configpars ...
- Delphi 画笔
樊伟胜
- 原创:(一)TCP/IP学习笔记之概述
端到端论点和命运共享其实不应该在底层,差错控制应该在应用程序附近来实现.这是因为考虑了连接,而不是传输的准确,因为差错可以根据某些算法(通信中的滤波等)来恢复,不过在大面积网络出现问题的时候有必要进行 ...
- /build-impl.xml:1030: The module has not been deployed.(netbean javaweb)
我在netbean上创建了一个javaweb,这个项目创建成功了,但是运行时却有了错误,错误贴图如下 报错: The module has not been deployed. See the se ...
- goquery 解析不了noscript
今天在用goquery的时候 解析noscript标签的时候.发现一直获取不到里面的元素. google得到.需要去除noscript标签. s.Find("noscript"). ...
- C# .NET 微信开发-------当微信服务器推送消息时如何接收处理
最近一直在看微信,整整一个月了,看到现在说实话还有很多没看的,从前两周一点看不懂到现在单个功能的一步步实现,不知道这样的速度是否太慢了. 不过现在往下看还是有思路了,目前整个文档完成学习只有1/3左右 ...
- BZOJ 1001 平面图转对偶图
原图的面转成点,原图的边依旧边,只是连接的是两个面. 对偶图的点数=原图的面数 对偶图的边数=原图的边数(如果原边只属于一个面,则它为环边) #include<bits/stdc++.h> ...
- usb发送字节
- 第二章 Vue快速入门--14 使用v-model实现计算器的案例
<!DOCTYPE html> <html lang="en"> <head> <meta charset="utf-8&quo ...