使用 java 创建你的第一个区块链(第二部分)
本系列教程的目的是帮助您了解如何开发区块链技术。
在这第二个教程中,我们将:
- 创建一个简单的钱包;
- 使用我们的区块链发送已签名的交易;
- 感觉更酷。
以上这些将使我们拥有自己的加密货币!
从上一个教程开始,我们有一个基本可验证的区块链。但是目前我们的区块链只存储了些相当无用的信息。今天我们将用交易数据代替这些无用信息(我们每个区块可以容纳多个交易信息)。我们将创建一个非常简单的加密货币,称之为“NoobCoin”。
本教程假设您已经进行了教程1中的操作。
依赖关系:您需要导入 bounceycastle (这是一个关于如何操作的迷你教程) and GSON.
1,准备一个钱包
在加密货币中,货币所有权作为交易在区块链上转移,参与者有一个可以发送和接收资金的地址。钱包可以存储这些地址,大多数钱包也是一个能够在区块链上进行新的交易的软件。
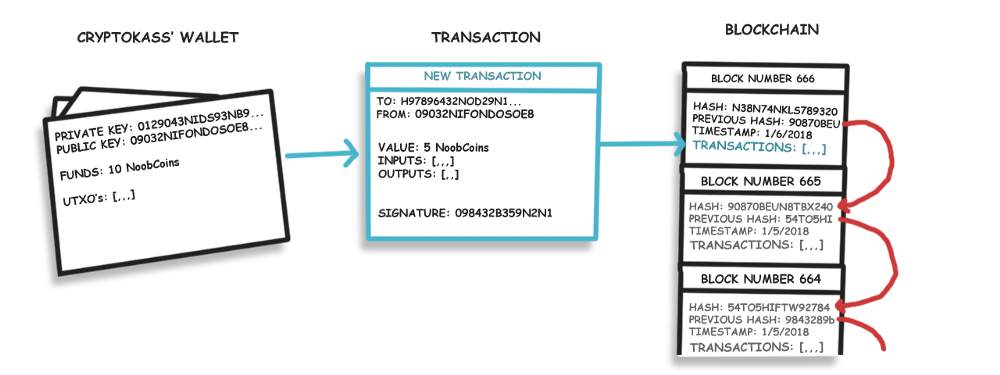
因此让我们创建一个Wallet类来保存我们的公钥和私钥:
 package noobchain;

 import java.security.*;

 public class Wallet {

     public PrivateKey privateKey;

     public PublicKey publicKey;

 }
什么是公钥什么是私钥??
对于我们的“noobcoin”,公钥将作为我们的地址。可以与他人共享此公钥以接收付款。我们的私钥用于签署我们的交易,因此除了私钥的所有者,没人可以使用我们的noobcoins。用户必须保密他们的私钥!我们还将我们的公钥与交易一起发送,它可用于验证我们的签名是否有效以及数据是否被篡改。

私钥用于签署我们不希望被篡改的数据,公钥用于验证签名。
我们在KeyPair中生成私钥和公钥。我们将使用Elliptic-curve cryptography来生成KeyPairs。在Wallet类中添加generateKeyPair()方法并在构造函数中调用它:
 package noobchain;

 import java.security.*;

 public class Wallet {

     public PrivateKey privateKey;

     public PublicKey publicKey;

     public Wallet(){

         generateKeyPair();

     }

     public void generateKeyPair() {

         try {

             KeyPairGenerator keyGen = KeyPairGenerator.getInstance("ECDSA","BC");

             SecureRandom random = SecureRandom.getInstance("SHA1PRNG");

             ECGenParameterSpec ecSpec = new ECGenParameterSpec("prime192v1");

             // Initialize the key generator and generate a KeyPair

             keyGen.initialize(ecSpec, random);   //256 bytes provides an acceptable security level

                 KeyPair keyPair = keyGen.generateKeyPair();

                 // Set the public and private keys from the keyPair

                 privateKey = keyPair.getPrivate();

                 publicKey = keyPair.getPublic();

         }catch(Exception e) {

             throw new RuntimeException(e);

         }

     }

 }
现在我们已经有了钱包类,接下来看看交易。
2,交易和签名
每笔交易都会带有一定数量的数据:
- 资金发送方的公钥(地址);
- 资金接收方的公钥(地址);
- 要转移的资金的价值/金额;
- 输入是对以前交易的引用,证明发送方有资金要发送;
- 输出显示交易中收到的相关地址金额;(这些输出在新的交易中作为输入引用)
- 验证地址所有者的加密签名是发送此事务并且数据未更改的加密签名。(例如,阻止第三方更改发送的金额)。
让我们创建这个新的Transaction类:
 import java.security.*;

 import java.util.ArrayList;

 public class Transaction {

     public String transactionId; // this is also the hash of the transaction.

     public PublicKey sender; // senders address/public key.

     public PublicKey reciepient; // Recipients address/public key.

     public float value;

     public byte[] signature; // this is to prevent anybody else from spending funds in our wallet.

     public ArrayList<TransactionInput> inputs = new ArrayList<TransactionInput>();

     public ArrayList<TransactionOutput> outputs = new ArrayList<TransactionOutput>();

     private static int sequence = 0; // a rough count of how many transactions have been generated.

     // Constructor:

     public Transaction(PublicKey from, PublicKey to, float value,  ArrayList<TransactionInput> inputs) {

         this.sender = from;

         this.reciepient = to;

         this.value = value;

         this.inputs = inputs;

     }

     // This Calculates the transaction hash (which will be used as its Id)

     private String calulateHash() {

         sequence++; //increase the sequence to avoid 2 identical transactions having the same hash

         return StringUtil.applySha256(

                 StringUtil.getStringFromKey(sender) +

                 StringUtil.getStringFromKey(reciepient) +

                 Float.toString(value) + sequence

                 );

     }

 }
我们还应该创建空的TransactionInput和TransactionOutput类,我们后面填写。
我们的交易类还将包含生成/验证签名和验证交易的相关方法。
签名的目的是什么?它们如何工作?
签名在我们区块链上执行两项非常重要的任务:首先,它们只允许所有者使用它们的货币;其次,它们阻止其他人在开采新区块前(在进入点)篡改它们提交的交易。
私钥用于签署数据,公钥用于验证其完整性。
例如: Bob希望向Sally发送2个 NoobCoins,因此他们的钱包软件生成此交易并将其提交给矿工以包含在下一个块中。矿工试图将2个硬币的收件人改为约翰。然而,幸运的是,Bob用他的私钥签署了交易数据,允许任何人使用Bob的公钥验证交易数据是否已被更改(因为没有其他人公钥可以验证交易)。
我们可以看到(从前面的代码块中)我们的签名将是一堆字节,所以让我们创建一个生成它们的方法。我们需要的第一件事是StringUtil 类中的一些辅助函数 :
 //Applies ECDSA Signature and returns the result ( as bytes ).

         public static byte[] applyECDSASig(PrivateKey privateKey, String input) {

         Signature dsa;

         byte[] output = new byte[0];

         try {

             dsa = Signature.getInstance("ECDSA", "BC");

             dsa.initSign(privateKey);

             byte[] strByte = input.getBytes();

             dsa.update(strByte);

             byte[] realSig = dsa.sign();

             output = realSig;

         } catch (Exception e) {

             throw new RuntimeException(e);

         }

         return output;

     }

     //Verifies a String signature

     public static boolean verifyECDSASig(PublicKey publicKey, String data, byte[] signature) {

         try {

             Signature ecdsaVerify = Signature.getInstance("ECDSA", "BC");

             ecdsaVerify.initVerify(publicKey);

             ecdsaVerify.update(data.getBytes());

             return ecdsaVerify.verify(signature);

         }catch(Exception e) {

             throw new RuntimeException(e);

         }

     }

     public static String getStringFromKey(Key key) {

         return Base64.getEncoder().encodeToString(key.getEncoded());

     }
不要太在意理解这些方法的内容。您真正需要知道的是:applyECDSASig接收发送者私钥和字符串输入,对其进行签名并返回一个字节数组。verifyECDSASig接收签名,公钥和字符串数据,如果签名有效,则返回true或false。getStringFromKey从任何键返回编码的字符串。
现在让我们在Transaction 类中使用这些签名方法,generateSignature()和verifiySignature() 方法:
 //Signs all the data we dont wish to be tampered with.

 public void generateSignature(PrivateKey privateKey) {

     String data = StringUtil.getStringFromKey(sender) + StringUtil.getStringFromKey(reciepient) + Float.toString(value)    ;

     signature = StringUtil.applyECDSASig(privateKey,data);

 }

 //Verifies the data we signed hasnt been tampered with

 public boolean verifiySignature() {

     String data = StringUtil.getStringFromKey(sender) + StringUtil.getStringFromKey(reciepient) + Float.toString(value)    ;

     return StringUtil.verifyECDSASig(sender, data, signature);

 }
实际上,您可能希望签署更多信息,例如使用的输出/输入和/或时间戳(现在我们只签署最低限度)。
当一个新的交易被添加到一个区块时,矿工将验证签名。
当我们检查区块链的有效性时,我们也可以检查签名。
3,测试钱包和签名
现在我们已经完成了一半让我们测试一些事情正在发挥作用。在NoobChain类中,让我们添加一些新变量并替换main 方法的内容 :
 import java.security.Security;

 import java.util.ArrayList;

 import java.util.Base64;

 import com.google.gson.GsonBuilder;

 public class NoobChain {

     public static ArrayList<Block> blockchain = new ArrayList<Block>();

     public static int difficulty = 5;

     public static Wallet walletA;

     public static Wallet walletB;

     public static void main(String[] args) {

         //Setup Bouncey castle as a Security Provider

         Security.addProvider(new org.bouncycastle.jce.provider.BouncyCastleProvider());

         //Create the new wallets

         walletA = new Wallet();

         walletB = new Wallet();

         //Test public and private keys

         System.out.println("Private and public keys:");

         System.out.println(StringUtil.getStringFromKey(walletA.privateKey));

         System.out.println(StringUtil.getStringFromKey(walletA.publicKey));

         //Create a test transaction from WalletA to walletB

         Transaction transaction = new Transaction(walletA.publicKey, walletB.publicKey, 5, null);

         transaction.generateSignature(walletA.privateKey);

         //Verify the signature works and verify it from the public key

         System.out.println("Is signature verified");

         System.out.println(transaction.verifiySignature());

     }
我们创建了两个钱包,walletA和walletB然后打印walletA的私钥和公钥。生成一个事务并使用walletA的私钥对其进行签名。
输出如下;

现在我们只需要创建/验证输出和输入,然后将事务存储在区块链中。
4,输入和输出1:如何拥有加密货币
为了拥有1比特币,你必须获得1比特币。总账单并没有真正为您添加一个比特币,减去发件人的一个比特币,发件人引用他/她之前收到的一个比特币,然后创建了一个交易输出,显示1比特币已发送到您的地址。(交易输入是对先前交易输出的引用。)。
您的钱包余额是发给您的所有未花费的交易输出的总和。
那么让我们创建一个TransactionInput 类:
 public class TransactionInput {

     public String transactionOutputId; //Reference to TransactionOutputs -> transactionId

     public TransactionOutput UTXO; //Contains the Unspent transaction output

     public TransactionInput(String transactionOutputId) {

         this.transactionOutputId = transactionOutputId;

     }

 }
此类将用于引用尚未使用的TransactionOutputs。transactionOutputId将用于查找相关的TransactionOutput,允许矿工检查您的所有权。
从这一点开始,我们将遵循比特币约定并调用未使用的事务输出:UTXO。
创建TransactionOutput 类:
 import java.security.PublicKey;

 public class TransactionOutput {

     public String id;

     public PublicKey reciepient; //also known as the new owner of these coins.

     public float value; //the amount of coins they own

     public String parentTransactionId; //the id of the transaction this output was created in

     //Constructor

     public TransactionOutput(PublicKey reciepient, float value, String parentTransactionId) {

         this.reciepient = reciepient;

         this.value = value;

         this.parentTransactionId = parentTransactionId;

         this.id = StringUtil.applySha256(StringUtil.getStringFromKey(reciepient)+Float.toString(value)+parentTransactionId);

     }

     //Check if coin belongs to you

     public boolean isMine(PublicKey publicKey) {

         return (publicKey == reciepient);

     }

 }
交易输出将显示从交易发送给每一方的最终金额。当在新交易中作为输入引用时,这些作为您要发送硬币的证明。
5,输入和输出2:处理交易
链中的块可能会收到许多事务,而区块链可能会非常非常长,因为我们必须查找并检查其输入,所以可能需要很长时间来处理新事务。为了解决这个问题,我们将额外收集所有可用作输入的未花费的交易。在我们的N oobChain 类中添加所有UTXO的集合:
 public class NoobChain {

     public static ArrayList<Block> blockchain = new ArrayList<Block>();

     public static HashMap<String,TransactionOutputs> UTXOs = new HashMap<String,TransactionOutputs>(); //list of all unspent transactions.

     public static int difficulty = 5;

     public static Wallet walletA;

     public static Wallet walletB;

     public static void main(String[] args) {
好的,是时候深入了解细节......
让我们把一切融合在一起来处理交易,用Transaction类中的processTransaction()方法:
 //Returns true if new transaction could be created.

 public boolean processTransaction() {

         if(verifiySignature() == false) {

             System.out.println("#Transaction Signature failed to verify");

             return false;

         }

         //gather transaction inputs (Make sure they are unspent):

         for(TransactionInput i : inputs) {

             i.UTXO = NoobChain.UTXOs.get(i.transactionOutputId);

         }

         //check if transaction is valid:

         if(getInputsValue() < NoobChain.minimumTransaction) {

             System.out.println("#Transaction Inputs to small: " + getInputsValue());

             return false;

         }

         //generate transaction outputs:

         float leftOver = getInputsValue() - value; //get value of inputs then the left over change:

         transactionId = calulateHash();

         outputs.add(new TransactionOutput( this.reciepient, value,transactionId)); //send value to recipient

         outputs.add(new TransactionOutput( this.sender, leftOver,transactionId)); //send the left over 'change' back to sender

         //add outputs to Unspent list

         for(TransactionOutput o : outputs) {

             NoobChain.UTXOs.put(o.id , o);

         }

         //remove transaction inputs from UTXO lists as spent:

         for(TransactionInput i : inputs) {

             if(i.UTXO == null) continue; //if Transaction can't be found skip it

             NoobChain.UTXOs.remove(i.UTXO.id);

         }

         return true;

     }

 //returns sum of inputs(UTXOs) values

     public float getInputsValue() {

         float total = 0;

         for(TransactionInput i : inputs) {

             if(i.UTXO == null) continue; //if Transaction can't be found skip it

             total += i.UTXO.value;

         }

         return total;

     }

 //returns sum of outputs:

     public float getOutputsValue() {

         float total = 0;

         for(TransactionOutput o : outputs) {

             total += o.value;

         }

         return total;

     }
使用此方法,我们执行一些检查以确保事务有效,然后收集输入并生成输出。
重要时刻,我们需要把UTXO列表删除,这意味着交易的输出只能作为输入,,,因此,所有的输入值必须被使用,所以,发送端发送“改变”回他们自己。

红色箭头是输出。请注意,绿色输入是对先前输出的引用。
最后让我们将钱包更新为:
- 收集我们的余额(遍历UTXOs列表并检查事务输出是否是我的);
- 为我们生成交易。
 import java.security.*;

 import java.security.spec.ECGenParameterSpec;

 import java.util.ArrayList;

 import java.util.HashMap;

 import java.util.Map;

 public class Wallet {

     public PrivateKey privateKey;

     public PublicKey publicKey;

     public HashMap<String,TransactionOutput> UTXOs = new HashMap<String,TransactionOutput>(); //only UTXOs owned by this wallet.

     public Wallet() {...

     public void generateKeyPair() {...

   //returns balance and stores the UTXO's owned by this wallet in this.UTXOs

     public float getBalance() {

         float total = 0;

         for (Map.Entry<String, TransactionOutput> item: NoobChain.UTXOs.entrySet()){

             TransactionOutput UTXO = item.getValue();

             if(UTXO.isMine(publicKey)) { //if output belongs to me ( if coins belong to me )

                 UTXOs.put(UTXO.id,UTXO); //add it to our list of unspent transactions.

                 total += UTXO.value ;

             }

         }

         return total;

     }

     //Generates and returns a new transaction from this wallet.

     public Transaction sendFunds(PublicKey _recipient,float value ) {

         if(getBalance() < value) { //gather balance and check funds.

             System.out.println("#Not Enough funds to send transaction. Transaction Discarded.");

             return null;

         }

     //create array list of inputs

         ArrayList<TransactionInput> inputs = new ArrayList<TransactionInput>();

         float total = 0;

         for (Map.Entry<String, TransactionOutput> item: UTXOs.entrySet()){

             TransactionOutput UTXO = item.getValue();

             total += UTXO.value;

             inputs.add(new TransactionInput(UTXO.id));

             if(total > value) break;

         }

         Transaction newTransaction = new Transaction(publicKey, _recipient , value, inputs);

         newTransaction.generateSignature(privateKey);

         for(TransactionInput input: inputs){

             UTXOs.remove(input.transactionOutputId);

         }

         return newTransaction;

     }

 }
您可以随意在钱包中添加其他功能,例如记录您的交易历史记录。
6,把交易数据添加到区块
现在我们有一个工作交易系统,我们需要将它实现到我们的区块链中。我们应该使用事务的ArrayList替换块中的无用数据。但是,在一个块中可能有1000个事务,在我们的哈希计算中包含的事务太多......但是不要担心我们可以使用事务的merkle根(您可以在这里快速阅读有关merkle树的信息*)*。
让我们添加一个帮助方法来生成StringUtils中的merkleroot:
 //Tacks in array of transactions and returns a merkle root.

 public static String getMerkleRoot(ArrayList<Transaction> transactions) {

         int count = transactions.size();

         ArrayList<String> previousTreeLayer = new ArrayList<String>();

         for(Transaction transaction : transactions) {

             previousTreeLayer.add(transaction.transactionId);

         }

         ArrayList<String> treeLayer = previousTreeLayer;

         while(count > 1) {

             treeLayer = new ArrayList<String>();

             for(int i=1; i < previousTreeLayer.size(); i++) {

                 treeLayer.add(applySha256(previousTreeLayer.get(i-1) + previousTreeLayer.get(i)));

             }

             count = treeLayer.size();

             previousTreeLayer = treeLayer;

         }

         String merkleRoot = (treeLayer.size() == 1) ? treeLayer.get(0) : "";

         return merkleRoot;

     }
现在更改我们的Block类:
 import java.util.ArrayList;

 import java.util.Date;

 public class Block {

     public String hash;

     public String previousHash;

     public String merkleRoot;

     public ArrayList<Transaction> transactions = new ArrayList<Transaction>(); //our data will be a simple message.

     public long timeStamp; //as number of milliseconds since 1/1/1970.

     public int nonce;

     //Block Constructor.

     public Block(String previousHash ) {

         this.previousHash = previousHash;

         this.timeStamp = new Date().getTime();

         this.hash = calculateHash(); //Making sure we do this after we set the other values.

     }

     //Calculate new hash based on blocks contents

     public String calculateHash() {

         String calculatedhash = StringUtil.applySha256(

                 previousHash +

                 Long.toString(timeStamp) +

                 Integer.toString(nonce) +

                 merkleRoot

                 );

         return calculatedhash;

     }

     //Increases nonce value until hash target is reached.

     public void mineBlock(int difficulty) {

         merkleRoot = StringUtil.getMerkleRoot(transactions);

         String target = StringUtil.getDificultyString(difficulty); //Create a string with difficulty * "0"

         while(!hash.substring( 0, difficulty).equals(target)) {

             nonce ++;

             hash = calculateHash();

         }

         System.out.println("Block Mined!!! : " + hash);

     }

     //Add transactions to this block

     public boolean addTransaction(Transaction transaction) {

         //process transaction and check if valid, unless block is genesis block then ignore.

         if(transaction == null) return false;

         if((previousHash != "0")) {

             if((transaction.processTransaction() != true)) {

                 System.out.println("Transaction failed to process. Discarded.");

                 return false;

             }

         }

         transactions.add(transaction);

         System.out.println("Transaction Successfully added to Block");

         return true;

     }

 }
注意我们还更新了我们的Block构造函数,因为我们不再需要传入字符串数据并在计算哈希方法中包含了merkle root。
我们的addTransaction 方法将添加事务,并且只有在成功添加事务后才返回true。
现在,实现区块链上交易功能所需的每个组件我们都实现了。
7,大结局
我们应该测试从钱包发送硬币,并更新我们的区块链有效性检查。但首先我们需要一种方法来引入新的硬币。例如,在比特币区块链上创建新硬币的方法有很多种:矿工可以将自己的交易作为对每个开采区块的奖励。但就目前而言,我们将在第一个区块(创世块)中释放我们希望拥有的所有硬币。就像比特币一样,我们会对创世块进行硬编码。
我们需要更新我们的NoobChain类:
- 一个创世块,释放100个Noobcoins到walletA;
- 更新的链式有效性检查,考虑了事务;
- 一些测试事务,看看是否一切正常。
public class NoobChain {
public static ArrayList<Block> blockchain = new ArrayList<Block>();
public static HashMap<String,TransactionOutput> UTXOs = new HashMap<String,TransactionOutput>();
public static int difficulty = 3;
public static float minimumTransaction = 0.1f;
public static Wallet walletA;
public static Wallet walletB;
public static Transaction genesisTransaction;
public static void main(String[] args) {
//add our blocks to the blockchain ArrayList:
Security.addProvider(new org.bouncycastle.jce.provider.BouncyCastleProvider()); //Setup Bouncey castle as a Security Provider
//Create wallets:
walletA = new Wallet();
walletB = new Wallet();
Wallet coinbase = new Wallet();
//create genesis transaction, which sends 100 NoobCoin to walletA:
genesisTransaction = new Transaction(coinbase.publicKey, walletA.publicKey, 100f, null);
genesisTransaction.generateSignature(coinbase.privateKey); //manually sign the genesis transaction
genesisTransaction.transactionId = "0"; //manually set the transaction id
genesisTransaction.outputs.add(new TransactionOutput(genesisTransaction.reciepient, genesisTransaction.value, genesisTransaction.transactionId)); //manually add the Transactions Output
UTXOs.put(genesisTransaction.outputs.get(0).id, genesisTransaction.outputs.get(0)); //its important to store our first transaction in the UTXOs list.
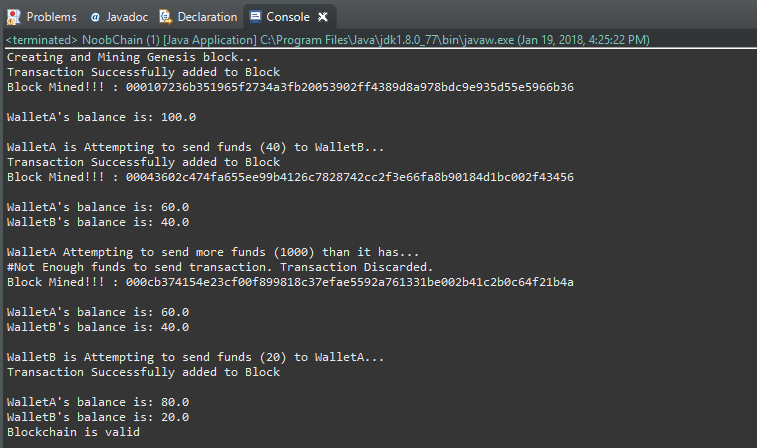
System.out.println("Creating and Mining Genesis block... ");
Block genesis = new Block("0");
genesis.addTransaction(genesisTransaction);
addBlock(genesis);
//testing
Block block1 = new Block(genesis.hash);
System.out.println("\nWalletA's balance is: " + walletA.getBalance());
System.out.println("\nWalletA is Attempting to send funds (40) to WalletB...");
block1.addTransaction(walletA.sendFunds(walletB.publicKey, 40f));
addBlock(block1);
System.out.println("\nWalletA's balance is: " + walletA.getBalance());
System.out.println("WalletB's balance is: " + walletB.getBalance());
Block block2 = new Block(block1.hash);
System.out.println("\nWalletA Attempting to send more funds (1000) than it has...");
block2.addTransaction(walletA.sendFunds(walletB.publicKey, 1000f));
addBlock(block2);
System.out.println("\nWalletA's balance is: " + walletA.getBalance());
System.out.println("WalletB's balance is: " + walletB.getBalance());
Block block3 = new Block(block2.hash);
System.out.println("\nWalletB is Attempting to send funds (20) to WalletA...");
block3.addTransaction(walletB.sendFunds( walletA.publicKey, 20));
System.out.println("\nWalletA's balance is: " + walletA.getBalance());
System.out.println("WalletB's balance is: " + walletB.getBalance());
isChainValid();
}
public static Boolean isChainValid() {
Block currentBlock;
Block previousBlock;
String hashTarget = new String(new char[difficulty]).replace('\0', '0');
HashMap<String,TransactionOutput> tempUTXOs = new HashMap<String,TransactionOutput>(); //a temporary working list of unspent transactions at a given block state.
tempUTXOs.put(genesisTransaction.outputs.get(0).id, genesisTransaction.outputs.get(0));
//loop through blockchain to check hashes:
for(int i=1; i < blockchain.size(); i++) {
currentBlock = blockchain.get(i);
previousBlock = blockchain.get(i-1);
//compare registered hash and calculated hash:
if(!currentBlock.hash.equals(currentBlock.calculateHash()) ){
System.out.println("#Current Hashes not equal");
return false;
}
//compare previous hash and registered previous hash
if(!previousBlock.hash.equals(currentBlock.previousHash) ) {
System.out.println("#Previous Hashes not equal");
return false;
}
//check if hash is solved
if(!currentBlock.hash.substring( 0, difficulty).equals(hashTarget)) {
System.out.println("#This block hasn't been mined");
return false;
}
//loop thru blockchains transactions:
TransactionOutput tempOutput;
for(int t=0; t <currentBlock.transactions.size(); t++) {
Transaction currentTransaction = currentBlock.transactions.get(t);
if(!currentTransaction.verifiySignature()) {
System.out.println("#Signature on Transaction(" + t + ") is Invalid");
return false;
}
if(currentTransaction.getInputsValue() != currentTransaction.getOutputsValue()) {
System.out.println("#Inputs are note equal to outputs on Transaction(" + t + ")");
return false;
}
for(TransactionInput input: currentTransaction.inputs) {
tempOutput = tempUTXOs.get(input.transactionOutputId);
if(tempOutput == null) {
System.out.println("#Referenced input on Transaction(" + t + ") is Missing");
return false;
}
if(input.UTXO.value != tempOutput.value) {
System.out.println("#Referenced input Transaction(" + t + ") value is Invalid");
return false;
}
tempUTXOs.remove(input.transactionOutputId);
}
for(TransactionOutput output: currentTransaction.outputs) {
tempUTXOs.put(output.id, output);
}
if( currentTransaction.outputs.get(0).reciepient != currentTransaction.reciepient) {
System.out.println("#Transaction(" + t + ") output reciepient is not who it should be");
return false;
}
if( currentTransaction.outputs.get(1).reciepient != currentTransaction.sender) {
System.out.println("#Transaction(" + t + ") output 'change' is not sender.");
return false;
}
}
}
System.out.println("Blockchain is valid");
return true;
}
public static void addBlock(Block newBlock) {
newBlock.mineBlock(difficulty);
blockchain.add(newBlock);
}
}
输出:
钱包现在能够安全地在区块链上发送资金,只要他们有资金发送即可。这意味着您拥有自己的本地加密货币*。
您已经完成了区块链上的交易!
您已成功创建自己的加密货币。您的区块链现在:
- 允许用户使用 new Wallet()创建钱包;
- 使用Elliptic-Curve加密技术为钱包提供公钥和私钥;
- 通过使用数字签名算法来证明所有权,确保资金转移;
- 允许用户使用 “Block.addTransaction(walletA.sendFunds(walletB.publicKey,20))”在您的区块链上进行交易。
您可以在Github上下载这些项目文件。
https://medium.com/programmers-blockchain/creating-your-first-blockchain-with-java-part-2-transactions-2cdac335e0ce
使用 java 创建你的第一个区块链(第二部分)的更多相关文章
- 使用 java 创建你的第一个区块链(第一部分)
本系列教程的目的是帮助您了解如何开发区块链技术. 在本教程中,我们将: 创建你的第一个(非常)基本的“区块链”. 实施简单的工作证明(采矿)系统. 惊叹于可能性. (我假设您对面向对象编程有基本的了解 ...
- 【原】用Java编写第一个区块链(一)
写这篇随笔主要是尝试帮助自己了解如何学习区块链技术开发. [本文禁止任何形式的全文粘贴式转载,本文来自 zacky31 的随笔] 目标: 创建一个最基本的"区块链" 实现一个简单的 ...
- 用Java编写第一个区块链
原文地址:https://www.cnblogs.com/zacky31/p/9057193.html 目标: 创建一个最基本的“区块链” 实现一个简单的挖矿系统 前提: 对面向对象编程有一定的基础 ...
- 只用120行Java代码写一个自己的区块链-3挖矿算法
在本系列前两篇文章中,我们向大家展示了如何通过精炼的Java代码实现一个简单的区块链.包括生成块,验证块数据,广播通信等等,这一篇让我们聚焦在如何实现 PoW算法. 大家都无不惊呼比特币.以太坊及其他 ...
- 【原】用Java编写第一个区块链(二)
这篇文章将去介绍如何使用区块链进行交易. [本文禁止任何形式的全文粘贴式转载,本文来自 zacky31 的随笔] 目标: 在上一篇文章中,我们已经创建了一个可信任的区块链.但是目前所创建的链中包含的有 ...
- 只用120行Java代码写一个自己的区块链
区块链是目前最热门的话题,广大读者都听说过比特币,或许还有智能合约,相信大家都非常想了解这一切是如何工作的.这篇文章就是帮助你使用 Java 语言来实现一个简单的区块链,用不到 120 行代码来揭示区 ...
- 只用120行Java代码写一个自己的区块链-2网络
已经看完第一章的内容了吗,欢迎回来. 上一章我们介绍了关于怎么去编写自己的区块链,完成哈希和新块的校验.但是它只是在一个终端(结点)上跑.我们怎么样来连接其他结点以及贡献新的块呢,怎么样广播到其他结点 ...
- 从零开始用golang创建一条简单的区块链
区块链(Blockchain),是比特币的一个重要概念,它本质上是一个去中心化的数据库,同时作为比特币的底层技术,是一串使用密码学方法相关联产生的数据块,每一个数据块中包含了一批次比特币网络交易的信息 ...
- JAVA 数据筛选(第一笔数据与第二笔数据比较)
第一笔数据与第二笔数据比较 Map<String, Object> jHpictureMap = new HashMap<String, Object>(); // 存放照片S ...
随机推荐
- JxBrowser开启调试模式,JxBrowser debug
原文: 一.问题描述 像一般的浏览器都带了调试功能,按F12就能打开,在JxBrowser中如何开启调试模式了. 二.解决方法 以下代码就能开启调试模式: import com.teamdev.jxb ...
- Hibernate3核心API-SchemaExport类
- "UICollectionView实现带头视图和组的头视图同时存在"实现
实现效果如下: 以前做这效果的界面,总是实现的是section的头视图,因为我一直觉得collectionView是不像UITableView那样有tableHeaderView的,所以每次实现只能是 ...
- Python:Base1(数据类型,print语句,变量,定义字符串,raw字符串与多行字符串,Unicode字符串,整数和浮点数运算,布尔类型运算)
1.Python中数据类型: 计算机顾名思义就是可以做数学计算的机器,因此,计算机程序理所当然地可以处理各种数值.但是,计算机能处理的远不止数值,还可以处理文本.图形.音频.视频.网页等各种各样的数据 ...
- 【.NET】无法加载协定为“ServiceReference1.ReportWsSoap”的终结点配置部分,因为找到了该协定的多个终结点配置。请按名称指示首选的终结点配置部分。
前言 引用websevice时,有时会出现如下错误: 异常详细信息: System.InvalidOperationException: 无法加载协定为“ServiceReference1.Repor ...
- ArcEngine二次开发之提取外包矩
1.通过ITopologicalOperator接口,此方法适用于需要获得包含几个或多个要素的最小外包矩形 public IEnvelope GetEnvelope(IGeometryCollecti ...
- 在Debian下利用URLOS快速安装SqlServer2017
SqlServer能在Debian上安装吗?答案是可以!网络上也能找到很多Linux系统下安装SqlServer的相关文章,也许经过一些折腾,你也能成功在Debian中安装sqlserver,但是其中 ...
- Spring Cloud Feign原理及性能
什么是Feign? Feign 的英文表意为“假装,伪装,变形”, 是一个http请求调用的轻量级框架,可以以Java接口注解的方式调用Http请求,而不用像Java中通过封装HTTP请求报文的方式直 ...
- Macaca环境搭建(三)----uirecorder Android录制
一.安装Macaca-Android 命令窗口输入:npm i macaca-android -g 二.安装android-SDK 1.下载并安装ADT-bundle,官网下载地址我就不提供了,因为下 ...
- 牛客小白月赛12-C(欧拉筛解积性方程)
题目链接:https://ac.nowcoder.com/acm/contest/392/C 题意:给定n,求: 思路:令res[i]=iN (%MOD),因为xn是一个积性函数,即(x*y)n=x ...