
ActiveMQ - 入门指南
首先需要下载ActiveMQ,下面的链接给我们列出了所有版本:
http://activemq.apache.org/download-archives.html
每个版本为不同的OS提供了链接:
公司电脑是windows的,用目录下的activemq.bat启动:
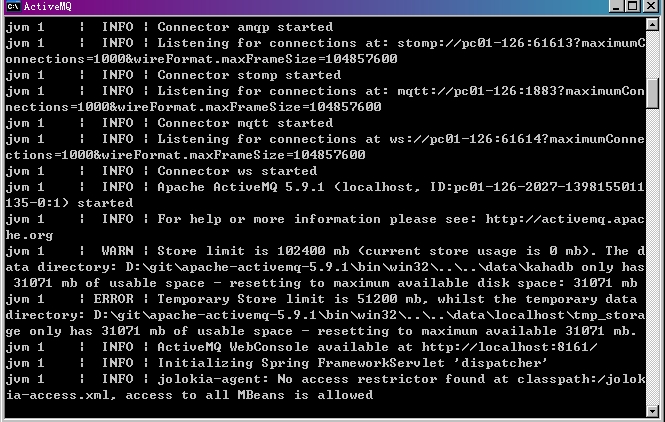
端口号默认是61616,可以在conf/activemq.xml中看到:
<transportConnectors>
<!-- DOS protection, limit concurrent connections to 1000 and frame size to 100MB -->
<transportConnector name="openwire" uri="tcp://0.0.0.0:61616?maximumConnections=1000&wireFormat.maxFrameSize=104857600"/>
<transportConnector name="amqp" uri="amqp://0.0.0.0:5672?maximumConnections=1000&wireFormat.maxFrameSize=104857600"/>
<transportConnector name="stomp" uri="stomp://0.0.0.0:61613?maximumConnections=1000&wireFormat.maxFrameSize=104857600"/>
<transportConnector name="mqtt" uri="mqtt://0.0.0.0:1883?maximumConnections=1000&wireFormat.maxFrameSize=104857600"/>
<transportConnector name="ws" uri="ws://0.0.0.0:61614?maximumConnections=1000&wireFormat.maxFrameSize=104857600"/>
</transportConnectors>
相关的Maven dependency:
<dependency>

    <groupId>javax.jms</groupId>

    <artifactId>javax.jms-api</artifactId>

    <version>2.0</version>

</dependency>

<dependency>

    <groupId>org.apache.activemq</groupId>

    <artifactId>activemq-core</artifactId>

    <version>5.7.0</version>

</dependency>
使用javax.jms.Session跟JMS Provider通信,好像说了句废话...:
ConnectionFactory connectionFactory = new ActiveMQConnectionFactory(

        ActiveMQConnection.DEFAULT_USER,

        ActiveMQConnection.DEFAULT_PASSWORD, "tcp://localhost:61616");

Connection connection = connectionFactory.createConnection();

connection.start();

Session session = connection.createSession(Boolean.TRUE,

        Session.AUTO_ACKNOWLEDGE);
然后一些目的地、发送者、发送内容什么的都是由session来弄的:
Destination destination = session.createQueue("this is sparta!!");

MessageProducer producer = session.createProducer(destination);

TextMessage message0 = session.createTextMessage("这是斯巴达!!!");

TextMessage message1 = session.createTextMessage("这也是斯巴达!!!");

TextMessage message2 = session.createTextMessage("这些都是斯巴达!!!");

producer.send(message0);

producer.send(message1);

producer.send(message2);

session.commit();
有了producer,相应地也有consumer,接收消息方法如下:
MessageConsumer consumer = session.createConsumer(destination);

System.out.println(((TextMessage) consumer.receive(10000)).getText());
结果还是consumer去一个个receive了,就像是接收人亲自去确认那样。
或许我们可以让Listener代劳:
consumer.setMessageListener(new MessageListener() {

    public void onMessage(Message message) {

        try {

            System.out.println("listener catched:::"+((TextMessage)message).getText());

        } catch (JMSException e) {

            e.printStackTrace();

        }

    }

});
当这个consumer设置了Listener的时候就不能再以receive()的方式接收了,
不然会出现javax.jms.IllegalStateException:Cannot synchronously receive a message when a MessageListener is set...
如果想使用publish/subscribe,直接将createQueue改为createTopic即可,但需要理解Topic是无状态的。
完整code如下,发送者:
{

    ConnectionFactory connectionFactory = new ActiveMQConnectionFactory(

            ActiveMQConnection.DEFAULT_USER,

            ActiveMQConnection.DEFAULT_PASSWORD, "tcp://localhost:61616");

    Connection connection = connectionFactory.createConnection();

    connection.start();

    Session session = connection.createSession(Boolean.TRUE,

            Session.AUTO_ACKNOWLEDGE);

    Destination destination = session.createQueue("this is sparta!!");

    MessageProducer producer = session.createProducer(destination);

    TextMessage message0 = session.createTextMessage("这是斯巴达!!!");

    TextMessage message1 = session.createTextMessage("这也是斯巴达!!!");

    TextMessage message2 = session.createTextMessage("这些都是斯巴达!!!");

    producer.send(message0);

    producer.send(message1);

    producer.send(message2);

    session.commit();

}
接收者:
{

    ConnectionFactory connectionFactory = new ActiveMQConnectionFactory(

            ActiveMQConnection.DEFAULT_USER,

            ActiveMQConnection.DEFAULT_PASSWORD, "tcp://localhost:61616");;

    Connection connection = connectionFactory.createConnection();

    connection.start();

    Session session = connection.createSession(Boolean.FALSE,

            Session.AUTO_ACKNOWLEDGE);

    Destination destination = session.createQueue("this is sparta!!");

    MessageConsumer consumer = session.createConsumer(destination);

    System.out.println(((TextMessage) consumer.receive(10000)).getText());

    System.out.println(((TextMessage) consumer.receive(10000)).getText());

    System.out.println(((TextMessage) consumer.receive(10000)).getText());

}
这次试试集成到Spring。
下面的连接是ActiveMQ官网提供的文档。
http://activemq.apache.org/spring-support.html
下面是我添加的一些dependency,基本的spring依赖我就不列举了:
<!-- jms activemq -->

<dependency>

    <groupId>javax.jms</groupId>

    <artifactId>javax.jms-api</artifactId>

    <version>2.0</version>

</dependency>

<dependency>

    <groupId>org.apache.activemq</groupId>

    <artifactId>activemq-core</artifactId>

    <version>${activemq.version}</version>

</dependency>

<dependency>

    <groupId>org.apache.activemq</groupId>

    <artifactId>activemq-pool</artifactId>

    <version>${activemq.version}</version>

</dependency>

<dependency>

    <groupId>org.apache.activemq</groupId>

    <artifactId>activemq-spring</artifactId>

    <version>${activemq.version}</version>

</dependency>

<dependency>

    <groupId>org.apache.xbean</groupId>

    <artifactId>xbean-spring</artifactId>

    <version>3.16</version>

</dependency>

<dependency>

<dependency>

    <groupId>org.springframework</groupId>

    <artifactId>spring-jms</artifactId>

    <version>${spring.version}</version>

</dependency>
maven中添加时要注意还有个xbean-spring;
之前并没有注意,运行发现异常提示 ClassNotFound:org.apache.xbean.spring.context.v2.XBeanNamespaceHandler;
后来我添加了xbean-v2,结果提示v2c,于是我添加v2c,后来感觉太傻就加了xbean-spring。
配置方面可以使用jms和activeMq的标签:
xmlns:amq="http://activemq.apache.org/schema/core"

xmlns:jms="http://www.springframework.org/schema/jms"
相应的xsi:schemaLocation:
http://activemq.apache.org/schema/core http://activemq.apache.org/schema/core/activemq-core.xsd

http://www.springframework.org/schema/jms http://www.springframework.org/schema/jms/spring-jms.xsd
关于connectionFactory的配置可以使用amq标签:
<amq:connectionFactory id="jmsFactory" brokerURL="tcp://localhost:61616" />
但是在这里我打算试试PooledConnectionFactory;
关于org.apache.activemq.pool.PooledConnectionFactory官网有以下解释(简单到位,都不用翻译了):
If you are not using a JCA container to manage your JMS connections, we recommend you use our pooling JMS connection provider, (org.apache.activemq.pool.PooledConnectionFactory) from the activemq-pool library, which will pool the JMS resources to work efficiently with Spring's JmsTemplate or with EJBs.
对于其属性,下面根据javaDoc给出一些解释:
- MaximumActiveSessionPerConnection:每个Connection的最大Session数
- BlockIfSessionPoolIsFull:默认为session池满时请求获得session会阻塞;设置false则会抛出JMSException
- MaxConnections:最大连接数
- IdleTimeout:空闲时间,默认为30秒
- CreateConnectionOnStartup:是否在启动时创建connection
在这里我先用默认参数声明,不知道为什么总是报MalformPrameterizedType...
<bean id="jmsFactory" class="org.apache.activemq.pool.PooledConnectionFactory" />
上次用的队列,这次换用Topic试试...
<bean id="destination" class="org.apache.activemq.command.ActiveMQTopic">

  <constructor-arg index="0" value="spartaTopic"></constructor-arg>

</bean>
当然也可以使用amq标签:
<amq:topic physicalName="sparta" />
如果是使用queue的话:
<amq:queue physicalName="sparta" />
难道我将这些放到spring里就是为了用用标签方便DI?
用里的话来说就是jmsTemplate是<spring对jms支持核心的部分>
(另有jmsTemplate102为适应jms1.0.2的);
和jdbcTemplate那样 jmsTemplate也有提供相似的优势。
比如,像jdbcTemplate处理失控的jdbc代码那样,用jmsTemplate处理失控的jms代码。
或者,如果在使用JmsTemplate是捕捉到了JMSException,JmsTemplate将捕获该异常,然后抛出一个Spring自带的JmsException的子类异常(个人感觉spring提供的不是更详细的异常信息,只是侧重点不同...)。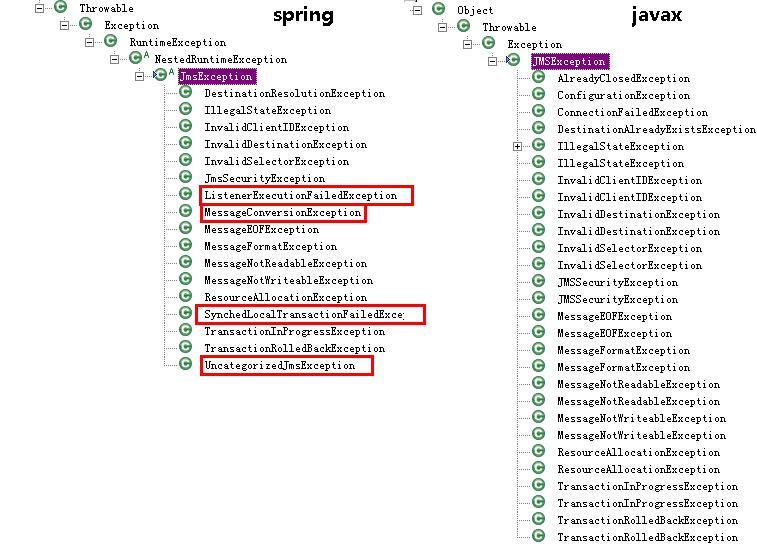
比如:
- ListenerExecutionFailedException:监听器执行失败
- MessageConversionException:消息转换失败
- SynchedLocalTransactionFailedException:同步本地事务未完成
- UncategorizedJmsException:没有适合异常的其他情况
如果我们catch了JMSException,我们依然可以把他转为JmsException:
catch (JMSException e) {

    e.printStackTrace();

    JmsException je = JmsUtils.convertJmsAccessException(e);

}
现在试着配置jmsTemplate:
<bean id="jmsTemplate" class="org.springframework.jms.core.JmsTemplate" >

    <property name="connectionFactory" >

        <bean class="org.apache.activemq.pool.PooledConnectionFactory" />

    </property>

    <property name="defaultDestination" >

        <amq:topic physicalName="sparta" />

    </property>

</bean>
这样编写代码时就变得简单多了,之前那些connectionFactory,connection,session,consumer,producer统统不见了;
我只需要(匿名内部类可能有些碍眼):
ApplicationContext context = new ClassPathXmlApplicationContext("classpath:applicationContext.xml");

JmsTemplate template = (JmsTemplate)context.getBean("jmsTemplate");

template.send(new MessageCreator() {

    public Message createMessage(Session session) throws JMSException {

        ActiveMQMapMessage msg = (ActiveMQMapMessage)session.createMapMessage();

        msg.setString("msg", "This is sparta!!");

        return msg;

    }

});
接收时只需要:
template.receive();
但需要注意!这个receive是同步接收消息的,他会一直阻塞到有消息个接收。
可能会想到MessageListener,比如我们可以给一个MessageConsumer对象setMessageListener:
MessageConsumer consumer = session.createConsumer(destination);

consumer.setMessageListener(new MessageListener() {

    public void onMessage(Message message) {

        try {

            System.out.println("listener catched:::"+((TextMessage)message).getText());

        } catch (JMSException e) {

            e.printStackTrace();

        }

    }

});
上面代码中的MessageListener实例,如果新建一个专门用来监听的类,实现MessageListener接口并加上MessageDriven标注就会出现一个问题——他不够pojo。他有侵入性,我不想要任何实现接口的语法出现在代码中。
于是我可以用listener-container;
现在我创建一个类去监听,比如:
public class CustomedListener {

    void processHandle(HashMap<String,String> map){

        System.out.println("msg:::"+map.get("msg"));

    }

}
但需要注意的是方法的参数列表,他并不是随便定义的。
上面的publisher发送的message是ActiveMQMapMessage,这就需要我把参数定义为上面那种形式。
然后看一下spring中如何配置这个Listener:
<bean id="myListener" class="pac.testcase.jms.CustomedListener"/>

<jms:listener-container connection-factory="connectionFactory">

    <jms:listener destination="sparta" ref="myListener" method="processHandle"/>

</jms:listener-container>
这样我就不需要去调用receive了,有消息就接收。
现在试试通过JMS,在应用程序之间发送消息。 先看看spring提供的RPC方案(其实还有其他方案,只是没见过谁用)。 需要使用到这两个类:
- org.springframework.jms.remoting.JmsInvokerServiceExporter将bean导出为基于消息的服务
- org.springframework.jms.remoting.JmsInvokerProxyFactoryBean让客户端调用服务
比较一下JmsInvokerServiceExporter和RmiServiceExporter: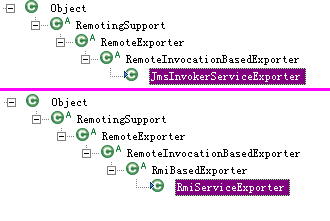
我创建一个接口和实现类如下:
package pac.testcase.jms;

public interface JmsRmiService {

    String doServe(String requestedNum);

}
实现:
package pac.testcase.jms;

import org.springframework.stereotype.Service;

@Service

public class JmsRmiServiceImpl implements JmsRmiService {

    public String doServe(String content) {

        System.out.println(content.concat(" has been requested!!"));

        return "your message::".concat(content).concat(":::length:")+content.length();

    }

}
将这个pojo声明为服务,在spring配置文件中配置:
<bean id="serverService" class="org.springframework.jms.remoting.JmsInvokerServiceExporter"

    p:serviceInterface="pac.testcase.jms.JmsRmiService"

    p:service-ref="JmsRmiServiceImpl">

</bean>
需将他设置为jms监听器,配置方法和一般的jmsMessageListener的配置相同:
<amq:connectionFactory id="jmsFactory" />

<jms:listener-container

    destination-type="queue"

    connection-factory="jmsFactory"

    concurrency="3"

    container-type="simple">

    <jms:listener  destination="sparta" ref="serverService"  />

</jms:listener-container>
container-type有simple和default,根据不同的type也可以使用task-Executor,这里先简单记录一下。
先启动jms broker再启动:
new ClassPathXmlApplicationContext("classpath:applicationContext-*.xml").getBean(JmsRmiService.class);
client这边我需要一个调用代理帮我去调用接口,也就是JmsInvokerProxyFactoryBean;
配置如下:
<amq:connectionFactory id="connectionFactory" />

<bean id="clientService" class="org.springframework.jms.remoting.JmsInvokerProxyFactoryBean"

    p:serviceInterface="pac.test.jms.SenderRmiService"

    p:connectionFactory-ref="connectionFactory"

    p:queueName="sparta"/>
配置中的serviceInterface是client端中根据要调用的方法创建的一个接口。
main方法试着调用看看:
public static void main(String[] args) {

    ApplicationContext context = new ClassPathXmlApplicationContext("classpath:applicationContext.xml");

    SenderRmiService service = (SenderRmiService)context.getBean("clientService");

    System.out.println(service.doServe("这才是斯巴达!!"));

}
server端输出: 
client端输出: 
ActiveMQ - 入门指南的更多相关文章
- 深入浅出 JMS(二) - ActiveMQ 入门指南
深入浅出 JMS(二) - ActiveMQ 入门指南 上篇博文深入浅出 JMS(一) – JMS 基本概念,我们介绍了消息通信的规范JMS,这篇博文介绍一款开源的 JMS 具体实现-- Active ...
- 《KAFKA官方文档》入门指南(转)
1.入门指南 1.1简介 Apache的Kafka™是一个分布式流平台(a distributed streaming platform).这到底意味着什么? 我们认为,一个流处理平台应该具有三个关键 ...
- Web API 入门指南 - 闲话安全
Web API入门指南有些朋友回复问了些安全方面的问题,安全方面可以写的东西实在太多了,这里尽量围绕着Web API的安全性来展开,介绍一些安全的基本概念,常见安全隐患.相关的防御技巧以及Web AP ...
- Vue.js 入门指南之“前传”(含sublime text 3 配置)
题记:关注Vue.js 很久了,但就是没有动手写过一行代码,今天准备入手,却发现自己比菜鸟还菜,于是四方寻找大牛指点,才终于找到了入门的“入门”,就算是“入门指南”的“前传”吧.此文献给跟我一样“白痴 ...
- yii2实战教程之新手入门指南-简单博客管理系统
作者:白狼 出处:http://www.manks.top/document/easy_blog_manage_system.html 本文版权归作者,欢迎转载,但未经作者同意必须保留此段声明,且在文 ...
- 【翻译】Fluent NHibernate介绍和入门指南
英文原文地址:https://github.com/jagregory/fluent-nhibernate/wiki/Getting-started 翻译原文地址:http://www.cnblogs ...
- ASP.NET MVC 5 入门指南汇总
经过前一段时间的翻译和编辑,我们陆续发出12篇ASP.NET MVC 5的入门文章.其中大部分翻译自ASP.NET MVC 5 官方教程,由于本系列文章言简意赅,篇幅适中,从一个web网站示例开始讲解 ...
- 一起学微软Power BI系列-官方文档-入门指南(1)Power BI初步介绍
我们在前一篇文章微软新神器-Power BI,一个简单易用,还用得起的BI产品中,我们初步介绍了Power BI的基本知识.由于Power BI是去年开始微软新发布的一个产品,虽然已经可以企业级应用, ...
- 一起学微软Power BI系列-官方文档-入门指南(2)获取源数据
我们在文章: 一起学微软Power BI系列-官方文档-入门指南(1)Power BI初步介绍中,我们介绍了官方入门文档的第一章.今天继续给大家介绍官方文档中,如何获取数据源的相关内容.虽然是英文,但 ...
随机推荐
- javascript实现playfair和hill密码算法
时至期末,补习信息安全概论作业.恰巧遇古典密码学算法中的playfair算法和hill算法,用javascript语言实现起来是在有趣,边查百度边编码,顺便好好补习一下javascript基础. pl ...
- oracle数据库中将clob字段内容利用java提取出至文本文档中
代码段: 1.执行clob转String public static String ClobToString(Clob sc) throws SQLException, IOException { S ...
- Tomcat源码(一):整体架构
由于tomcat的组件较多,处理流程比较复杂 ,这里是 由浅到深来解释tomcat的整体架构 1.首先应该大致了解下tomcat的 /conf/server.xml 配置文件:在tomcat启动的时 ...
- IO模型《三》非阻塞IO
非阻塞IO(non-blocking IO) Linux下,可以通过设置socket使其变为non-blocking.当对一个non-blocking socket执行读操作时,流程是这个样子: 从图 ...
- 深入了解java虚拟机(JVM) 第二章 内存区域---栈空间
一.栈的含义 用于描述方法执行的动态内存模型,简单来说就是代码中的方法模块.主要用于局部变量表.栈的大小在编译器中就已经分配了空间,在进入一个方法时,这个方法需要栈帧分配多少内存是固定的,运行期间是不 ...
- mysql高级内容
一. 简介 实体与实体之间有3种对应关系,这些关系也需要存储下来 在开发中需要对存储的数据进行一些处理,用到内置的一些函数 视图用于完成查询语句的封装 事务可以保证复杂的增删改操作有效 二. 关系 创 ...
- Struts2框架action层学习心得体会
在struts2框架中,当action处理完之后,就应该向用户返回结果信息,该任务被分为两部分:结果类型和结果本身. 结果类型提供了返回给用户信息类型的实现细节.结果类型通常在Struts2中就已预定 ...
- javascript 动态脚本添加
异步加载js文件或者异步加载js模块,支持所有浏览器,包括IE,参考至javascript高级编程 1.createScript方法用于创建一个script标签并添加到body标签中 2.create ...
- PIE SDK组件式开发综合运用示例
1. 功能概述 关于PIE SDK的功能开发,在我们的博客上已经分门别类的进行了展示,点击PIESat博客就可以访问,为了初学者入门,本章节将对从PIE SDK组件式二次开发如何搭建界面.如何综合开发 ...
- Git创建版本库和添加文件
创建版本库: 首先新建一个目录,然后通过 $ git init命令把这个目录变成Git可管理的仓库,例如: 在"C:\AmyPersonal\AmyGit"路径下新建文件夹Git1 ...