connect VisualVM to Tomcat
https://blogs.oracle.com/jmxetc/
http://stackoverflow.com/questions/1051817/unable-to-connect-to-tomcat-using-visualvm
http://blog.markshead.com/1129/connecting-visual-vm-to-tomcat-7/
http://hackers.lookout.com/2014/06/profiling-remote-jvms/
You need to enable the management extensions to the Tomcat VM. Usually that means passing in something like these:
-Dcom.sun.management.jmxremote.port=8086
-Dcom.sun.management.jmxremote.ssl=false
-Dcom.sun.management.jmxremote.authenticate=false
Of course, if you do it the above way make sure your Tomcat isn't visible on the Internet or the port is firewalled from remote access or take similar security measures to avoid being port scanned and compromised. Otherwise use the authentication options.
http://blog.markshead.com/1129/connecting-visual-vm-to-tomcat-7/
Connecting Visual VM to Tomcat 7
by Mark Shead on February 5, 2012
Connecting Visual VM to a remote instance of Tomcat 7 is surprisingly easy. All you have to do is add some options to JAVA_OPTS turning on JMX, specifying how you want to handle security and setting the hostname. While it is easy to get it up and running, there are quite a few steps to go through if you want to make it work with authentication and behind a firewall.
My goal with this post is to walk through the basics of getting it running and then modifying the installation to support common configuration needs.
Here are instructions for how to set it up using Ubuntu 11.10:
First lets install Tomcat 7 if you don’t have it.
sudo apt-get update
sudo apt-get upgrade
sudo apt-get install tomcat7
Now we need to set the JAVA_OPTS. We will do that by creating a setenv.sh file in /usr/share/tomcat7/bin/ and putting the options in there. setenv.sh gets called before Tomcat starts to set any environmental variables you may want.
export JAVA_OPTS="-Dcom.sun.management.jmxremote=true \
                  -Dcom.sun.management.jmxremote.port=9090 \
                  -Dcom.sun.management.jmxremote.ssl=false \
                  -Dcom.sun.management.jmxremote.authenticate=false \
                  -Djava.rmi.server.hostname=50.112.22.47"
Line 1 enables jmxremote. Line 2 specifies the port. Line 3 says that we don’t need to use ssl. Line 4 says to leave it wide open and not use any type of authentication. Line 5 specifies the ip address of the server where you are running Tomcat. (Don’t use my ip address of 50.112.22.47, substitute your own.) This is left out of many instructions on the web, so it might work in some circumstances without it, but I wasn’t able to connect with VisualVM unless this configuration points to itself.
I believe this has to do with the fact that JMX is going to open another connection on a random port (discussed below). If you don’t tell it what its hostname (or ip) is, JMX doesn’t know how to tell the client how to connect back to that other port.
Now open VisualVM. On OS X you just run:
jvisualvm
Add the connection by clicking on File > Add JMX Connection… and fill out the dialog box as shown (but using the ip address of your server). 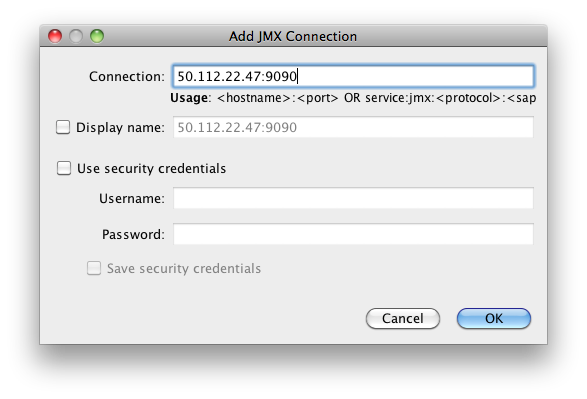
Once you add it, you should see the server in the list on the left hand side. Double click on the JMX connection to the server. (The JMX connection has a JMX icon and should show port 9090.) 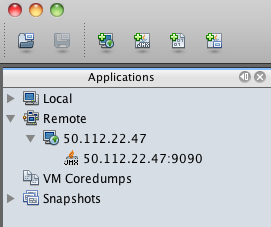
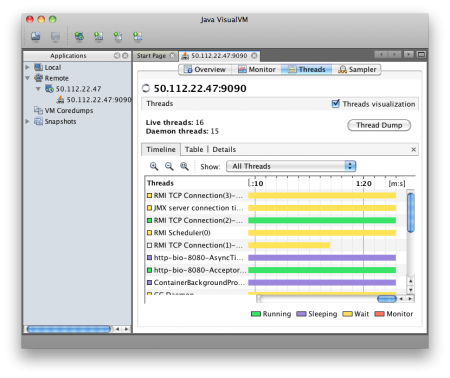
You should then be able to view the following screens of information showing what is going on inside of Tomcat. 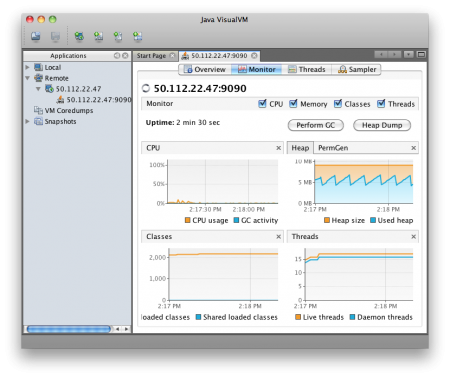
Firewall
One problem people run into in getting this to work is that they open port 9090 (or whatever they have specified) and VisualVM is unable to connect. This is because JMX appears to accept connections port 9090, but then opens at least one other random port and instructs the client to connect to this port as well.
If we run
sudo netstat -ntlp
We should see something like this:
ubuntu@ip-10-252-22-93:~$ sudo netstat -ntlp
Active Internet connections (only servers)
Proto Recv-Q Send-Q Local Address           Foreign Address         State       PID/Program name
tcp        0      0 0.0.0.0:22              0.0.0.0:*               LISTEN      494/sshd
tcp6       0      0 :::8080                 :::*                    LISTEN      2650/java
tcp6       0      0 :::36851                :::*                    LISTEN      2650/java
tcp6       0      0 :::22                   :::*                    LISTEN      494/sshd
tcp6       0      0 :::35543                :::*                    LISTEN      2650/java
tcp6       0      0 :::9090                 :::*                    LISTEN      2650/java
Line 4 shows ssh running on port 22. 5 is where Tomcat is serving HTTP. 9 shows the JMX connection. However 6 & 8 appear to be part of the JMX process. If you have firewall that is blocking access to these ports, VisualVM won’t be able to connect. You can’t just add those specific ports because they are random and can change every time Tomcat is restarted. So you have to leave your machine wide open to connect or use the Listener that will be explained a few sections below.
Authentication
Now lets look at how to secure the connection a bit and require a username and password. We can change the settings we put into setenv.sh to tell it to require authentication by changing false to true.
export JAVA_OPTS="-Dcom.sun.management.jmxremote=true \
                  -Dcom.sun.management.jmxremote.port=9090 \
                  -Dcom.sun.management.jmxremote.ssl=false \
                  -Dcom.sun.management.jmxremote.authenticate=true \
                  -Djava.rmi.server.hostname=50.112.22.47"
By default this should look for two files. One is called jmxremote.access and the other is jmxremote.password. It will probably look for the files in /usr/lib/jvm/java-6-openjdk/jre/lib/management/ but this may be different depending on which JDK you have installed and in some cases it will look for the files in the CATALINA_HOME directory.
We need to specify where the files should be found with the following options. Here we specify the files will be in the tomcat7/conf directories. So now our /usr/share/tomcat7/setenv.sh file should look like:
export JAVA_OPTS="-Dcom.sun.management.jmxremote=true \
 -Dcom.sun.management.jmxremote.port=9090 \
 -Dcom.sun.management.jmxremote.ssl=false \
 -Dcom.sun.management.jmxremote.authenticate=true \
 -Djava.rmi.server.hostname=50.112.22.47 \
 -Dcom.sun.management.jmxremote.password.file=/var/lib/tomcat7/conf/jmxremote.password \
 -Dcom.sun.management.jmxremote.access.file=/var/lib/tomcat7/conf/jmxremote.access"
jmxremote.password should look something like:
jmxadmin mysecretpassword
and jmxremote.access should have something like:
jmxadmin readwrite
Our user is jmxadmin, but could be any username. jmxremote.password tells what password is assigned to each user and jmxremote.access tells what access rights each user has. For a user to have access, they need to have an entry in both files.
Now if you try to run this setup, you will probably see something like this error in your catalina.out file:
Error: Password file read access must be restricted: /var/lib/tomcat7/conf/jmxremote.password
To fix this we need to make sure that both files are owned by the tomcat7 user:
sudo chown tomcat7:tomcat7 /var/lib/tomcat7/conf/jmxremote.*
Then we need to make sure that the tomcat7 user is the only user who has read access.
sudo chmod 0600 /var/lib/tomcat7/conf/jmxremote.*
Now you should be able to create a new connection to the server as before, but this time specifying the username and password you wish to use to connect. VisualVM wouldn’t let me just modify an existing JMX connection, so I had to create a new one rather than just adding the username and password to the existing connection.
Controlling the Ports
The only remaining inconvenience is the fact that JMX is going to choose a random port. If you aren’t dealing with a firewall this might not be a big deal, but if you are dealing with a remote server in a data center or in the cloud, it becomes more problematic. We need some way to tell Tomcat to bind the other JMX ports to a specific port number rather than choosing something at random.
We can do this by adding a listener to the /var/lib/tomcat7/conf/server.xml file like this:
<Listener className="org.apache.catalina.mbeans.JmxRemoteLifecycleListener"
  rmiRegistryPortPlatform="9090" rmiServerPortPlatform="9091" />
Just put it below the other Listeners in server.xml. Notice the rmiRegistryPortPlatform is the 9090 that we previously specified in setenv.sh. The rmiServerPortPlatform allows us to bind the process to 9091 instead of a random port number.
Note: You can now remove the line that specifies port 9090 in setenv.sh.
In addition to adding the Listener we need to put the jar in /usr/share/tomcat7/lib/. The jar we are looking for is called catalina-jmx-remote.jar.
To locate this jar, first determine what version of Tomcat you are using by running the version script which will give us the output as shown.
ubuntu@ip-10-252-22-93:$ /usr/share/tomcat7/bin/version.sh
Using CATALINA_BASE:   /usr/share/tomcat7
Using CATALINA_HOME:   /usr/share/tomcat7
Using CATALINA_TMPDIR: /usr/share/tomcat7/temp
Using JRE_HOME:        /usr
Using CLASSPATH:       /usr/share/tomcat7/bin/bootstrap.jar:/usr/share/tomcat7/bin/tomcat-juli.jar
Server version: Apache Tomcat/7.0.21
Server built:   Sep 8 2011 01:23:08
Server number:  ...0
OS Name:        Linux
OS Version:     3.0.0-14-virtual
Architecture:   amd64
JVM Version:    1.6.0_23-b23
JVM Vendor:     Sun Microsystems Inc.
In our case we are using Tomcat/7.0.21, so we want to go to http://archive.apache.org/dist/tomcat/tomcat-7/v7.0.21/bin/extras/. You can substitute your own version number in the URL to find the file.
Once the file is in /usr/share/tomcat7/lib/, restart your tomcat server and create a new JMX connection as specified above using VisualVM. You should now have a server that requires authenticated access for JMX and where
connect VisualVM to Tomcat的更多相关文章
- 使用VisualVM分析tomcat运行状况(1)
VisualVM是一款java程序性能分析与调优工具,而且还是jdk中自带的工具之一. tomcat也是一个java程序,自然也可以用它来进行监控.不过这里还是会有些问题,tomcat有两种常用的期待 ...
- visualvm监控tomcat
https://my.oschina.net/weidedong/blog/787203
- Windows平台下,Java性能分析工具VisualVM的Tomcat8的配置
VisualVM在JDK6版本及以上已经自带这个应用. 位置:C:\Program Files (x86)\Java\jdk1.8.0_60\bin\jvisualvm.exe 在Windows环 ...
- JMX configuration for Tomcat
Window下执行步骤: D:\apache-tomcat-7.0.57\bin\catalina.bat set CATALINA_OPTS=-Dcom.sun.management.jmxremo ...
- Tomcat翻译--The Host Container
原文:http://tomcat.apache.org/tomcat-7.0-doc/config/host.html Introduction(介绍) The Host element repres ...
- jmeter对tomcat性能测试
主要对tomcat的参数做一些记录(jmeter和tomcat在同一个计算机,可能引起测试误差) 我的计算机配置 4核8线程 8G内存 案例一 tomcat JVM 1.8G堆内存,无数据库操 ...
- tomcat 1.2 负载均衡
实验效果:访问同一个ip或域名,轮询显示两个不同的tomcat界面, nginx服务器ip:192.168.213.4 tomcat服务器ip:192.168.213.3 实验环境:两台服 ...
- 记一次Web服务的性能调优
前言 一个项目在经历开发.测试.上线后,当时的用户规模还比较小,所以刚刚上线的项目一般会表现稳定.但是随着时间的推移,用户数量的增加,qps的增加等因素会造成项目慢慢表现出网页半天无响应的状况.在之前 ...
- Linux ---> 监控JVM工具
Linux ---> 监控JVM工具shkingshking 发布时间: 2013/10/10 01:27 阅读: 2642 收藏: 26 点赞: 1 评论: 0 JDK内置工具使用 jps(J ...
随机推荐
- CentOS 7系统挂载NTFS分区的移动硬盘(转载及体验 CentOS6.5系统挂载NTFS分区的移动硬盘)
作为IT的工作者,避免不了使用Linux系统,我比较喜欢CentOS,为了锻炼自己对CentOS的熟练操作,就把自己的笔记本装了CentOS,强制自己使用,使自己在平时的工作中逐渐掌握Linux的学习 ...
- 使用WordPress模板搭建博客系统
综述: 前端展示:外观--->主题. 功能模块:插件. 遇到的问题: 1:无法加载编辑器文件: 切换下不同的wordPress模板,可能缓存文件有问题. 2:注册功能:密码重设链接无效bug-- ...
- 描述Linux运行级别0-6的各自含义
中文: 0: 关机模式 1:单用户模式<==破解root密码 2:无网络支持的多用户模式 3:有网络支持的多用户模式(文本模式,工作中最长使用的模式) 4:保留,未使用 5:有网络支持又x-wi ...
- CSS 3 动画2D
动画分为两种,1,逐帧动画 组成动画的每一个画面就是一帧 2,关键帧动画,确定关键帧电脑会自动过度 动画中如果遇到不兼容的问题也是要加前缀 @-webkit-keyframes规则 @-webk ...
- zabbix3.0.4 部署之二 (Centos6.5系统准备)
1.安装Centos6.5 2.6.32-642.4.2.el6.x86_64 升级所有软件至最新: yum update 2.同步时间.安装ntpd yum install ntpddate n ...
- Yii 检查输入的数据是否已经存在
只需要在对应的Model文件中的rules方法里面加入 array('username', 'unique', 'message'=>'{attribute}已存在'),//username是需 ...
- 1.jquery的变量赋予方式
1.首先通过将变量赋予 $_ = window.$ _jQuery = window.JQuery 2.将函数赋给两个全局变量 window.jQuery = window.$ = jQuery 3. ...
- 实现Asp.Net MVC无刷新分页
整个过程主要就是:一开始进入页面是,在页面加载完成之后直接通过$(function(){ LoadRegisterUserInfo(1,10,0,0);//加载注册用户信息 });无条件加载数据,调 ...
- Client默认用户及登录密码(转)
Client默认用户及登录密码 SAP系统(如ERP.CRM等)安装完成,初始化状态下有若干个客户端(Client).如果是生产系统,一般只有000.001.066等三个Client:如果是IDES系 ...
- 简单研究Android View绘制二 LayoutParams
2015-07-28 17:23:20 本篇是关于LayoutParams相关 ViewGroup.LayoutParams文档解释如下: LayoutParams are used by views ...