Pyqt 一个简单的浏览器
使用QtWebKit 做一个简单的浏览器.
mybrowserUI.ui
<?xml version="1.0" encoding="UTF-8"?>
<ui version="4.0">
<class>MainWindow</class>
<widget class="QMainWindow" name="MainWindow">
<property name="geometry">
<rect>
<x>0</x>
<y>0</y>
<width>522</width>
<height>336</height>
</rect>
</property>
<property name="windowTitle">
<string>MainWindow</string>
</property>
<widget class="QWidget" name="centralwidget">
<layout class="QVBoxLayout" name="verticalLayout">
<item>
<widget class="QWebView" name="webView">
<property name="url">
<url>
<string>about:blank</string>
</url>
</property>
</widget>
</item>
</layout>
</widget>
<widget class="QMenuBar" name="menubar">
<property name="geometry">
<rect>
<x>0</x>
<y>0</y>
<width>522</width>
<height>23</height>
</rect>
</property>
<widget class="QMenu" name="menu_F">
<property name="title">
<string>文件【&F】</string>
</property>
<widget class="QMenu" name="menu">
<property name="title">
<string>新建</string>
</property>
<property name="icon">
<iconset resource="qrcc.qrc">
<normaloff>:/img/resource/worm.gif</normaloff>:/img/resource/worm.gif</iconset>
</property>
<addaction name="actionNew_Windows"/>
</widget>
<addaction name="menu"/>
<addaction name="actionResoures"/>
<addaction name="separator"/>
<addaction name="actionClose"/>
</widget>
<widget class="QMenu" name="menuAbout">
<property name="title">
<string>关于【&A】</string>
</property>
<addaction name="actionAboutUS"/>
</widget>
<widget class="QMenu" name="menu_2">
<property name="title">
<string>工具【&T】</string>
</property>
<addaction name="actionLLink"/>
<addaction name="separator"/>
<addaction name="actionshot"/>
</widget>
<addaction name="menu_F"/>
<addaction name="menu_2"/>
<addaction name="menuAbout"/>
</widget>
<widget class="QToolBar" name="toolBar">
<property name="windowTitle">
<string>toolBar</string>
</property>
<attribute name="toolBarArea">
<enum>TopToolBarArea</enum>
</attribute>
<attribute name="toolBarBreak">
<bool>false</bool>
</attribute>
<addaction name="actionBack"/>
<addaction name="actionForward"/>
<addaction name="actionRefresh"/>
<addaction name="actionPause"/>
<addaction name="actionHome"/>
<addaction name="separator"/>
<addaction name="actionGo"/>
</widget>
<action name="actionClose">
<property name="icon">
<iconset resource="qrcc.qrc">
<normaloff>:/img/resource/birthday.gif</normaloff>:/img/resource/birthday.gif</iconset>
</property>
<property name="text">
<string>关闭</string>
</property>
</action>
<action name="actionBack">
<property name="icon">
<iconset resource="qrcc.qrc">
<normaloff>:/img/resource/back.png</normaloff>:/img/resource/back.png</iconset>
</property>
<property name="text">
<string>back</string>
</property>
<property name="toolTip">
<string>后退</string>
</property>
</action>
<action name="actionForward">
<property name="icon">
<iconset resource="qrcc.qrc">
<normaloff>:/img/resource/forward.png</normaloff>:/img/resource/forward.png</iconset>
</property>
<property name="text">
<string>forward</string>
</property>
<property name="toolTip">
<string>前进</string>
</property>
</action>
<action name="actionHome">
<property name="icon">
<iconset resource="qrcc.qrc">
<normaloff>:/img/resource/home.png</normaloff>:/img/resource/home.png</iconset>
</property>
<property name="text">
<string>home</string>
</property>
<property name="toolTip">
<string>主页</string>
</property>
</action>
<action name="actionPause">
<property name="icon">
<iconset resource="qrcc.qrc">
<normaloff>:/img/resource/pause.png</normaloff>:/img/resource/pause.png</iconset>
</property>
<property name="text">
<string>pause</string>
</property>
<property name="toolTip">
<string>暂停</string>
</property>
</action>
<action name="actionRefresh">
<property name="icon">
<iconset resource="qrcc.qrc">
<normaloff>:/img/resource/refresh.png</normaloff>:/img/resource/refresh.png</iconset>
</property>
<property name="text">
<string>refresh</string>
</property>
<property name="toolTip">
<string>刷新</string>
</property>
</action>
<action name="actionGo">
<property name="icon">
<iconset resource="qrcc.qrc">
<normaloff>:/img/resource/enter.jpg</normaloff>:/img/resource/enter.jpg</iconset>
</property>
<property name="text">
<string>go</string>
</property>
<property name="toolTip">
<string>确定前往</string>
</property>
</action>
<action name="actionNew_Windows">
<property name="icon">
<iconset resource="qrcc.qrc">
<normaloff>:/img/resource/newwindows.gif</normaloff>:/img/resource/newwindows.gif</iconset>
</property>
<property name="text">
<string>New Windows</string>
</property>
</action>
<action name="actionResoures">
<property name="icon">
<iconset resource="qrcc.qrc">
<normaloff>:/img/resource/cool.gif</normaloff>:/img/resource/cool.gif</iconset>
</property>
<property name="text">
<string>查看源码</string>
</property>
</action>
<action name="actionLLink">
<property name="icon">
<iconset resource="qrcc.qrc">
<normaloff>:/img/resource/cry.gif</normaloff>:/img/resource/cry.gif</iconset>
</property>
<property name="text">
<string>高亮链接</string>
</property>
</action>
<action name="actionAboutUS">
<property name="icon">
<iconset resource="qrcc.qrc">
<normaloff>:/img/resource/eat.gif</normaloff>:/img/resource/eat.gif</iconset>
</property>
<property name="text">
<string>关于我们</string>
</property>
</action>
<action name="actionshot">
<property name="icon">
<iconset resource="qrcc.qrc">
<normaloff>:/img/resource/sex.gif</normaloff>:/img/resource/sex.gif</iconset>
</property>
<property name="text">
<string>截图网页</string>
</property>
</action>
</widget>
<customwidgets>
<customwidget>
<class>QWebView</class>
<extends>QWidget</extends>
<header>QtWebKit/QWebView</header>
</customwidget>
</customwidgets>
<resources>
<include location="qrcc.qrc"/>
</resources>
<connections/>
</ui>
mainbrowser.py
 # -*- coding: UTF8 -*-

 from PyQt4 import QtGui, QtCore, QtWebKit, QtNetwork

 from PyQt4.QtCore import QUrl

 from mybrowserUI import Ui_MainWindow

 import sys, os

 import qrcc

 reload(sys)

 sys.setdefaultencoding("utf-8")

 class MainMyBrowser(QtGui.QMainWindow):

     def __init__(self,parent=None):

         super(MainMyBrowser,self).__init__(parent)

         self.Ui = Ui_MainWindow()

         self.Ui.setupUi(self)

         self.setWindowTitle('MyBrowser V2.1')

         self.statusBar().showMessage('Ready')

         self.initLayout()

         self.initSimpleEvent()

         url = QUrl('http://m.hao123.com')

         self.Ui.webView.load(url)

     # 初始化Layout

     def initLayout(self):

         self.Ui.actionClose.setStatusTip(u'退出')

         '''

         添加地址栏,输入框 lineEdit

         '''

         self.lblAddress = QtGui.QLabel(u"地址:", self.Ui.toolBar)

         self.Ui.toolBar.insertWidget(self.Ui.actionGo, self.lblAddress)   #(self, QAction before #控件之前, QWidget widget # 改控件)

         self.addressEdit = QtGui.QLineEdit(self.Ui.toolBar)

         self.addressEdit.setFixedHeight(30)  # lineEdit 框高度

         self.addressEdit.setFont(QtGui.QFont('.SansSerif', 19))  # 设置框内字体

         self.addressEdit.setStatusTip(u'请输入链接地址')

         self.Ui.actionGo.setStatusTip(u'前往链接')

         self.Ui.toolBar.insertWidget(self.Ui.actionGo, self.addressEdit)

     # 初始化效果事件

     def initSimpleEvent(self):

         self.progress = 0

         self.Ui.actionClose.triggered.connect(QtGui.qApp.quit)  # 退出

         self.addressEdit.returnPressed.connect(self.changeLocation)  #地址框回车触发GO效果

         self.Ui.webView.loadFinished.connect(self.adjustLocation)  # 加载完成改变输入框text()

         self.Ui.webView.titleChanged.connect(self.adjustTitle)   #标题修改触发

         self.Ui.webView.loadProgress.connect(self.setProgress)   # 显示加载进度

         self.Ui.actionGo.triggered.connect(self.changeLocation)

         self.Ui.actionBack.triggered.connect(self.Ui.webView.back)   #返回

         self.Ui.actionPause.triggered.connect(self.Ui.webView.stop)

         self.Ui.actionRefresh.triggered.connect(self.Ui.webView.reload)

         self.Ui.actionForward.triggered.connect(self.Ui.webView.forward)

         self.Ui.actionHome.triggered.connect(self.GoHome)   # 无法获取主页**=> self.Ui.webView.gohome

         self.Ui.actionResoures.triggered.connect(self.viewSource)  # 查看源码

         self.Ui.actionNew_Windows.triggered.connect(self.newindows)  # 新打开一个windows_tab

         self.Ui.actionLLink.triggered.connect(self.highlightAllLinks)  # 高亮

         self.Ui.actionAboutUS.triggered.connect(self.aboutus)  # 关于我们

         self.Ui.actionshot.triggered.connect(self.shot)  # 截图

         '''

         Webkit屏蔽右键菜单

         '''

         self.Ui.webView.setContextMenuPolicy(QtCore.Qt.CustomContextMenu)

         self.Ui.webView.customContextMenuRequested.connect(self.showContextMenu)

         self.Ui.webView.contextMenu = QtGui.QMenu(self)

     #输入框改变时

     def changeLocation(self):

         url = QtCore.QUrl.fromUserInput(self.addressEdit.text())

         self.Ui.webView.load(url)

         self.Ui.webView.setFocus()

     # 调整输入框的显示

     def adjustLocation(self):

         self.addressEdit.setText(self.Ui.webView.url().toString())

     #调整windows标题显示

     def adjustTitle(self):

         if 0 < self.progress < 100:

             self.setWindowTitle("%s (%s%%)" % (self.Ui.webView.title(), self.progress))

         else:

             self.setWindowTitle(self.Ui.webView.title())

     #显示加载进度

     def setProgress(self, p):

         self.progress = p

         self.adjustTitle()

     #模拟首页

     def GoHome(self):

         self.Ui.webView.load(QUrl('http://www.baidu.com'))

      #查看源码

     def viewSource(self):

         accessManager = self.Ui.webView.page().networkAccessManager()

         request = QtNetwork.QNetworkRequest(self.Ui.webView.url())

         reply = accessManager.get(request)

         reply.finished.connect(self.slotSourceDownloaded)

      #查看源码

     def slotSourceDownloaded(self):

         reply = self.sender()

         self.textEdit = QtGui.QTextEdit(None)

         self.textEdit.setAttribute(QtCore.Qt.WA_DeleteOnClose)

         self.textEdit.show()

         self.textEdit.setPlainText(QtCore.QTextStream(reply).readAll())

         self.textEdit.resize(600, 400)

         reply.deleteLater()

     #新打开tab

     # @QtCore.pyqtSlot()

     def newindows(self):

         window = MainMyBrowser(self)

         window.show()

         if self.addressEdit.text().isEmpty():

             return;

     # 高亮

     def highlightAllLinks(self):

         code = """$('a').each(

                     function () {

                         $(this).css('background-color', 'yellow')

                     }

                   )"""

         self.Ui.webView.page().mainFrame().evaluateJavaScript(code)

     # 关于我们

     def aboutus(self):

         QtGui.QMessageBox.about(self, "About WebBrowser",u"Pyqt 浏览器V2.1, power by dcb3688")

     #截图

     def shot(self):

         webView = self.Ui.webView

         url = QtCore.QUrl.fromUserInput(self.addressEdit.text())

         webView.load(QtCore.QUrl(url))

         self.webPage = webView.page()

         self.connect(webView, QtCore.SIGNAL("loadFinished(bool)"), self.savePage)

     # 截图保存图片

     def savePage(self,finished):

         if finished:

             self.statusBar().showMessage(u'开始截图')

             size = self.webPage.mainFrame().contentsSize()

             self.statusBar().showMessage(u"页面宽:%d,页面高:%d" % (size.width(), size.height()))

             self.webPage.setViewportSize(QtCore.QSize(size.width()+16, size.height()))

             img = QtGui.QImage(size, QtGui.QImage.Format_ARGB32)

             painter = QtGui.QPainter(img)

             self.webPage.mainFrame().render(painter)

             painter.end()

             fileName= "shot.png"

             if img.save(fileName):

                 filePath = os.path.join(os.path.dirname(__file__), fileName)

                 QtGui.QMessageBox.information(self, "About WebBrowser", u'图片保存完成,\n'+'路径:'+filePath);

             else:

                 self.statusBar().showMessage(u'截图失败')

         else:

             self.statusBar().showMessage(u'网页加载失败')

     # 显示右键内容

     def showContextMenu(self, pos):

         self.Ui.webView.contextMenu.move(self.pos() + pos)

         self.Ui.webView.contextMenu.show()

     def keyPressEvent(self, event):

         if event.key() ==QtCore.Qt.Key_Escape:

             self.close()

         if event.key() == QtCore.Qt.Key_F5:

             self.changeLocation()

 class aboutDialog(QtGui.QWidget):

     def __init__(self, parent=None):

         super(aboutDialog, self).__init__(parent)

         self.show()

 if __name__ == '__main__':

     app = QtGui.QApplication(sys.argv)

     appshow = MainMyBrowser()

     appshow.show()

     sys.exit(app.exec_())
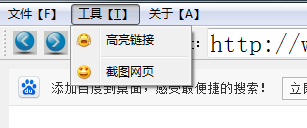
效果:


网上一个截图: 给工具栏添加action:

Pyqt 一个简单的浏览器的更多相关文章
- 【Java】 实现一个简单文件浏览器(1)
学习Java的Swing的时候写的一个超简单文件浏览器 效果如图: 项目结构: 这里面主要用了两个控件,JTree和JTable 下面先说下左侧的文件树如何实现: 首先是FileTree类,继承于JT ...
- Promise A 规范的一个简单的浏览器端实现
简单的实现了一个promise 的规范,留着接下来模块使用.感觉还有很多能优化的地方,有时间看看源码,或者其他大神的代码 主要是Then 函数.回调有点绕人. !(function(win) { fu ...
- PYQT实现简单的浏览器功能
主要的类 QMainWindow 提供一个有菜单条.锚接窗口(例如工具条)和一个状态条的主应用程序窗口. http://www.kuqin.com/qtdocument/qmainwindow.htm ...
- pyqt一个简单的动画
import sys from PyQt4.QtGui import QApplication , QGraphicsEllipseItem , QGraphicsItemAnimationfrom ...
- 【Java】 实现一个简单文件浏览器(2)
接着上篇文章 接下来说下程序右侧的文件内容表格如何实现 FileTable类: FileTable基础于JTable类,构造函数里用setDefaultRenderer设置每行默认的渲染器为FileT ...
- vue_cli下开发一个简单的模块权限系统之建立登录页面并且实现在浏览器输入地址出现内容
新建一个Login.vue(登录页面,先把Hello.vue的内容复制过来即可) 然后我们打开router下面的index.js,第一个箭头:(引入vue路由)第二个箭头(引入我们新建的Login.v ...
- 一个简单有效的兼容IE7浏览器的办法
最近发现了一个简单有效的兼容IE7浏览器的办法 直接将下面代码复制道页面 <meta http-equiv="X-UA-Compatible" content="I ...
- 制作一个简单的WPF图片浏览器
原文:制作一个简单的WPF图片浏览器 注:本例选自MSDN样例,并略有改动.先看效果: 这里实现了以下几个功能:1. 对指定文件夹下所有JPG文件进行预览2. 对选定图片进行旋转3. 对选定图片 ...
- 如何开发一个简单的HTML5 Canvas 小游戏
原文:How to make a simple HTML5 Canvas game 想要快速上手HTML5 Canvas小游戏开发?下面通过一个例子来进行手把手教学.(如果你怀疑我的资历, A Wiz ...
随机推荐
- java代码生成二维码以及解析二维码
package com.test; import java.awt.Color; import java.awt.Graphics2D; import java.awt.image.BufferedI ...
- HTTP协议与HTTPS协议区别
HTTPS(Secure Hypertext Transfer Protocol)安全超文本传输协议: 它是一个安全通信通道,它基于HTTP开发,用于在客户计算机和服务器之间交换信息,它使用安全套 ...
- PHP中面相对象对象的知识点整理
面向对象 万物皆对象,将构成问题的事务分解到各个对象上,建立对象的目的不是为了完成一个工作,而是为了描述某个事务在解决问题中的行为,更符合人的思维习惯,代码重用性高,可扩展性. ___________ ...
- linux下一步一步安装禅道项目管理工具
linux下一步一步安装禅道项目管理工具 因为禅道官网的安装教程实在是太简陋了,所以记录在此. 1.安装apache服务 archlinux下直接 sudo pacman -S apache ubun ...
- hibernate日常BUG总结
在使用hibernate自动生产表的时候失败, 是配置文件我是从别地方拷贝过来忘记更改,所以报了这个错误. 重新命名了生成表的名称,问题解决! 问题很明显,自动增长的主键应该使用整型. 这里写的是St ...
- 【Networking】Thrift and gRPC
参考资料: http://doc.oschina.net/grpc?t=60138 http://www.grpc.io/ https://thrift.apache.org/ https://git ...
- 对称加密之AES、压缩解压以及压缩加密解密解压综合实战
AES 压缩解压 压缩加密解密解压 对称加密: 就是采用这种加密方法的双方使用方式用同样的密钥进行加密和解密.密钥是控制加密及解密过程的指令.算法是一组规则,规定如何进行加密和解密. 因此加密的安 ...
- iOS CoreData relationship 中的inverse
官方文档建议为每一个可以设置inverse的relationship设置一个inverse.目的是保持数据库的正确性.但是没有具体的说明. 我在stackoverflow中找到了一个是分好的答案,ht ...
- mysql日常语句总结
#删除mysql的二进制日志文件 #将删除mysql-bin.*****1之前的日志文件 purge binary logs to 'mysql-bin.*****1'; #重新生成一个二进制日志文件 ...
- jboss服务器修改端口说明
如果一台机器安装多个jboss服务器,就需要修改服务器的端口号,否则各个服务器之间会有冲突.目前确认需要修改的配置如下一.vi $JBOSS_HOME/server/default/conf/jbos ...
