003商城项目:数据库的创建以及ssm框架的整合
我们创建一个数据库。如下:

然后开始整合框架:
1、配置数据源
2、需要让spring容器管理SqlsessionFactory,单例存在。
3、把mapper的代理对象放到spring容器中。使用扫描包的方式加载mapper的代理对象。
<?xml version="1.0" encoding="UTF-8" ?>

<!DOCTYPE configuration

        PUBLIC "-//mybatis.org//DTD Config 3.0//EN"

        "http://mybatis.org/dtd/mybatis-3-config.dtd">

<configuration>

</configuration>
<?xml version="1.0" encoding="UTF-8"?>

<beans xmlns="http://www.springframework.org/schema/beans"

    xmlns:context="http://www.springframework.org/schema/context" xmlns:p="http://www.springframework.org/schema/p"

    xmlns:aop="http://www.springframework.org/schema/aop" xmlns:tx="http://www.springframework.org/schema/tx"

    xmlns:xsi="http://www.w3.org/2001/XMLSchema-instance"

    xsi:schemaLocation="http://www.springframework.org/schema/beans http://www.springframework.org/schema/beans/spring-beans-4.0.xsd

    http://www.springframework.org/schema/context http://www.springframework.org/schema/context/spring-context-4.0.xsd

    http://www.springframework.org/schema/aop http://www.springframework.org/schema/aop/spring-aop-4.0.xsd http://www.springframework.org/schema/tx http://www.springframework.org/schema/tx/spring-tx-4.0.xsd

    http://www.springframework.org/schema/util http://www.springframework.org/schema/util/spring-util-4.0.xsd">

    <!-- 数据库连接池 -->

    <!-- 加载配置文件 -->

    <context:property-placeholder location="classpath:resource/db.properties" />

    <!-- 数据库连接池 -->

    <bean id="dataSource" class="com.alibaba.druid.pool.DruidDataSource"

        destroy-method="close">

        <property name="url" value="${jdbc.url}" />

        <property name="username" value="${jdbc.username}" />

        <property name="password" value="${jdbc.password}" />

        <property name="driverClassName" value="${jdbc.driver}" />

        <property name="maxActive" value="10" />

        <property name="minIdle" value="5" />

    </bean>

    <!-- 配置sqlsessionFactory -->

    <bean id="sqlSessionFactory" class="org.mybatis.spring.SqlSessionFactoryBean">

        <property name="configLocation" value="classpath:mybatis/SqlMapConfig.xml"></property>

        <property name="dataSource" ref="dataSource"></property>

    </bean>

    <!-- 配置扫描包,加载mapper代理对象

     -->

    <bean class="org.mybatis.spring.mapper.MapperScannerConfigurer">

        <property name="basePackage" value="com.taotao.mapper"></property>

    </bean>

</beans>
这里的db.properties:
jdbc.driver=com.mysql.jdbc.Driver

jdbc.url=jdbc:mysql://127.0.0.1:3306/taotao?characterEncoding=utf-8

jdbc.username=root

jdbc.password=1234

basePackage使我们要扫描的包路径。
sqlSessionFactory是里面的一个属性,spring容器生成MapperScannerConfigurer对象时要从IOC容器里面去拿这个sqlSessionFactory对象,所以我们之前要配置
<bean id="sqlSessionFactory"。但是要配置sqlSessionFactory时有需要两个属性:

1、事务管理
2、需要把service实现类对象放到spring容器中管理。
我们先配置把service实现类对象放到spring容器中管理。
applicationContext-service.xml
<?xml version="1.0" encoding="UTF-8"?>

<beans xmlns="http://www.springframework.org/schema/beans"

    xmlns:context="http://www.springframework.org/schema/context" xmlns:p="http://www.springframework.org/schema/p"

    xmlns:aop="http://www.springframework.org/schema/aop" xmlns:tx="http://www.springframework.org/schema/tx"

    xmlns:xsi="http://www.w3.org/2001/XMLSchema-instance"

    xsi:schemaLocation="http://www.springframework.org/schema/beans http://www.springframework.org/schema/beans/spring-beans-4.0.xsd

    http://www.springframework.org/schema/context http://www.springframework.org/schema/context/spring-context-4.0.xsd

    http://www.springframework.org/schema/aop http://www.springframework.org/schema/aop/spring-aop-4.0.xsd
    http://www.springframework.org/schema/tx http://www.springframework.org/schema/tx/spring-tx-4.0.xsd

    http://www.springframework.org/schema/util http://www.springframework.org/schema/util/spring-util-4.0.xsd">

    <!-- 扫描包加载Service实现类 -->

    <context:component-scan base-package="com.taotao.service"></context:component-scan>

</beans>
我们再配置事务管理:要么不执行要么一起执行。
<?xml version="1.0" encoding="UTF-8"?>

<beans xmlns="http://www.springframework.org/schema/beans"

    xmlns:context="http://www.springframework.org/schema/context" xmlns:p="http://www.springframework.org/schema/p"

    xmlns:aop="http://www.springframework.org/schema/aop" xmlns:tx="http://www.springframework.org/schema/tx"

    xmlns:xsi="http://www.w3.org/2001/XMLSchema-instance"

    xsi:schemaLocation="http://www.springframework.org/schema/beans http://www.springframework.org/schema/beans/spring-beans-4.0.xsd

    http://www.springframework.org/schema/context http://www.springframework.org/schema/context/spring-context-4.0.xsd

    http://www.springframework.org/schema/aop http://www.springframework.org/schema/aop/spring-aop-4.0.xsd http://www.springframework.org/schema/tx http://www.springframework.org/schema/tx/spring-tx-4.0.xsd

    http://www.springframework.org/schema/util http://www.springframework.org/schema/util/spring-util-4.0.xsd">

    <!-- 事务管理器 -->

    <bean id="transactionManager"

        class="org.springframework.jdbc.datasource.DataSourceTransactionManager">

        <!-- 数据源 -->

        <property name="dataSource" ref="dataSource" />

    </bean>

    <!-- 通知 -->

    <tx:advice id="txAdvice" transaction-manager="transactionManager">

        <tx:attributes>

            <!-- 传播行为 -->

            <tx:method name="save*" propagation="REQUIRED" />

            <tx:method name="insert*" propagation="REQUIRED" />

            <tx:method name="add*" propagation="REQUIRED" />

            <tx:method name="create*" propagation="REQUIRED" />

            <tx:method name="delete*" propagation="REQUIRED" />

            <tx:method name="update*" propagation="REQUIRED" />

            <tx:method name="find*" propagation="SUPPORTS" read-only="true" />

            <tx:method name="select*" propagation="SUPPORTS" read-only="true" />

            <tx:method name="get*" propagation="SUPPORTS" read-only="true" />

        </tx:attributes>

    </tx:advice>

    <!-- 切面 -->

    <aop:config>

        <aop:advisor advice-ref="txAdvice"

            pointcut="execution(* com.taotao.service.*.*(..))" />

    </aop:config>

</beans>
这里是spring的传统AOP编程参考这篇文章10Spring_AOP编程(传统编程)。
第三步:
接下来我们来配置表现层:
springmvc.xml:
<?xml version="1.0" encoding="UTF-8"?>

<beans xmlns="http://www.springframework.org/schema/beans"

    xmlns:xsi="http://www.w3.org/2001/XMLSchema-instance" xmlns:p="http://www.springframework.org/schema/p"

    xmlns:context="http://www.springframework.org/schema/context"

    xmlns:mvc="http://www.springframework.org/schema/mvc"

    xsi:schemaLocation="http://www.springframework.org/schema/beans http://www.springframework.org/schema/beans/spring-beans.xsd

        http://www.springframework.org/schema/mvc http://www.springframework.org/schema/mvc/spring-mvc-4.0.xsd

        http://www.springframework.org/schema/context http://www.springframework.org/schema/context/spring-context.xsd">

    <context:component-scan base-package="com.taotao.controller" />

    <mvc:annotation-driven />

    <bean

        class="org.springframework.web.servlet.view.InternalResourceViewResolver">

        <property name="prefix" value="/WEB-INF/jsp/" />

        <property name="suffix" value=".jsp" />

    </bean>

</beans>
第四步:最后配置web.xml来启动spring容器和拦截链接,配置springmvc,解决post乱码.
web.xml:
<?xml version="1.0" encoding="UTF-8"?>

<web-app xmlns:xsi="http://www.w3.org/2001/XMLSchema-instance"

    xmlns="http://java.sun.com/xml/ns/javaee" xmlns:web="http://java.sun.com/xml/ns/javaee/web-app_2_5.xsd"

    xsi:schemaLocation="http://java.sun.com/xml/ns/javaee http://java.sun.com/xml/ns/javaee/web-app_2_5.xsd"

    id="taotao" version="2.5">

    <display-name>taotao-manager</display-name>

    <welcome-file-list>

        <welcome-file>index.html</welcome-file>

        <welcome-file>index.htm</welcome-file>

        <welcome-file>index.jsp</welcome-file>

        <welcome-file>default.html</welcome-file>

        <welcome-file>default.htm</welcome-file>

        <welcome-file>default.jsp</welcome-file>

    </welcome-file-list>

    <!-- 加载spring容器 -->

    <context-param>

        <param-name>contextConfigLocation</param-name>

        <param-value>classpath:spring/applicationContext-*.xml</param-value>

    </context-param>

    <listener>

        <listener-class>org.springframework.web.context.ContextLoaderListener</listener-class>

    </listener>

    <!-- 解决post乱码 -->

    <filter>

        <filter-name>CharacterEncodingFilter</filter-name>

        <filter-class>org.springframework.web.filter.CharacterEncodingFilter</filter-class>

        <init-param>

            <param-name>encoding</param-name>

            <param-value>utf-8</param-value>

        </init-param>

    </filter>

    <filter-mapping>

        <filter-name>CharacterEncodingFilter</filter-name>

        <url-pattern>/*</url-pattern>

    </filter-mapping>

    <!-- springmvc的前端控制器 -->

    <servlet>

        <servlet-name>taotao-manager</servlet-name>

        <servlet-class>org.springframework.web.servlet.DispatcherServlet</servlet-class>

        <!-- contextConfigLocation不是必须的, 如果不配置contextConfigLocation, springmvc的配置文件默认在:WEB-INF/servlet的name+"-servlet.xml" -->

        <init-param>

            <param-name>contextConfigLocation</param-name>

            <param-value>classpath:spring/springmvc.xml</param-value>

        </init-param>

        <load-on-startup>1</load-on-startup>

    </servlet>

    <servlet-mapping>

        <servlet-name>taotao-manager</servlet-name>

        <url-pattern>/</url-pattern>

    </servlet-mapping>

</web-app>
注意我们上面这么配置的话,所有的请求都会被拦截的。包括我们请求的静态资源,而且我们创建静态资源如下:
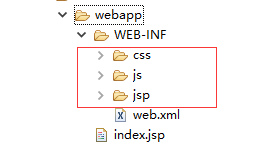

上面的红色框框就做了资源的映射,凡是请求形式是/css/**的都会被转成/WEB-INF/CSS/这种形式,这样静态资源就不会被拦截了可以正常发访问了。
整合测试:碰到的问题比较多,就放在下一篇博客里面讲了。
003商城项目:数据库的创建以及ssm框架的整合的更多相关文章
- SSM 框架快速整合实例--学生查询
一.快速准备 SSM 框架即 Spring 框架.SpringMVC 框架.MyBatis 框架,关于这几个框架的基础和入门程序,我前面已经写过几篇文章作为基础和入门介绍了.对于这 3 个框架还不熟悉 ...
- SSM框架快速整合实例——学生查询
一.快速准备 SSM 框架即 Spring 框架.SpringMVC 框架.MyBatis 框架,关于这几个框架的基础和入门程序,我前面已经写过几篇文章作为基础和入门介绍了.这里再简单的介绍一下: 1 ...
- SSM框架——详细整合教程
SSM框架——详细整合教程(Spring+SpringMVC+MyBatis) 1.基本概念 1.1.Spring Spring是一个开源框架,Spring是于2003 年兴起的一个轻量级的Jav ...
- SSM框架的整合与使用——实现简单的转账系统
一.整合思路 SSM框架即SpringMVC + Spring + MyBati框架集,是一种轻量级的Web开源框架.它们各自在JAVA三层架构中负责的模块如下图所示: 其中,SpringMVC与Sp ...
- SSM框架的整合思路&功能实现
这是我第一篇博客,关于SSM框架的整合思路以及简单功能实现. 首先,最近刚刚学习Spring+SpringMVC+Mybatis,在开发时遇到形形色色的问题,周遭人也为我提供了一些思路,我会一点点整理 ...
- SSM框架——详细整合教程(Spring+SpringMVC+MyBatis)【申明:来源于网络】
SSM框架--详细整合教程(Spring+SpringMVC+MyBatis)[申明:来源于网络] 地址:http://blog.csdn.net/u014662268/article/details ...
- 026 SSM综合练习02--数据后台管理系统--数据库表创建及SSM环境搭建
1.数据库准备 本项目我们Oracle数据库,Oracle 为每个项目创建单独user,oracle数据表存放在表空间下,每个用户有独立表空间. (1)采用数据库管理员账号:SYSTEM,再配合数据库 ...
- 002杰信-陌生的maven-web项目整改成我们熟悉的Web架构;classpath的含义;ssm框架的整合;junit测试
这篇博客的资源来源于创智播客,先在此申明.这篇博客的出发点是jk项目,传智的做法是Maven的web模板生成的,但是这样子的结构目录与我们熟知的Web项目的结构目录相差很大,所以要按照我们熟知的项目结 ...
- SSM框架——详细整合教程(Spring+SpringMVC+MyBatis)
1.前言 使用框架都是较新的版本: Spring 4.0.2 RELEASE Spring MVC 4.0.2 RELEASE MyBatis 3.2.6 2.Maven引入需要的JAR包 2.1设置 ...
随机推荐
- 【代码笔记】iOS-手机验证码
一,效果图. 二,代码. RootViewController.h #import <UIKit/UIKit.h> @interface RootViewController : UIVi ...
- iOS 学习 - 14.本地联系人
苹果在iOS9的SDK中废除了AddressBookUI.framework的一些功能(是不是这个库都废除了,有待验证),具体和保存联系人相关的几个系统界面如下:联系人选择:AddressBookUI ...
- new ActiveXObject("Scripting.FileSystemObject") 时抛出异常 .
使用JScript读写本地文件时,会使用Scripting.FileSystemObject控件. IE默认是不允许运行这类“未标记为安全执行脚本的ActiveX控件”的. 因此执行下行代码时: fs ...
- [转]android笔记--Intent和IntentFilter详解
Intent用于启动Activity, Service, 以及BroadcastReceiver三种组件, 同时还是组件之间通信的重要媒介. 使用Intent启动组件的优势1, Intent为组件的启 ...
- 10个关于Java异常的常见问题
这篇文章总结了十个经常被问到的JAVA异常问题: 1.检查型异常VS非检查型异常 简单的说,检查型异常是指需要在方法中自己捕获异常处理或者声明抛出异常由调用者去捕获处理: 非检查型异常指那些不能解决的 ...
- Access字段类型“查阅向导”
1.显示控件有:“列表框”和“组合框”两种 2.组合框:第一个字段为“填充字段” 3.通过查阅向导建立的会自动添加“关系”(外键),因此在删除或修改字段时需要先删除二者关系,最好不通过“查阅向导”建立 ...
- 【ASH】如何导出视图DBA_HIST_ACTIVE_SESS_HISTORY的查询结果数据
[ASH]如何导出视图DBA_HIST_ACTIVE_SESS_HISTORY的查询结果数据 1.1 BLOG文档结构图 1.2 前言部分 1.2.1 导读和注意事项 各位技术爱好者,看完本文后 ...
- 注解学习(模仿springMvc的注解注入方式)
最近在看springMvc的源码,看到了该框架的注入注解的部分觉的有点吃力,可能还是对注解的方面的知识还认识的不够深刻,所以特意去学习注解方面的知识.由于本人也是抱着学习的态度来阅读源码,若文章在表述 ...
- 奇 arch/i386/kernel/head.o(.text+0x3e): undefined reference to `stack_start'
当linux/linkage.h 是dos格式保存,即以\r\n作行结束,gcc-2.96/redhat-7.3报错
- HDU 4866 Shooting(持久化线段树)
view code//第二道持久化线段树,照着别人的代码慢慢敲,还是有点不理解 #include <iostream> #include <cstdio> #include & ...