Android第七周作业
1.三个界面,界面1点击按钮使用显式意图开启界面2.
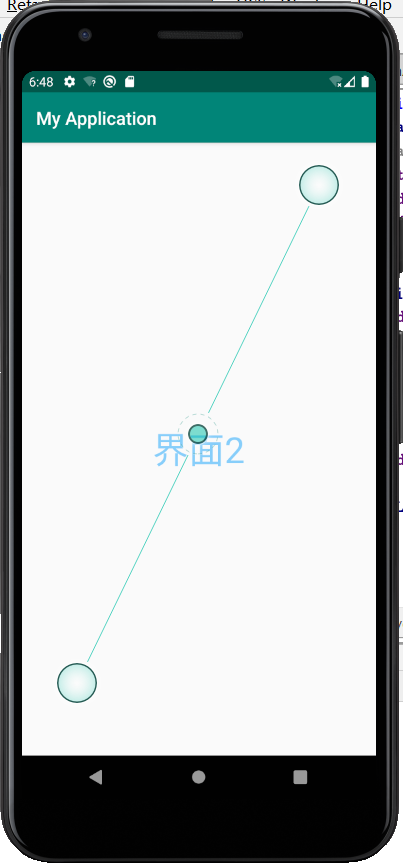
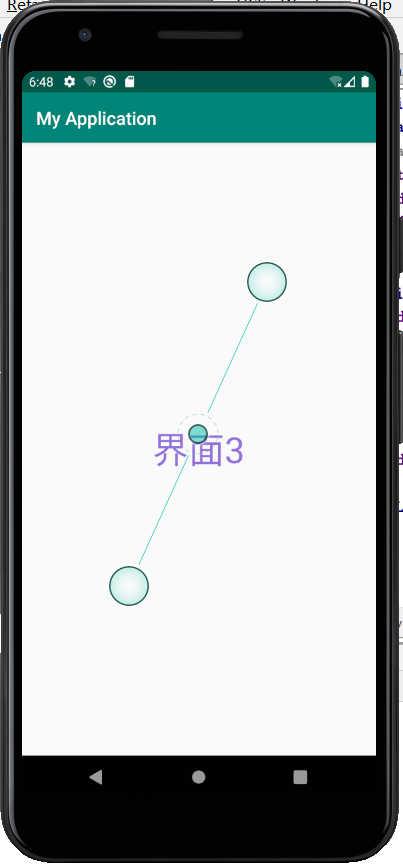
界面2点击按钮隐式意图开启界面3
package com.example.myapplication;

import androidx.appcompat.app.AppCompatActivity;

import android.net.Uri;

import android.os.Bundle;

import android.util.Log;

import android.content.Intent;

import android.view.View;

public class MainActivity extends AppCompatActivity {

    @Override

    protected void onCreate(Bundle savedInstanceState) {

        super.onCreate(savedInstanceState);

        setContentView(R.layout.activity_main);
}
public void click1(View view){

        Intent intent=new Intent(this,oneActivity.class);

        startActivity(intent);

    }

    public void click2(View view){

        Intent intent=new Intent();

        intent.setAction("cn.it.ab_cd");

        intent.addCategory("android.intent.category.DEFAULT");

        startActivity(intent);

    }

}
<?xml version="1.0" encoding="utf-8"?>

<LinearLayout xmlns:android="http://schemas.android.com/apk/res/android"

    android:layout_width="match_parent"

    android:layout_height="match_parent"

    android:orientation="vertical">

    <Button

        android:id="@+id/v1"

        android:layout_width="match_parent"

        android:layout_height="wrap_content"

        android:onClick="click1"

        android:text="按钮1开启界面2"

        android:textColor="#FFC0CB"

        android:textSize="30sp" />

    <Button

        android:id="@+id/v2"

        android:layout_width="match_parent"

        android:layout_height="wrap_content"

        android:onClick="click2"

        android:text="按钮2开启界面3"

        android:textSize="30sp"

        android:textColor="#DDA0DD" />

</LinearLayout>
package com.example.myapplication;

import androidx.appcompat.app.AppCompatActivity;

import android.os.Bundle;

public class oneActivity extends AppCompatActivity {

    @Override

    protected void onCreate(Bundle savedInstanceState) {

        super.onCreate(savedInstanceState);

        setContentView(R.layout.activity_one);

    }

}
<?xml version="1.0" encoding="utf-8"?>

<RelativeLayout xmlns:android="http://schemas.android.com/apk/res/android"

    xmlns:app="http://schemas.android.com/apk/res-auto"

    xmlns:tools="http://schemas.android.com/tools"

    android:layout_width="match_parent"

    android:layout_height="match_parent"

    tools:context=".oneActivity">

    <TextView

        android:layout_width="wrap_content"

        android:layout_height="wrap_content"

        android:text="界面2"

        android:textSize="40dp"

        android:textColor="#87CEFA"

        android:layout_centerVertical="true"

        android:layout_centerHorizontal="true"

        />

</RelativeLayout>
package com.example.myapplication;

import androidx.appcompat.app.AppCompatActivity;

import android.os.Bundle;

public class twoActivity extends AppCompatActivity {

    @Override

    protected void onCreate(Bundle savedInstanceState) {

        super.onCreate(savedInstanceState);

        setContentView(R.layout.activity_two);

    }

}
<?xml version="1.0" encoding="utf-8"?>

<manifest xmlns:android="http://schemas.android.com/apk/res/android"

    package="com.example.myapplication">

    <application

        android:allowBackup="true"

        android:icon="@mipmap/ic_launcher"

        android:label="@string/app_name"

        android:roundIcon="@mipmap/ic_launcher_round"

        android:supportsRtl="true"

        android:theme="@style/AppTheme">

        <activity android:name=".twoActivity">

            <intent-filter>

                <action android:name="cn.it.ab_cd"/>

                <category android:name="android.intent.category.DEFAULT"/>

            </intent-filter>

        </activity>

        <activity android:name=".oneActivity" />

        <activity android:name=".MainActivity">

            <intent-filter>

                <action android:name="android.intent.action.MAIN" />

                <category android:name="android.intent.category.LAUNCHER" />

            </intent-filter>

        </activity>

    </application>

</manifest>
<?xml version="1.0" encoding="utf-8"?>

<RelativeLayout xmlns:android="http://schemas.android.com/apk/res/android"

    xmlns:app="http://schemas.android.com/apk/res-auto"

    xmlns:tools="http://schemas.android.com/tools"

    android:layout_width="match_parent"

    android:layout_height="match_parent"

    tools:context=".twoActivity">

    <TextView

        android:layout_width="wrap_content"

        android:layout_height="wrap_content"

        android:text="界面3"

        android:textSize="40dp"

        android:textColor="#9370DB"

        android:layout_centerVertical="true"

        android:layout_centerHorizontal="true"

        />

</RelativeLayout>

2.在界面1做一个按钮开启浏览器访问百度
package com.example.myapplication;

import androidx.appcompat.app.AppCompatActivity;

import android.content.Intent;

import android.net.Uri;

import android.os.Bundle;

import android.view.View;

public class MainActivity extends AppCompatActivity {

    @Override

    protected void onCreate(Bundle savedInstanceState) {

        super.onCreate(savedInstanceState);

        setContentView(R.layout.activity_main);

    }

    public void click1(View view){

        Intent intent=new Intent();

        intent.setAction("android.intent.action.VIEW");

        intent.setData(Uri.parse("http://www.baidu.com"));

        startActivity(intent);

    }

}
<?xml version="1.0" encoding="utf-8"?>

<RelativeLayout xmlns:android="http://schemas.android.com/apk/res/android"

    android:layout_width="match_parent"

    android:layout_height="match_parent"

    android:padding="8dp"

>

    <Button

        android:id="@+id/b1"

        android:layout_width="match_parent"

        android:layout_height="wrap_content"

        android:textColor="#FFC0CB"

        android:text="按钮1"

        android:textSize="40sp"

        android:layout_centerVertical="true"

        android:layout_centerHorizontal="true"

        android:onClick="click1"/>

</RelativeLayout>


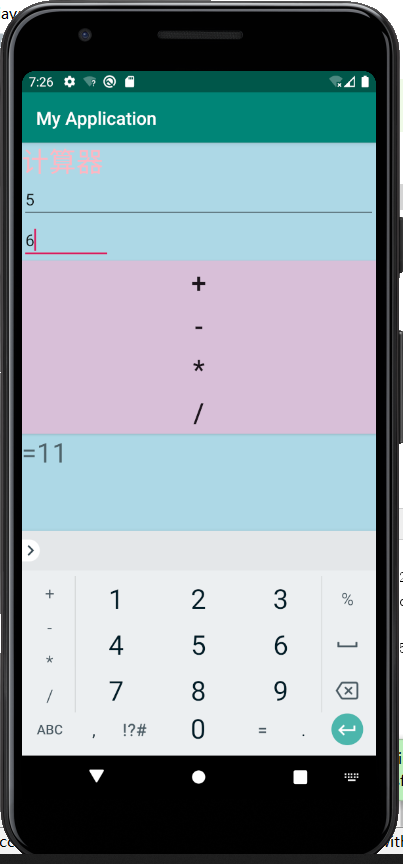
3.2个edittext,4个按钮一个textview,实现简单计算器。
提示1:如何获取edittext上的数据?
String num1=((EditText)(findViewById(R.id.et1))).getText().toString();//获取et1上面的文本,并
转成字符串
提示2:字符串如何转int
int n1=Integer.parseInt(num1);
提示3:如何把计算结果显示在textview上?
TextView tv1=(TextView)findViewById(R.id.tv1);//获取控件
tv1.setText("1233213");//用settext方法赋值
package com.example.myapplication;

import androidx.appcompat.app.AppCompatActivity;

import android.view.View;

import android.widget.EditText;

import android.os.Bundle;

import android.widget.TextView;

public class MainActivity extends AppCompatActivity {

    @Override

    protected void onCreate(Bundle savedInstanceState) {

        super.onCreate(savedInstanceState);

        setContentView(R.layout.activity_main);

        findViewById(R.id.c1).setOnClickListener(new View.OnClickListener(){

            @Override

            public void onClick(View view) {

                String num1=((EditText)(findViewById(R.id.b1))).getText().toString();

                String num2=((EditText)(findViewById(R.id.b2))).getText().toString();

                int a1= Integer.parseInt( num1 );

                int a2=Integer.parseInt( num2 );

                int a3=a1+a2;

                TextView d1=findViewById( R.id.d1 );

                d1.setText( "="+a3);

            }

        });

        findViewById(R.id.c2).setOnClickListener(new View.OnClickListener(){

            @Override

            public void onClick(View view) {

                String num1=((EditText)(findViewById(R.id.b1))).getText().toString();

                String num2=((EditText)(findViewById(R.id.b2))).getText().toString();

                int a1= Integer.parseInt( num1 );

                int a2=Integer.parseInt( num2 );

                int a3=a1-a2;

                TextView d1=findViewById( R.id.d1 );

                d1.setText( "="+a3 );

            }

        });

        findViewById(R.id.c3).setOnClickListener(new View.OnClickListener(){

            @Override

            public void onClick(View view) {

                String num1=((EditText)(findViewById(R.id.b1))).getText().toString();

                String num2=((EditText)(findViewById(R.id.b2))).getText().toString();

                int a1= Integer.parseInt( num1 );

                int a2=Integer.parseInt( num2 );

                int a3=a1*a2;

                TextView d1=findViewById( R.id.d1 );

                d1.setText( "="+a3 );

            }

        });

        findViewById(R.id.c4).setOnClickListener(new View.OnClickListener(){

            @Override

            public void onClick(View view) {

                String num1=((EditText)(findViewById(R.id.b1))).getText().toString();

                String num2=((EditText)(findViewById(R.id.b2))).getText().toString();

                int a1= Integer.parseInt( num1 );

                int a2=Integer.parseInt( num2 );

                int a3=a1/a2;

                TextView d1=findViewById( R.id.d1 );

                d1.setText( "="+a3 );

            }

        });

    }

}
<?xml version="1.0" encoding="utf-8"?>

<LinearLayout xmlns:android="http://schemas.android.com/apk/res/android"

    xmlns:app="http://schemas.android.com/apk/res-auto"

    xmlns:tools="http://schemas.android.com/tools"

    android:layout_width="match_parent"

    android:layout_height="match_parent"

    tools:context=".MainActivity"

    android:orientation="vertical"

    android:background="#ADD8E6">

    <TextView

        android:id="@+id/a1"

        android:layout_width="wrap_content"

        android:layout_height="wrap_content"

        android:text="计算器"

        android:textSize="30sp"

        android:textColor="#FFB6C1"/>

    <EditText

        android:id="@+id/b1"

        android:layout_width="match_parent"

        android:layout_height="wrap_content"

        android:hint="请输入数字"

    />

    <EditText

        android:id="@+id/b2"

        android:layout_width="wrap_content"

        android:layout_height="wrap_content"

        android:hint="请输入数字"/>

    <Button

        android:id="@+id/c1"

        android:layout_width="match_parent"

        android:layout_height="wrap_content"

        android:text="+"

        android:textSize="30sp"

        android:background="#D8BFD8"

        />

    <Button

        android:id="@+id/c2"

        android:layout_width="match_parent"

        android:layout_height="wrap_content"

        android:text="-"

        android:textSize="30sp"

        android:background="#D8BFD8"

        />

    <Button

        android:id="@+id/c3"

        android:layout_width="match_parent"

        android:layout_height="wrap_content"

        android:text="*"

        android:textSize="30sp"

        android:background="#D8BFD8"

        />

    <Button

        android:id="@+id/c4"

        android:layout_width="match_parent"

        android:layout_height="wrap_content"

        android:text="/"

        android:textSize="30sp"

        android:background="#D8BFD8"

        />

    <TextView

        android:id="@+id/d1"

        android:layout_width="wrap_content"

        android:layout_height="wrap_content"

        android:text="="

        android:textSize="30dp"/>

</LinearLayout>
Android第七周作业的更多相关文章
- 2017-2018-1 我爱学Java 第六七周 作业
团队六七周作业 完善版需求规格说明书 制定团队编码规范 数据库设计 后端架构设计 TODOList 参考资料 完善版需求规格说明书 <需求规格说明书>初稿不足之处: 1.开发工具写错 2. ...
- 2018-2019-1 20189221 《Linux内核原理与分析》第七周作业
2018-2019-1 20189221 <Linux内核原理与分析>第七周作业 实验六 分析Linux内核创建一个新进程的过程 代码分析 task_struct: struct task ...
- 2017-2018-1 JAVA实验站 第六、七周作业
2017-2018-1 JAVA实验站 第六.七周作业 详情请见团队博客
- 2017-2018-1 JaWorld 第六、七周作业
2017-2018-1 JaWorld 第六.七周作业 修改需求规格说明书 上次的<需求规格说明书>初稿有哪些不足? 王译潇同学回答: 1. 引言和目的性考虑的不是很周全. 2. ...
- 2017-2018-1 20179205《Linux内核原理与设计》第七周作业
<Linux内核原理与设计>第七周作业 视频学习及操作分析 创建一个新进程在内核中的执行过程 fork.vfork和clone三个系统调用都可以创建一个新进程,而且都是通过调用do_for ...
- 2019-2020-1 20199325《Linux内核原理与分析》第七周作业
第七周作业 1.进程描述符task_struct数据结构(一) 为了管理进程,内核必须对每个进程进行清晰的描述,进程描述符提供了内核所需了解的进程信息. struct task_struct数据结构很 ...
- 2019-2020-1 20199329《Linux内核原理与分析》第七周作业
<Linux内核原理与分析>第七周作业 一.本周内容概述: 对Linux系统如何创建一个新进程进行追踪 分析Linux内核创建一个新进程的过程 二.本周学习内容: 1.学习进程的描述 操作 ...
- 2020-2021-1 20209307《Linux内核原理与分析》第七周作业
这个作业属于哪个课程 <2020-2021-1Linux内核原理与分析)> 这个作业要求在哪里 <2020-2021-1Linux内核原理与分析第七周作业> 这个作业的目标 & ...
- 1903021116—吉琛—Java第七周作业—客户类测试
项目 内容 课程班级博客链接 19信计班 这个作业要求链接 第七周作业链接 博客名称 学号-姓名-Java第七周作业-客户类测试 要求 每道题要有题目,代码(使用插入代码,不会插入代码的自己查资料解决 ...
随机推荐
- [SPDK/NVMe存储技术分析]001 - SPDK/NVMe概述
1. NVMe概述 NVMe是一个针对基于PCIe的固态硬盘的高性能的.可扩展的主机控制器接口. NVMe的显著特征是提供多个队列来处理I/O命令.单个NVMe设备支持多达64K个I/O 队列,每个I ...
- python练习册 每天一个小程序 第0008题
1 # -*-coding:utf-8-*- 2 __author__ = 'Deen' 3 ''' 4 题目描述: 5 一个HTML文件,找出里面的正文. 6 7 思路: 8 利用Beautiful ...
- python练习册 每天一个小程序 第0001题
1 # -*-coding:utf-8-*- 2 __author__ = 'Deen' 3 ''' 4 题目描述: 5 做为 Apple Store App 独立开发者,你要搞限时促销,为你的应用生 ...
- MySQL&SQL server&Oracle&Access&PostgreSQL数据库sql注入详解
判断数据库的类型 当我们通过一些测试,发现存在SQL注入之后,首先要做的就是判断数据库的类型. 常用的数据库有MySQL.Access.SQLServer.Oracle.PostgreSQL.虽然绝大 ...
- Mycat 数据切分 看这一篇就够了
数据切分 数据切分指的是通过某种特定的条件,将我们存放在同一个数据库中的数据分散存放到多个数据库上面,以达到分散单台设备负载的效果. 数据的切分根据其切分规则的类型,可以分为两种切分模式.一种 ...
- 【原创】浅谈指针(十一)alloca函数
前言 好几天没写了,最近网课,事情也比较多,今天多写点东西. 目录 前言 alloca函数 1.简介 2.反汇编看alloca 3.手工调用alloca函数 4.注意事项 alloca函数 1.简介 ...
- Qt自定义控件之可伸缩组合框(GroupBox)控件
摘要 本文基于QGroupBox扩展了一种可以伸缩的组合框,正常状态下,组合框处于收缩状态,内部的控件是隐藏的:需要的时候,可以将组合框进行伸展,并将内部控件显示出来. 正文 实现的代码比较简单,主要 ...
- SpringMVC源码解读 - RequestMapping注解实现解读
SpringMVC源码解读 - RequestMapping注解实现解读 - RequestCondition体系 https://www.cnblogs.com/leftthen/p/520840 ...
- pg数据库org.postgresql.util.PSQLException: ERROR: "xxx" is not a sequence
问题场景 对pg数据表执行插入语句的时候,报错如下: { "timestamp": 1587012576734, "status": 500, "er ...
- Spring Framework 中有多少个模块,它们分别是什么?
Spring 核心容器 – 该层基本上是 Spring Framework 的核心.它包含以下模块: Spring Core Spring Bean SpEL (Spring Expression L ...