
Minio分布式集群部署——Swarm
最近研究minio分布式集群部署,发现网上大部分都是单服务器部署,而minio官方在github上现在也只提供了k8s和docker-compose的方式,网上有关与swarm启动minio集群的文章都不完整,这里我研究了近一周时间,终于是成功使用swarm部署minio集群,并用nginx统一入口
环境准备
四台虚拟机
- 192.168.2.38(管理节点)
- 192.168.2.81(工作节点)
- 192.168.2.100(工作节点)
- 192.168.2.102(工作节点)
时间同步
yum install -y ntp

cat <<EOF>>/var/spool/cron/root

00 12 * * * /usr/sbin/ntpdate -u ntp1.aliyun.com && /usr/sbin/hwclock -w

EOF

##查看计划任务

crontab -l

##手动执行

/usr/sbin/ntpdate -u ntp1.aliyun.com && /usr/sbin/hwclock -w
Docker
安装Docker
curl -sSL https://get.daocloud.io/docker | sh
启动docker
sudo systemctl start docker

sudo systemctl enable docker
搭建Swarm集群
打开防火墙(Swarm需要)
管理节点打开2377
# manager

firewall-cmd --zone=public --add-port=2377/tcp --permanent
所有节点打开以下端口
# 所有node

firewall-cmd --zone=public --add-port=7946/tcp --permanent

firewall-cmd --zone=public --add-port=7946/udp --permanent

firewall-cmd --zone=public --add-port=4789/tcp --permanent

firewall-cmd --zone=public --add-port=4789/udp --permanent
所有节点重启防火墙
# 所有node

firewall-cmd --reload

systemctl restart docker
图个方便可以直接关闭防火墙
创建Swarm
docker swarm init --advertise-addr your_manager_ip
加入Swarm
docker swarm join --token SWMTKN-1-

51b7t8whxn8j6mdjt5perjmec9u8qguxq8tern9nill737pra2-ejc5nw5f90oz6xldcbmrl2ztu

192.168.2.38:2377

#查看节点

docker node ls
服务约束
添加label
sudo docker node update --label-add minio1=true 管理节点名称

sudo docker node update --label-add minio2=true 工作节点名称

sudo docker node update --label-add minio3=true 工作节点名称

sudo docker node update --label-add minio4=true 工作节点名称

为MinIO创建Docker secret
echo "minioadmin" | docker secret create access_key -

echo "12345678" | docker secret create secret_key -
Minio集群部署文件
创建文件存放目录
管理节点执行
cd /root

mkdir minio-swarm

vi docker-compose-nginx.yml
Docker-Compose.yml
version: '3.7'

services:

  nginx:

    image: nginx

    hostname: minionginx

    volumes:

      - /root/minio-swarm/conf/swarm-nginx.conf:/etc/nginx/nginx.conf

    ports:

      - "9090:80"

      - "9000:9000"

    deploy:

      replicas: 1

      restart_policy:

        delay: 10s

        max_attempts: 10

        window: 60s

      placement:

        constraints:

          - node.labels.minio1==true

      resources:

        limits:

          # cpus: '0.001'

          memory: 1024M

        reservations:

          # cpus: '0.001'

          memory: 64M

      resources:

        limits:

          memory: 2048M

        reservations:

          memory: 512M

    networks:

      - minio_distributed

    depends_on:

      - minio1

      - minio2

      - minio3

      - minio4

  minio1:

    image: quay.io/minio/minio:RELEASE.2022-02-12T00-51-25Z

    hostname: minio1

    volumes:

      - data1-1:/data1

      - data1-2:/data2

    deploy:

      replicas: 1

      restart_policy:

        delay: 10s

        max_attempts: 10

        window: 60s

      placement:

        constraints:

          - node.labels.minio1==true

      resources:

        limits:

          memory: 2048M

        reservations:

          memory: 512M

    command: server --console-address ":9001" http://minio{1...4}/data{1...2}

    networks:

      - minio_distributed

    secrets:

      - secret_key

      - access_key

    healthcheck:

      test:

        [

          "CMD",

          "curl",

          "-f",

          "http://localhost:9000/minio/health/live"

        ]

      interval: 30s

      timeout: 20s

      retries: 3

  minio2:

    image: quay.io/minio/minio:RELEASE.2022-02-12T00-51-25Z

    hostname: minio2

    volumes:

      - data2-1:/data1

      - data2-2:/data2

    deploy:

      replicas: 1

      restart_policy:

        delay: 10s

        max_attempts: 10

        window: 60s

      placement:

        constraints:

          - node.labels.minio2==true

      resources:

        limits:

          memory: 2048M

        reservations:

          memory: 512M

    command: server --console-address ":9001" http://minio{1...4}/data{1...2}

    networks:

      - minio_distributed

    secrets:

      - secret_key

      - access_key

    healthcheck:

      test:

        [

          "CMD",

          "curl",

          "-f",

          "http://localhost:9000/minio/health/live"

        ]

      interval: 30s

      timeout: 20s

      retries: 3

  minio3:

    image: quay.io/minio/minio:RELEASE.2022-02-12T00-51-25Z

    hostname: minio3

    volumes:

      - data3-1:/data1

      - data3-2:/data2

    deploy:

      replicas: 1

      restart_policy:

        delay: 10s

        max_attempts: 10

        window: 60s

      placement:

        constraints:

          - node.labels.minio3==true

      resources:

        limits:

          memory: 2048M

        reservations:

          memory: 512M

    command: server --console-address ":9001" http://minio{1...4}/data{1...2}

    networks:

      - minio_distributed

    secrets:

      - secret_key

      - access_key

    healthcheck:

      test:

        [

          "CMD",

          "curl",

          "-f",

          "http://localhost:9000/minio/health/live"

        ]

      interval: 30s

      timeout: 20s

      retries: 3

  minio4:

    image: quay.io/minio/minio:RELEASE.2022-02-12T00-51-25Z

    hostname: minio4

    volumes:

      - data4-1:/data1

      - data4-2:/data2

    deploy:

      replicas: 1

      restart_policy:

        delay: 10s

        max_attempts: 10

        window: 60s

      placement:

        constraints:

          - node.labels.minio4==true

      resources:

        limits:

          memory: 2048M

        reservations:

          memory: 512M

    command: server --console-address ":9001" http://minio{1...4}/data{1...2}

    networks:

      - minio_distributed

    secrets:

      - secret_key

      - access_key

    healthcheck:

      test:

        [

          "CMD",

          "curl",

          "-f",

          "http://localhost:9000/minio/health/live"

        ]

      interval: 30s

      timeout: 20s

      retries: 3

volumes:

  data1-1:

  data1-2:

  data2-1:

  data2-2:

  data3-1:

  data3-2:

  data4-1:

  data4-2:

networks:

  minio_distributed:

    driver: overlay

secrets:

  secret_key:

    external: true

  access_key:

    external: true
说明:
- secret_key和access_key由上一步通过
docker secret create xxx -创建的 - 一个节点上只能部署一个minio服务,如果部署多个会出现磁盘被占用的情况,所以最好是增加机器再部署
nginx.conf
创建目录
cd /root/minio-swarm

mkdir conf

cd conf

vi swarm-nginx.conf
如果需要增加集群的节点,需要在Upstream中添加新节点的服务名:9001
user  nginx;

worker_processes  auto;

error_log  /var/log/nginx/error.log warn;

pid        /var/run/nginx.pid;

events {

    worker_connections  4096;

}

http {

    include       /etc/nginx/mime.types;

    default_type  application/octet-stream;

    log_format  main  '$remote_addr - $remote_user [$time_local] "$request" '

                      '$status $body_bytes_sent "$http_referer" '

                      '"$http_user_agent" "$http_x_forwarded_for"';

    access_log  /var/log/nginx/access.log  main;

    sendfile        on;

    keepalive_timeout  65;

    upstream minio {

        server minio1:9000;

        server minio2:9000;

        server minio3:9000;

        server minio4:9000;

    }

    server {

        listen       9000;

        listen  [::]:9000;

        server_name  localhost;

        # To allow special characters in headers

        ignore_invalid_headers off;

        # Allow any size file to be uploaded.

        # Set to a value such as 1000m; to restrict file size to a specific value

        client_max_body_size 0;

        # To disable buffering

        proxy_buffering off;

        proxy_request_buffering off;

        location / {

            proxy_set_header Host $http_host;

            proxy_set_header X-Real-IP $remote_addr;

            proxy_set_header X-Forwarded-For $proxy_add_x_forwarded_for;

            proxy_set_header X-Forwarded-Proto $scheme;

            proxy_connect_timeout 300;

            # Default is HTTP/1, keepalive is only enabled in HTTP/1.1

            proxy_http_version 1.1;

            proxy_set_header Connection "";

            chunked_transfer_encoding off;

            proxy_pass http://minio;

        }

    }

    # include /etc/nginx/conf.d/*.conf;

    upstream console {

        server minio1:9001;

        server minio2:9001;

        server minio3:9001;

        server minio4:9001;

    }

    server {

        listen       80;

        listen  [::]:80;

        server_name  localhost;

        # To allow special characters in headers

        ignore_invalid_headers off;

        # Allow any size file to be uploaded.

        # Set to a value such as 1000m; to restrict file size to a specific value

        client_max_body_size 0;

        # To disable buffering

        proxy_buffering off;

        location / {

            proxy_connect_timeout 5;

            proxy_send_timeout 10;

            proxy_read_timeout 10;

            proxy_set_header Host $http_host;

            proxy_set_header X-Real-IP $remote_addr;

            proxy_set_header X-Forwarded-For $proxy_add_x_forwarded_for;

            proxy_set_header X-Forwarded-Proto $scheme;

            # Default is HTTP/1, keepalive is only enabled in HTTP/1.1

            proxy_http_version 1.1;

            proxy_set_header Connection "";

            chunked_transfer_encoding off;

            proxy_pass http://console;

        }

    }

}
部署
cd /root/minio-swarm

docker stack deploy -c docker-compose-nginx.yaml minio-swarm
测试
浏览器访问

一个节点宕机
模拟其中一个节点宕机,看能否正常读取数据(minio集群的写入需要至少4个在线磁盘,如果是两个节点的集群,一个节点宕机,那么集群就只能读取,无法写入)
如果是一个有N块硬盘的分布式Minio,只要有N/2硬盘在线,你的数据就是可以读取的。不过你需要至少有N/2+1个硬盘来创建新的对象。
[root@test redis-swarm2]# docker service ls

ID             NAME                      MODE         REPLICAS   IMAGE                                              PORTS

l317d9wc49tt   minio-swarm_minio1        replicated   1/1        quay.io/minio/minio:RELEASE.2022-02-12T00-51-25Z

x2gj6ert03tj   minio-swarm_minio2        replicated   1/1        quay.io/minio/minio:RELEASE.2022-02-12T00-51-25Z

z624sonlnk02   minio-swarm_minio3        replicated   1/1        quay.io/minio/minio:RELEASE.2022-02-12T00-51-25Z

xu0gx8mbjocm   minio-swarm_minio4        replicated   1/1        quay.io/minio/minio:RELEASE.2022-02-12T00-51-25Z

53w8cpjpe7wd   minio-swarm_nginx         replicated   1/1        nginx:latest                                       *:9000->9000/tcp, *:9090->80/tcp
现在将其中一台服务器停机处理,刷新浏览器
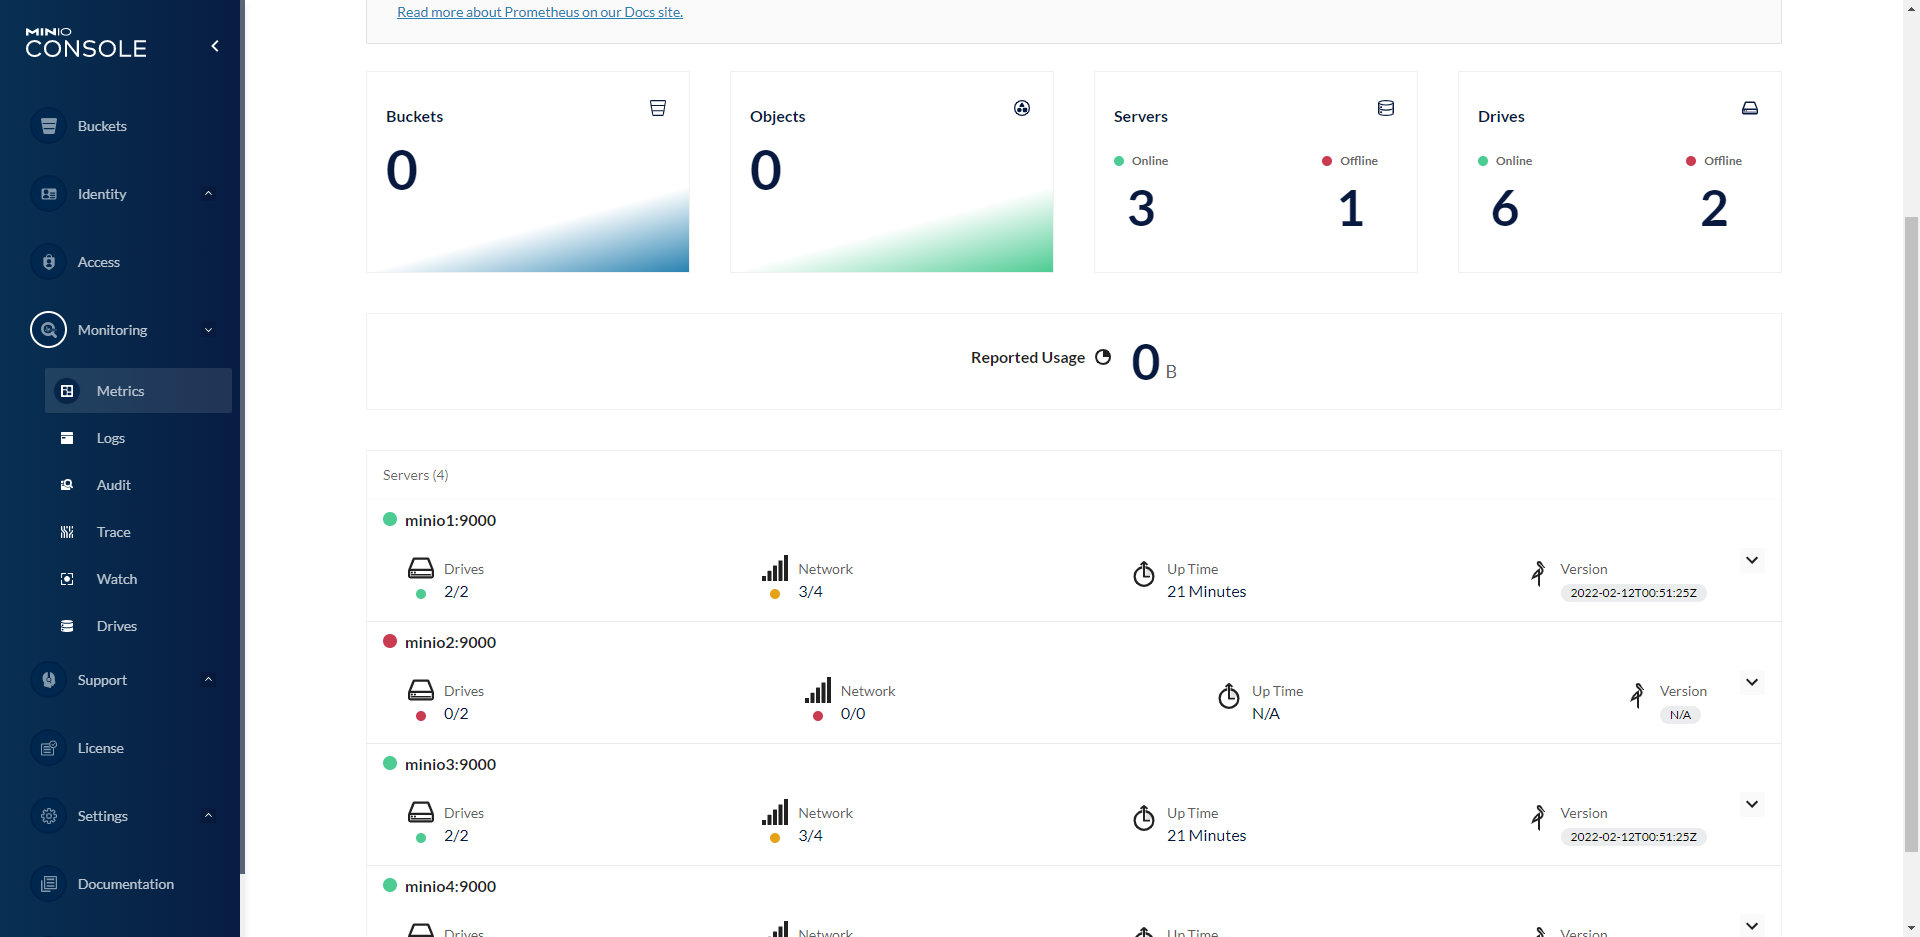
可以正常写入和读取数据

二个节点宕机
被强制退到登录界面,无法登录进去

注意: 如果要模拟节点宕机,至少需要3台机器,如果是两台,模拟宕机一台,另一台是无法写入的

Minio分布式集群部署——Swarm的更多相关文章
- MinIO分布式集群部署方式
文章转载自:https://blog.51cto.com/u_10950710/4843738 关于分布式集群MinIo 单机Minio服务存在单点故障,如果是一个有N块硬盘的分布式Minio,只要有 ...
- 三、Linux部署MinIO分布式集群
MinIO的官方网站非常详细,以下只是本人学习过程的整理 一.MinIO的基本概念 二.Windows安装与简单使用MinIO 三.Linux部署MinIO分布式集群 四.C#简单操作MinIO 一. ...
- MinIO 分布式集群搭建
MinIO 分布式集群搭建 分布式 Minio 可以让你将多块硬盘(甚至在不同的机器上)组成一个对象存储服务.由于硬盘分布在不同的节点上,分布式 Minio 避免了单点故障. Minio 分布式模式可 ...
- 基于winserver的Apollo配置中心分布式&集群部署实践(正确部署姿势)
基于winserver的Apollo配置中心分布式&集群部署实践(正确部署姿势) 前言 前几天对Apollo配置中心的demo进行一个部署试用,现公司已决定使用,这两天进行分布式部署的时候 ...
- 超详细从零记录Hadoop2.7.3完全分布式集群部署过程
超详细从零记录Ubuntu16.04.1 3台服务器上Hadoop2.7.3完全分布式集群部署过程.包含,Ubuntu服务器创建.远程工具连接配置.Ubuntu服务器配置.Hadoop文件配置.Had ...
- Hadoop(HA)分布式集群部署
Hadoop(HA)分布式集群部署和单节点namenode部署其实一样,只是配置文件的不同罢了. 这篇就讲解hadoop双namenode的部署,实现高可用. 系统环境: OS: CentOS 6.8 ...
- Hadoop分布式集群部署(单namenode节点)
Hadoop分布式集群部署 系统系统环境: OS: CentOS 6.8 内存:2G CPU:1核 Software:jdk-8u151-linux-x64.rpm hadoop-2.7.4.tar. ...
- Hadoop教程(五)Hadoop分布式集群部署安装
Hadoop教程(五)Hadoop分布式集群部署安装 1 Hadoop分布式集群部署安装 在hadoop2.0中通常由两个NameNode组成,一个处于active状态,还有一个处于standby状态 ...
- solr 集群(SolrCloud 分布式集群部署步骤)
SolrCloud 分布式集群部署步骤 安装软件包准备 apache-tomcat-7.0.54 jdk1.7 solr-4.8.1 zookeeper-3.4.5 注:以上软件都是基于 Linux ...
随机推荐
- HDLBits->Verilog Language->Modules:Hierarchy->Modules and vectors
题目要求如上不再赘述,主要关注到最后的四选一多路选择器. 最初编写的选择器代码如下 always@(sel) case(sel) 2'd0:q <= d; 2'd1:q <= in1; 2 ...
- SAP Word97 Intergration
*&---------------------------------------------------------------------* *& Report SAPRDEMOW ...
- kubernetes集群简单实例搭建
systemctl stop firewalld && systemctl disable firewalldvim /etc/selinux/configSELINUX=disabl ...
- mysql InnoDB通过.frm和.ibd恢复表和数据
ibdata1是一个用来构建innodb系统表空间的文件,这个文件包含了innodb表的元数据.撤销记录.修改buffer和双写buffer.如果file-per-table选项打开的话,该文件则不一 ...
- JS 会有变量提升和函数提升
JavaScript变量函数声明提升(Hoisting)是在 Javascript 中执行上下文工作方式的一种认识(也可以说是一种预编译),从字面意义上看,"变量提升"意味着变量和 ...
- 【python量化】将Transformer模型用于股票价格预测
本篇文章主要教大家如何搭建一个基于Transformer的简单预测模型,并将其用于股票价格预测当中.原代码在文末进行获取.小熊猫的python第二世界 1.Transformer模型 Transfor ...
- windows如何结束某个端口的进程
netstat -ano | findstr 端口号 (查询端口号被哪个进程占用) tasklist | findstr 进程PID (根据PID找到进程名称) taskkill -PID 进程PID ...
- 没有编辑器时,使用echo更换源
echo "\ deb http://mirrors.aliyun.com/ubuntu/ xenial main deb-src http://mirrors.aliyun.com/ubu ...
- CentOS7设置内核启动顺序
1.查看设备上安装了几个内核 cat /boot/grub2/grub.cfg |grep menuentry 2.查看当前内核 grub2-editenv list saved_entry=Cent ...
- Element 2 组件源码剖析之布局容器
0x00 简介 前文分析过组件的 布局栅格化(Grid Layout) ,通过基础的 24 分栏,迅速简便地创建布局. 本文将介绍用于布局的容器组件,使用 Flexbox 功能将其所控制区域设定为特定 ...