学习.NET MAUI Blazor(三)、创建.NET MAUI Blazor应用并使用AntDesignBlazor
大致了解了Blazor和MAUI之后,尝试创建一个.NET MAUI Blazor应用。
需要注意的是: 虽然都叫MAUI,但.NET MAUI与.NET MAUI Blazor 并不相同,MAUI还是以xaml为主,而MAUI Blazor则是以razor为主。
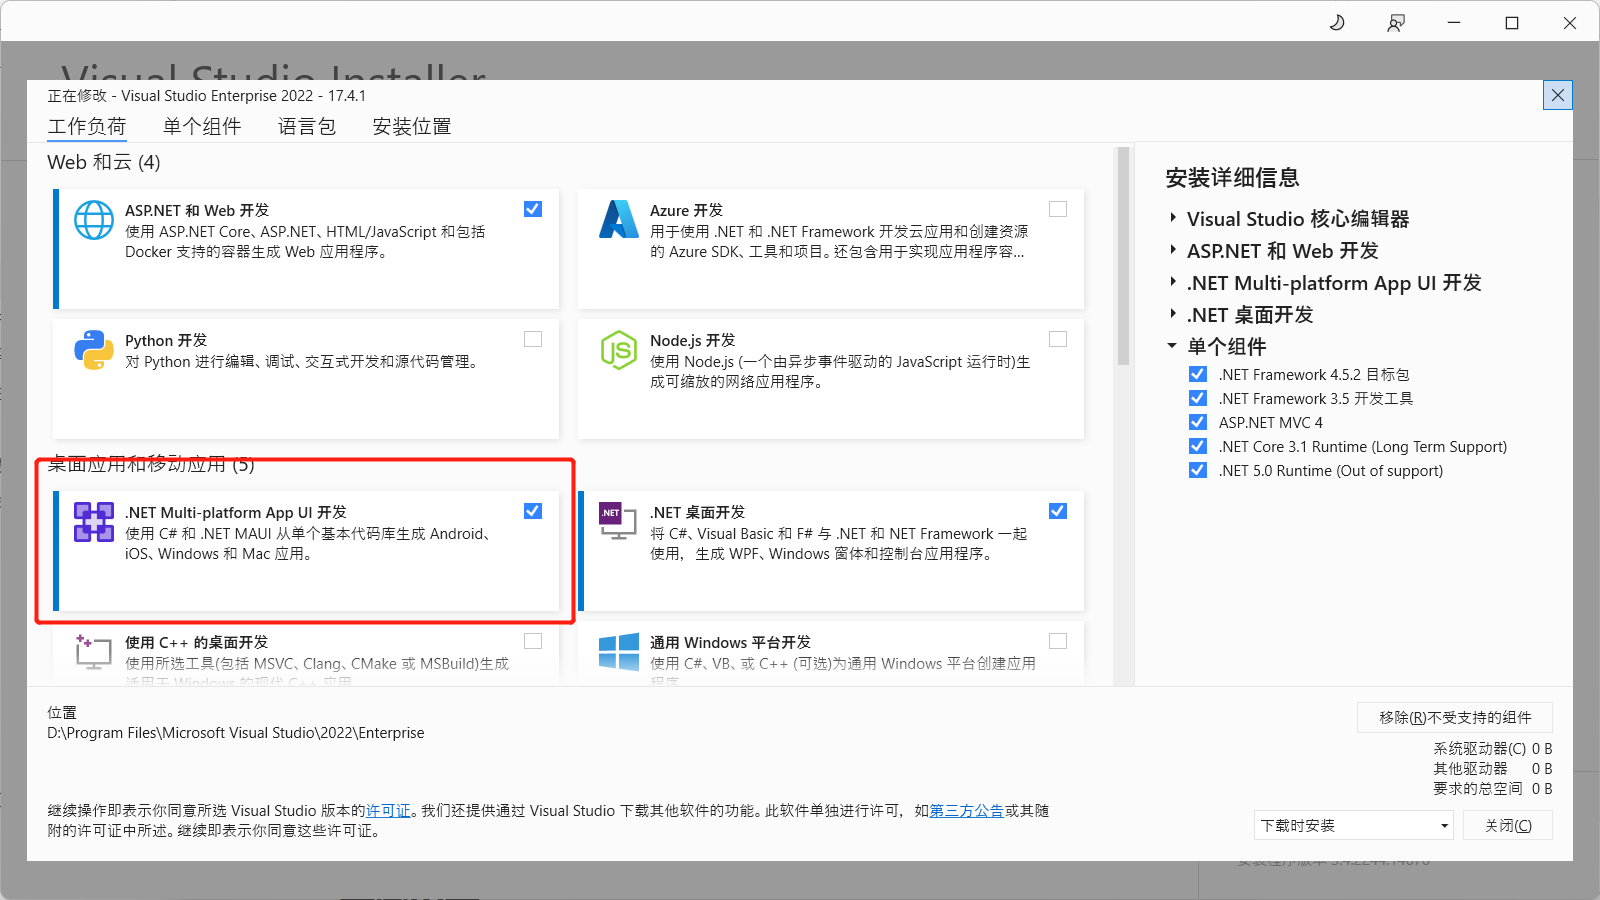
这个系列还是以MAUI Blazor为主,要创建一个MAUI Blazor应用,需要安装Visual Studio 2022 17.3 或更高版本,并在安装程序上,勾选.NET Multi-platform App UI 开发!最好是升级到最新的.NET 7。
创建.NET MAUI Blazor应用
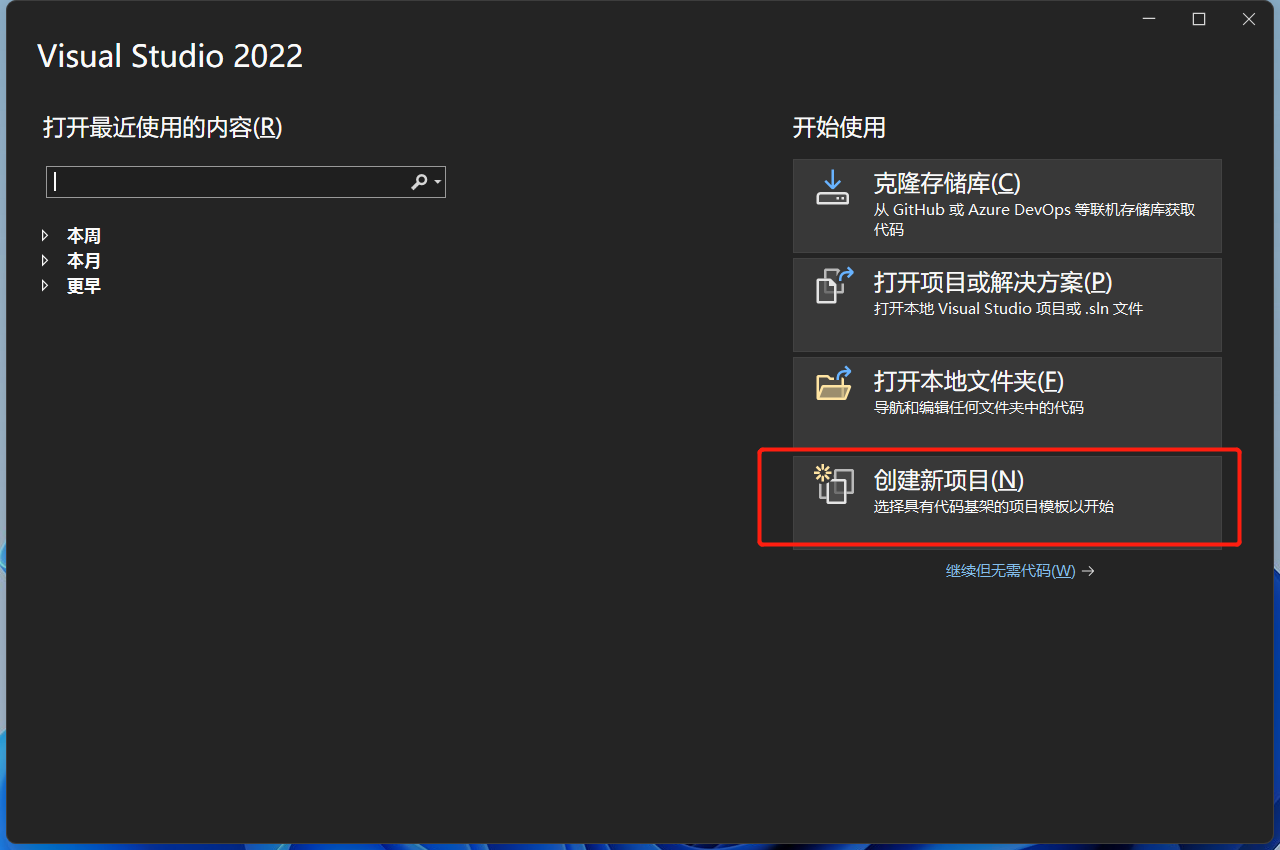
打开Visual Studio 2022,选择创建新项目
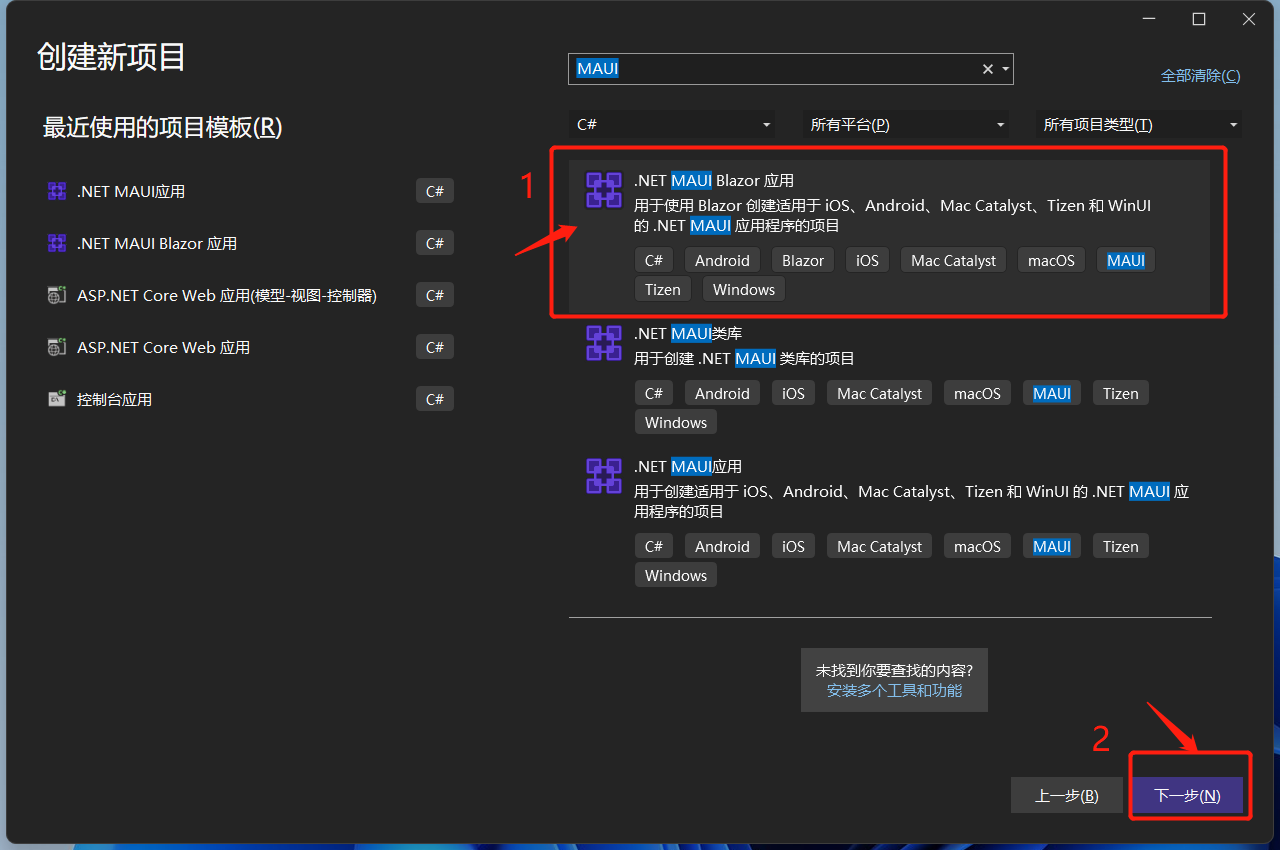
在搜索框输入MAUI,选择.NET MAUI Blazor应用,点下一步!
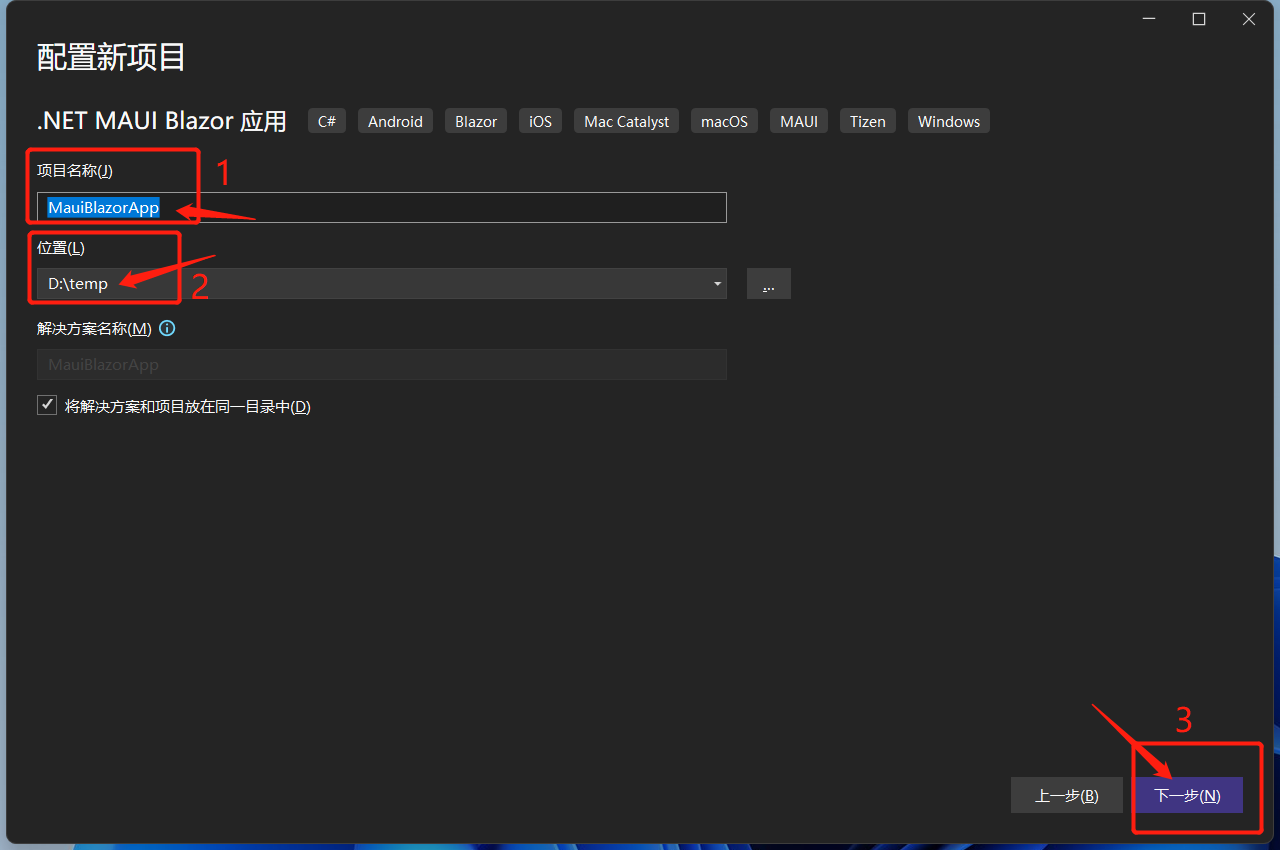
给项目起一个好听的名字,选择项目存在的位置,点下一步!
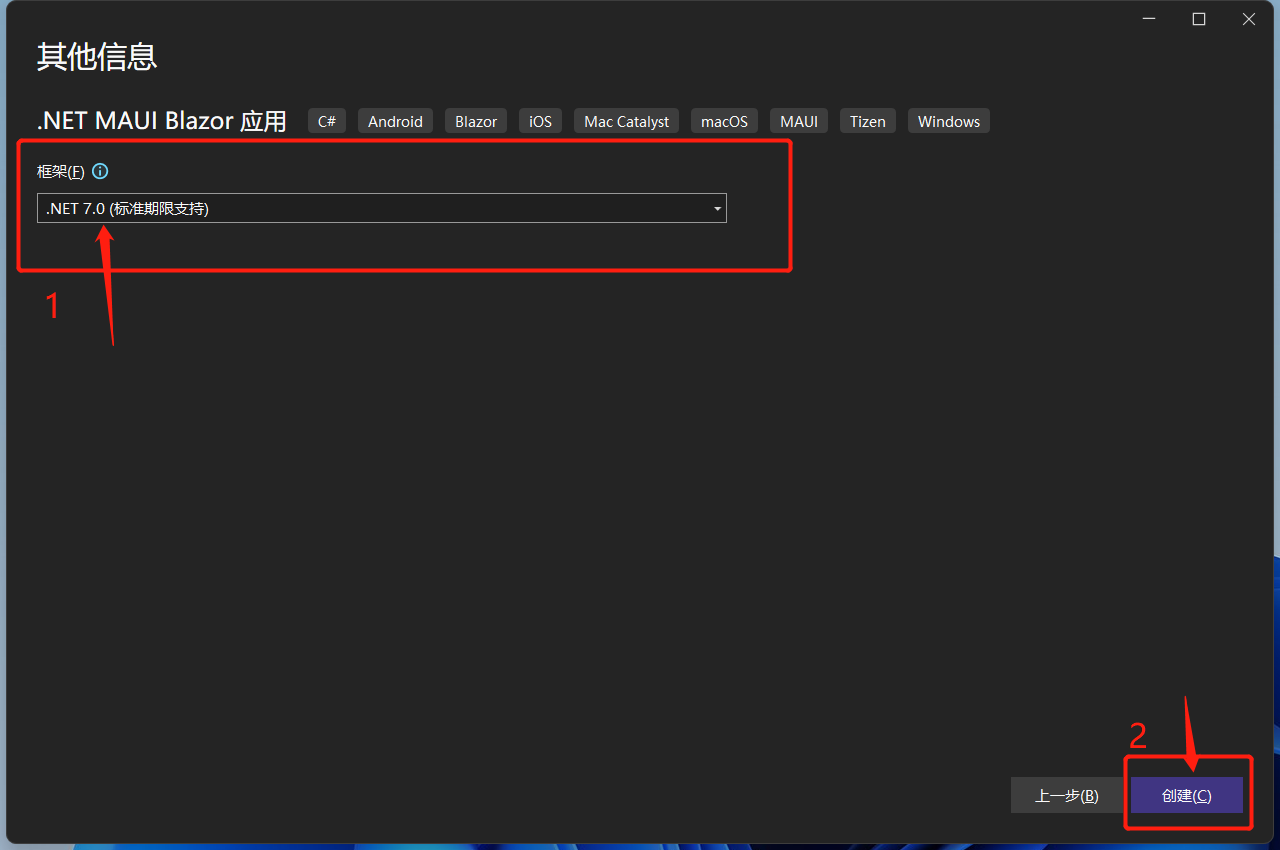
选择目标框架,这里选择的是.NET 7,点击创建。
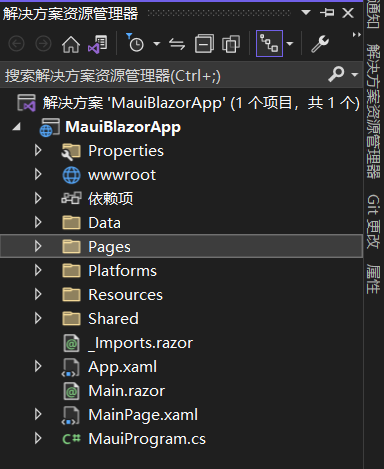
等待创建项目及其依赖项还原。完成后的目录结构如下:
.NET MAUI Blazor 需要注意的地方
.NET MAUI Blazor 运行在WebView2上,WebView2是微软推出的新一代用于桌面端混合开发的解决方案。它可以让本地应用程序(WinForm、WPF、WinUI、Win32)、移动应用程序(MAUI)轻松嵌入Web技术。WebView2 控件使用 Microsoft Edge 作为呈现引擎在客户端应用程序及App中显示 Web 内容。使用 WebView2 可以将 Web 代码嵌入到客户端应用程序及App中的不同部分,或在单个 WebView 实例中构建所有本机应用程序。
可以这么看MAUI Blazor, .NET MAUI 包含 BlazorWebView 控件,该控件运行将 Razor 组件呈现到嵌入式 Web View 中。 通过结合使用 .NET MAUI 和 Blazor,可以跨移动设备、桌面设备和 Web 重复使用一组 Web UI 组件。
说人话就是,它就是一个Hybrid App(混合应用) !
调试.NET MAUI Blazor
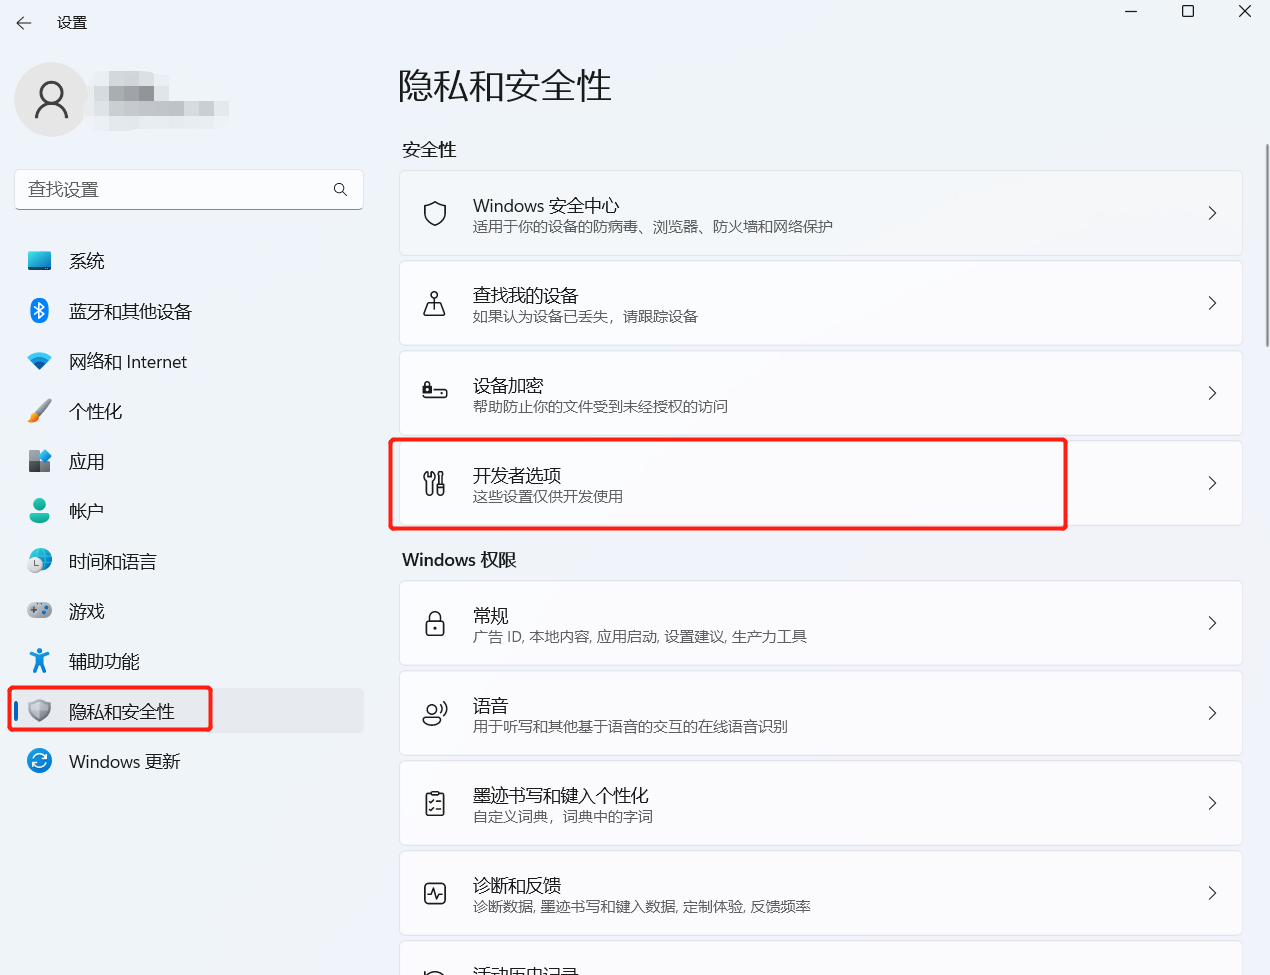
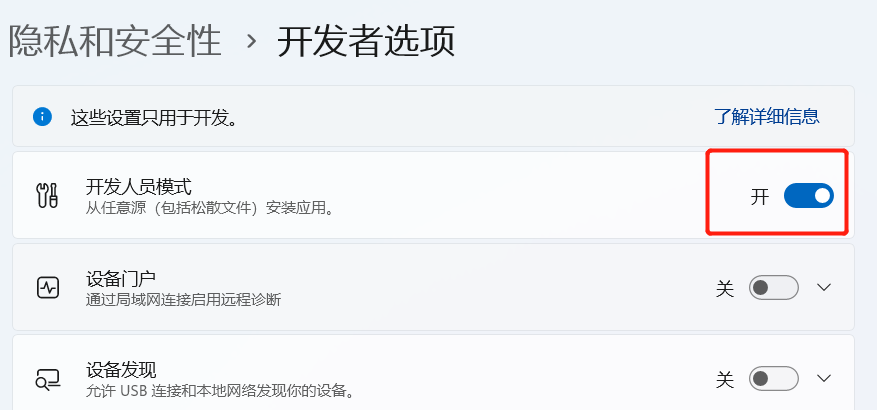
在windows上调试 MAUI Blazor应用,需要Windows 10 1809及更高版本上,并打开开发者模式。
windows 11上,位于设置->隐私和安全性->开发者选项->开发人员模式
点击Windows Machine,运行程序!
如无意外,运行成功!
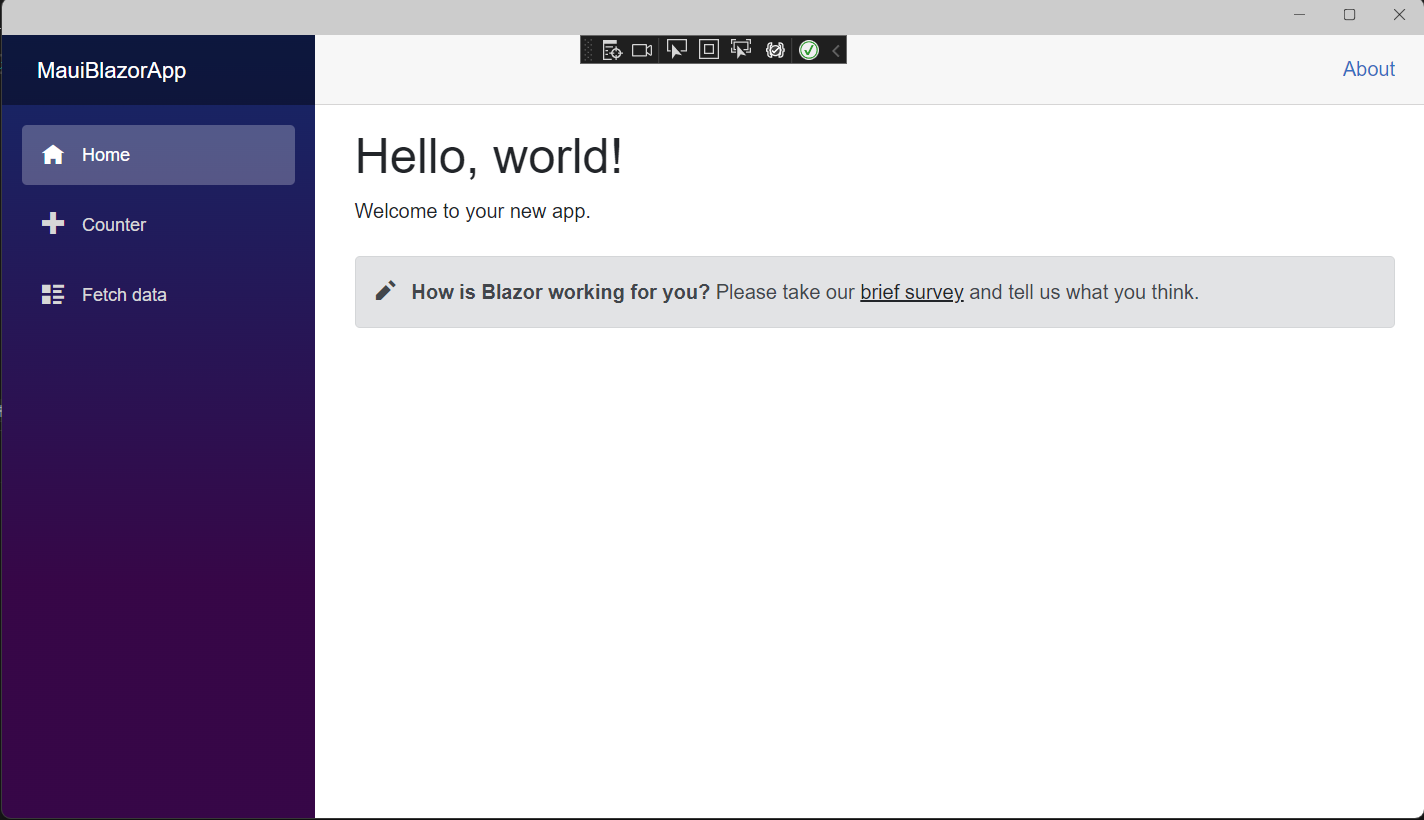
这时,MAUI Blazor使用的是bootstrap样式以及open-iconic图标。
在wwwroot/index.html中也可以看到
<link rel="stylesheet" href="css/bootstrap/bootstrap.min.css" />
现在已经有个很多基于Blazor的组件库,所以暂时把默认的bootstrap替换成第三方组件库,这里使用的是AntDesignBlazor。
使用AntDesignBlazor 组件库
安装依赖:
PM> NuGet\Install-Package AntDesign.ProLayout -Version 0.13.1
注入AntDesign
在MauiProgram.cs注入AntDesign 服务与设置基本配置,完整的MauiProgram.cs代码
using Microsoft.Extensions.Logging;

using MauiBlazorApp.Data;

namespace MauiBlazorApp;

public static class MauiProgram

{

	public static MauiApp CreateMauiApp()

	{

		var builder = MauiApp.CreateBuilder();

		builder

			.UseMauiApp<App>()

			.ConfigureFonts(fonts =>

			{

				fonts.AddFont("OpenSans-Regular.ttf", "OpenSansRegular");

			});

		builder.Services.AddMauiBlazorWebView();

#if DEBUG

		builder.Services.AddBlazorWebViewDeveloperTools();

		builder.Logging.AddDebug();

#endif

		builder.Services.AddSingleton<WeatherForecastService>();

        //注入AntDesign

        builder.Services.AddAntDesign();

		//基本配置

		builder.Services.Configure<ProSettings>(settings =>

		{

            settings.NavTheme = "light";

            settings.Layout = "side";

            settings.ContentWidth = "Fluid";

			settings.FixedHeader = false;

			settings.FixSiderbar = true;

            settings.Title = "DotNet宝藏库";

			settings.PrimaryColor = "daybreak";

			settings.ColorWeak = false;

			settings.SplitMenus= false;

			settings.HeaderRender= true;

			settings.FooterRender= false;

			settings.MenuRender= true;

			settings.MenuHeaderRender= true;

			settings.HeaderHeight = 48;

		});

		return builder.Build();

	}

}
配置项都写上了。参数含义从表达的意思就能看出来,不做注释了!
引入样式
打开wwwroot/index.html。由于我们使用的是AntDesign,所以需要改造下index.html,修改后内容如下:
<!DOCTYPE html>

<html lang="en">

<head>

    <meta charset="utf-8" />

    <meta name="viewport" content="width=device-width, initial-scale=1.0, maximum-scale=1.0, user-scalable=no, viewport-fit=cover" />

    <title>DotNet宝藏库</title>

    <base href="/" />

    <link href="_content/AntDesign/css/ant-design-blazor.css" rel="stylesheet" />

    <link rel="stylesheet" href="_content/AntDesign.ProLayout/css/ant-design-pro-layout-blazor.css" />

</head>

<body>

    <div class="status-bar-safe-area"></div>

    <div id="app">

        <style>

            html,

            body,

            #app {

                height: 100%;

                margin: 0;

                padding: 0;

            }

            #app {

                background-repeat: no-repeat;

                background-size: 100% auto;

            }

            .page-loading-warp {

                padding: 98px;

                display: flex;

                justify-content: center;

                align-items: center;

            }

            .ant-spin {

                -webkit-box-sizing: border-box;

                box-sizing: border-box;

                margin: 0;

                padding: 0;

                color: rgba(0, 0, 0, 0.65);

                font-size: 14px;

                font-variant: tabular-nums;

                line-height: 1.5;

                list-style: none;

                -webkit-font-feature-settings: 'tnum';

                font-feature-settings: 'tnum';

                position: absolute;

                display: none;

                color: #1890ff;

                text-align: center;

                vertical-align: middle;

                opacity: 0;

                -webkit-transition: -webkit-transform 0.3s cubic-bezier(0.78, 0.14, 0.15, 0.86);

                transition: -webkit-transform 0.3s cubic-bezier(0.78, 0.14, 0.15, 0.86);

                transition: transform 0.3s cubic-bezier(0.78, 0.14, 0.15, 0.86);

                transition: transform 0.3s cubic-bezier(0.78, 0.14, 0.15, 0.86), -webkit-transform 0.3s cubic-bezier(0.78, 0.14, 0.15, 0.86);

            }

            .ant-spin-spinning {

                position: static;

                display: inline-block;

                opacity: 1;

            }

            .ant-spin-dot {

                position: relative;

                display: inline-block;

                font-size: 20px;

                width: 20px;

                height: 20px;

            }

            .ant-spin-dot-item {

                position: absolute;

                display: block;

                width: 9px;

                height: 9px;

                background-color: #1890ff;

                border-radius: 100%;

                -webkit-transform: scale(0.75);

                -ms-transform: scale(0.75);

                transform: scale(0.75);

                -webkit-transform-origin: 50% 50%;

                -ms-transform-origin: 50% 50%;

                transform-origin: 50% 50%;

                opacity: 0.3;

                -webkit-animation: antSpinMove 1s infinite linear alternate;

                animation: antSpinMove 1s infinite linear alternate;

            }

            .ant-spin-dot-item:nth-child(1) {

                top: 0;

                left: 0;

            }

            .ant-spin-dot-item:nth-child(2) {

                top: 0;

                right: 0;

                -webkit-animation-delay: 0.4s;

                animation-delay: 0.4s;

            }

            .ant-spin-dot-item:nth-child(3) {

                right: 0;

                bottom: 0;

                -webkit-animation-delay: 0.8s;

                animation-delay: 0.8s;

            }

            .ant-spin-dot-item:nth-child(4) {

                bottom: 0;

                left: 0;

                -webkit-animation-delay: 1.2s;

                animation-delay: 1.2s;

            }

            .ant-spin-dot-spin {

                -webkit-transform: rotate(45deg);

                -ms-transform: rotate(45deg);

                transform: rotate(45deg);

                -webkit-animation: antRotate 1.2s infinite linear;

                animation: antRotate 1.2s infinite linear;

            }

            .ant-spin-lg .ant-spin-dot {

                font-size: 32px;

                width: 32px;

                height: 32px;

            }

            .ant-spin-lg .ant-spin-dot i {

                width: 14px;

                height: 14px;

            }

            .status-bar-safe-area {

                display: none;

            }

            @supports (-webkit-touch-callout: none) {

                .status-bar-safe-area {

                    display: flex;

                    position: sticky;

                    top: 0;

                    height: env(safe-area-inset-top);

                    background-color: #f7f7f7;

                    width: 100%;

                    z-index: 1;

                }

                .flex-column, .navbar-brand {

                    padding-left: env(safe-area-inset-left);

                }

            }

            @media all and (-ms-high-contrast: none), (-ms-high-contrast: active) {

                .ant-spin-blur {

                    background: #fff;

                    opacity: 0.5;

                }

            }

            @-webkit-keyframes antSpinMove {

                to {

                    opacity: 1;

                }

            }

            @keyframes antSpinMove {

                to {

                    opacity: 1;

                }

            }

            @-webkit-keyframes antRotate {

                to {

                    -webkit-transform: rotate(405deg);

                    transform: rotate(405deg);

                }

            }

            @keyframes antRotate {

                to {

                    -webkit-transform: rotate(405deg);

                    transform: rotate(405deg);

                }

            }

        </style>

        <div style="

          display: flex;

          justify-content: center;

          align-items: center;

          flex-direction: column;

          min-height: 420px;

          height: 100%;

        ">

            <div class="page-loading-warp">

                <div class="ant-spin ant-spin-lg ant-spin-spinning">

                    <span class="ant-spin-dot ant-spin-dot-spin">

                        <i class="ant-spin-dot-item"></i><i class="ant-spin-dot-item"></i><i class="ant-spin-dot-item"></i><i class="ant-spin-dot-item"></i>

                    </span>

                </div>

            </div>

            <div style="display: flex; justify-content: center; align-items: center;">

                 <div class="loading-progress-text"></div>

            </div>

        </div>

    </div>

    <script src="_framework/blazor.webview.js" autostart="false"></script>

    <script src="_content/AntDesign/js/ant-design-blazor.js"></script>

</body>

</html>
加入命名空间
在_Imports.razor添加AntDesign命名空间:
@using System.Net.Http

@using Microsoft.AspNetCore.Components.Forms

@using Microsoft.AspNetCore.Components.Routing

@using Microsoft.AspNetCore.Components.Web

@using Microsoft.AspNetCore.Components.Web.Virtualization

@using Microsoft.JSInterop

@using MauiBlazorApp

@using MauiBlazorApp.Shared

//引入AntDesign

@using AntDesign
设置容器
在Main.razor中加入<AntContainer />
<Router AppAssembly="@typeof(Main).Assembly">

    <Found Context="routeData">

        <RouteView RouteData="@routeData" DefaultLayout="@typeof(MainLayout)" />

        <FocusOnNavigate RouteData="@routeData" Selector="h1" />

    </Found>

    <NotFound>

        <LayoutView Layout="@typeof(MainLayout)">

            <p role="alert">Sorry, there's nothing at this address.</p>

        </LayoutView>

    </NotFound>

</Router>

<!--设置容器-->

<AntContainer />
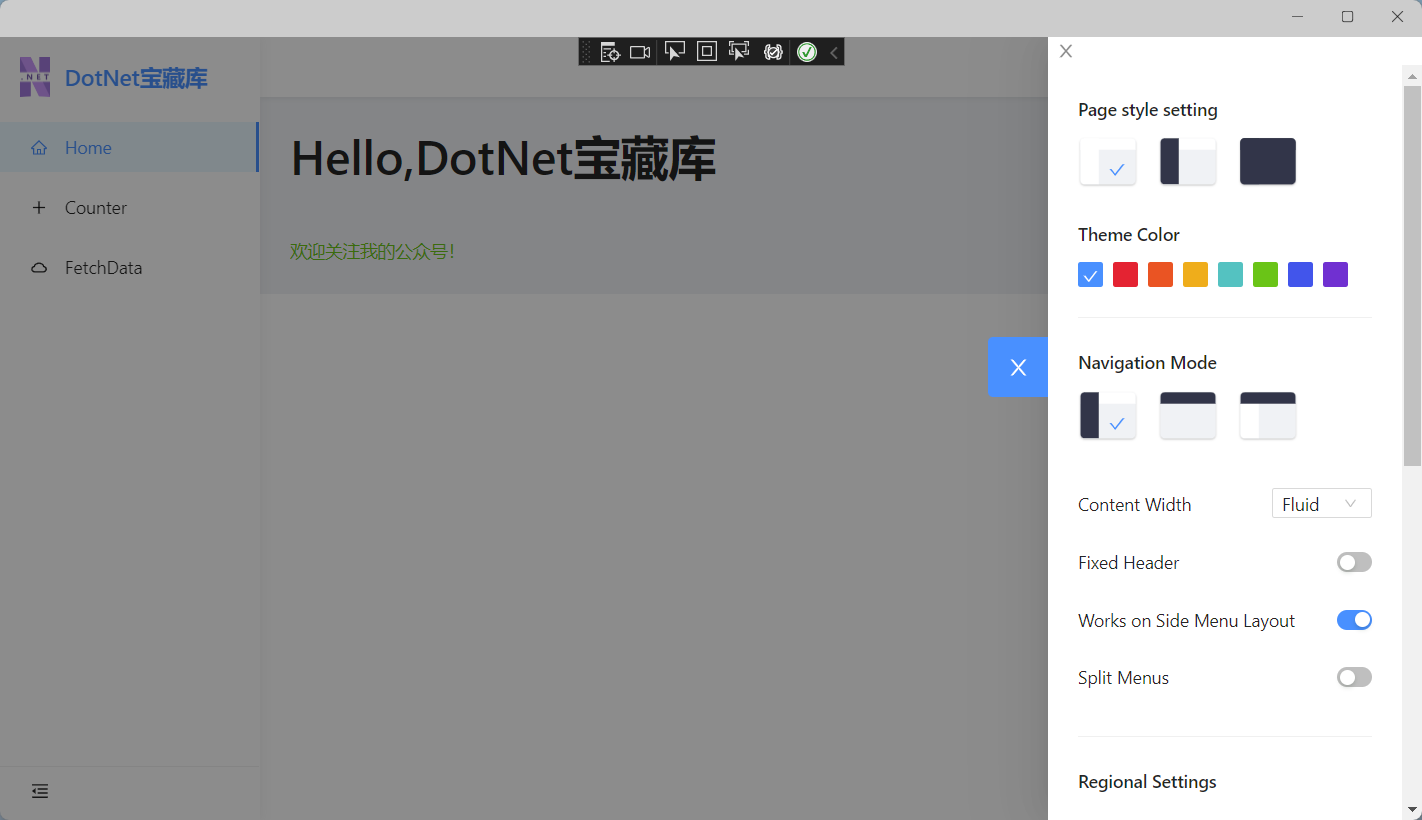
修改 MainLayout
- 修改
MainLayout.razor。 - 把
MainLayout.razor中默认布局删除 - 引入
AntDesign.ProLayout - 设置布局为
AntDesign.ProLayout - 构造菜单、页脚的链接、版权
- wwwroot目录下新建个文件夹
images,把提前准备好的logo放进去
完整代码如下:
@using AntDesign.ProLayout

@inherits LayoutComponentBase

<AntDesign.ProLayout.BasicLayout

    Logo="@("images/logo.png")"

    MenuData="MenuData">

    <ChildContent>

        @Body

    </ChildContent>

    <FooterRender>

        <FooterView Copyright="MauiBlazorApp" Links="Links"></FooterView>

    </FooterRender>

</AntDesign.ProLayout.BasicLayout>

<SettingDrawer />

@code

{

    private readonly MenuDataItem[] MenuData =

        {

        new MenuDataItem

        {

            Path = "/",

            Name = "Home",

            Key = "Home",

            Icon = "home"

        },

        new MenuDataItem

        {

            Path = "/Counter",

            Name = "Counter",

            Key = "Counter",

            Icon = "plus"

        },

        new MenuDataItem

        {

            Path = "/FetchData",

            Name = "FetchData",

            Key = "FetchData",

            Icon = "cloud"

        }

    };

    private readonly LinkItem[] Links =

    {

        new LinkItem

        {

            Key = "DotNet宝藏库",

            Title = "基于Ant Design Blazor",

            Href = "https://antblazor.com",

            BlankTarget = true

        }

    };

}
这时可以把项目中无用的内容删除掉了,如Shared/NavMenu.razor、wwwroot/css文件。
由于删除掉了css文件夹,页面元素肯定没有样式了。那么就简单的改造下默认的几个页面!
改造默认页面
index.razor
打开Pages/Index.razor,将演示组件SurveyPrompt 删掉。顺便把Shared/SurveyPrompt.razor也删除掉。将<h1>Hello, world!</h1>
替换为Ant Design组件。
@page "/"

<Title Level="1">Hello,DotNet宝藏库</Title>

<br />

<Text Type="success">欢迎关注我的公众号!</Text>
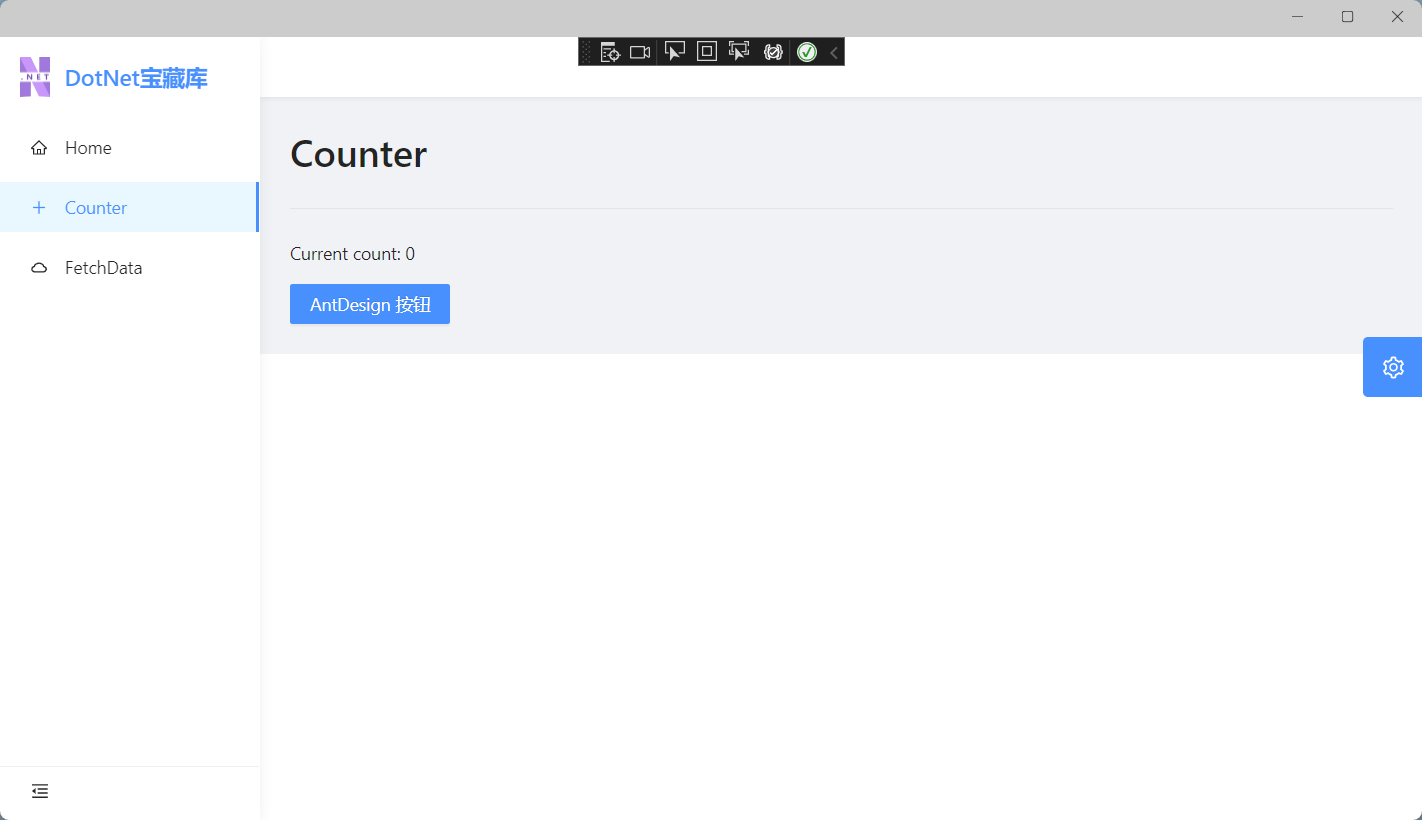
Counter.razor
打开 Pages/Counter.razor,将代码改为如下:
@page "/counter"

<Title Level="2">HCounter</Title>

<Divider />

<p role="status">Current count: @currentCount</p>

<Button @onclick="IncrementCount" Type="primary">AntDesign 按钮</Button>

@code {

    private int currentCount = 0;

    private void IncrementCount()

    {

        currentCount++;

    }

}
FetchData.razor
打开Pages/FetchData.razor,将数据表格替换为Ant Design,删除页面所有代码,替换为Ant Design的示例!
@page "/fetchdata"

@using System.ComponentModel

@using AntDesign.TableModels

@using System.Text.Json

@using MauiBlazorApp.Data

@inject WeatherForecastService ForecastService

<Table @ref="table"

       TItem="WeatherForecast"

       DataSource="@forecasts"

       Total="_total"

       @bind-PageIndex="_pageIndex"

       @bind-PageSize="_pageSize"

       @bind-SelectedRows="selectedRows"

       OnChange="OnChange">

    <Selection Key="@(context.Id.ToString())" />

    <PropertyColumn Property="c=>c.Id" Sortable />

    <PropertyColumn Property="c=>c.Date" Format="yyyy-MM-dd" Sortable />

    <PropertyColumn Property="c=>c.TemperatureC" Sortable />

    <PropertyColumn Title="Temp. (F)" Property="c=>c.TemperatureF" />

    <PropertyColumn Title="Hot" Property="c=>c.Hot">

        <Switch @bind-Value="@context.Hot"></Switch>

    </PropertyColumn>

    <PropertyColumn Property="c=>c.Summary" Sortable />

    <ActionColumn>

        <Space>

            <SpaceItem><Button Danger OnClick="()=>Delete(context.Id)">Delete</Button></SpaceItem>

        </Space>

    </ActionColumn>

</Table>

<br />

<p>PageIndex: @_pageIndex | PageSize: @_pageSize | Total: @_total</p>

<br />

<h5>selections:</h5>

@if (selectedRows != null && selectedRows.Any())

{

    <Button Danger Size="small" OnClick="@(e => { selectedRows = null; })">Clear</Button>

    @foreach (var selected in selectedRows)

    {

        <Tag @key="selected.Id" Closable OnClose="e=>RemoveSelection(selected.Id)">@selected.Id - @selected.Summary</Tag>

    }

}

<Button Type="@ButtonType.Primary" OnClick="()=> { _pageIndex--; }">Previous page</Button>

<Button Type="@ButtonType.Primary" OnClick="()=> { _pageIndex++; }">Next Page</Button>

@code {

    private WeatherForecast[] forecasts;

    IEnumerable<WeatherForecast> selectedRows;

    ITable table;

    int _pageIndex = 1;

    int _pageSize = 10;

    int _total = 0;

    protected override async Task OnInitializedAsync()

    {

        forecasts = await GetForecastAsync(1, 50);

        _total = 50;

    }

    public class WeatherForecast

    {

        public int Id { get; set; }

        [DisplayName("Date")]

        public DateTime? Date { get; set; }

        [DisplayName("Temp. (C)")]

        public int TemperatureC { get; set; }

        [DisplayName("Summary")]

        public string Summary { get; set; }

        public int TemperatureF => 32 + (int)(TemperatureC / 0.5556);

        public bool Hot { get; set; }

    }

    private static readonly string[] Summaries = new[]

    {

        "Freezing", "Bracing", "Chilly", "Cool", "Mild", "Warm", "Balmy", "Hot", "Sweltering", "Scorching"

    };

    public void OnChange(QueryModel<WeatherForecast> queryModel)

    {

        Console.WriteLine(JsonSerializer.Serialize(queryModel));

    }

    public Task<WeatherForecast[]> GetForecastAsync(int pageIndex, int pageSize)

    {

        var rng = new Random();

        return Task.FromResult(Enumerable.Range((pageIndex - 1) * pageSize + 1, pageSize).Select(index =>

        {

            var temperatureC = rng.Next(-20, 55);

            return new WeatherForecast

                {

                    Id = index,

                    Date = DateTime.Now.AddDays(index),

                    TemperatureC = temperatureC,

                    Summary = Summaries[rng.Next(Summaries.Length)],

                    Hot = temperatureC > 30,

                };

        }).ToArray());

    }

    public void RemoveSelection(int id)

    {

        var selected = selectedRows.Where(x => x.Id != id);

        selectedRows = selected;

    }

    private void Delete(int id)

    {

        forecasts = forecasts.Where(x => x.Id != id).ToArray();

        _total = forecasts.Length;

    }

}
运行效果:


总结
暂无,下次再会

学习.NET MAUI Blazor(三)、创建.NET MAUI Blazor应用并使用AntDesignBlazor的更多相关文章
- 从零开始学习 asp.net core 2.1 web api 后端api基础框架(三)-创建Data Transfer Object
原文:从零开始学习 asp.net core 2.1 web api 后端api基础框架(三)-创建Data Transfer Object 版权声明:本文为博主原创文章,未经博主允许不得转载. ht ...
- WCF学习之旅—第三个示例之四(三十)
上接WCF学习之旅—第三个示例之一(二十七) WCF学习之旅—第三个示例之二(二十八) WCF学习之旅—第三个示例之三(二十九) ...
- WCF学习之旅—第三个示例之二(二十八)
上接WCF学习之旅—第三个示例之一(二十七) 五.在项目BookMgr.Model创建实体类数据 第一步,安装Entity Framework 1) 使用NuGet下载最新版的Entity Fram ...
- WCF学习之旅—第三个示例之三(二十九)
上接WCF学习之旅—第三个示例之一(二十七) WCF学习之旅—第三个示例之二(二十八) 在上一篇文章中我们创建了实体对象与接口协定,在这一篇文章中我们来学习如何创建WCF的服务端代码.具体步骤见下面. ...
- css学习归纳总结(三) 转
原文地址:css学习归纳总结(三) 为文档添加样式的三种方法 行内样式 行内样式是写在HTML标签的style属性里的,比如: <p style="font-size: 12px;fo ...
- 【Unity Shaders】学习笔记——SurfaceShader(三)BasicDiffuse和HalfLambert
[Unity Shaders]学习笔记——SurfaceShader(三)BasicDiffuse和HalfLambert 转载请注明出处:http://www.cnblogs.com/-867259 ...
- [转]Spark学习之路 (三)Spark之RDD
Spark学习之路 (三)Spark之RDD https://www.cnblogs.com/qingyunzong/p/8899715.html 目录 一.RDD的概述 1.1 什么是RDD? ...
- 【转】Spring学习---Bean配置的三种方式(XML、注解、Java类)介绍与对比
[原文]https://www.toutiao.com/i6594205115605844493/ Spring学习Bean配置的三种方式(XML.注解.Java类)介绍与对比 本文将详细介绍Spri ...
- V-rep学习笔记:机器人模型创建2—添加关节
下面接着之前经过简化并调整好视觉效果的模型继续工作流,为了使模型能受控制运动起来必须在合适的位置上添加相应的运动副/关节.一般情况下我们可以查阅手册或根据设计图纸获得这些关节的准确位置和姿态,知道这些 ...
- Linux内核分析第六周学习笔记——分析Linux内核创建一个新进程的过程
Linux内核分析第六周学习笔记--分析Linux内核创建一个新进程的过程 zl + <Linux内核分析>MOOC课程http://mooc.study.163.com/course/U ...
随机推荐
- 基于SqlSugar的开发框架循序渐进介绍(15)-- 整合代码生成工具进行前端界面的生成
在前面随笔<基于SqlSugar的开发框架循序渐进介绍(12)-- 拆分页面模块内容为组件,实现分而治之的处理>中我们已经介绍过,对于相关的业务表的界面代码,我们已经尽可能把不同的业务逻辑 ...
- Oracle字段约束
初识约束 约束是数据库用来确保数据满足业务规则的手段,对数据做的条件限制. 约束的类型 1. 主键约束(PRIMARY KEY) 2. 唯一性约束(UNIQUE) 3. 非空约束(NOT NULL) ...
- Java8新特性之Stream流(含具体案例)
一.概述 Stream 流是 Java 8 新提供给开发者的一组操作集合的 API,将要处理的元素集合看作一种流, 流在管道中传输, 并且可以在管道的节点上进行处理, 比如筛选.排序.聚合等.元素 ...
- TomCat之安装
TomCat 之安装(伪分布式版本) 本次安装是使用的伪分布式的安装(即一台机器安装两个tomcat) 1.通过scp导入tomcat安装包 2.解压缩成俩个文件 3.修改第一个tomcat的配置文件 ...
- ByPass
WebShell-ByPass php一句话木马 <?php eval($_REQUEST['a']]);?> 拦截进行替换 替换eval() assert() 替换$_REQUEST[' ...
- js红宝书学习笔记(一)引用类型
一.引用类型 ECMAScript中,引用类型是一种数据结构称之为对象定义,,引用对象不同于传统面向对象语言所支持的类和接口等基本结构 创建Object 实例的两种方式: new操作符跟Object构 ...
- 如何规范App广告的隐私获取,让用户拥有更多知情权?
随着互联网的不断普及,越来越多老百姓使用智能设备触达互联网.但用户经常发现自己无意间提到的东西,打开App就收到相关产品的广告推送,甚至有人怀疑手机App是通过麦克风来窃取自己平时聊天信息中的关键词进 ...
- antd 批量上传文件逻辑
基本步骤 通过 antd 框架的 Upload 控件,采用手动上传的方式,先选择需要上传的文件(控制文件数量以及大小),再根据所选的文件列表,循环上传,期间通过 Spin 控件提示上传中. 效果展示 ...
- AR人体姿态识别,实现无边界的人机交互
近年来,AR不断发展,作为一种增强现实技术,给用户带来了虚拟和现实世界的融合体验.但用户已经不满足于单纯地将某件虚拟物品放在现实场景中来感受AR技术,更想用身体姿势来触发某个指令,达到更具真实感的人机 ...
- Python基础部分:7、 垃圾回收机制和流程控制
目录 一.垃圾回收机制 1.引用计数 2.标记清除 3.分类代收 二.流程控制 1.理论 2.必备知识 3.分支结构 4.循环结构 一.垃圾回收机制 垃圾回收机制,简称GC,是python解释器自带的 ...