VuePress个人博客搭建
vuepress概述
VuePress 由两部分组成:第一部分是一个极简静态网站生成器 (opens new window),它包含由 Vue 驱动的主题系统和插件 API,另一个部分是为书写技术文档而优化的默认主题,它的诞生初衷是为了支持 Vue 及其子项目的文档需求。
每一个由 VuePress 生成的页面都带有预渲染好的 HTML,也因此具有非常好的加载性能和搜索引擎优化(SEO)。同时,一旦页面被加载,Vue 将接管这些静态内容,并将其转换成一个完整的单页应用(SPA),其他的页面则会只在用户浏览到的时候才按需加载。
官网地址: https://www.vuepress.cn/guide/getting-started.html
node环境和npm支持
VuePress 需要 Node.js 版本 >= 8.6
若已有node.js环境使用命令查看node.js 版本
node -v
安装node.js
下载安装包
本文选择v12.18.4版本
上传解压
tar -zxvf node-v12.18.4-linux-x64.tar.gz -C /usr/local/
重命名
cd /usr/local/
mv node-v12.18.4-linux-x64/ node-v12.18.4
配置环境变量
创建nodejs.sh文件并添加如下内容
vi /etc/profile.d/nodejs.sh
export PATH=/usr/local/node-v12.18.4/bin:$PATH
刷新nodejs.sh文件
[root@localhost local]# source /etc/profile.d/nodejs.sh
查看版本
[root@localhost local]# node --version
v12.18.4
[root@localhost local]# npm --version
6.14.6
VuePress安装步骤
全局安装
创建放项目的文件夹
项目文件夹可以选自任意目录,本文选自在根目录下,
[root@localhost local]# cd /
[root@localhost /]# mkdir vuepress
在项目文件夹中全局安装
[root@localhost /]# cd /vuepress/
[root@localhost vuepress]# npm install -g vuepress
安装过程较慢,请耐心等待,出现如下信息表示安装完成
+ vuepress@1.8.2
added 1221 packages from 547 contributors in 871.19s
项目初始化
执行初始化命令: npm init –y
[root@localhost vuepress]# npm init -y
Wrote to /vuepress/package.json:
{
"name": "vuepress",
"version": "1.0.0",
"description": "",
"main": "index.js",
"scripts": {
"test": "echo \"Error: no test specified\" && exit 1"
},
"keywords": [],
"author": "",
"license": "ISC"
}
初始化后会生成package.json文件
[root@localhost vuepress]# ll
total 4
-rw-r--r--. 1 root root 222 Jun 14 12:34 package.json
配置package.json
编辑package.json文件,在scripts项中添加如下两行
{
"scripts": {
"dev": "vuepress dev docs",
"build": "vuepress build docs"
}
文件完整内容,标红的为添加的内容
{
"name": "vuepress",
"version": "1.0.0",
"description": "",
"main": "index.js",
"scripts": {
"dev": "vuepress dev docs",
"build": "vuepress build docs",
"test": "echo \"Error: no test specified\" && exit 1"
},
"keywords": [],
"author": "",
"license": "ISC"
}
创建主页
创建存放博客文件的docs文件夹
mkdir docs
[root@localhost vuepress]# mkdir docs
[root@localhost vuepress]# ll
total 4
drwxr-xr-x. 2 root root 6 Jun 14 12:40 docs
-rw-r--r--. 1 root root 290 Jun 14 12:38 package.json
进入到docs文件夹中创建README.md文件,这个文件就是博客的首页,在里面添加官网上的例子,也可以自定义其他内容
[root@localhost vuepress]# cd docs
[root@localhost docs]# vi README.md
# 添加如下内容
---
home: true
heroImage: /logo.jpg #主页上显示的logo图片
heroText: 莲藕淹 #主页标题
tagline: 莲藕淹的博客 #主页副标题
actionText: 开始浏览 ->
actionLink: /guide/ #点击开始浏览跳转的路径
features:
- title: 简洁至上
details: 以 Markdown 为中心的项目结构,以最少的配置帮助你专注于写作。
- title: Vue驱动
details: 享受 Vue + webpack 的开发体验,在 Markdown 中使用 Vue 组件,同时可以>使用 Vue 来开发自定义主题。
- title: 高性能
details: VuePress 为每个页面预渲染生成静态的 HTML,同时在页面被加载的时候,将>作为 SPA 运行。
footer: Copyright @ 2018-present Evan You #尾行
---注意: 每个变量名和值之间有一个英文空格,没有会报错,冒号(:)要使用英文符号
启动访问
启动命令
npm run dev
出现如下信息表示启动成功,并监听端口8080
Client
Compiled successfully in 174.56ms
success [12:45:17] Build 8c5288 finished in 175 ms! ( http://localhost:8080/ )
浏览器访问
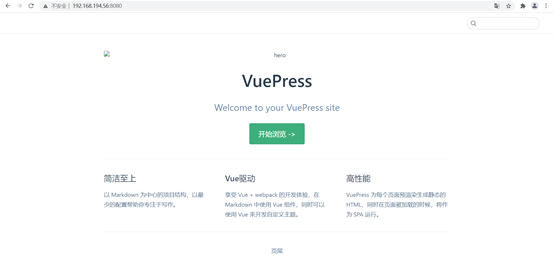
在浏览器中访问链接http://ip:8080,即可看到上一步创建的主页信息
编译
按ctrl+C结束运行,执行编译命令: npm run build
^C
[root@localhost docs]# npm run build
> vuepress@1.0.0 build /vuepress
> vuepress build docs
出现如下信息表示编译成功
Client
Compiled successfully in 14.65s
Server
Compiled successfully in 10.23s
wait Rendering static HTML...
success Generated static files in docs/.vuepress/dist.
编译完成后在docs文件夹下多了一个.vuepress文件夹
如果在linux系统下,以点. 开头的文件夹会被隐藏,可以直接cd到文件夹下
[root@localhost docs]# ll
total 4
-rw-r--r--. 1 root root 538 Jun 14 12:44 README.md
[root@localhost docs]# cd .vuepress/
[root@localhost .vuepress]# pwd
/vuepress/docs/.vuepress
[root@localhost .vuepress]#
配置网站信息
在.vuepress文件夹下新建一个config.js文件
这个文件是全局配置文件,可以配置网站的标题、描述、主题、导航栏等信息,添加内容如下
module.exports = {
title: '莲藕淹的博客',
description: '莲藕淹的博客',
dest: './dist',
port: '8080',
head: [
['link', {rel: 'icon', href: '/logo.jpg'}]
],
markdown: {
lineNumbers: true
},
themeConfig: {
nav: [{
text: '指南', link: '/guide/'
}],
sidebar: {'/guide/':[
{
title:'hadoop',
collapsable: true,
children:[
'/guide/notes/one',
]
},
{
title:'java',
collapsable: true,
children:[
'/guide/notes/two',
]
}
]
},
sidebarDepth: 2,
lastUpdated: 'Last Updated',
searchMaxSuggestoins: 10,
serviceWorker: {
updatePopup: {
message: "有新的内容.",
buttonText: '更新'
}
},
editLinks: true,
editLinkText: '在 GitHub 上编辑此页 !'
}
}
nav是导航栏,sidebar是侧边栏,详细配置请参考官网文档有更详细的配置:
https://www.vuepress.cn/theme/
导航栏和侧边栏的配置参考博客
https://blog.csdn.net/weixin_34910772/article/details/112240767
默认的侧边栏配置并不友好,可以使用插件自动生成,插件链接
https://github.com/realduang/vuepress-plugin-auto-sidebar
完成了基础搭建后,按照config.js里面配置的目录结构,在docs目录下新增相应的.md文件,一篇文章就是一个.md文件
[root@localhost docs]# pwd
/vuepress/docs
[root@localhost docs]# ll
total 8
drwxr-xr-x. 4 root root 32 Jun 14 13:23 guide
-rw-r--r--. 1 root root 538 Jun 14 12:44 README.md
-rw-r--r--. 1 root root 13 Jun 14 13:27 test.md
[root@localhost docs]# cd guide/
[root@localhost guide]# pwd
/vuepress/docs/guide
[root@localhost guide]# ll
total 0
drwxr-xr-x. 2 root root 28 Jun 14 13:24 hadoop
drwxr-xr-x. 2 root root 26 Jun 14 13:24 java
发布部署
安装部署nginx
- 安装依赖包
yum -y install pcre-devel
yum -y install openssl-devel
yum -y install gcc
yum -y install lrzsz
yum -y install openssh-clients
- 下载安装包
http://nginx.org/en/download.html
本文选择1.18.0版本
- 上传解压
tar -zxvf nginx-1.18.0.tar.gz -C /usr/local/
- 检查安装
cd /usr/local/nginx-1.18.0/
./configure --prefix=/usr/local/nginx --conf-path=/usr/local/nginx/nginx.conf
注:不指定prefix,则可执行文件默认放在/usr/local/bin,库文件默认放在/usr/local/lib,配置文件默认放在/usr/local/etc
出现以下信息表示检查通过完成
Configuration summary
+ using system PCRE library
+ OpenSSL library is not used
+ using system zlib library
nginx path prefix: "/usr/local/nginx"
nginx binary file: "/usr/local/nginx/sbin/nginx"
nginx modules path: "/usr/local/nginx/modules"
nginx configuration prefix: "/usr/local/nginx"
nginx configuration file: "/usr/local/nginx/nginx.conf"
nginx pid file: "/usr/local/nginx/logs/nginx.pid"
nginx error log file: "/usr/local/nginx/logs/error.log"
nginx http access log file: "/usr/local/nginx/logs/access.log"
nginx http client request body temporary files: "client_body_temp"
nginx http proxy temporary files: "proxy_temp"
nginx http fastcgi temporary files: "fastcgi_temp"
nginx http uwsgi temporary files: "uwsgi_temp"
nginx http scgi temporary files: "scgi_temp"
- 编译安装
make && make install
出现以下信息表示安装完成
test -d '/usr/local/nginx/logs' \
|| mkdir -p '/usr/local/nginx/logs'
test -d '/usr/local/nginx/html' \
|| cp -R html '/usr/local/nginx'
test -d '/usr/local/nginx/logs' \
|| mkdir -p '/usr/local/nginx/logs'
make[1]: Leaving directory `/usr/local/nginx-1.18.0'
- 启动
/usr/local/nginx/sbin/nginx
注意,若启动失败请使用命令 netstat –tupln 检查端口是否占用,nginx默认端口是80,若被占用可kill掉占用程序或者修改nginx端口
修改默认端口
cd /usr/local/nginx
vi nginx.conf
server {
listen 80;
server_name localhost;
把listen 80;中的80修改为其他未占用的端口号
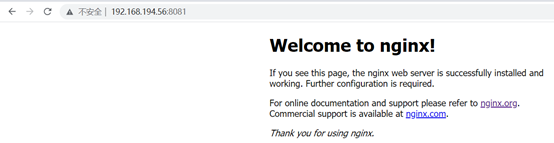
- 访问测试
浏览器中输入http://ip:port ,出现如下界面表示nginx服务部署成功
编译vuepress文件
再次执行npm run build
.vuepress下的dist文件夹,就是编译后的文件,将该文件夹通过nginx代理,就可以通过nginx代理访问自己的博客网站
配置Nginx代理
配置nginx.conf文件
cd /usr/local/nginx
vi nginx.conf
server {
listen 8081;
server_name localhost;
#charset koi8-r;
#access_log logs/host.access.log main;
location / {
root /vuepress/docs/.vuepress/dist; # //这里配置编译后的dist路径
try_files $uri $uri/ /index.html
index index.html index.htm;
}
重启nginx
停止nginx [root@localhost nginx]# sbin/nginx -s stop
启动nginx [root@localhost nginx]# sbin/nginx
访问http://192.168.194.56:8081/

Nginx代理配置成功
VuePress个人博客搭建的更多相关文章
- [原创]HEXO博客搭建日记
博客系统折腾了好久,使用过Wordpress,Ghost,Typecho,其中Typecho是我使用起来最舒心的一种,Markdown编辑+轻量化设计,功能不多不少刚好,着实让我这种强迫症患者舒服了好 ...
- Node.js博客搭建
Node.js 博客搭建 一. 学习需求 Node 的安装运行 会安装node,搭建node环境 会运行node. 基础模块的使用 Buffer:二进制数据处理模块 Event:事件模块 fs:文件系 ...
- nodejs环境 + 入门 + 博客搭建
NodeJS:NodeJS是一个使用了Google高性能V8 引擎 的服务器端JavaScript实现.它提供了一个(几乎)完全非阻塞I/O栈,与JavaScript提供的闭包和匿名函数相结合,使之成 ...
- WordPress博客搭建与问题总结
一.WordPress博客搭建 1.安装Apache web服务器 yum install -y httpd systemctl restart httpd systemctl enable ht ...
- 基于Github&Hexo的个人博客搭建过程
大家好,这里是「 从零开始学 Web 系列教程 」,并在下列地址同步更新...... github:https://github.com/Daotin/Web 微信公众号:Web前端之巅 博客园:ht ...
- 个人博客搭建( wordpress )
最近同学买了一台虚机( centos7 系统 ).一个域名,让帮忙搭一个个人博客.本着简单快捷,个人博客采用 wordpress 来搭建.为了以后博客系统的迁移方便,使用 docker 来安装 wor ...
- Hexo博客搭建以及Next主题美化的经验之谈
这并不是一篇博客搭建教程.内容主要包含个人对于Hexo博客搭建的心得,Next6.0主题美化的部分建议,以及摘录一些各种用于博客搭建的link. 在博客园3年6个月,确实也学到了很多,博客园也是目前为 ...
- Hexo博客搭建全解
[原创,转载请附网址:http://dongshuyan.top] 欢迎来到莫与的博客,第一篇记录了一下怎么写一篇博客,以方便之后写博客~ #从配置说起下载安装Git与Node.js略过 1.安装he ...
- GITHUB个人博客搭建-Pelican 在Windows环境下的安装及配置
GITHUB个人博客搭建-Pelican 在Windows环境下的安装及配置 前言 此篇博客主要为Pelican在Windows平台下的配置安装所写,在此过程中主要参考资料烟雨林博客.poem_of_ ...
随机推荐
- Resilience4J通过yml设置circuitBreaker
介绍 Resilience4j是一个轻量级.易于使用的容错库,其灵感来自Netflix Hystrix,但专为Java 8和函数式编程设计. springcloud2020升级以后Hystrix被官方 ...
- llinux下mysql建库、新建用户、用户授权、修改用户密码
1.创建新的数据库 1.1.root用户登录mysql mysql -u root -p 1.2.查看现有数据库 show databases; 1.3.新建数据库,此命名为cjc create ...
- v-debounce-throttle是一个vue防抖节流指令
v-debounce-throttle是一个vue防抖节流指令 简介 v-debounce-throttle是一个vue防抖节流指令,控制单一事件的触发频率.其核心是拦截组件元素的v-on绑定事件,采 ...
- day09-Tomcat01
Tomcat01 1.WEB开发介绍 WEB,在英文中WEB表示网/网络资源,它用于表示WEB服务器(主机)供浏览器访问的资源 WEB服务器(主机)上供外界访问的Web资源为: 静态web资源(如ht ...
- 一个基于角色的访问控制(RBAC)的简单示例
关于"基于角色的访问控制"是什么,本文不再赘述,如果不明白,请自行查阅资料了解. 本文参考用户·角色·权限·表的设计的思想设计. 本文用到的技术有Spring Boot.Sprin ...
- [leetcode] 706. Design HashMap
题目 Design a HashMap without using any built-in hash table libraries. Implement the MyHashMap class: ...
- RabbitMQ 常见问题
RabbitMQ 常见问题 昔我往矣,杨柳依依.今我来思,雨雪霏霏. 1.什么是RabbitMQ? RabbitMQ是一款开源的.Erlang编写的消息中间件:最大的特点就是消费并不需要确保提供方存 ...
- jdk线程池ThreadPoolExecutor优雅停止原理解析(自己动手实现线程池)(二)
jdk线程池工作原理解析(二) 本篇博客是jdk线程池ThreadPoolExecutor工作原理解析系列博客的第二篇,在第一篇博客中从源码层面分析了ThreadPoolExecutor在RUNNIN ...
- 禁用显卡自动更新(解决官办驱动和OEM驱动相冲)
起因 有一天打开MC(我的世界)时候突然显示显卡不支持,想了想可能是自己捣鼓电脑的时候弄坏了,提示说版本不支持,一看自己的驱动还是上古版本,但是之前都是可以正常玩的,想着更新下驱动就行了呗,更新完&q ...
- Devexpress控件searchLookUpEdit获得选中行的其他列数据
使用searchLookUpEdit控件获得选中行的其他列的数据.比如有一列代码列和一列描述.那么我们选中一行后想获得选中的代码和描述.可以在searchLookUpEdit1_EditValueCh ...