【SpringBoot1.x】SpringBoot1.x 数据访问
SpringBoot1.x 数据访问
简介
对于数据访问层,无论是 SQL 还是 NOSQL,Spring Boot 默认采用整合 Spring Data 的方式进行统一处理,添加大量自动配置,屏蔽了很多设置。引入各种 xxxTemplate,xxxRepository 来简化我们对数据访问层的操作,对我们来说只需要进行简单的设置即可。
在本文中测试使用 SQL 相关内容,在其他文章中测试使用 NOSQL 相关内容。
JDBC API
通过包含以下设计决策,SpringData JDBC API 的目标是从概念上简化得多:
- 如果加载实体,则将运行SQL语句。完成此操作后,您将拥有一个完全加载的实体。不会进行延迟加载或缓存。
- 如果保存实体,则将保存它。如果您不这样做,则不会。没有肮脏的跟踪,也没有会话。
- 有一个简单的模型可以将实体映射到表。它可能仅适用于相当简单的情况。如果您不喜欢这样做,则应编写自己的策略。SpringData JDBC API 仅提供非常有限的支持,以通过注释自定义策略。
所以它不提供 JPA 的缓存,延迟加载,回写或其他许多功能。这使 SpringData JDBC API 成为简单,有限,易用的ORM。
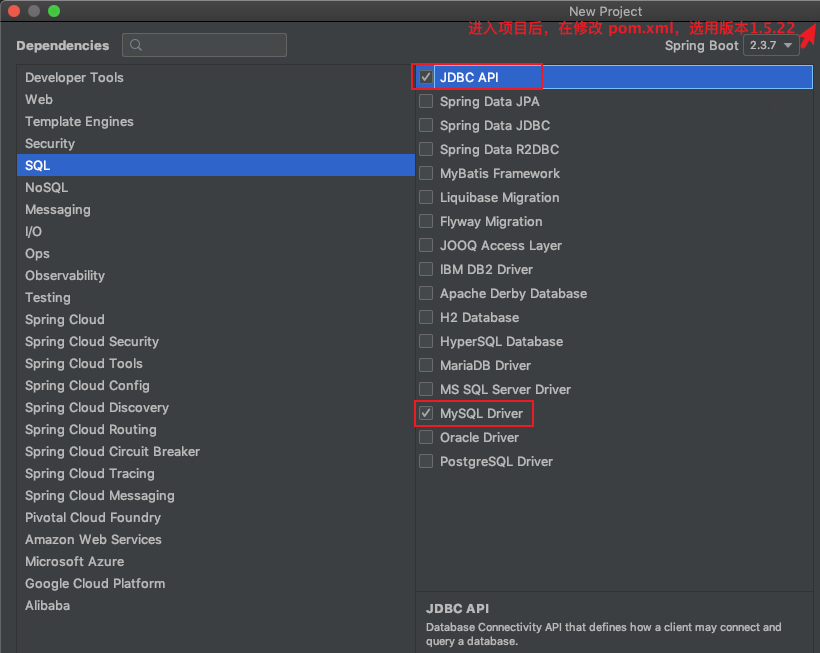
新建 SpringBoot 项目,选择 Web 模块,JDBC API 和 MySQL 模块,如下图:
或者 新建 SpringBoot 项目后,添加如下的相关依赖:
    <dependencies>

        <dependency>

            <groupId>org.springframework.boot</groupId>

            <artifactId>spring-boot-starter-jdbc</artifactId>

        </dependency>

        <dependency>

            <groupId>org.springframework.boot</groupId>

            <artifactId>spring-boot-starter-web</artifactId>

        </dependency>

        <dependency>

            <groupId>mysql</groupId>

            <artifactId>mysql-connector-java</artifactId>

            <scope>runtime</scope>

        </dependency>

        <dependency>

            <groupId>org.springframework.boot</groupId>

            <artifactId>spring-boot-starter-test</artifactId>

            <scope>test</scope>

            <exclusions>

                <exclusion>

                    <groupId>org.junit.vintage</groupId>

                    <artifactId>junit-vintage-engine</artifactId>

                </exclusion>

            </exclusions>

        </dependency>

    </dependencies>
然后修改 application.yml 配置文件:
# 配置数据源

spring:

  datasource:

    username: root

    password: 123456

    url: jdbc:mysql://localhost:3306/dockerT?useSSL=false

    driver-class-name: com.mysql.jdbc.Driver
默认是用 org.apache.tomcat.jdbc.pool.DataSource 作为数据源,数据源的相关配置都在 DataSourceProperties 里面。
数据源自动配置原理:
- 参考
org.springframework.boot.autoconfigure.jdbc.DataSourceConfiguration,它根据配置创建数据源,默认使用 Tomcat 连接池,也可以使用spring.datasource.type指定自定义的数据源类型。 - SpringBoot默认可以支持数据源为:
org.apache.tomcat.jdbc.pool.DataSource、HikariDataSource、BasicDataSource - 通过
org.springframework.boot.autoconfigure.jdbc.DataSourceInitializer的runSchemaScripts()可以运行建表语句,runDataScripts()可以运行插入数据的 sql 语句,默认只需要将文件命名为schema‐all.sql data-sqll.sql,也可以通过配置文件的spring.datasource.schema和spring.datasource.data属性指定。 - 因为自动配置了JdbcTemplate,所以可以直接用它操作数据库
整合 Druid 数据源
添加依赖:
        <dependency>

            <groupId>com.alibaba</groupId>

            <artifactId>druid-spring-boot-starter</artifactId>

            <version>1.1.24</version>

        </dependency>
然后修改 application.yml 配置文件:
# 配置数据源

spring:

  datasource:

    # 数据源基本配置

    # ...

    # 使用 DruidDataSource 作为数据源

    type: com.alibaba.druid.pool.DruidDataSource

    # 数据源其他配置

    initialSize: 5

    minIdle: 5

    maxActive: 20

    maxWait: 60000

    timeBetweenEvictionRunsMillis: 60000

    minEvictableIdleTimeMillis: 300000

    validationQuery: SELECT 1 FROM DUAL

    testWhileIdle: true

    testOnBorrow: false

    testOnReturn: false

    poolPreparedStatements: true

    # 配置监控统计拦截的filters,去掉后监控界面sql无法统计,'wall'用于防火墙

    filters: stat,wall,log4j

    maxPoolPreparedStatementPerConnectionSize: 20

    useGlobalDataSourceStat: true

    connectionProperties: druid.stat.mergeSql=true;druid.stat.slowSqlMillis=500
最后编写 Druid 数据源配置类:
/**

 * @Author : parzulpan

 * @Time : 2020-12

 * @Desc : Druid 数据源配置类

 */

@Configuration

public class DruidConfig {

    @ConfigurationProperties(prefix = "spring.datasource")

    @Bean

    public DataSource druid() {

        return new DruidDataSource();

    }

    // 配置Druid的监控

    // 先配置一个管理后台的 Servlet

    @Bean

    public ServletRegistrationBean statViewServlet() {

        ServletRegistrationBean srb = new ServletRegistrationBean(new StatViewServlet(), "/druid/*");

        Map<String, String> initParams = new HashMap<>();

        initParams.put("loginUsername", "admin123");

        initParams.put("loginPassword", "admin123");

        initParams.put("allow", "");    //  默认允许所有访问

        initParams.put("deny", ""); // 拒绝的访问

        srb.setInitParameters(initParams);

        return srb;

    }

    // 再配置一个 web 监控的 filter

    @Bean

    public FilterRegistrationBean webStatFilter() {

        FilterRegistrationBean frb = new FilterRegistrationBean();

        frb.setFilter(new WebStatFilter());

        Map<String,String> initParams = new HashMap<>();

        initParams.put("exclusions","*.js,*.css,/druid/*");

        frb.setInitParameters(initParams);

        frb.setUrlPatterns(Collections.singletonList("/*"));

        return frb;

    }

}
配置好后,可以通过访问 /druid 通过管理后台。
整合 MyBatis
添加依赖:
        <dependency>

            <groupId>org.mybatis.spring.boot</groupId>

            <artifactId>mybatis-spring-boot-starter</artifactId>

            <version>1.3.5</version>

        </dependency>
注解方式
纯注解方式,先建表,然后编写实体类。
数据表:
use dockerT;

SET FOREIGN_KEY_CHECKS=0;

# Table structure for department

DROP TABLE IF EXISTS `department`;

CREATE TABLE `department` (

    `id` int(11) primary key NOT NULL AUTO_INCREMENT,

    `departmentName` varchar(255) DEFAULT NULL

) ENGINE=InnoDB AUTO_INCREMENT=1 DEFAULT CHARSET=utf8;

# Table structure for employee

DROP TABLE IF EXISTS `employee`;

CREATE TABLE `employee` (

    `id` int(11) primary key NOT NULL AUTO_INCREMENT,

    `lastName` varchar(255) DEFAULT NULL,

    `email` varchar(255) DEFAULT NULL,

    `gender` int(2) DEFAULT NULL,

    `birth` date DEFAULT NULL,

    `d_id` int(11) DEFAULT NULL

) ENGINE=InnoDB AUTO_INCREMENT=1 DEFAULT CHARSET=utf8;
实体类:
省略...
编写操作 Department 表的 Mapper:
/**

 * @Author : parzulpan

 * @Time : 2020-12

 * @Desc : 操作 Department 表的 Mapper

 */

@Repository

@Mapper

public interface DepartmentMapper {

    @Select("select * from department where id=#{id}")

    public Department getDeptById(Integer id);

    @Delete("delete from department where id=#{id}")

    public int deleteDeptById(Integer id);

    // 自增

    @Options(useGeneratedKeys = true, keyProperty = "id")

    @Insert("insert into department(departmentName)values(#{departmentName})")

    public int insertDept(Department department);

    @Update("update department set departmentName=#{departmentName} where id=#{id}")

    public int updateDept(Department department);

}
编写控制类:
@RestController

public class DeptController {

    @Autowired

    DepartmentMapper departmentMapper;

    // http://localhost:8080/dept?departmentName=Admin

    @GetMapping("/dept")

    public Department addDepartment(Department department) {

        departmentMapper.insertDept(department);

        return department;

    }

    // http://localhost:8080/dept/1001

    @GetMapping("/dept/{id}")

    public Department getDepartment(@PathVariable("id") Integer id) {

        return departmentMapper.getDeptById(id);

    }

}
也可以自定义 MyBatis 的配置规则,如果解决数据表名和属性名不一致的情况,给容器中添加一个 ConfigurationCustomizer 即可。
@Configuration

public class MyBatisConfig {

    public ConfigurationCustomizer configurationCustomizer() {

        return new ConfigurationCustomizer() {

            @Override

            public void customize(org.apache.ibatis.session.Configuration configuration) {

                configuration.setMapUnderscoreToCamelCase(true);

            }

        };

    }

}
如果 Mapper 接口太多,可以需要写很多个 @Mapper 注解,可以使用 @MapperScan 批量扫描所有的 Mapper 接口。
@MapperScan("cn.parzulpan.mapper")

@SpringBootApplication()

public class DataJdbcApiApplication {

    public static void main(String[] args) {

        SpringApplication.run(DataJdbcApiApplication.class, args);

    }

}
配置方式
编写全局配置文件:
编写 SQL 映射文件:
然后修改 application.yml 配置文件,指定文件位置:
mybatis:

  config‐location: classpath:mybatis/mybatis‐config.xml

  mapper‐locations: classpath:mybatis/mapper/*.xml
SpringData JPA
为了执行简单查询以及执行分页和审核,必须编写太多样板代码。SpringData JPA 旨在通过将工作量减少到实际需要的数量来显着改善数据访问层的实现。它相比与 SpringData JDBC API 功能更加强大,使用也更复杂。
使用步骤:
编写一个实体类和数据表进行映射,并且配置好映射关系
/**

* @Author : parzulpan

* @Time : 2020-12

* @Desc : 使用 JPA 注解配置映射关系

*/

@Entity // 告诉 JPA 这是一个实体类,即和数据库映射的表

@Table  // 指定和哪个数据表对应,如果没有这个表在配置中可以指定自动创建,如果省略默认表名就是 user,即类名首字母小写

public class User {

    @Id // 这是一个主键

    @GeneratedValue(strategy = GenerationType.IDENTITY) // 策略是自增

    private Integer id;

    @Column(name = "last_name", length = 50)    // 指定和数据表对应的一个列,如果省略默认列名就是属性名

    private String lastName;

    @Column

    private String email;

    // getter setter

}
编写一个接口来操作实体类对应的数据表(Repository)
/**

* @Author : parzulpan

* @Time : 2020-12

* @Desc : 操作实体类对应的数据表的接口

* JpaRepository<T, ID extends Serializable>

* T 是 实体类,ID 是实体类的主键

*/

public interface UserRepository extends JpaRepository<User, Integer> {

}
配置 JPA
spring:

datasource:

    username: root

    password: 123456

    url: jdbc:mysql://localhost:3306/dockerT?useSSL=false

    driver-class-name: com.mysql.jdbc.Driver

jpa:

    hibernate:

    ddl-auto: update  # 更新或者创建数据表结构

    show-sql: true  # 控制显示相应 SQL
测试
package cn.parzulpan.controller;

import cn.parzulpan.entity.User;

import cn.parzulpan.repository.UserRepository;

import org.springframework.beans.factory.annotation.Autowired;

import org.springframework.web.bind.annotation.GetMapping;

import org.springframework.web.bind.annotation.PathVariable;

import org.springframework.web.bind.annotation.RestController;

@RestController

public class UserController {

    @Autowired

    UserRepository userRepository;

    // http://localhost:8080/user/1

    @GetMapping("/user/{id}")

    public User getUser(@PathVariable("id") Integer id){

        User user = userRepository.findOne(id);

        return user;

    }

    // http://localhost:8080/user/?lastName=parzul&email=aaf@gmail.com

    @GetMapping("/user")

    public User insertUser(User user){

        User save = userRepository.save(user);

        return save;

    }

}
练习和总结
【SpringBoot1.x】SpringBoot1.x 数据访问的更多相关文章
- SpringBoot之数据访问和事务-专题三
SpringBoot之数据访问和事务-专题三 四.数据访问 4.1.springboot整合使用JdbcTemplate 4.1.1 pom文件引入 <parent> <groupI ...
- ADO.NET编程之美----数据访问方式(面向连接与面向无连接)
最近,在学习ADO.NET时,其中提到了数据访问方式:面向连接与面向无连接.于是,百度了一下,发现并没有很好的资料,然而,在学校图书馆中发现一本好书(<ASP.NET MVC5 网站开发之美&g ...
- 高性能Javascript--高效的数据访问
接上一篇,希望能写一个高性能Javascript专题. 第一篇:高性能Javascript--脚本的无阻塞加载策略. 参考摘录<高性能Javascript>. 经典计算机科学的一个问题是, ...
- 解析大型.NET ERP系统数据访问 对象关系映射框架LLBL Gen Pro
LLBL Gen Pro是一个为.NET开发人员设计的的对象关系映射(ORM)框架,与NHibernate,Entity Framework等框架一样,通过实体与数据表的映射,实现关系数据库持久化. ...
- 架构从最简单的数据访问框架(ORM)到资源调度和治理中心(SOA)说起
随着互联网的发展,网站应用的规模不断扩大,常规的垂直应用架构已无法应对,分布式服务架构以及流动计算架构势在必行,亟需一个治理系统确保架构有条不紊的演进. 单一应用架构当网站流量很小时,只需一个应用,将 ...
- ADO.NET数据访问模板整理
/// <summary> /// 数据访问类:hi_test /// </summary> public partial class TestDA { public Test ...
- ADO.NET数据访问技术
ADO.NET数据访问技术 就是将C#和MSSQLl连接起来的纽带 可以通过ADO.NET将内存中的临时数据写入到数据库中,也可以将数据库中的数据提取到内存中供程序调用.是所有数据访问技术的基础. A ...
- Oracle数据访问组件ODAC的安装方法
Oracle数据访问组件ODAC(Oracle Data Access Components)顾名思义就是用来访问Oracle数据库的小程序.我们可以编程调用这些组件来实现在没有安装Oracle数据库 ...
- 分享自己的超轻量级高性能ORM数据访问框架Deft
Deft 简介 Deft是一个超轻量级高性能O/R mapping数据访问框架,简单易用,几分钟即可上手. Deft包含如下但不限于此的特点: 1.按照Transact-SQL的语法语义风格来设计,只 ...
随机推荐
- AcWing 127. 任务
题目链接 参考y神的思路QWQ 算法:贪心 对于每一个任务: \(y\) 的差异最多能使利润\(w\)浮动\(2 * 100 = 200\)元. \(x\) 差\(1\),则会使利润\(w\)浮动\( ...
- 时间转成x时x分x秒的封装(简易版)
function createTime(t) { let timer; if (t <= 0 || !t || t < 60 || typeof(t)!=='number') timer ...
- sqli-labs less-7(文件读写)
less-7 dump into outfile(文件读写) 通俗的来讲,就是通过outfile传入一句话木马到网站目录里,然后用菜刀或者蚁剑等连接 过程: 输入id=?判断闭合类型 页面上提示了使用 ...
- axios 封装 跨域 实现 (后端跨域配置白名单)
1. 始vue化项目 vue init webpack deaxios # 使用脚手架创建项目 deaxios(项目名,随便取得) cd deaxios # 进入项目cnpm install npm ...
- Mysql8.0新特性【详细版本】
1. 账户与安全 用户创建与授权 之前:创建用户并授权 1 grant all privileges on *.* to 'myuser'@'%' identified by '3edc#EDC'; ...
- 1款开源工具,实现自动化升级K3S集群!
即便你的集群能够平稳运行,Kubernetes升级依旧是一项艰难的任务.由于每3个月Kubernetes会发布一个新版本,所以升级是十分必要的.如果一年内你不升级你的Kubernetes集群,你就会落 ...
- Vue3 使用 svg-sprite-loader 实现 svg 图标按需加载
前面文章有讲到 svg 图标按需加载的优势以及 Vue 如何使用 vue-svg-icon 实现 svg 图标按需载入: https://www.cnblogs.com/Leophen/p/13201 ...
- day021|python之面向对象进阶1
面向对象进阶 目录 面向对象进阶 1 继承 1.1 继承入门 1.1.1 继承基础 1.1.2 类的基本使用 1.2 多继承 1.2.1 多继承的基本使用 1.2.2 多继承以后的重复性 1.3 类的 ...
- 2020年Spring Cloud最后一个大版本发布!
2020年12月22日,Spring Cloud 2020.0 正式发布GA版本! 版本说明 每次Spring Cloud的大版本发布,我们都要先弄清楚,它对应的Spring Boot版本是哪个! 该 ...
- SpringBoot全局异常拦截
SpringBoot全局异常捕获 使用到的技能 @RestControllerAdvice或(@ControllerAdvice+@ResponseBody) @ExceptionHandler 代码 ...