elk部署(实操二)
续上篇
https://www.cnblogs.com/wangql/p/13373022.html
安装logstash
下载地址:wget https://artifacts.elastic.co/downloads/logstash/logstash-6.1.0.rpm

#安装

rpm -ivh logstash-6.1.0.rpm

#启动服务

systemctl  restart logstash.service

systemctl  status logstash.service

systemctl  enable logstash.service
测试基本输入输出
 [root@elk2 ~]# /usr/share/logstash/bin/logstash -e  'input { stdin{} } output { stdout{} }'

WARNING: Could not find logstash.yml which is typically located in $LS_HOME/config or /etc/logstash. You can specify the path using --path.settings. Continuing using the defaultsCould not find log4j2 configuration at path /usr/share/logstash/config/log4j2.properties. Using default config which logs errors to the consoleThe stdin plugin is now waiting for
input:Abc                  #输入这个
2020-06-17T05:38:32.783Z elk2 abc    #输出这个
使用rubydebug详细输出
[root@elk2 ~]# /usr/share/logstash/bin/logstash -e 'input { stdin{} } output { stdout{ codec => rubydebug} }'


WARNING: Could not find logstash.yml which is typically located in $LS_HOME/config or /etc/logstash. You can specify the path using --path.settings. Continuing using the defaultsCould not find log4j2 configuration at path /usr/share/logstash/config/log4j2.properties. Using default config which logs errors to the consoleThe stdin plugin is now waiting for
input:Hello                  #输入
{          "host" => "elk2",          #输出
"@timestamp" => 2020-06-17T05:40:38.039Z,
"message" => "hello",
"@version" => "1"
}

[root@elk2 ~]# /usr/share/logstash/bin/logstash -e 'input { stdin{} } output { elasticsearch { hosts => ["192.168.0.208:9200"]} }'


WARNING: Could not find logstash.yml which is typically located in $LS_HOME/config or /etc/logstash. You can specify the path using --path.settings. Continuing using the defaultsCould not find log4j2 configuration at path /usr/share/logstash/config/log4j2.properties. Using default config which logs errors to the consoleThe stdin plugin is now waiting for
input:123456
wangshibo
huanqiu
hahaha
logstash的配置
配置地址
/etc/logstash/conf.d下,以*.conf结尾
vim /etc/logstash/conf.d/elk1.conf

input { stdin { } }

output {

    elasticsearch { hosts => ["192.168.0.208:9200"]}

    stdout { codec => rubydebug }

}
执行
[root@elk2 ~]# /usr/share/logstash/bin/logstash -f /etc/logstash/conf.d/elk1.conf


WARNING: Could not find logstash.yml which is typically located in $LS_HOME/config or /etc/logstash. You can specify the path using --path.settings. Continuing using the defaultsCould not find log4j2 configuration at path /usr/share/logstash/config/log4j2.properties. Using default config which logs errors to the consoleThe stdin plugin is now waiting for
input:Beijing        #输入
{      "@version" => "1",    #输出

"host" => "elk2",
 "message" => "beijing",
 "@timestamp" => 2020-06-17T05:48:29.275Z
}
更多用法后续列出
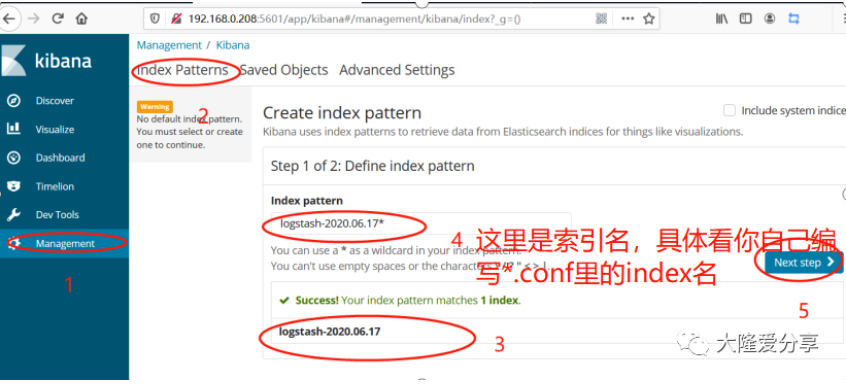
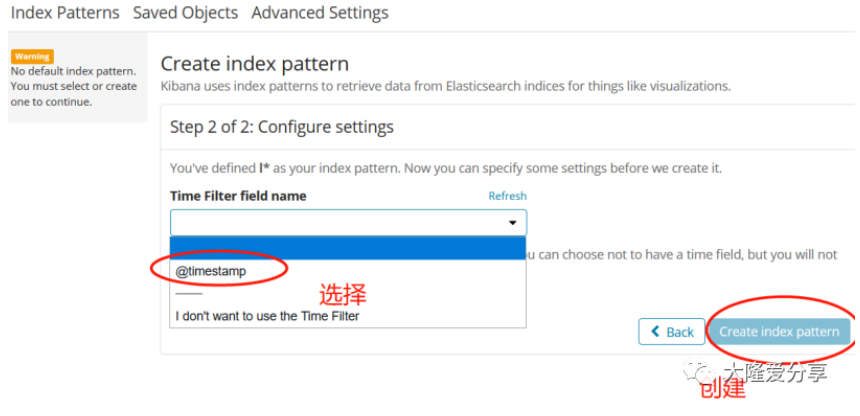
安装kibana
下载地址:wget https://artifacts.elastic.co/downloads/kibana/kibana-6.1.0-x86_64.rpm

#安装

rpm -ivh kibana-6.1.0-x86_64.rpm
修改配置文件
vim /etc/kibana/kibana.yml


2 server.port: 5601                #端口
7 server.host: "0.0.0.0"              #服务监听地址
21 elasticsearch.url: "http://192.168.0.213:9200"    #声明地址,从哪里查,集群里面随便选一个
30 kibana.index: ".kibana"            #kibana自己创建的索引
33 kibana.defaultAppId: "discover"        #打开kibana页面时,默认打开discover
62 elasticsearch.pingTimeout: 1500        #ping检测超时时间
66 elasticsearch.requestTimeout: 30000      #请求超时时间
80 elasticsearch.startupTimeout: 5000        #启动超时时间

114 i18n.locale: "zh-CN"        #启用中文
启动服务
systemctl  restart  kibana.service

systemctl  status kibana.service

systemctl  enable kibana.service
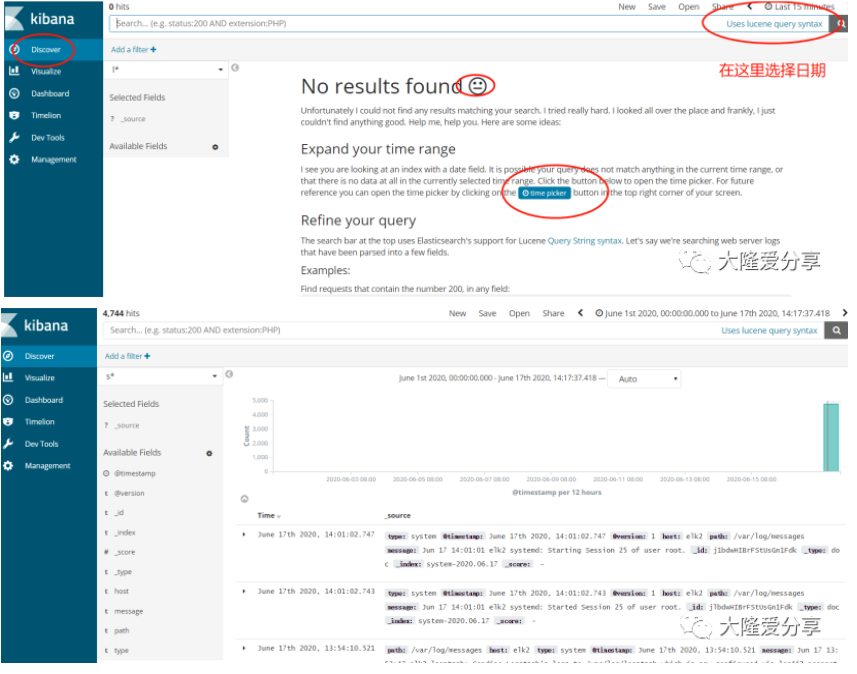
查看端口
netstat -utnlp | grep 5601
访问服务
http://192.168.0.208:5601

如果起不来
curl -XDELETE http://localhost:9200/.kibana*
到这里我们的elk就搭建成功了,下一篇教大家安装es 的插件,方便后续更好的维护。
本文为我自己的学习笔记,难免有些遗漏,欢迎指正。遇事不慌,大隆来帮,也请大家关注我,支持我,谢谢!
没有理论,只有实战
更多干货
来关注我
elk部署(实操二)的更多相关文章
- Istio的流量管理(实操二)(istio 系列四)
Istio的流量管理(实操二)(istio 系列四) 涵盖官方文档Traffic Management章节中的inrgess部分. 目录 Istio的流量管理(实操二)(istio 系列四) Ingr ...
- Python实操二
实操一: 1.用map来处理字符串列表啊,把列表中所有人都变成sb,比方alex_sb name=['alex','wupeiqi','yuanhao'] name=['alex','wupeiqi' ...
- Linux基础实操二
实操一: 1) 新建用户natasha uid为1000,gid为555,备注信息为“master” 2) 修改natasha用户的家目录为/Natasha 3) 查看用户信息配置文件的最后一行 ca ...
- unittest测试框架详谈及实操(二)
类级别的setUp()方法与tearDown()方法 在实操(一)的例子中,通过setUp()方法为每个测试方法都创建了一个Chrome实例,并且在每个测试方法执行结束后要关闭实例.是不是觉得有个多余 ...
- GitBook安装部署实操手册
前言 GitBook是一个基于Node.js的命令行工具,可使用Git和Markdown来编写文档,赞誉太多,不再赘述. Node.js 下载安装包 cd /tmp wget https://node ...
- ASP.NET Core托管和部署Linux实操演练手册
一.课程介绍 ASP.NET Core 是一种全新的跨平台开源 .NET 框架,能够在 IIS.Nginx.Apache.Docker 上进行托管或在自己的进程中进行自托管. 作为一个.NET Web ...
- Python关于类的实操
实操一:总结 1.什么是绑定到对象的方法,如何定义,如何调用,给谁用?有什么特性? 2.什么是绑定到类的方法,如何定义,如何调用,给谁用?有什么特性? 3.什么是解除绑定的函数,如何定义,如何调用,给 ...
- Linux基础实操六
实操一: 临时配置网络(ip,网关,dns)+永久配置 #ifconfig ens33 192.168.145.134/24 #vim /etc/resolv.conf #route add defa ...
- Linux基础实操五
实操一:nginx服务 二进制安装nginx包1) 1)#yum clean all 2)#yum install epel-release -y 3)#yum install nginx -y 1) ...
随机推荐
- Spring学习(六)--Spring的IOC
1.autowiring(自动依赖装配)的实现 自动装配中不需要对Bean属性做显示的依赖管理方式,只需要配置好autowiring的属性就可以,IOC容器会自动根据这个属性的配置通过反射自动找到属性 ...
- Anaconda安装Pytorch(通过本地安装包)
前提:你已经事先安装好了Anaconda 在线安装pytorch总是出现这样那样的问题,所以我选择先去清华镜像下载好与python版本对应的pytorch和torchvision文件,然后本地安装 清 ...
- 十一、模拟扫码登录微信(用Django简单的布置了下页面)发送接收消息
为了能够模拟登陆QQ,并获取信息.对扫码登录微信进行了分析.简单的用了一下Django将获取的信息映射到页面上.(python3+pycharm) 主要过程就是: 1.获取二维码 2.扫码登录(有三种 ...
- 从实体框架核心开始:构建一个ASP。NET Core应用程序与Web API和代码优先开发
下载StudentApplication.Web.zip - 599.5 KB 下载StudentApplication.API.zip - 11.5 KB 介绍 在上一篇文章中,我们了解了实体框架的 ...
- CSP-S 2019 游记,以及AFO
CSP-S:Day1 195 Day2 84 滚粗,AFO. Day0 和cyl神仙打了一会儿游戏,九点半教了cyl一下LCT,开始写板子题,写到十点半,睡觉. Day1 六点半起床.吃饭.赶赴考场, ...
- css做模糊处理
-webkit-filter: blur(9px); filter: blur(9px);
- 搭建ipse隧道
我没有太多的物理服务器,实验环境只能用四台装了linux的虚拟机来模拟,用户层工具是openswan.大致拓扑如下(我有点懒,公网地址我用的194.168.10.0/24,别和192.168.xx.x ...
- ip地址和网络端口总结
ip地址 ip地址默认指ipv4地址,用4个字节表示,转换为点分10进制,可以表达范围0.0.0.0到255.255.255.255的地址,大约为42.95亿个地址.互联网编号分配机构(IANA,In ...
- Python3.7有什么新变化
https://docs.python.org/zh-cn/3/whatsnew/3.7.html
- <二分查找+双指针+前缀和>解决子数组和排序后的区间和
<二分查找+双指针+前缀和>解决子数组和排序后的区间和 题目重现: 给你一个数组 nums ,它包含 n 个正整数.你需要计算所有非空连续子数组的和,并将它们按升序排序,得到一个新的包含 ...